
Specification (English)
Page 1
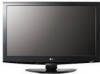
LCD TV 42LF11 42" Full HD 1080p LCD TV (42.0" diagonal) Full HD 1080p performance has never been so attainable. TV • Full HD 1080p Resolution • 30,000:1 Dynamic Contrast Ratio • 5ms Response Time (GTG) • 450 cd/m2 Brightness • Wide Viewing Angle &#...
LCD TV 42LF11 42" Full HD 1080p LCD TV (42.0" diagonal) Full HD 1080p performance has never been so attainable. TV • Full HD 1080p Resolution • 30,000:1 Dynamic Contrast Ratio • 5ms Response Time (GTG) • 450 cd/m2 Brightness • Wide Viewing Angle &#...
Specification (English)
Page 2
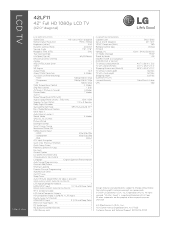
...Off • 1080p Source Input - HDMI 60p/30p/24p - Non-metric weights and messurements are the property of LG Corp. "LG Life's Good" is present) • SIDE AUDIO/VIDEO INPUTS/OUTPUTS L/R Audio/Composite Video In 1 HDMI/HDCP...& WEIGHT TV without stand (WxHxD) 40.7" x 26.4" x 3.6" TV with stand (WxHxD) 40.7" x 29.2" x 11.4" Shipping Dimensions (WxHxD) 52.4" x 30.4" x 10.1" TV without notice. Component 60p/30p/24p - LCD TV 42LF11 42" Full HD 1080p LCD TV (42.0" diagonal) LGusa.com LCD SPECIFICATION Screen Size 42" Class (42.0" diagonal...
...Off • 1080p Source Input - HDMI 60p/30p/24p - Non-metric weights and messurements are the property of LG Corp. "LG Life's Good" is present) • SIDE AUDIO/VIDEO INPUTS/OUTPUTS L/R Audio/Composite Video In 1 HDMI/HDCP...& WEIGHT TV without stand (WxHxD) 40.7" x 26.4" x 3.6" TV with stand (WxHxD) 40.7" x 29.2" x 11.4" Shipping Dimensions (WxHxD) 52.4" x 30.4" x 10.1" TV without notice. Component 60p/30p/24p - LCD TV 42LF11 42" Full HD 1080p LCD TV (42.0" diagonal) LGusa.com LCD SPECIFICATION Screen Size 42" Class (42.0" diagonal...
Owner's Manual (English)
Page 1
... Commercial User 1-888-542-2623 CANADA LG Customer Information Center P/NO : SAC33601901 (0905-REV04) www.lgusa.com / www.lg.ca / www.lgcommercial.com LCD TV OWNER'S MANUAL 19LH20 22LH20 26LH20 32LH20 37LH20 42LH20 22LH200C 32LH30 37LH30 42LH30 47LH30 32LF11 37LF11 42LF11 47LF11 19LU55 22LU55 26LU55 32CL20 47LF21 Please ...read this manual carefully before operating your set and retain it below should you ever need service. Record it for future reference. The model and serial number of the TV is located on...
... Commercial User 1-888-542-2623 CANADA LG Customer Information Center P/NO : SAC33601901 (0905-REV04) www.lgusa.com / www.lg.ca / www.lgcommercial.com LCD TV OWNER'S MANUAL 19LH20 22LH20 26LH20 32LH20 37LH20 42LH20 22LH200C 32LH30 37LH30 42LH30 47LH30 32LF11 37LF11 42LF11 47LF11 19LU55 22LU55 26LU55 32CL20 47LF21 Please ...read this manual carefully before operating your set and retain it below should you ever need service. Record it for future reference. The model and serial number of the TV is located on...
Owner's Manual (English)
Page 2
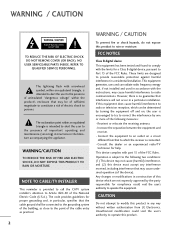
...point within the product's enclosure that may be determined by turning the equipment off and on a circuit different from LG Electronics. NOTE TO CABLE/TV INSTALLER This reminder is no guarantee that the cable ground shall be connected to the grounding system of the building,...device, pursuant to the following measures: - Increase the separation between the equipment and receiver. - Consult the dealer or an experienced radio/TV technician for compliance could void the user's authority to rain or moisture. Unauthorized modification could void the user's authority to which the receiver...
...point within the product's enclosure that may be determined by turning the equipment off and on a circuit different from LG Electronics. NOTE TO CABLE/TV INSTALLER This reminder is no guarantee that the cable ground shall be connected to the grounding system of the building,...device, pursuant to the following measures: - Increase the separation between the equipment and receiver. - Consult the dealer or an experienced radio/TV technician for compliance could void the user's authority to rain or moisture. Unauthorized modification could void the user's authority to which the receiver...
Owner's Manual (English)
Page 4
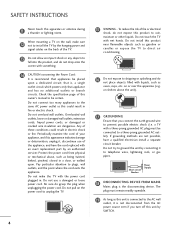
...its appearance indicates damage or deterioration, unplug it, discontinue use a damaged or loose power cord. on the power cord to unplug the TV. 4 15 WARNING - a TV with something. 14 CAUTION concerning the Power Cord: It is connected to the AC wall outlet, it to prevent possible electric shock (i.e. ...outlets. Do not pull on or over the apparatus (e.g. Pay particular attention to rain, moisture or other liquids. Do not touch the TV with liquids, such as this unit by the hanging power and signal cables on shelves above the unit). 17 GROUNDING Ensure that appliance ...
...its appearance indicates damage or deterioration, unplug it, discontinue use a damaged or loose power cord. on the power cord to unplug the TV. 4 15 WARNING - a TV with something. 14 CAUTION concerning the Power Cord: It is connected to the AC wall outlet, it to prevent possible electric shock (i.e. ...outlets. Do not pull on or over the apparatus (e.g. Pay particular attention to rain, moisture or other liquids. Do not touch the TV with liquids, such as this unit by the hanging power and signal cables on shelves above the unit). 17 GROUNDING Ensure that appliance ...
Owner's Manual (English)
Page 5
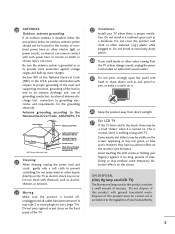
..., Part H) 21 Cleaning When cleaning, unplug the power cord and scrub gently with cloth or other odors coming from direct sunlight. 27 For LCD TV If the TV feels cold to the touch, there may be carried out in . However, they have been removed. Do not cover the product with a ...may take 2 or more people to grounding electrodes and requirements for long periods of the TV. 23 Ventilation Install your local authority. 5 Do not install in the U.S.A. ON DISPOSAL (Only Hg lamp used LCD TV) The fluorescent lamp used in this product with respect to proper grounding of the mast ...
..., Part H) 21 Cleaning When cleaning, unplug the power cord and scrub gently with cloth or other odors coming from direct sunlight. 27 For LCD TV If the TV feels cold to the touch, there may be carried out in . However, they have been removed. Do not cover the product with a ...may take 2 or more people to grounding electrodes and requirements for long periods of the TV. 23 Ventilation Install your local authority. 5 Do not install in the U.S.A. ON DISPOSAL (Only Hg lamp used LCD TV) The fluorescent lamp used in this product with respect to proper grounding of the mast ...
Owner's Manual (English)
Page 6
...Management 25 Desktop Pedestal Installation 28 Swivel Stand 28 Positioning your Display 28 Attaching the TV to a Desk 29 Kensington Security System 29 Securing the TV to the wall to prevent falling when the TV is used on a stand 30 Antenna or Cable Connection 31 EXTERNAL EQUIPMENT SETUP HD... 32 DVD Setup 35 VCR Setup 37 Other A/V Source Setup 39 Audio out Connection 40 PC Setup 41 WATCHING TV / CHANNEL CONTROL Remote Control Functions 48 Turning On TV 50 Channel Selection 50 Volume Adjustment 50 Initial Setting 51 On-Screen Menus Selection 52 Quick Menu 53 6 Channel ...
...Management 25 Desktop Pedestal Installation 28 Swivel Stand 28 Positioning your Display 28 Attaching the TV to a Desk 29 Kensington Security System 29 Securing the TV to the wall to prevent falling when the TV is used on a stand 30 Antenna or Cable Connection 31 EXTERNAL EQUIPMENT SETUP HD... 32 DVD Setup 35 VCR Setup 37 Other A/V Source Setup 39 Audio out Connection 40 PC Setup 41 WATCHING TV / CHANNEL CONTROL Remote Control Functions 48 Turning On TV 50 Channel Selection 50 Volume Adjustment 50 Initial Setting 51 On-Screen Menus Selection 52 Quick Menu 53 6 Channel ...
Owner's Manual (English)
Page 7
User Mode 83 Balance 84 TV Speakers On/Off Setup 85 Audio Reset 86 Stereo/SAP Broadcasts Setup 87 Audio Language 88 On-Screen Menus Language Selection 89 Caption Mode - Caption ... Clock Setup 94 Auto On/Off Time Setting 95 Sleep Timer Setting 96 PARENTAL CONTROL / RATINGS Set Password & Lock System 97 Channel Blocking 100 Movie & TV Rating 101 Downloadable Rating 106 External Input Blocking 107 APPENDIX Troubleshooting 108 Maintenance 110 Product Specifications 111 IR Codes 115 External Control Through RS-232C...
User Mode 83 Balance 84 TV Speakers On/Off Setup 85 Audio Reset 86 Stereo/SAP Broadcasts Setup 87 Audio Language 88 On-Screen Menus Language Selection 89 Caption Mode - Caption ... Clock Setup 94 Auto On/Off Time Setting 95 Sleep Timer Setting 96 PARENTAL CONTROL / RATINGS Set Password & Lock System 97 Channel Blocking 100 Movie & TV Rating 101 Downloadable Rating 106 External Input Blocking 107 APPENDIX Troubleshooting 108 Maintenance 110 Product Specifications 111 IR Codes 115 External Control Through RS-232C...
Owner's Manual (English)
Page 8
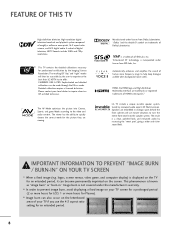
...inquire about an ISF certified technician. I In order to help keep dialogue audible when background noise swells. This TV contains the detailed calibrations necessary for LCD, 1 or more pixels, 16:9 aspect-ratio screens, and AC3 digital audio. Detailed calibration requires a licensed ...technician. HDMI, the HDMI logo and High-Definition Multimedia Interface are viewing. LG TV include a unique invisible speaker system, tuned by the ...
...inquire about an ISF certified technician. I In order to help keep dialogue audible when background noise swells. This TV contains the detailed calibrations necessary for LCD, 1 or more pixels, 16:9 aspect-ratio screens, and AC3 digital audio. Detailed calibration requires a licensed ...technician. HDMI, the HDMI logo and High-Definition Multimedia Interface are viewing. LG TV include a unique invisible speaker system, tuned by the ...

Owner's Manual (English)
Page 9
...Owner's Manual CD Manual Remote Control, Batteries Power Cord Not included with all models Polishing Cloth * Wipe spots on the exterior only with your TV. Option Extras D-sub 15 pin Cable When using the VGA (D-sub 15 pin cable) PC connection, the user must use shielded signal interface ...assembly (Refer to P.22) Screw for stand fixing (Refer to P.29) Cable Holder (Refer to P.25) For 19/22LH20, 22LH200C For 32/37/42/47LF11, 47LF21, 32CL20 (Except 47LF11, 47LF21) (Except 47LF11, 47LF21) x4 x4 or Cable Management Clip Protection Cover Bolts for stand assembly Screw for stand...
...Owner's Manual CD Manual Remote Control, Batteries Power Cord Not included with all models Polishing Cloth * Wipe spots on the exterior only with your TV. Option Extras D-sub 15 pin Cable When using the VGA (D-sub 15 pin cable) PC connection, the user must use shielded signal interface ...assembly (Refer to P.22) Screw for stand fixing (Refer to P.29) Cable Holder (Refer to P.25) For 19/22LH20, 22LH200C For 32/37/42/47LF11, 47LF21, 32CL20 (Except 47LF11, 47LF21) (Except 47LF11, 47LF21) x4 x4 or Cable Management Clip Protection Cover Bolts for stand assembly Screw for stand...

Owner's Manual (English)
Page 10
... ON OFF AC power control switch (Except 19/22LH20, 22LH200C) 10 PREPARATION PREPARATION FRONT PANEL INFORMATION I Image shown may differ from your TV. 19/22/26LH20, 22LH200C INPUT Button POWER Button MENU Button ENTER Button VOLUME CHANNEL (-, +) Buttons (E,D) Buttons INPUT MENU ENTER VOL CH... 32/37/42LH20, 32/37/42/47LH30 SPEAKER Remote Control Sensor, Power/Standby Indicator Illuminates red in the OPTION menu. Illuminates blue when the TV is switched on. (Can be adjusted Power Indicator in standby mode.
... ON OFF AC power control switch (Except 19/22LH20, 22LH200C) 10 PREPARATION PREPARATION FRONT PANEL INFORMATION I Image shown may differ from your TV. 19/22/26LH20, 22LH200C INPUT Button POWER Button MENU Button ENTER Button VOLUME CHANNEL (-, +) Buttons (E,D) Buttons INPUT MENU ENTER VOL CH... 32/37/42LH20, 32/37/42/47LH30 SPEAKER Remote Control Sensor, Power/Standby Indicator Illuminates red in the OPTION menu. Illuminates blue when the TV is switched on. (Can be adjusted Power Indicator in standby mode.

Owner's Manual (English)
Page 12
Illuminates white when the TV is switched on. 12 ❖x AC power control ❖❋❋ switch PREPARATION PREPARATION I Image shown may differ from your TV. 19/22LU55 INPUT Button POWER Button MENU Button ENTER Button VOLUME CHANNEL (-, +) Buttons ( , ) Buttons INPUT MENU ENTER VOL CH SPEAKER 26LU55 CH VOL ENTER MENU INPUT CHANNEL ( , ) Buttons VOLUME (+, -) Buttons ENTER Button MENU Button INPUT Button POWER Button Remote Control Sensor Power/Standby Indicator Illuminates red in standby mode.
Illuminates white when the TV is switched on. 12 ❖x AC power control ❖❋❋ switch PREPARATION PREPARATION I Image shown may differ from your TV. 19/22LU55 INPUT Button POWER Button MENU Button ENTER Button VOLUME CHANNEL (-, +) Buttons ( , ) Buttons INPUT MENU ENTER VOL CH SPEAKER 26LU55 CH VOL ENTER MENU INPUT CHANNEL ( , ) Buttons VOLUME (+, -) Buttons ENTER Button MENU Button INPUT Button POWER Button Remote Control Sensor Power/Standby Indicator Illuminates red in standby mode.

Owner's Manual (English)
Page 15
Doesn't support 480i. Connect cable signals to this jack. Accepts DVI video using an adapter or HDMI to operate the TV on DC power. 15 Uses a D-sub 15 pin cable (VGA cable). This port is used for use with AC power. Caution: Never attempt to DVI ...
Doesn't support 480i. Connect cable signals to this jack. Accepts DVI video using an adapter or HDMI to operate the TV on DC power. 15 Uses a D-sub 15 pin cable (VGA cable). This port is used for use with AC power. Caution: Never attempt to DVI ...

Owner's Manual (English)
Page 16
PREPARATION PREPARATION STAND INSTRUCTIONS (For 19/22LH20, 22LH200C) I Image shown may differ from damage. 2 Assemble the TV as shown until you hear it click. 16 INSTALLATION 1 Carefully place the TV screen side down on a cushioned surface to protect the screen from your TV.
PREPARATION PREPARATION STAND INSTRUCTIONS (For 19/22LH20, 22LH200C) I Image shown may differ from damage. 2 Assemble the TV as shown until you hear it click. 16 INSTALLATION 1 Carefully place the TV screen side down on a cushioned surface to protect the screen from your TV.

Owner's Manual (English)
Page 17
PROTECTION COVER 4 Insert the PROTECTION COVER into the TV. 5 Fix the 4 bolts securely using the holes in the back of the TV. PROTECTION COVER 17 PREPARATION DETACHMENT 1 Carefully place the TV screen side down on a cushioned surface to protect the screen from damage. 2 Loose the bolts from TV. 3 Detach the stand from TV.
PROTECTION COVER 4 Insert the PROTECTION COVER into the TV. 5 Fix the 4 bolts securely using the holes in the back of the TV. PROTECTION COVER 17 PREPARATION DETACHMENT 1 Carefully place the TV screen side down on a cushioned surface to protect the screen from damage. 2 Loose the bolts from TV. 3 Detach the stand from TV.

Owner's Manual (English)
Page 18
Do not over tighten. 18 PREPARATION PREPARATION STAND INSTRUCTIONS (For 26/32/37/42LH20, 32/37/42/47LH30) I Image shown may differ from damage. 2 Assemble the TV as shown. 3 Fix the 4 bolts securely using the holes in the back of the TV. ! INSTALLATION 1 Carefully place the TV screen side down on a cushioned surface to protect the screen from your TV. NOTE G When assembling the desk type stand, make sure the bolt is fully tightened (If not tightened fully, the TV can tilt forward after the product installation).
Do not over tighten. 18 PREPARATION PREPARATION STAND INSTRUCTIONS (For 26/32/37/42LH20, 32/37/42/47LH30) I Image shown may differ from damage. 2 Assemble the TV as shown. 3 Fix the 4 bolts securely using the holes in the back of the TV. ! INSTALLATION 1 Carefully place the TV screen side down on a cushioned surface to protect the screen from your TV. NOTE G When assembling the desk type stand, make sure the bolt is fully tightened (If not tightened fully, the TV can tilt forward after the product installation).

Owner's Manual (English)
Page 19
PREPARATION DETACHMENT 1 Carefully place the TV screen side down on a cushioned surface to protect the screen from damage. 2 Loose the bolts from TV. 3 Detach the stand from TV. Press the PROTECTION COVER into the TV until you hear it click. 19 PROTECTION COVER After removing the stand, install the included protection cover over the hole for the stand.
PREPARATION DETACHMENT 1 Carefully place the TV screen side down on a cushioned surface to protect the screen from damage. 2 Loose the bolts from TV. 3 Detach the stand from TV. Press the PROTECTION COVER into the TV until you hear it click. 19 PROTECTION COVER After removing the stand, install the included protection cover over the hole for the stand.

Owner's Manual (English)
Page 20
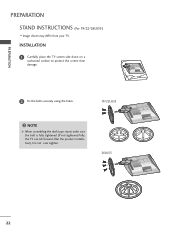
... a protection tape attached, remove the tape. INSTALLATION (For 32/37/42LF11, 32CL20) 1 If your TV. STAND BODY COVER BASE 4 Fix the 4 bolts securely using the 4 screws supplied. 3 Assemble the TV as shown. PREPARATION PREPARATION STAND INSTRUCTIONS (For 32/37/42/47LF11, 47LF21, 32CL20) I Image shown may differ from damage. 2 Assemble the parts of the...
... a protection tape attached, remove the tape. INSTALLATION (For 32/37/42LF11, 32CL20) 1 If your TV. STAND BODY COVER BASE 4 Fix the 4 bolts securely using the 4 screws supplied. 3 Assemble the TV as shown. PREPARATION PREPARATION STAND INSTRUCTIONS (For 32/37/42/47LF11, 47LF21, 32CL20) I Image shown may differ from damage. 2 Assemble the parts of the...

Owner's Manual (English)
Page 21
PROTECTION COVER After removing the stand, install the included protection cover over the hole for the stand. PREPARATION DETACHMENT 1 Carefully place the TV screen side down on a cushioned surface to protect the screen from damage. 2 Loose the bolts from TV. 3 Detach the stand from TV. Press the PROTECTION COVER into the TV until you hear it click. 21
PROTECTION COVER After removing the stand, install the included protection cover over the hole for the stand. PREPARATION DETACHMENT 1 Carefully place the TV screen side down on a cushioned surface to protect the screen from damage. 2 Loose the bolts from TV. 3 Detach the stand from TV. Press the PROTECTION COVER into the TV until you hear it click. 21
Owner's Manual (English)
Page 22
INSTALLATION 1 Carefully place the TV screen side down on a cushioned surface to protect the screen from your TV. NOTE G When assembling the desk type stand, make sure the bolt is fully tightened (If not tightened fully, the TV can tilt forward after the product installation). PREPARATION PREPARATION STAND INSTRUCTIONS (For 19/22/26LU55) I Image shown may differ from damage. 2 Fix the bolts securely using the holes. ! Do not over tighten. 19" 22" 19/22LU55 19" 22" 26LU55 26" 22
INSTALLATION 1 Carefully place the TV screen side down on a cushioned surface to protect the screen from your TV. NOTE G When assembling the desk type stand, make sure the bolt is fully tightened (If not tightened fully, the TV can tilt forward after the product installation). PREPARATION PREPARATION STAND INSTRUCTIONS (For 19/22/26LU55) I Image shown may differ from damage. 2 Fix the bolts securely using the holes. ! Do not over tighten. 19" 22" 19/22LU55 19" 22" 26LU55 26" 22


