Specification (English)
Page 2
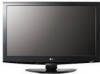
...11.4" Shipping Dimensions (WxHxD) 52.4" x 30.4" x 10.1" TV without notice. Component 1080p/1080i/720p - HDMI 1080p/1080i/720p - All rights reserved. All other trademarks are approximate. © 2009 LG Electronics U.S.A., Inc., Englewood Cliffs, NJ. RF 1080i/720p Color ...owners. 09/11/09 LG Electronics U.S.A., Inc. 1000 Sylvan Avenue Englewood Cliffs, NJ 07632 Customer Service and Technical Support: (800) 243-0000 LCD TV 42LF11 42" Full HD 1080p LCD TV (42.0" diagonal) LGusa.com LCD SPECIFICATION Screen Size 42" Class (42.0" diagonal) Native Display...
...11.4" Shipping Dimensions (WxHxD) 52.4" x 30.4" x 10.1" TV without notice. Component 1080p/1080i/720p - HDMI 1080p/1080i/720p - All rights reserved. All other trademarks are approximate. © 2009 LG Electronics U.S.A., Inc., Englewood Cliffs, NJ. RF 1080i/720p Color ...owners. 09/11/09 LG Electronics U.S.A., Inc. 1000 Sylvan Avenue Englewood Cliffs, NJ 07632 Customer Service and Technical Support: (800) 243-0000 LCD TV 42LF11 42" Full HD 1080p LCD TV (42.0" diagonal) LGusa.com LCD SPECIFICATION Screen Size 42" Class (42.0" diagonal) Native Display...
Owner's Manual (English)
Page 4
... It is the disconnecting device. Be sure do not drop onto the screen with liquids, such as this unit by the hanging power and signal cables on the power cord ...Periodically examine the cord of this product near flammable objects such as gasoline or candles or expose the TV to direct air conditioning. 16 Do not expose to dripping or splashing and do not expose this... possible, have the cord replaced with wet hands. on or over the apparatus (e.g. Do not touch the TV with an exact replacement part by connecting it , discontinue use a damaged or loose power cord. on shelves...
... It is the disconnecting device. Be sure do not drop onto the screen with liquids, such as this unit by the hanging power and signal cables on the power cord ...Periodically examine the cord of this product near flammable objects such as gasoline or candles or expose the TV to direct air conditioning. 16 Do not expose to dripping or splashing and do not expose this... possible, have the cord replaced with wet hands. on or over the apparatus (e.g. Do not touch the TV with an exact replacement part by connecting it , discontinue use a damaged or loose power cord. on shelves...
Owner's Manual (English)
Page 5
... Ventilation Install your TV where there is turned off, unplugged and all cables have no adverse effect on the front panel of mercury. Do not press against or put stress on the monitor's performance. Avoid touching the LCD screen or holding your local authority. 5 Doing so may... take 2 or more people to provide some temporary dis- Disposal of your finger(s) against voltage surges and built-up static charges. 20 ANTENNAS Outdoor antenna grounding If an outdoor antenna is nothing wrong with TV. Antenna...
... Ventilation Install your TV where there is turned off, unplugged and all cables have no adverse effect on the front panel of mercury. Do not press against or put stress on the monitor's performance. Avoid touching the LCD screen or holding your local authority. 5 Doing so may... take 2 or more people to provide some temporary dis- Disposal of your finger(s) against voltage surges and built-up static charges. 20 ANTENNAS Outdoor antenna grounding If an outdoor antenna is nothing wrong with TV. Antenna...
Owner's Manual (English)
Page 6
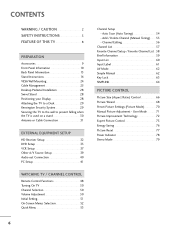
...Wizard 68 Preset Picture Settings (Picture Mode 70 Manual Picture Adjustment - CONTENTS WARNING / CAUTION 2 SAFETY INSTRUCTIONS 3 FEATURE OF THIS TV 8 PREPARATION Accessories 9 Front Panel Information 10 Back Panel Information 13 Stand Instructions 16 VESA Wall Mounting 24 Cable Management 25 Desktop ...Other A/V Source Setup 39 Audio out Connection 40 PC Setup 41 WATCHING TV / CHANNEL CONTROL Remote Control Functions 48 Turning On TV 50 Channel Selection 50 Volume Adjustment 50 Initial Setting 51 On-Screen Menus Selection 52 Quick Menu 53 6 Channel Setup - Auto Scan (...
...Wizard 68 Preset Picture Settings (Picture Mode 70 Manual Picture Adjustment - CONTENTS WARNING / CAUTION 2 SAFETY INSTRUCTIONS 3 FEATURE OF THIS TV 8 PREPARATION Accessories 9 Front Panel Information 10 Back Panel Information 13 Stand Instructions 16 VESA Wall Mounting 24 Cable Management 25 Desktop ...Other A/V Source Setup 39 Audio out Connection 40 PC Setup 41 WATCHING TV / CHANNEL CONTROL Remote Control Functions 48 Turning On TV 50 Channel Selection 50 Volume Adjustment 50 Initial Setting 51 On-Screen Menus Selection 52 Quick Menu 53 6 Channel Setup - Auto Scan (...
Owner's Manual (English)
Page 7
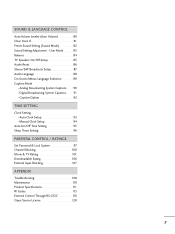
...Off Time Setting 95 Sleep Timer Setting 96 PARENTAL CONTROL / RATINGS Set Password & Lock System 97 Channel Blocking 100 Movie & TV Rating 101 Downloadable Rating 106 External Input Blocking 107 APPENDIX Troubleshooting 108 Maintenance 110 Product Specifications 111 IR Codes 115 External Control Through... RS-232C 116 Open Source License 120 7 User Mode 83 Balance 84 TV Speakers On/Off Setup 85 Audio Reset 86 Stereo/SAP Broadcasts Setup 87 Audio Language 88 On-Screen Menus Language Selection 89 Caption Mode - SOUND & LANGUAGE CONTROL Auto Volume Leveler ...
...Off Time Setting 95 Sleep Timer Setting 96 PARENTAL CONTROL / RATINGS Set Password & Lock System 97 Channel Blocking 100 Movie & TV Rating 101 Downloadable Rating 106 External Input Blocking 107 APPENDIX Troubleshooting 108 Maintenance 110 Product Specifications 111 IR Codes 115 External Control Through... RS-232C 116 Open Source License 120 7 User Mode 83 Balance 84 TV Speakers On/Off Setup 85 Audio Reset 86 Stereo/SAP Broadcasts Setup 87 Audio Language 88 On-Screen Menus Language Selection 89 Caption Mode - SOUND & LANGUAGE CONTROL Auto Volume Leveler ...
Owner's Manual (English)
Page 8
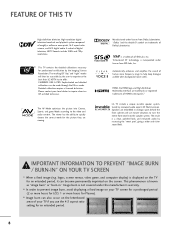
... system. is displayed on the TV for an extended period. 8 LG TV include a unique invisible speaker system, tuned by the Imaging Science Foundation. Speakers are viewing. logos, screen menus, video game, and computer display) is a trademark of your TV if you use minute vibrations to...can be accessible by increasing the "sweet spot", giving a wider and richer sound field. This TV contains the detailed calibrations necessary for LCD, 1 or more pixels, 16:9 aspect-ratio screens, and AC3 digital audio. CALIBRATE LIKE A PRO: Sophisticated and detailed calibrations can also occur on ...
... system. is displayed on the TV for an extended period. 8 LG TV include a unique invisible speaker system, tuned by the Imaging Science Foundation. Speakers are viewing. logos, screen menus, video game, and computer display) is a trademark of your TV if you use minute vibrations to...can be accessible by increasing the "sweet spot", giving a wider and richer sound field. This TV contains the detailed calibrations necessary for LCD, 1 or more pixels, 16:9 aspect-ratio screens, and AC3 digital audio. CALIBRATE LIKE A PRO: Sophisticated and detailed calibrations can also occur on ...

Owner's Manual (English)
Page 16
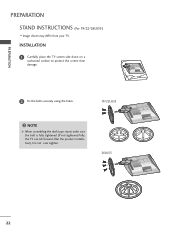
INSTALLATION 1 Carefully place the TV screen side down on a cushioned surface to protect the screen from your TV. PREPARATION PREPARATION STAND INSTRUCTIONS (For 19/22LH20, 22LH200C) I Image shown may differ from damage. 2 Assemble the TV as shown until you hear it click. 16
INSTALLATION 1 Carefully place the TV screen side down on a cushioned surface to protect the screen from your TV. PREPARATION PREPARATION STAND INSTRUCTIONS (For 19/22LH20, 22LH200C) I Image shown may differ from damage. 2 Assemble the TV as shown until you hear it click. 16

Owner's Manual (English)
Page 17
PROTECTION COVER 17 PREPARATION DETACHMENT 1 Carefully place the TV screen side down on a cushioned surface to protect the screen from damage. 2 Loose the bolts from TV. 3 Detach the stand from TV. PROTECTION COVER 4 Insert the PROTECTION COVER into the TV. 5 Fix the 4 bolts securely using the holes in the back of the TV.
PROTECTION COVER 17 PREPARATION DETACHMENT 1 Carefully place the TV screen side down on a cushioned surface to protect the screen from damage. 2 Loose the bolts from TV. 3 Detach the stand from TV. PROTECTION COVER 4 Insert the PROTECTION COVER into the TV. 5 Fix the 4 bolts securely using the holes in the back of the TV.

Owner's Manual (English)
Page 18
Do not over tighten. 18 PREPARATION PREPARATION STAND INSTRUCTIONS (For 26/32/37/42LH20, 32/37/42/47LH30) I Image shown may differ from damage. 2 Assemble the TV as shown. 3 Fix the 4 bolts securely using the holes in the back of the TV. ! NOTE G When assembling the desk type stand, make sure the bolt is fully tightened (If not tightened fully, the TV can tilt forward after the product installation). INSTALLATION 1 Carefully place the TV screen side down on a cushioned surface to protect the screen from your TV.
Do not over tighten. 18 PREPARATION PREPARATION STAND INSTRUCTIONS (For 26/32/37/42LH20, 32/37/42/47LH30) I Image shown may differ from damage. 2 Assemble the TV as shown. 3 Fix the 4 bolts securely using the holes in the back of the TV. ! NOTE G When assembling the desk type stand, make sure the bolt is fully tightened (If not tightened fully, the TV can tilt forward after the product installation). INSTALLATION 1 Carefully place the TV screen side down on a cushioned surface to protect the screen from your TV.

Owner's Manual (English)
Page 19
PREPARATION DETACHMENT 1 Carefully place the TV screen side down on a cushioned surface to protect the screen from damage. 2 Loose the bolts from TV. 3 Detach the stand from TV. Press the PROTECTION COVER into the TV until you hear it click. 19 PROTECTION COVER After removing the stand, install the included protection cover over the hole for the stand.
PREPARATION DETACHMENT 1 Carefully place the TV screen side down on a cushioned surface to protect the screen from damage. 2 Loose the bolts from TV. 3 Detach the stand from TV. Press the PROTECTION COVER into the TV until you hear it click. 19 PROTECTION COVER After removing the stand, install the included protection cover over the hole for the stand.

Owner's Manual (English)
Page 20
...over tighten. 20 And carefully place the TV screen side down on a cushioned surface to protect the screen from your TV has a protection tape attached, remove the tape. PREPARATION PREPARATION STAND INSTRUCTIONS (For 32/37/42/47LF11, 47LF21, 32CL20) I Image ...shown may differ from damage. 2 Assemble the parts of the STAND BODY with COVER BASE of the TV by using the holes in the back of the TV. ! INSTALLATION (For 32/37/42LF11...
...over tighten. 20 And carefully place the TV screen side down on a cushioned surface to protect the screen from your TV has a protection tape attached, remove the tape. PREPARATION PREPARATION STAND INSTRUCTIONS (For 32/37/42/47LF11, 47LF21, 32CL20) I Image ...shown may differ from damage. 2 Assemble the parts of the STAND BODY with COVER BASE of the TV by using the holes in the back of the TV. ! INSTALLATION (For 32/37/42LF11...

Owner's Manual (English)
Page 21
Press the PROTECTION COVER into the TV until you hear it click. 21 PREPARATION DETACHMENT 1 Carefully place the TV screen side down on a cushioned surface to protect the screen from damage. 2 Loose the bolts from TV. 3 Detach the stand from TV. PROTECTION COVER After removing the stand, install the included protection cover over the hole for the stand.
Press the PROTECTION COVER into the TV until you hear it click. 21 PREPARATION DETACHMENT 1 Carefully place the TV screen side down on a cushioned surface to protect the screen from damage. 2 Loose the bolts from TV. 3 Detach the stand from TV. PROTECTION COVER After removing the stand, install the included protection cover over the hole for the stand.
Owner's Manual (English)
Page 22
INSTALLATION 1 Carefully place the TV screen side down on a cushioned surface to protect the screen from your TV. NOTE G When assembling the desk type stand, make sure the bolt is fully tightened (If not tightened fully, the TV can tilt forward after the product installation). Do not over tighten. 19" 22" 19/22LU55 19" 22" 26LU55 26" 22 PREPARATION PREPARATION STAND INSTRUCTIONS (For 19/22/26LU55) I Image shown may differ from damage. 2 Fix the bolts securely using the holes. !
INSTALLATION 1 Carefully place the TV screen side down on a cushioned surface to protect the screen from your TV. NOTE G When assembling the desk type stand, make sure the bolt is fully tightened (If not tightened fully, the TV can tilt forward after the product installation). Do not over tighten. 19" 22" 19/22LU55 19" 22" 26LU55 26" 22 PREPARATION PREPARATION STAND INSTRUCTIONS (For 19/22/26LU55) I Image shown may differ from damage. 2 Fix the bolts securely using the holes. !

Owner's Manual (English)
Page 23
And detach the COVER BASE from TV. PREPARATION DETACHMENT 1 Carefully place the TV screen side down on a cushioned surface to protect the screen from damage. 2 Loose the bolts and then detach the stand from TV. 19" 19/22LU55 19" 22" 22" 26LU55 26" 26" 3 Loose the bolts from TV. COVER BASE 4 Detach the STAND BODY from TV. 19/22LU55 26LU55 STAND BODY 23
And detach the COVER BASE from TV. PREPARATION DETACHMENT 1 Carefully place the TV screen side down on a cushioned surface to protect the screen from damage. 2 Loose the bolts and then detach the stand from TV. 19" 19/22LU55 19" 22" 22" 26LU55 26" 26" 3 Loose the bolts from TV. COVER BASE 4 Detach the STAND BODY from TV. 19/22LU55 26LU55 STAND BODY 23
Owner's Manual (English)
Page 33
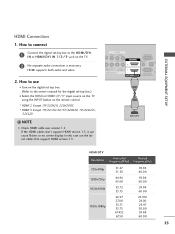
If the HDMI cables don't support HDMI version 1.3, it can cause flickers or no screen display. How to use the latest cables that support HDMI version 1.3. AV IN VIDEO AUDIO L(MONO) R 2 DEO L R AUDIO 1 COMPONENT IN RGB IN (PC) AUDIO IN (... ! NOTE G Check HDMI cable over version 1.3. EXTERNAL EQUIPMENT SETUP HDMI Connection 1. How to the HDMI/DVI I Select the HDMI or HDMI1/2*/3* input source on the TV using the INPUT button on the TV. 2 No separate audio connection is necessary. HDMI supports both audio and video. 2.
If the HDMI cables don't support HDMI version 1.3, it can cause flickers or no screen display. How to use the latest cables that support HDMI version 1.3. AV IN VIDEO AUDIO L(MONO) R 2 DEO L R AUDIO 1 COMPONENT IN RGB IN (PC) AUDIO IN (... ! NOTE G Check HDMI cable over version 1.3. EXTERNAL EQUIPMENT SETUP HDMI Connection 1. How to the HDMI/DVI I Select the HDMI or HDMI1/2*/3* input source on the TV using the INPUT button on the TV. 2 No separate audio connection is necessary. HDMI supports both audio and video. 2.
Owner's Manual (English)
Page 36
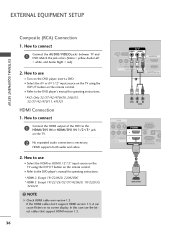
...1. I Refer to the DVD player's manual for operating instructions. * AV2: Only 32/37/42/47LH30, 26LU55, 32/37/42/47LF11, 47LF21 HDMI Connection 1. I Select the A V or AV1/2* input source on the TV using the INPUT button on the remote control. If the HDMI cables don't support HDMI version 1.3,... it can cause flickers or no screen display. NOTE G Check HDMI cable over version 1.3. How...
...1. I Refer to the DVD player's manual for operating instructions. * AV2: Only 32/37/42/47LH30, 26LU55, 32/37/42/47LF11, 47LF21 HDMI Connection 1. I Select the A V or AV1/2* input source on the TV using the INPUT button on the remote control. If the HDMI cables don't support HDMI version 1.3,... it can cause flickers or no screen display. NOTE G Check HDMI cable over version 1.3. How...

Owner's Manual (English)
Page 42
... PC audio output to the AUDIO IN (RGB/DVI) jack on the PC and the TV. How to HDMI Connection 1. I Turn on the TV. 2. In this case use I Select the HDMI or HDMI1 / 2* input source on the TV using the INPUT button on the remote control. * HDMI 2: Except 19/22LH20, 22LH200C ! EXTERNAL ... L(MONO) R 2 DEO L R AUDIO 1 OMPONENT IN RGB IN (PC) AUDIO IN (RGB/DVI) OPTI AU RS-232C IN ACNA /DVI IN (CONTROL&SERVICE) 1 2 DVI OUTPUT AUDIO 42 If the HDMI cables don't support HDMI version 1.3, it can cause flickers or no screen display. NOTE G Check HDMI cable over version 1.3.
... PC audio output to the AUDIO IN (RGB/DVI) jack on the PC and the TV. How to HDMI Connection 1. I Turn on the TV. 2. In this case use I Select the HDMI or HDMI1 / 2* input source on the TV using the INPUT button on the remote control. * HDMI 2: Except 19/22LH20, 22LH200C ! EXTERNAL ... L(MONO) R 2 DEO L R AUDIO 1 OMPONENT IN RGB IN (PC) AUDIO IN (RGB/DVI) OPTI AU RS-232C IN ACNA /DVI IN (CONTROL&SERVICE) 1 2 DVI OUTPUT AUDIO 42 If the HDMI cables don't support HDMI version 1.3, it can cause flickers or no screen display. NOTE G Check HDMI cable over version 1.3.
Owner's Manual (English)
Page 43
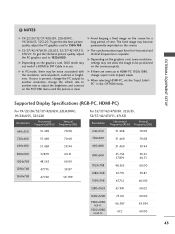
... contrast or brightness. G Depending on the graphics card, DOS mode may become permanently imprinted on the screen for Horizontal and Vertical frequencies is clear. G 32/37/42/47LH30, 22LU55, 32/37/42/47LF11, 47LF21: To get the the best picture quality, adjust the PC graphics card to DVI Cable ...is in use. The fixed image may not work if a HDMI to 1360x768. G Avoid keeping a fixed image on the screen. EXTERNAL EQUIPMENT SETUP !...
... contrast or brightness. G Depending on the graphics card, DOS mode may become permanently imprinted on the screen for Horizontal and Vertical frequencies is clear. G 32/37/42/47LH30, 22LU55, 32/37/42/47LF11, 47LF21: To get the the best picture quality, adjust the PC graphics card to DVI Cable ...is in use. The fixed image may not work if a HDMI to 1360x768. G Avoid keeping a fixed image on the screen. EXTERNAL EQUIPMENT SETUP !...
Owner's Manual (English)
Page 44
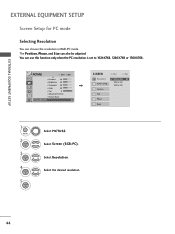
Select the desired resolution. 44 EXTERNAL EQUIPMENT SETUP EXTERNAL EQUIPMENT SETUP Screen Setup for PC mode Selecting Resolution You can use this function only when the PC resolution is set to 1024X768, 1280X768 or 1360X768. Position Size .... 1024 x 768 1280 x 768 1360 x 768 1 MENU 2 ENTER 3 ENTER 4 ENTER 5 ENTER Select PICTURE. Select Resolution. You can choose the resolution in RGB-PC mode. Select Screen (RGB-PC). The Position, Phase, and Size can also be adjusted. PICTURE Move Enter E • Contrast 50 • Brightness 50 • Sharpness 50 • Color...
Select the desired resolution. 44 EXTERNAL EQUIPMENT SETUP EXTERNAL EQUIPMENT SETUP Screen Setup for PC mode Selecting Resolution You can use this function only when the PC resolution is set to 1024X768, 1280X768 or 1360X768. Position Size .... 1024 x 768 1280 x 768 1360 x 768 1 MENU 2 ENTER 3 ENTER 4 ENTER 5 ENTER Select PICTURE. Select Resolution. You can choose the resolution in RGB-PC mode. Select Screen (RGB-PC). The Position, Phase, and Size can also be adjusted. PICTURE Move Enter E • Contrast 50 • Brightness 50 • Sharpness 50 • Color...
Owner's Manual (English)
Page 45
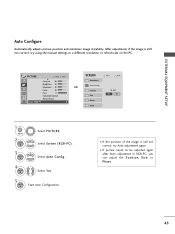
After adjustment, if the image is still not correct, try using the manual settings or a different resolution or refresh rate on the PC. Select Screen (RGB-PC). Select Auto Config.. 4 ENTER Select Y e s. 5 ENTER Start Auto Configuration. Position Size Phase Reset Move Prev. To Set Yes No 1 MENU 2 ENTER 3 ENTER Select ... instability. PICTURE Move Enter E • Contrast 50 • Brightness 50 • Sharpness 50 • Color 50 • Tint 0R G • Advanced Control • Picture Reset Screen (RGB-PC) SCREEN Resolution Auto Config.
After adjustment, if the image is still not correct, try using the manual settings or a different resolution or refresh rate on the PC. Select Screen (RGB-PC). Select Auto Config.. 4 ENTER Select Y e s. 5 ENTER Start Auto Configuration. Position Size Phase Reset Move Prev. To Set Yes No 1 MENU 2 ENTER 3 ENTER Select ... instability. PICTURE Move Enter E • Contrast 50 • Brightness 50 • Sharpness 50 • Color 50 • Tint 0R G • Advanced Control • Picture Reset Screen (RGB-PC) SCREEN Resolution Auto Config.


