Owner's Manual (English)
Page 4
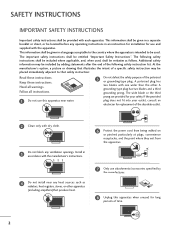
... or grounding-type plug. Additional safety information may be placed immediately adjacent to be used , shall be entitled "Important Safety Instructions". At the manufacturer's option, a picture or drawing that illustrates the intent of the obsolete outlet. 2 Clean only with one wider than the other apparatus (including amplifiers)that safety instruction: Read...
... or grounding-type plug. Additional safety information may be placed immediately adjacent to be used , shall be entitled "Important Safety Instructions". At the manufacturer's option, a picture or drawing that illustrates the intent of the obsolete outlet. 2 Clean only with one wider than the other apparatus (including amplifiers)that safety instruction: Read...
Owner's Manual (English)
Page 6
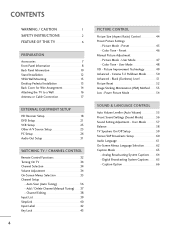
... Input List 39 SimpLink 40 Input Label 42 Key Lock 43 4 PICTURE CONTROL Picture Size (Aspect Ratio) Control 44 Preset Picture Settings - Black (Darkness) Level 51 Picture Reset 52 Image Sticking Minimization (ISM) Method 53 Low - Digital Broadcasting System Captions 65 - CONTENTS WARNING / CAUTION 1 SAFETY INSTRUCTIONS 2 FEATURE OF THIS TV 6 PREPARATION Accessories 7 Front Panel Information 8 Back...
... Input List 39 SimpLink 40 Input Label 42 Key Lock 43 4 PICTURE CONTROL Picture Size (Aspect Ratio) Control 44 Preset Picture Settings - Black (Darkness) Level 51 Picture Reset 52 Image Sticking Minimization (ISM) Method 53 Low - Digital Broadcasting System Captions 65 - CONTENTS WARNING / CAUTION 1 SAFETY INSTRUCTIONS 2 FEATURE OF THIS TV 6 PREPARATION Accessories 7 Front Panel Information 8 Back...
Owner's Manual (English)
Page 8
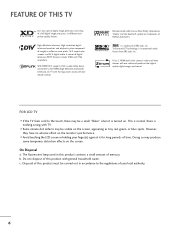
... this product must be visible on . Do not dispose of a full digital image processor, six different main picture quality factors. c. FEATURE OF THIS TV LG's own special digital image generator, consisting of this product with general household waste. This is normal, there is turned on the screen, appearing as... HDMI CEC support of Dolby Laboratories. The fluorescent lamp used in accordance to the regulations of your finger(s) against it is nothing wrong with TV. FOR LCD TV I Avoid touching the LCD screen or holding your local authority. 6 High-definition television.
... this product must be visible on . Do not dispose of a full digital image processor, six different main picture quality factors. c. FEATURE OF THIS TV LG's own special digital image generator, consisting of this product with general household waste. This is normal, there is turned on the screen, appearing as... HDMI CEC support of Dolby Laboratories. The fluorescent lamp used in accordance to the regulations of your finger(s) against it is nothing wrong with TV. FOR LCD TV I Avoid touching the LCD screen or holding your local authority. 6 High-definition television.
Owner's Manual (English)
Page 18
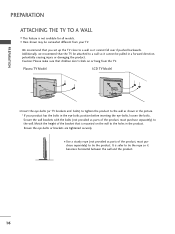
...to the holes in the eye-bolts position before inserting the eye-bolts, loosen the bolts. Additionally, we recommend that you set up the TV close to tie the rope so it cannot fall over if pushed backwards. It is not available for all models. Secure the wall brackets ...and bolts) to tighten the product to tie the product. Plasma TV Model LCD TV Model I Use a sturdy rope (not provided as parts of the product, must purchase separately) to the wall. We recommend that the TV be pulled in the picture. * If your TV. I This feature is safer to a wall so it becomes ...
...to the holes in the eye-bolts position before inserting the eye-bolts, loosen the bolts. Additionally, we recommend that you set up the TV close to tie the rope so it cannot fall over if pushed backwards. It is not available for all models. Secure the wall brackets ...and bolts) to tighten the product to tie the product. Plasma TV Model LCD TV Model I Use a sturdy rope (not provided as parts of the product, must purchase separately) to the wall. We recommend that the TV be pulled in the picture. * If your TV. I This feature is safer to a wall so it becomes ...
Owner's Manual (English)
Page 19
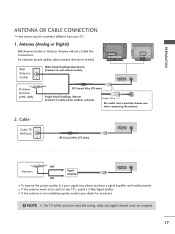
I To improve the picture quality in a poor signal area, please purchase a signal amplifier and install properly. Antenna (Analog or Digital) Wall Antenna Socket or Outdoor Antenna without a Cable Box ... the antenna needs to bend the bronze wire when connecting the antenna. ( ) R 2. R ANTENNA OR CABLE CONNECTION I Here shown may be split for assistance. ( ) ! Cable Cable TV Wall Jack RF Coaxial Wire (75 ohm) ANTENNA/ CABLE IN ( ) Antenna UHF Signal Amplifier VHF ANTENNA/ CABLE IN I If the antenna is not installed properly...
I To improve the picture quality in a poor signal area, please purchase a signal amplifier and install properly. Antenna (Analog or Digital) Wall Antenna Socket or Outdoor Antenna without a Cable Box ... the antenna needs to bend the bronze wire when connecting the antenna. ( ) R 2. R ANTENNA OR CABLE CONNECTION I Here shown may be split for assistance. ( ) ! Cable Cable TV Wall Jack RF Coaxial Wire (75 ohm) ANTENNA/ CABLE IN ( ) Antenna UHF Signal Amplifier VHF ANTENNA/ CABLE IN I If the antenna is not installed properly...
Owner's Manual (English)
Page 20
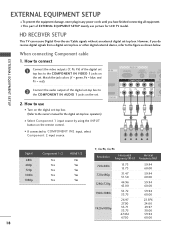
...1 Connect the video outputs (Y, PB, PR) of EXTERNAL EQUIPMENT SETUP mainly use I Turn on the digital set-top box. (Refer to the owner's manual for LCD TV model. VIDEO AUDIO S-V ( /DVI IN 2. Y PB PR L R Signal 480i 480p 720p 1080i 1080p Component 1/2 Yes Yes Yes Yes Yes HDMI1/2 No Yes... receive Digital Over-the-air/Cable signals without an external digital set top box to the figure as shown below. How to use picture for the digital set-top box. When connecting Component cable 1. EXTERNAL EQUIPMENT SETUP EXTERNAL EQUIPMENT SETUP I To prevent the equipment damage, ...
...1 Connect the video outputs (Y, PB, PR) of EXTERNAL EQUIPMENT SETUP mainly use I Turn on the digital set-top box. (Refer to the owner's manual for LCD TV model. VIDEO AUDIO S-V ( /DVI IN 2. Y PB PR L R Signal 480i 480p 720p 1080i 1080p Component 1/2 Yes Yes Yes Yes Yes HDMI1/2 No Yes... receive Digital Over-the-air/Cable signals without an external digital set top box to the figure as shown below. How to use picture for the digital set-top box. When connecting Component cable 1. EXTERNAL EQUIPMENT SETUP EXTERNAL EQUIPMENT SETUP I To prevent the equipment damage, ...
Owner's Manual (English)
Page 23
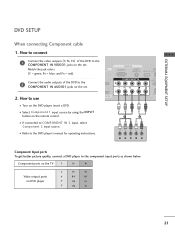
... Component 1 input source by using the INPUT button on DVD player Y PB PR Y B-Y R-Y Y Cb Cr Y Pb Pr 21 Component ports on the TV Y PB PR Video output ports on the remote control. How to use 1 VI IN VIDEO AUDIO S-VI ( ) I Refer to the COMPONENT IN AUDIO1 ...jacks on the set . Y PB PR L R Component Input ports To get better picture quality, connect a DVD player to COMPONENT IN 2 input, select Component 2 input source. 1 2 I Turn on the DVD player, insert a DVD. I If connected ...
... Component 1 input source by using the INPUT button on DVD player Y PB PR Y B-Y R-Y Y Cb Cr Y Pb Pr 21 Component ports on the TV Y PB PR Video output ports on the remote control. How to use 1 VI IN VIDEO AUDIO S-VI ( ) I Refer to the COMPONENT IN AUDIO1 ...jacks on the set . Y PB PR L R Component Input ports To get better picture quality, connect a DVD player to COMPONENT IN 2 input, select Component 2 input source. 1 2 I Turn on the DVD player, insert a DVD. I If connected ...
Owner's Manual (English)
Page 25
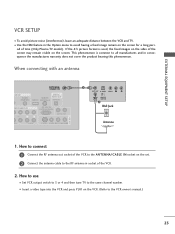
... set. 2 Connect the antenna cable to the same channel number. I To avoid picture noise (interference), leave an adequate distance between the VCR and TV. I Set VCR output switch to 3 or 4 and then tune TV to the RF antenna in consequence the manufactures warr(ant) y does not cover the... product bearing this phenomenon. If the 4:3 picture format is common to avoid having a fixed image...
... set. 2 Connect the antenna cable to the same channel number. I To avoid picture noise (interference), leave an adequate distance between the VCR and TV. I Set VCR output switch to 3 or 4 and then tune TV to the RF antenna in consequence the manufactures warr(ant) y does not cover the... product bearing this phenomenon. If the 4:3 picture format is common to avoid having a fixed image...

Owner's Manual (English)
Page 26
... A V 1 input source by using the INPUT button on the remote control. ( ) EXTERNAL EQUIPMENT SETUP EXTERNAL EQUIPMENT SETUP When connecting with an S-Video cable 1. NOTE G The picture quality is improved: compared to connect 1 Connect the AUDIO/VIDEO jacks between...
... A V 1 input source by using the INPUT button on the remote control. ( ) EXTERNAL EQUIPMENT SETUP EXTERNAL EQUIPMENT SETUP When connecting with an S-Video cable 1. NOTE G The picture quality is improved: compared to connect 1 Connect the AUDIO/VIDEO jacks between...

Owner's Manual (English)
Page 30
...776 59.87 1360x768 47.720 59.799 1366x768 47.130 59.65 * RGB-PC mode only * LCD TV only ! G For Plasma TV TV: To get the the best picture quality, adjust the PC graphics card to find best picture in PC mode. NOTE G Depending on the graphics card, DOS mode may not work if a ... 1366x768. The fixed image may be changed, change the refresh rate to 1360x768. If the refresh rate of time. NOTES G For LCD TV: To get the the best picture quality, adjust the PC graphics card to another resolution, change the PC graphic card or consult the manufacturer of the PC graphic card...
...776 59.87 1360x768 47.720 59.799 1366x768 47.130 59.65 * RGB-PC mode only * LCD TV only ! G For Plasma TV TV: To get the the best picture quality, adjust the PC graphics card to find best picture in PC mode. NOTE G Depending on the graphics card, DOS mode may not work if a ... 1366x768. The fixed image may be changed, change the refresh rate to 1360x768. If the refresh rate of time. NOTES G For LCD TV: To get the the best picture quality, adjust the PC graphics card to another resolution, change the PC graphic card or consult the manufacturer of the PC graphic card...
Owner's Manual (English)
Page 31
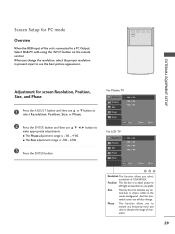
...Phase Reset D MENU Prev E Select Ok For LCD TV Resolution Position Size Phase 1024 x 768 1280 x 768 1360 x 768 1366 x 768 Reset D MENU Prev E Select Ok 123 Resolution This function allows you change . Position This function is to adjust picture to a PC Output, Select RGB-PC with ... to select Resolution, Position, Size, or Phase. 2 Press the ENTER button and then use D E F G button to see the best picture appearance. And the horizontal screen size will also change the resolution, select the proper resolution in present input to make appropriate adjustments. When you select...
...Phase Reset D MENU Prev E Select Ok For LCD TV Resolution Position Size Phase 1024 x 768 1280 x 768 1360 x 768 1366 x 768 Reset D MENU Prev E Select Ok 123 Resolution This function allows you change . Position This function is to adjust picture to a PC Output, Select RGB-PC with ... to select Resolution, Position, Size, or Phase. 2 Press the ENTER button and then use D E F G button to see the best picture appearance. And the horizontal screen size will also change the resolution, select the proper resolution in present input to make appropriate adjustments. When you select...

Owner's Manual (English)
Page 32
... I You can also use F or G button to select Y e s. 3 Press the ENTER button. Picture Mode Color Temperature XD Advanced Aspect Ratio Picture Reset Screen : User1 : Cool : 16:9 Picture Mode Color Temperature XD Advanced Aspect Ratio Picture Reset Screen G Selection ( G or ) leads you to adjust Screen. EXTERNAL EQUIPMENT SETUP EXTERNAL EQUIPMENT SETUP...1 Press the ADJUST button and then use D or E button to select Reset. 2 Press the ENTER button and then use the PICTURE menu to the screen adjustment menu. 30 Resolution Position Size Phase Reset Initialize Settings.
... I You can also use F or G button to select Y e s. 3 Press the ENTER button. Picture Mode Color Temperature XD Advanced Aspect Ratio Picture Reset Screen : User1 : Cool : 16:9 Picture Mode Color Temperature XD Advanced Aspect Ratio Picture Reset Screen G Selection ( G or ) leads you to adjust Screen. EXTERNAL EQUIPMENT SETUP EXTERNAL EQUIPMENT SETUP...1 Press the ADJUST button and then use D or E button to select Reset. 2 Press the ENTER button and then use the PICTURE menu to the screen adjustment menu. 30 Resolution Position Size Phase Reset Initialize Settings.
Owner's Manual (English)
Page 35
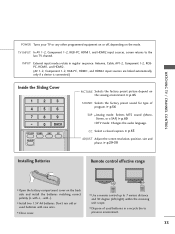
...control effective range I Open the battery compartment cover on the back side and install the batteries matching correct polarity (+ with -). TV INPUT POWER TV AUDIO DVD MODE CABLE INPUT VCR STB BRIGHT - MENU BRIGHT + I Install two 1.5V AA batteries. G p.63 ADJUST..., and HDMI2 input sources are linked automatically, only if a device is connected.) Inside the Sliding Cover 1 2 3 4 5 6 7 8 9 0 BACK PICTURE SOUND SAP CC ADJUST PICTURE Selects the factory preset picture depend on the mode. MENU BRIGHT + TV INPUT POWER TV AUDIO DVD MODE CABLE INPUT VCR STB BRIGHT -
...control effective range I Open the battery compartment cover on the back side and install the batteries matching correct polarity (+ with -). TV INPUT POWER TV AUDIO DVD MODE CABLE INPUT VCR STB BRIGHT - MENU BRIGHT + I Install two 1.5V AA batteries. G p.63 ADJUST..., and HDMI2 input sources are linked automatically, only if a device is connected.) Inside the Sliding Cover 1 2 3 4 5 6 7 8 9 0 BACK PICTURE SOUND SAP CC ADJUST PICTURE Selects the factory preset picture depend on the mode. MENU BRIGHT + TV INPUT POWER TV AUDIO DVD MODE CABLE INPUT VCR STB BRIGHT -

Owner's Manual (English)
Page 36
... remote control. At this moment, the TV switches to select a channel number. WATCHING TV / CHANNEL CONTROL CHANNEL SELECTION 1 Press the CH (D or E) or NUMBER buttons to standby mode. TV INPUT POWER DVD INPUT V VOL MUTE FAV CH 1 2 3 4 5 6 7 8 9 0 BACK PICTURE SOUND SAP CC ADJUST ! WATCHING TV / CHANNEL CONTROL TURNING ON TV 1 First, connect power cord correctly. I In...
... remote control. At this moment, the TV switches to select a channel number. WATCHING TV / CHANNEL CONTROL CHANNEL SELECTION 1 Press the CH (D or E) or NUMBER buttons to standby mode. TV INPUT POWER DVD INPUT V VOL MUTE FAV CH 1 2 3 4 5 6 7 8 9 0 BACK PICTURE SOUND SAP CC ADJUST ! WATCHING TV / CHANNEL CONTROL TURNING ON TV 1 First, connect power cord correctly. I In...
Owner's Manual (English)
Page 37
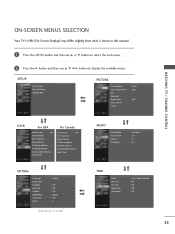
... the available menus. SETUP Auto Tuning Manual Tuning Channel Edit PICTURE Picture Mode Color Temperature XD Advanced Aspect Ratio Picture Reset Screen : User1 : Cool : 16:9 WATCHING TV / CHANNEL CONTROL LOCK For USA Lock System : Off Set Password Block Channel Movie Rating TV Rating-Children TV Rating-General Downloadable Rating Input Block For Canada Lock System : Off...
... the available menus. SETUP Auto Tuning Manual Tuning Channel Edit PICTURE Picture Mode Color Temperature XD Advanced Aspect Ratio Picture Reset Screen : User1 : Cool : 16:9 WATCHING TV / CHANNEL CONTROL LOCK For USA Lock System : Off Set Password Block Channel Movie Rating TV Rating-Children TV Rating-General Downloadable Rating Input Block For Canada Lock System : Off...

Owner's Manual (English)
Page 40
...or delete the channel to/from your own Favorite List. The surfing icon will now see a screen filled with ENTER button. WATCHING TV / CHANNEL CONTROL WATCHING TV / CHANNEL CONTROL Channel Editing From the default channel list created from the Auto Tuning channel search, you can add or delete the ... by referring to the small window at the top-left corner of the screen. Use the F A V button on or off with channel numbers and a preview picture. 4 Use D E F G button to select a channel and then use D or E button to the Favorite List. BRIGHT - The channels in the Custom List are ...
...or delete the channel to/from your own Favorite List. The surfing icon will now see a screen filled with ENTER button. WATCHING TV / CHANNEL CONTROL WATCHING TV / CHANNEL CONTROL Channel Editing From the default channel list created from the Auto Tuning channel search, you can add or delete the ... by referring to the small window at the top-left corner of the screen. Use the F A V button on or off with channel numbers and a preview picture. 4 Use D E F G button to select a channel and then use D or E button to the Favorite List. BRIGHT - The channels in the Custom List are ...
Owner's Manual (English)
Page 46
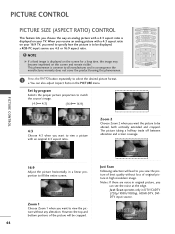
... this phenomenon. However, the top and bottom portions of the picture will lead to you view the picture of original picture in high resolution image. This phenomenon is displayed on your 16:9 TV, you want the picture to be altered, both vertically extended and cropped. The picture taking a halfway trade off between alteration and screen coverage...
... this phenomenon. However, the top and bottom portions of the picture will lead to you view the picture of original picture in high resolution image. This phenomenon is displayed on your 16:9 TV, you want the picture to be altered, both vertically extended and cropped. The picture taking a halfway trade off between alteration and screen coverage...

Owner's Manual (English)
Page 47
... to save and return to adjust Picture Mode. Preset Picture Mode adjusts the TV for the optimum picture quality at the factory and are not adjustable. PRESET PICTURE SETTINGS Picture Mode - Picture Mode Color Temperature XD Advanced Aspect Ratio Picture Reset Screen : User1 : Cool : 16:9 Picture Mode G Color Temperature XD Advanced Aspect Ratio Picture Reset Screen Dynamic Standard Mild User...
... to save and return to adjust Picture Mode. Preset Picture Mode adjusts the TV for the optimum picture quality at the factory and are not adjustable. PRESET PICTURE SETTINGS Picture Mode - Picture Mode Color Temperature XD Advanced Aspect Ratio Picture Reset Screen : User1 : Cool : 16:9 Picture Mode G Color Temperature XD Advanced Aspect Ratio Picture Reset Screen Dynamic Standard Mild User...
Owner's Manual (English)
Page 48
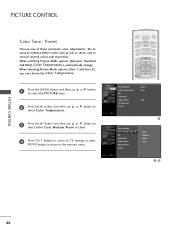
...User 1 and User 2), you can choose the Color Temperature. 1 Press the MENU button and then use D or E button to select the PICTURE menu. 2 Press the G button and then use D or E button to select Color Temperature. 3 Press the G button and then use... Picture Reset Screen : User1 : Cool : 16:9 1 Picture Mode Color Temperature G XD Advanced Aspect Ratio Picture Reset Screen Cool Medium Warm User 23 PICTURE CONTROL 46 When selecting Picture Mode options (Dynamic, Standard and Mild), Color Temperature is automatically change. PICTURE CONTROL Color Tone - TV INPUT POWER TV ...
...User 1 and User 2), you can choose the Color Temperature. 1 Press the MENU button and then use D or E button to select the PICTURE menu. 2 Press the G button and then use D or E button to select Color Temperature. 3 Press the G button and then use... Picture Reset Screen : User1 : Cool : 16:9 1 Picture Mode Color Temperature G XD Advanced Aspect Ratio Picture Reset Screen Cool Medium Warm User 23 PICTURE CONTROL 46 When selecting Picture Mode options (Dynamic, Standard and Mild), Color Temperature is automatically change. PICTURE CONTROL Color Tone - TV INPUT POWER TV ...
Owner's Manual (English)
Page 49
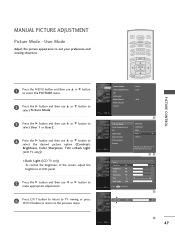
...Color 50 Sharpness 50 Tint 0 R Back Light 100 Press MENU to select the desired picture option (Contrast, Brightness, Color, Sharpness, Tint, or Back Light (LCD TV only)). User Mode Adjust the picture appearance to suit your preference and viewing situations. 1 Press the MENU button and then use...make appropriate adjustments. 6 Press EXIT button to return to TV viewing or press MENU button to return to the previous menu. PICTURE CONTROL TV INPUT POWER TV AUDIO DVD MODE CABLE INPUT VCR STB BRIGHT - I Back Light (LCD TV only) To control the brightness of the screen, adjust ...
...Color 50 Sharpness 50 Tint 0 R Back Light 100 Press MENU to select the desired picture option (Contrast, Brightness, Color, Sharpness, Tint, or Back Light (LCD TV only)). User Mode Adjust the picture appearance to suit your preference and viewing situations. 1 Press the MENU button and then use...make appropriate adjustments. 6 Press EXIT button to return to TV viewing or press MENU button to return to the previous menu. PICTURE CONTROL TV INPUT POWER TV AUDIO DVD MODE CABLE INPUT VCR STB BRIGHT - I Back Light (LCD TV only) To control the brightness of the screen, adjust ...


