Owner's Manual (English)
Page 1
... this information to your set. A.,Inc. www.lgusa.com / www.lg.ca / www.lgcommercial.com has determined that this product meets the ENERGY STAR guidelines for future reference. Retain it for energy efficiency. LCD TV PLASMA TV OWNER'S MANUAL LCD TV MODELS 32LC7D 32LC7DC 37LC7D 42LC7D PLASMA TV MODELS 42PC5D 42PC5DC 50PC5D 50PC5DC Please read this manual carefully...
... this information to your set. A.,Inc. www.lgusa.com / www.lg.ca / www.lgcommercial.com has determined that this product meets the ENERGY STAR guidelines for future reference. Retain it for energy efficiency. LCD TV PLASMA TV OWNER'S MANUAL LCD TV MODELS 32LC7D 32LC7DC 37LC7D 42LC7D PLASMA TV MODELS 42PC5D 42PC5DC 50PC5D 50PC5DC Please read this manual carefully...
Owner's Manual (English)
Page 8
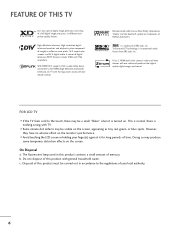
...are trademarks of a full digital image processor, six different main picture quality factors. is turned on the screen. FEATURE OF THIS TV LG's own special digital image generator, consisting of Dolby Laboratories. TruSurround XT technology is nothing wrong with one cable and produces the ...(s) against it is a trademark of SRS Labs, Inc. On Disposal a. With HDMI CEC support of mercury. High-definition television. FOR LCD TV I Some minute dot defects may produce some temporary distortion effects on . However, they have no adverse effect on the screen, appearing as...
...are trademarks of a full digital image processor, six different main picture quality factors. is turned on the screen. FEATURE OF THIS TV LG's own special digital image generator, consisting of Dolby Laboratories. TruSurround XT technology is nothing wrong with one cable and produces the ...(s) against it is a trademark of SRS Labs, Inc. On Disposal a. With HDMI CEC support of mercury. High-definition television. FOR LCD TV I Some minute dot defects may produce some temporary distortion effects on . However, they have no adverse effect on the screen, appearing as...
Owner's Manual (English)
Page 9
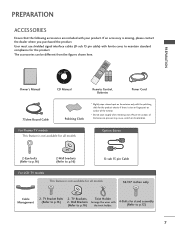
...Eye-bolts (Refer to p.16) 2-Wall brackets (Refer to p.16) 2- Please be different from the figures shown here. For Plasma TV models This feature is not available for the product. Wall Brackets Arrange the wires with your product. MENU BRIGHT + ENTER EXIT 1 4 ... VOL MUTE RATIO SIMPLINK FAV CH 2 7 5 3 8 6 0 9 BACK 1.5V 1.5V Owner's Manual Copyright© 2007 LGE, All Rights Reserved. TV Brackets, Twist Holder (Refer to p.16) D-sub 15 pin Cable For LCD TV models This feature is not available for all models 32/37 inches only Cable Management 2-
...Eye-bolts (Refer to p.16) 2-Wall brackets (Refer to p.16) 2- Please be different from the figures shown here. For Plasma TV models This feature is not available for the product. Wall Brackets Arrange the wires with your product. MENU BRIGHT + ENTER EXIT 1 4 ... VOL MUTE RATIO SIMPLINK FAV CH 2 7 5 3 8 6 0 9 BACK 1.5V 1.5V Owner's Manual Copyright© 2007 LGE, All Rights Reserved. TV Brackets, Twist Holder (Refer to p.16) D-sub 15 pin Cable For LCD TV models This feature is not available for all models 32/37 inches only Cable Management 2-
Owner's Manual (English)
Page 11
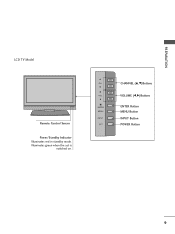
CH VOL ENTER MENU INPUT CH VOL ENTER MENU INPUT CHANNEL (D,E)Buttons VOLUME (F,G)Buttons ENTER Button MENU Button INPUT Button POWER Button 9 Illuminates green when the set is switched on. PREPARATION LCD TV Model Remote Control Sensor Power/Standby Indicator Illuminates red in standby mode.
CH VOL ENTER MENU INPUT CH VOL ENTER MENU INPUT CHANNEL (D,E)Buttons VOLUME (F,G)Buttons ENTER Button MENU Button INPUT Button POWER Button 9 Illuminates green when the set is switched on. PREPARATION LCD TV Model Remote Control Sensor Power/Standby Indicator Illuminates red in standby mode.
Owner's Manual (English)
Page 14
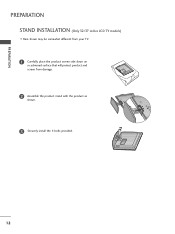
PREPARATION PREPARATION STAND INSTALLATION (Only 32/37 inches LCD TV models) I Here shown may be somewhat different from your TV. 1 Carefully place the product screen side down on a cushioned surface that will protect product and screen from damage. 2 Assemble the product stand with the product as shown. 3 Securely install the 4 bolts provided. 12
PREPARATION PREPARATION STAND INSTALLATION (Only 32/37 inches LCD TV models) I Here shown may be somewhat different from your TV. 1 Carefully place the product screen side down on a cushioned surface that will protect product and screen from damage. 2 Assemble the product stand with the product as shown. 3 Securely install the 4 bolts provided. 12

Owner's Manual (English)
Page 15
... 600 mm (32 inches only: 200 mm) R R 400 mm 400 mm (32 inches only: 100 mm) ! Plasma TV Model LCD TV Model 4 inches 4 inches 4 inches 4 inches 4 inches 4 inches 4 inches 4 inches CAUTION G Ensure adequate ventilation by following the clearance recommendations. 13 PREPARATION VESA WALL MOUNTING This product ...
... 600 mm (32 inches only: 200 mm) R R 400 mm 400 mm (32 inches only: 100 mm) ! Plasma TV Model LCD TV Model 4 inches 4 inches 4 inches 4 inches 4 inches 4 inches 4 inches 4 inches CAUTION G Ensure adequate ventilation by following the clearance recommendations. 13 PREPARATION VESA WALL MOUNTING This product ...
Owner's Manual (English)
Page 17
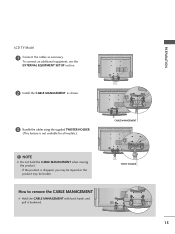
NOTE G Do not hold the CABLE MANAGEMENT when moving the product. - If the product is not available for all models.) CABLE MANAGEMENT ! TWIST HOLDER 15 How to remove the CABLE MANAGEMENT G Hold the CABLE MANAGEMENT with both hands and pull it backward. PREPARATION LCD TV Model 1 Connect the cables as shown. 3 Bundle the cables using the supplied TWISTER HOLDER. (This feature is dropped, you may be injured or the product may be broken. To connect an additional equipment, see the EXTERNAL EQUIPMENT SETUP section. 2 Install the CABLE MANAGEMENT as necessary.
NOTE G Do not hold the CABLE MANAGEMENT when moving the product. - If the product is not available for all models.) CABLE MANAGEMENT ! TWIST HOLDER 15 How to remove the CABLE MANAGEMENT G Hold the CABLE MANAGEMENT with both hands and pull it backward. PREPARATION LCD TV Model 1 Connect the cables as shown. 3 Bundle the cables using the supplied TWISTER HOLDER. (This feature is dropped, you may be injured or the product may be broken. To connect an additional equipment, see the EXTERNAL EQUIPMENT SETUP section. 2 Install the CABLE MANAGEMENT as necessary.
Owner's Manual (English)
Page 18
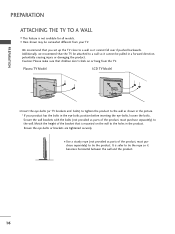
...the product, must purchase separately) to a wall so it cannot be somewhat different from the TV. Plasma TV Model LCD TV Model I Use a sturdy rope (not provided as shown in the picture. * If your TV. Ensure the eye-bolts or brackets are tightened securely. It is mounted on or hang ...the height of the product, must purchase separately) to tie the rope so it cannot fall over if pushed backwards. PREPARATION PREPARATION ATTACHING THE TV TO A WALL I Here shown may be pulled in a forward direction, potentially causing injury or damaging the product. We recommend that is ...
...the product, must purchase separately) to a wall so it cannot be somewhat different from the TV. Plasma TV Model LCD TV Model I Use a sturdy rope (not provided as shown in the picture. * If your TV. Ensure the eye-bolts or brackets are tightened securely. It is mounted on or hang ...the height of the product, must purchase separately) to tie the rope so it cannot fall over if pushed backwards. PREPARATION PREPARATION ATTACHING THE TV TO A WALL I Here shown may be pulled in a forward direction, potentially causing injury or damaging the product. We recommend that is ...
Owner's Manual (English)
Page 20
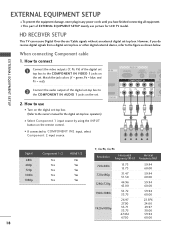
... -top box. How to connect 1 Connect the video outputs (Y, PB, PR) of the digital set top box to the owner's manual for LCD TV model. HD RECEIVER SETUP This TV can receive Digital Over-the-air/Cable signals without an external digital set -top box or other digital external device, refer to COMPONENT...
... -top box. How to connect 1 Connect the video outputs (Y, PB, PR) of the digital set top box to the owner's manual for LCD TV model. HD RECEIVER SETUP This TV can receive Digital Over-the-air/Cable signals without an external digital set -top box or other digital external device, refer to COMPONENT...

Owner's Manual (English)
Page 30
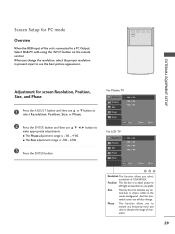
...a HDMI to another resolution, change the PC graphic card or consult the manufacturer of time. G For Plasma TV TV: To get the the best picture quality, adjust the PC graphics card to 1360x768. G Depending on the ...776 59.87 1360x768 47.720 59.799 1366x768 47.130 59.65 * RGB-PC mode only * LCD TV only ! There may be changed, change the refresh rate to another rate or adjust the brightness and contrast... pattern, contrast or brightness in use. NOTE G Depending on your TV. NOTES G For LCD TV: To get the the best picture quality, adjust the PC graphics card to 1366x768.
...a HDMI to another resolution, change the PC graphic card or consult the manufacturer of time. G For Plasma TV TV: To get the the best picture quality, adjust the PC graphics card to 1360x768. G Depending on the ...776 59.87 1360x768 47.720 59.799 1366x768 47.130 59.65 * RGB-PC mode only * LCD TV only ! There may be changed, change the refresh rate to another rate or adjust the brightness and contrast... pattern, contrast or brightness in use. NOTE G Depending on your TV. NOTES G For LCD TV: To get the the best picture quality, adjust the PC graphics card to 1366x768.
Owner's Manual (English)
Page 31
... using the INPUT button on the screen background. When you select resolution of characters. 29 For Plasma TV Resolution Position Size 1024 x 768 1280 x 768 1360 x 768 Phase Reset D MENU Prev E Select Ok For LCD TV Resolution Position Size Phase 1024 x 768 1280 x 768 1360 x 768 1366 x 768 Reset D MENU Prev E Select Ok...
... using the INPUT button on the screen background. When you select resolution of characters. 29 For Plasma TV Resolution Position Size 1024 x 768 1280 x 768 1360 x 768 Phase Reset D MENU Prev E Select Ok For LCD TV Resolution Position Size Phase 1024 x 768 1280 x 768 1360 x 768 1366 x 768 Reset D MENU Prev E Select Ok...
Owner's Manual (English)
Page 49
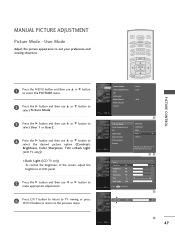
... F or G button to make appropriate adjustments. 6 Press EXIT button to return to TV viewing or press MENU button to return to the previous menu. I Back Light (LCD TV only) To control the brightness of the screen, adjust the brightness of LCD panel. 5 Press the G button and then use D or E button to confirm.... 0 R Back Light 100 Press MENU to select the desired picture option (Contrast, Brightness, Color, Sharpness, Tint, or Back Light (LCD TV only)). PICTURE CONTROL TV INPUT POWER TV AUDIO DVD MODE CABLE INPUT VCR STB BRIGHT - MANUAL PICTURE ADJUSTMENT Picture Mode -
... F or G button to make appropriate adjustments. 6 Press EXIT button to return to TV viewing or press MENU button to return to the previous menu. I Back Light (LCD TV only) To control the brightness of the screen, adjust the brightness of LCD panel. 5 Press the G button and then use D or E button to confirm.... 0 R Back Light 100 Press MENU to select the desired picture option (Contrast, Brightness, Color, Sharpness, Tint, or Back Light (LCD TV only)). PICTURE CONTROL TV INPUT POWER TV AUDIO DVD MODE CABLE INPUT VCR STB BRIGHT - MANUAL PICTURE ADJUSTMENT Picture Mode -
Owner's Manual (English)
Page 93
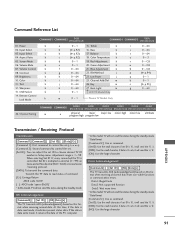
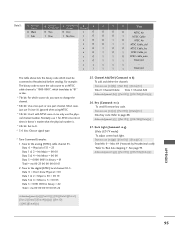
...Blue Adjustment k g 0 ~ 64 22. Back Light m l 0~1 LCD TV Model Only m 0~1 Plasma TV Model Only r 0 ~ 64 s 0 ~ 64 t 0 ~ 64 u 0~3 v 0 ~ C8 w 0 ~ C8 $ 0 ~ C8 p (G p.94) q 0~1 b 0~1 c (G p.95) g 0 ~ 64 24. When selecting Set ID '0', every connected the TV is 1~ 99. Screen Mute k 06. Treble k b (G p.92)... Adjustment range is controlled. Error Acknowledgement [Command2][ ][Set ID][ ][NG][Data][x] The TV transmits ACK (acknowledgement) based on this model, TV will not send the status during the standby mode. Data1: Illegal Code Data2: Not supported...
...Blue Adjustment k g 0 ~ 64 22. Back Light m l 0~1 LCD TV Model Only m 0~1 Plasma TV Model Only r 0 ~ 64 s 0 ~ 64 t 0 ~ 64 u 0~3 v 0 ~ C8 w 0 ~ C8 $ 0 ~ C8 p (G p.94) q 0~1 b 0~1 c (G p.95) g 0 ~ 64 24. When selecting Set ID '0', every connected the TV is 1~ 99. Screen Mute k 06. Treble k b (G p.92)... Adjustment range is controlled. Error Acknowledgement [Command2][ ][Set ID][ ][NG][Data][x] The TV transmits ACK (acknowledgement) based on this model, TV will not send the status during the standby mode. Data1: Illegal Code Data2: Not supported...
Owner's Manual (English)
Page 97
... delete the channels Transmission [m][b][ ][Set ID][ ][Data][Cr] Data 0: Channel Delete Data 1: Channel Add Acknowledgement [b][ ][Set ID][ ][OK/NG][Data][x] 26. Back Light (Command: m g) (Only LCD TV model) To adjust screen back light. For example: The binary code to tune the sub source to an NTSC cable channel is "1000 0001", which...
... delete the channels Transmission [m][b][ ][Set ID][ ][Data][Cr] Data 0: Channel Delete Data 1: Channel Add Acknowledgement [b][ ][Set ID][ ][OK/NG][Data][x] 26. Back Light (Command: m g) (Only LCD TV model) To adjust screen back light. For example: The binary code to tune the sub source to an NTSC cable channel is "1000 0001", which...


