
Owner's Manual (English)
Page 6
... 17 Stand Installation 18 VESA Wall Mounting 19 Desktop Pedestal Installation 19 Antenna or Cable Connection 20 EXTERNAL EQUIPMENT SETUP HD Receiver Setup 21 DVD Setup 24 VCR Setup 26 Other A/V Source Setup 28 Digital Audio Output 28 PC Setup 29 WATCHING TV / CHANNEL CONTROL Remote Control Functions 32 Turning On TV 34 Channel Selection 34 Volume Adjustment 34 On-Screen Menus Selection 35 Channel Setup 36 - Auto Scan (EZ Scan 36 - Preset 45 - Color Tone - EZ Picture - User Mode 48 XD - Picture Improvement Technology 49 Advanced - Digital Broadcasting System Captions...
... 17 Stand Installation 18 VESA Wall Mounting 19 Desktop Pedestal Installation 19 Antenna or Cable Connection 20 EXTERNAL EQUIPMENT SETUP HD Receiver Setup 21 DVD Setup 24 VCR Setup 26 Other A/V Source Setup 28 Digital Audio Output 28 PC Setup 29 WATCHING TV / CHANNEL CONTROL Remote Control Functions 32 Turning On TV 34 Channel Selection 34 Volume Adjustment 34 On-Screen Menus Selection 35 Channel Setup 36 - Auto Scan (EZ Scan 36 - Preset 45 - Color Tone - EZ Picture - User Mode 48 XD - Picture Improvement Technology 49 Advanced - Digital Broadcasting System Captions...

Owner's Manual (English)
Page 8
... this product must be exchanged or returned. Using plasma is individually controlled by advanced electronics to achieve flat panel displays with excellent image quality and large screen sizes that this product with TV. Plasma TV is fewer than five inches thick. 160° - The Picture-in the Plasma TV manufacturing process. Several tiny, minute colored dots visible on . A few cell defects are easily viewable...
... this product must be exchanged or returned. Using plasma is individually controlled by advanced electronics to achieve flat panel displays with excellent image quality and large screen sizes that this product with TV. Plasma TV is fewer than five inches thick. 160° - The Picture-in the Plasma TV manufacturing process. Several tiny, minute colored dots visible on . A few cell defects are easily viewable...

Owner's Manual (English)
Page 9
... pin cable) with the polishing cloth for the product exteri- PIP CH SWAP + DVD VCR PIP INPUT INFO EXIT CC MENU RATIO SAP ENTER L TIMER MUTE 2 3 CH PAGE 6 TINVPUT INPUT MULTI POWER TMVODE PIP EZ PIC EZ PIP CH SOUND - PIP CH SWAP + DVD VCR PIP INPUT INFO EXIT CC MENU RATIO SAP ENTER 9 VOL TIMER MUTE 1 4 2 7 5 3 8 6 0 9 BAFCLKASH CH PAGE 1.5V 1.5V Owner's Manual, Setup & Operation Guide for Commercial Mode CD Manual Remote Control, Batteries Power Cord LCD TV model only...
... pin cable) with the polishing cloth for the product exteri- PIP CH SWAP + DVD VCR PIP INPUT INFO EXIT CC MENU RATIO SAP ENTER L TIMER MUTE 2 3 CH PAGE 6 TINVPUT INPUT MULTI POWER TMVODE PIP EZ PIC EZ PIP CH SOUND - PIP CH SWAP + DVD VCR PIP INPUT INFO EXIT CC MENU RATIO SAP ENTER 9 VOL TIMER MUTE 1 4 2 7 5 3 8 6 0 9 BAFCLKASH CH PAGE 1.5V 1.5V Owner's Manual, Setup & Operation Guide for Commercial Mode CD Manual Remote Control, Batteries Power Cord LCD TV model only...

Owner's Manual (English)
Page 23
... plug in any power cords until you do receive digital signals from a digital set-top box or other digital external device, refer to the figure as shown below. HD RECEIVER SETUP This TV can receive Digital Over-the-air/Cable signals without an external digital set -top box.) ■ Select Component input source with using the INPUT button on the digital set-top box. (Refer to the owner's manual for LCD TV models. When connecting Component cable 1. Match the jack colors (Y = green, PB = blue, and PR = red...
... plug in any power cords until you do receive digital signals from a digital set-top box or other digital external device, refer to the figure as shown below. HD RECEIVER SETUP This TV can receive Digital Over-the-air/Cable signals without an external digital set -top box.) ■ Select Component input source with using the INPUT button on the digital set-top box. (Refer to the owner's manual for LCD TV models. When connecting Component cable 1. Match the jack colors (Y = green, PB = blue, and PR = red...

Owner's Manual (English)
Page 24
...VIDEO AUDIO COMPONENT IN HDMI-DTV OUTPUT ( ) 22 How to connect 1 Connect the digital set-top box to HDMI/DVI IN 1(DVI) or 2 jack on the remote control. How to use ■ Turn on the digital set-top box. ( ) (Refer to set . 2 No separated audio connection is necessary. NOTE G If the device does not support Auto HDMI, you need to the owner's manual for the digital set-top box.) ■ Select HDMI1/DVI or HDMI2 input source with using the INPUT button on the set the output resolution appropriately. EXTERNAL EQUIPMENT SETUP EXTERNAL EQUIPMENT SETUP When connecting HDMI cable...
...VIDEO AUDIO COMPONENT IN HDMI-DTV OUTPUT ( ) 22 How to connect 1 Connect the digital set-top box to HDMI/DVI IN 1(DVI) or 2 jack on the remote control. How to use ■ Turn on the digital set-top box. ( ) (Refer to set . 2 No separated audio connection is necessary. NOTE G If the device does not support Auto HDMI, you need to the owner's manual for the digital set-top box.) ■ Select HDMI1/DVI or HDMI2 input source with using the INPUT button on the set the output resolution appropriately. EXTERNAL EQUIPMENT SETUP EXTERNAL EQUIPMENT SETUP When connecting HDMI cable...
Owner's Manual (English)
Page 25
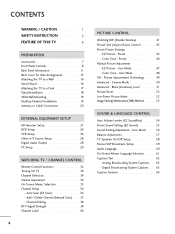
... set . 2. EXTERNAL EQUIPMENT SETUP When connecting HDMI to the AUDIO IN (RGB,DVI) jack on the remote control. 23 RESET UPDATE REMOTE CONTROL OUT SERVICE ONLY RGB IN RJP INTERFACE 1 VIDEO AUDIO COMPONENT IN S-VIDEO (MONO) AUDIO AV IN 1 VIDEO SPEAKER AUDIO OUT IN 8 (RGB, DVI) 2 DVI-DTV OUTPUT L R 1. How to use ■ Turn on the digital set-top box. (Refer to the owner's manual for the digital set-top box.) ■ Select HDMI1/DVI or HDMI2 input source with using the INPUT button on the set -top box to DVI cable HDMI/DVI IN 1(DVI) DIGITAL AUDIO OUT (OPTICAL...
... set . 2. EXTERNAL EQUIPMENT SETUP When connecting HDMI to the AUDIO IN (RGB,DVI) jack on the remote control. 23 RESET UPDATE REMOTE CONTROL OUT SERVICE ONLY RGB IN RJP INTERFACE 1 VIDEO AUDIO COMPONENT IN S-VIDEO (MONO) AUDIO AV IN 1 VIDEO SPEAKER AUDIO OUT IN 8 (RGB, DVI) 2 DVI-DTV OUTPUT L R 1. How to use ■ Turn on the digital set-top box. (Refer to the owner's manual for the digital set-top box.) ■ Select HDMI1/DVI or HDMI2 input source with using the INPUT button on the set -top box to DVI cable HDMI/DVI IN 1(DVI) DIGITAL AUDIO OUT (OPTICAL...

Owner's Manual (English)
Page 26
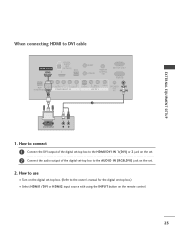
...EQUIPMENT SETUP EXTERNAL EQUIPMENT SETUP DVD SETUP When connecting Component cable 1. Match the jack colors (Y = green, PB = blue, and PR = red). How to use ■ Turn on the remote control. ■ Refer to the 2 COMPONENT IN AUDIO jacks on the set . RJP ERFACE VIDEO AUDIO S-VIDEO ( ) COMPONENT IN Component Input ports To get better picture quality, connect a DVD player to the COMPONENT IN VIDEO jacks on DVD player Y Y PB PR PB PR B-Y R-Y Cb Cr Pb Pr 24 HDMI/DVI IN 1(DVI) 1 2 DIGITAL AUDIO OUT (OPTICAL) 2 M.P.I. ■ Select Component input...
...EQUIPMENT SETUP EXTERNAL EQUIPMENT SETUP DVD SETUP When connecting Component cable 1. Match the jack colors (Y = green, PB = blue, and PR = red). How to use ■ Turn on the remote control. ■ Refer to the 2 COMPONENT IN AUDIO jacks on the set . RJP ERFACE VIDEO AUDIO S-VIDEO ( ) COMPONENT IN Component Input ports To get better picture quality, connect a DVD player to the COMPONENT IN VIDEO jacks on DVD player Y Y PB PR PB PR B-Y R-Y Cb Cr Pb Pr 24 HDMI/DVI IN 1(DVI) 1 2 DIGITAL AUDIO OUT (OPTICAL) 2 M.P.I. ■ Select Component input...
Owner's Manual (English)
Page 27
... OUTPUT 25 S-VIDEO AUDIO L R EXTERNAL EQUIPMENT SETUP 2 Connect the audio outputs of the DVD to use HDMI/DVI IN 1(DVI) DIGITAL AUDIO OUT (OPTICAL) 2 M.P.I . How to the AUDIO input jacks on the set . 2. S REMOTE CONTROL UPDATE OUT AUDIO NT IN S-VIDEO (MONO) AUDIO AV IN 1 VIDEO SPE O When connecting HDMI cable 1. How to connect 1 Connect the HDMI output of the DVD to the S -VIDEO input on the remote control. ■ If connected to AV IN2, select A V 2 input source. ■ Refer to the DVD player's manual for operating instructions. 1 2 GITAL UDIO OUT RESET...
... OUTPUT 25 S-VIDEO AUDIO L R EXTERNAL EQUIPMENT SETUP 2 Connect the audio outputs of the DVD to use HDMI/DVI IN 1(DVI) DIGITAL AUDIO OUT (OPTICAL) 2 M.P.I . How to the AUDIO input jacks on the set . 2. S REMOTE CONTROL UPDATE OUT AUDIO NT IN S-VIDEO (MONO) AUDIO AV IN 1 VIDEO SPE O When connecting HDMI cable 1. How to connect 1 Connect the HDMI output of the DVD to the S -VIDEO input on the remote control. ■ If connected to AV IN2, select A V 2 input source. ■ Refer to the DVD player's manual for operating instructions. 1 2 GITAL UDIO OUT RESET...
Owner's Manual (English)
Page 28
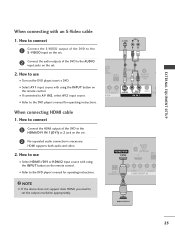
... channel number. ■ Insert a video tape into the VCR and press PLAY on the screen for a long period of time. (Only Plasma TV model). EXTERNAL EQUIPMENT SETUP EXTERNAL EQUIPMENT SETUP VCR SETUP ■ To avoid picture noise (interference), leave an adequate distance between the VCR and TV. ■ Use the ISM feature in consequence the manufactures warranty does not cover the product bearing this phenomenon. How to connect 1 Connect the RF antenna...
... channel number. ■ Insert a video tape into the VCR and press PLAY on the screen for a long period of time. (Only Plasma TV model). EXTERNAL EQUIPMENT SETUP EXTERNAL EQUIPMENT SETUP VCR SETUP ■ To avoid picture noise (interference), leave an adequate distance between the VCR and TV. ■ Use the ISM feature in consequence the manufactures warranty does not cover the product bearing this phenomenon. How to connect 1 Connect the RF antenna...
Owner's Manual (English)
Page 31
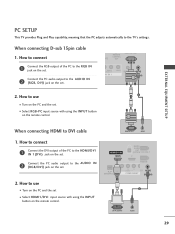
... HDMI/DVI IN 1(DVI) jack on the set. 2. EXTERNAL EQUIPMENT SETUP PC SETUP This TV provides Plug and Play capability, meaning that the PC adjusts automatically to the AUDIO IN 2 (RGB/DVI) jack on the set. DVI-PC OUTPUT AUDIO 29 RGB IN ( ) ( ) RJP INTERFACE VIDEO ER AUDIO COMPONENT IN (RGB, DVI) 2. How to DVI cable RGB OUTPUT AUDIO 1. How to use ( ) 1 ■ Turn on the PC and the set 2 ■ Select HDMI1/DVI input source with using the INPUT button on the remote control. 2 1 When connecting HDMI to use...
... HDMI/DVI IN 1(DVI) jack on the set. 2. EXTERNAL EQUIPMENT SETUP PC SETUP This TV provides Plug and Play capability, meaning that the PC adjusts automatically to the AUDIO IN 2 (RGB/DVI) jack on the set. DVI-PC OUTPUT AUDIO 29 RGB IN ( ) ( ) RJP INTERFACE VIDEO ER AUDIO COMPONENT IN (RGB, DVI) 2. How to DVI cable RGB OUTPUT AUDIO 1. How to use ( ) 1 ■ Turn on the PC and the set 2 ■ Select HDMI1/DVI input source with using the INPUT button on the remote control. 2 1 When connecting HDMI to use...

Owner's Manual (English)
Page 32
... Vertical frequencies is in PC mode. G The synchronization input form for a long period of the PC graphic card. If the refresh rate of the PC graphic card can not be noise associated with the resolution, vertical pattern, contrast or brightness in use. G Avoid keeping a fixed image on the screen. EXTERNAL EQUIPMENT SETUP Supported Display Specifications (RGB/HDMI1-PC) Resolution Horizontal Vertical Frequency(KHz...
... Vertical frequencies is in PC mode. G The synchronization input form for a long period of the PC graphic card. If the refresh rate of the PC graphic card can not be noise associated with the resolution, vertical pattern, contrast or brightness in use. G Avoid keeping a fixed image on the screen. EXTERNAL EQUIPMENT SETUP Supported Display Specifications (RGB/HDMI1-PC) Resolution Horizontal Vertical Frequency(KHz...

Owner's Manual (English)
Page 37
... Lock System Set Password Block Channel Movie Rating TV Rating-Children TV Rating-General Aux. Block Downloadable Rating SCREEN SETUP VIDEO AUDIO TIME OPTION SCREEN LOCK Auto config. Block Downloadable Rating For Canada Lock System Set Password Block Channel TV Rating-English TV Rating-French Aux. Manual config. XGA Mode Reset TIME SETUP VIDEO AUDIO TIME OPTION SCREEN LOCK Auto Clock Manual Clock Off Timer On Timer Auto Off OPTION SETUP VIDEO AUDIO TIME OPTION SCREEN LOCK Aspect Ratio Caption/Text Caption Options Language ISM Method Low Power Set ID Only Plasma TV model...
... Lock System Set Password Block Channel Movie Rating TV Rating-Children TV Rating-General Aux. Block Downloadable Rating SCREEN SETUP VIDEO AUDIO TIME OPTION SCREEN LOCK Auto config. Block Downloadable Rating For Canada Lock System Set Password Block Channel TV Rating-English TV Rating-French Aux. Manual config. XGA Mode Reset TIME SETUP VIDEO AUDIO TIME OPTION SCREEN LOCK Auto Clock Manual Clock Off Timer On Timer Auto Off OPTION SETUP VIDEO AUDIO TIME OPTION SCREEN LOCK Aspect Ratio Caption/Text Caption Options Language ISM Method Low Power Set ID Only Plasma TV model...

Owner's Manual (English)
Page 47
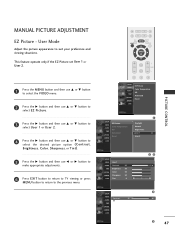
... viewing. ■ You can directly adjust the contrast, brightness, color, sharpness, tint. 1 Press the EZ PIC button repeatedly to adjust EZ Picture. Select the preset value in the EZ Picture menu based on the program category. INPUT TV POWER MODE TV INPUT DVD MULTI VCR PIP PIP CH - PRESET PICTURE SETTINGS EZ Picture - Daylight, Normal, Night Time Settings are preset for the best picture appearance. In the User1 and User2 modes only, user can also use the VIDEO menu to select...
... viewing. ■ You can directly adjust the contrast, brightness, color, sharpness, tint. 1 Press the EZ PIC button repeatedly to adjust EZ Picture. Select the preset value in the EZ Picture menu based on the program category. INPUT TV POWER MODE TV INPUT DVD MULTI VCR PIP PIP CH - PRESET PICTURE SETTINGS EZ Picture - Daylight, Normal, Night Time Settings are preset for the best picture appearance. In the User1 and User2 modes only, user can also use the VIDEO menu to select...
Owner's Manual (English)
Page 49
CC EXIT RATIO MENU SAP ENTER VOL TIMER MUTE CH PAGE 1 2 3 SETUP VIDEO AUDIO TIME OPTION SCREEN LOCK EZ Picture Color Temperature XD Advanced Reset PICTURE CONTROL 1 SETUP EZ Picture Daylight VIDEO Color Temperature Normal AUDIO XD Night Time TIME Advanced User 1 G OPTION Reset User 2 SCREEN LOCK SETUP VIDEO User1 AUDIO Contrast 85 TIME Brightness 50 OPTION Color 50 SCREEN Sharpness 50 LOCK Tint 0 R 23 G G SETUP VIDEO AUDIO TIME OPTION SCREEN LOCK Contrast E 85 F 4 G 5 47 This feature operate only if the EZ Picture set User 1 or CH User 2. 2 ...
CC EXIT RATIO MENU SAP ENTER VOL TIMER MUTE CH PAGE 1 2 3 SETUP VIDEO AUDIO TIME OPTION SCREEN LOCK EZ Picture Color Temperature XD Advanced Reset PICTURE CONTROL 1 SETUP EZ Picture Daylight VIDEO Color Temperature Normal AUDIO XD Night Time TIME Advanced User 1 G OPTION Reset User 2 SCREEN LOCK SETUP VIDEO User1 AUDIO Contrast 85 TIME Brightness 50 OPTION Color 50 SCREEN Sharpness 50 LOCK Tint 0 R 23 G G SETUP VIDEO AUDIO TIME OPTION SCREEN LOCK Contrast E 85 F 4 G 5 47 This feature operate only if the EZ Picture set User 1 or CH User 2. 2 ...

Owner's Manual (English)
Page 58
...SETUP VIDEO AUDIO TIME OPTION SCREEN LOCK Front Surround 4 Off 5 SOUND & LANGUAGE CONTROL 56 Selecting the Front surround Press the G button and then use F or G button to select O f f or 3D EchoSound System. SETUP Audio Language VIDEO EZ SoundRite AUDIO EZ Sound TIME Balance 0 OPTION TV Speakers SCREEN LOCK 1 SETUP Audio Language VIDEO EZ SoundRite Normal AUDIO EZ Sound Stadium TIME Balance 0 News OPTION TV Speakers Music SCREEN Theater LOCK User G 5 Press the G button and then use F or G button to make appropriate adjustments. USER MODE Adjust the sound...
...SETUP VIDEO AUDIO TIME OPTION SCREEN LOCK Front Surround 4 Off 5 SOUND & LANGUAGE CONTROL 56 Selecting the Front surround Press the G button and then use F or G button to select O f f or 3D EchoSound System. SETUP Audio Language VIDEO EZ SoundRite AUDIO EZ Sound TIME Balance 0 OPTION TV Speakers SCREEN LOCK 1 SETUP Audio Language VIDEO EZ SoundRite Normal AUDIO EZ Sound Stadium TIME Balance 0 News OPTION TV Speakers Music SCREEN Theater LOCK User G 5 Press the G button and then use F or G button to make appropriate adjustments. USER MODE Adjust the sound...
Owner's Manual (English)
Page 60
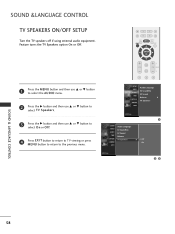
... use D or E button to select O n or O f f. 4 Press EXIT button to return to TV viewing or press MENU button to return to the previous menu. CC EXIT RATIO MENU SAP ENTER VOL TIMER MUTE CH PAGE 1 2 3 SETUP Audio Language VIDEO EZ SoundRite AUDIO EZ Sound TIME Balance 0 OPTION TV Speakers SCREEN LOCK 1 SETUP VIDEO AUDIO TIME Audio Language EZ SoundRite EZ Sound Balance OPTION TV Speakers G Off SCREEN On LOCK 23 58 SOUND & LANGUAGE CONTROL SOUND &LANGUAGE CONTROL TV SPEAKERS ON/OFF SETUP Turn the TV speakers off if using external audio...
... use D or E button to select O n or O f f. 4 Press EXIT button to return to TV viewing or press MENU button to return to the previous menu. CC EXIT RATIO MENU SAP ENTER VOL TIMER MUTE CH PAGE 1 2 3 SETUP Audio Language VIDEO EZ SoundRite AUDIO EZ Sound TIME Balance 0 OPTION TV Speakers SCREEN LOCK 1 SETUP VIDEO AUDIO TIME Audio Language EZ SoundRite EZ Sound Balance OPTION TV Speakers G Off SCREEN On LOCK 23 58 SOUND & LANGUAGE CONTROL SOUND &LANGUAGE CONTROL TV SPEAKERS ON/OFF SETUP Turn the TV speakers off if using external audio...
Owner's Manual (English)
Page 64
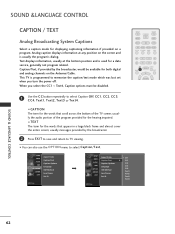
... The term for both digital and analog channels on the Antenna/Cable. PIP CH + PIP INPUT EZ PIC EZ SOUND SWAP INFO CC EXIT RATIO MENU SAP ENTER 1 Use the C C button repeatedly to select Caption/Text. Text displays information, usually at any position on a program. SETUP VIDEO AUDIO TIME OPTION SCREEN LOCK Aspect Ratio Caption/Text Caption Options Language ISM Method Low Power Set ID SETUP VIDEO Aspect Ratio Caption/Text Off G CC1 AUDIO Caption Options CC2 TIME OPTION SCREEN LOCK Language ISM Method Low Power Set ID CC3 CC4...
... The term for both digital and analog channels on the Antenna/Cable. PIP CH + PIP INPUT EZ PIC EZ SOUND SWAP INFO CC EXIT RATIO MENU SAP ENTER 1 Use the C C button repeatedly to select Caption/Text. Text displays information, usually at any position on a program. SETUP VIDEO AUDIO TIME OPTION SCREEN LOCK Aspect Ratio Caption/Text Caption Options Language ISM Method Low Power Set ID SETUP VIDEO Aspect Ratio Caption/Text Off G CC1 AUDIO Caption Options CC2 TIME OPTION SCREEN LOCK Language ISM Method Low Power Set ID CC3 CC4...

Owner's Manual (English)
Page 76
... EXIT RATIO MENU SAP ENTER VOL TIMER MUTE CH PAGE PARENTAL CONTROL / RATINGS Parental Control can be blocked by the broadcasting station. The default setting is also possible to block all programs to block specific channels, ratings and other viewing sources. Most television programs and television movies can be used to this function, the following must be blocked. 2. Specify a password 3. The Parental Control Function (V-Chip) is required to gain access to block program viewing based...
... EXIT RATIO MENU SAP ENTER VOL TIMER MUTE CH PAGE PARENTAL CONTROL / RATINGS Parental Control can be blocked by the broadcasting station. The default setting is also possible to block all programs to block specific channels, ratings and other viewing sources. Most television programs and television movies can be used to this function, the following must be blocked. 2. Specify a password 3. The Parental Control Function (V-Chip) is required to gain access to block program viewing based...

Owner's Manual (English)
Page 82
... your antenna direction and/or location. ■ Test the wall power outlet, plug another channel. The video function does not work normally. Lines or streaks in menu option. ■ Keep a sufficient distance between the product and the remote control causing obstruction. to -). ■ Ensure that the batteries are installed with Auto off ■ Is the sleep timer set : TV, VCR etc. ■ Install new batteries. No picture &No sound ■...
... your antenna direction and/or location. ■ Test the wall power outlet, plug another channel. The video function does not work normally. Lines or streaks in menu option. ■ Keep a sufficient distance between the product and the remote control causing obstruction. to -). ■ Ensure that the batteries are installed with Auto off ■ Is the sleep timer set : TV, VCR etc. ■ Install new batteries. No picture &No sound ■...
Owner's Manual (English)
Page 86
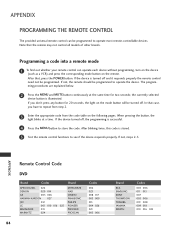
... store the code. APPENDIX PROGRAMMING THE REMOTE CONTROL The provided universal remote control can operate each device without programming, turn on the device (such as a VCR) and press the corresponding mode button on the remote. If the device is successful. 4 Press the MENU button to repeat from step 2. 3 Enter the appropriate code from the code table on the following pages. When pressing the button, the light blinks at the same time for...
... store the code. APPENDIX PROGRAMMING THE REMOTE CONTROL The provided universal remote control can operate each device without programming, turn on the device (such as a VCR) and press the corresponding mode button on the remote. If the device is successful. 4 Press the MENU button to repeat from step 2. 3 Enter the appropriate code from the code table on the following pages. When pressing the button, the light blinks at the same time for...

