

Owners Manual
Page 3
...set top box. Certain advanced interactive digital cable services such as video-on-demand, cable operator enhanced program the TV Guide On Screen system, and data enhanced television service may require the use of the CableCARDTM TradeMark. "CableCARDTM is required to a cable system ...programming. Digital Cable Compatibility This digital television is protected by direct connection to view encrypted digital programming. The TV Guide On Screen system is capable of receiving basic analog, digital basic and digital premium cable television programming by one or more information contact...
...set top box. Certain advanced interactive digital cable services such as video-on-demand, cable operator enhanced program the TV Guide On Screen system, and data enhanced television service may require the use of the CableCARDTM TradeMark. "CableCARDTM is required to a cable system ...programming. Digital Cable Compatibility This digital television is protected by direct connection to view encrypted digital programming. The TV Guide On Screen system is capable of receiving basic analog, digital basic and digital premium cable television programming by one or more information contact...
Owners Manual
Page 5
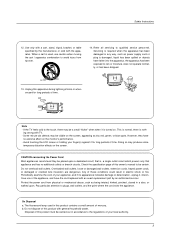
.... If the TV feels cold to rain or moisture, does not operate normally, or has been dropped. 13. Avoid touching the LCD screen or holding your finger(s) against it is noth- Pay particular attention to qualified service personnel. b. Unplug this apparatus during lightning storms or ...apparatus combination to avoid injury from physical or mechanical abuse, such as being twisted, kinked, pinched, closed in accordance to be visible on the screen. The fluorescent lamp used , use of mercury. Use only with TV. - Protect the power cord from tip-over. 14. Do not dispose...
.... If the TV feels cold to rain or moisture, does not operate normally, or has been dropped. 13. Avoid touching the LCD screen or holding your finger(s) against it is noth- Pay particular attention to qualified service personnel. b. Unplug this apparatus during lightning storms or ...apparatus combination to avoid injury from physical or mechanical abuse, such as being twisted, kinked, pinched, closed in accordance to be visible on the screen. The fluorescent lamp used , use of mercury. Use only with TV. - Protect the power cord from tip-over. 14. Do not dispose...
Owners Manual
Page 6
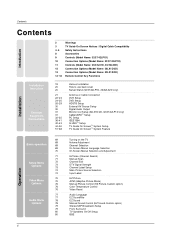
...3 4~5 8 9 10 11 12 13 14~18 Warnings TV Guide On Screen Notices / Digital Cable Compatibility Safety Instructions Accessories Controls (Model Name: 32/37/42LP1D) Connection Options (Model Name: 32/37/42LP1D) Controls (Model Name: 26/32LX1D, 26/32LX2D) Connection Options (Model Name: 26LX1D/2D) Connection Options (Model... 77 77 Audio Menu 78 Options 78 79 79 80 80 Turning on the TV Volume Adjustment Channel Selection On Screen Menus Language Selection On Screen Menus Selection and Adjustment EZ Scan (Channel Search) Manual Scan Channel Edit DTV Signal Strength Channel Label Setup Main...
...3 4~5 8 9 10 11 12 13 14~18 Warnings TV Guide On Screen Notices / Digital Cable Compatibility Safety Instructions Accessories Controls (Model Name: 32/37/42LP1D) Connection Options (Model Name: 32/37/42LP1D) Controls (Model Name: 26/32LX1D, 26/32LX2D) Connection Options (Model Name: 26LX1D/2D) Connection Options (Model... 77 77 Audio Menu 78 Options 78 79 79 80 80 Turning on the TV Volume Adjustment Channel Selection On Screen Menus Language Selection On Screen Menus Selection and Adjustment EZ Scan (Channel Search) Manual Scan Channel Edit DTV Signal Strength Channel Label Setup Main...

Owners Manual
Page 7
... OSD Display 99 Picture Selection and Popup menu MP3 Files Playing Operation 100 Music List OSD Display 101 MP3 File Selection and Popup menu 101 Screen Saver 102~107 External Control Device Setup 108~109 IR Codes 110 Programming the Remote 111~112 Programming Codes 113~114 Troubleshooting Checklist 115 Maintenance...
... OSD Display 99 Picture Selection and Popup menu MP3 Files Playing Operation 100 Music List OSD Display 101 MP3 File Selection and Popup menu 101 Screen Saver 102~107 External Control Device Setup 108~109 IR Codes 110 Programming the Remote 111~112 Programming Codes 113~114 Troubleshooting Checklist 115 Maintenance...

Owners Manual
Page 8
... ENTER VOL MUTE MARK PAGE INFO i 1 FAV 4 7 2 PAGE CH 5 8 3 CC PIP SFARPEETZIMEEEZARUPTIOCRDEAMTOIAOPPMIP M/C 0 CH- Power Cord 75Ω Round Cable G-LINK Cable Polishing Cloth Polish the screen with your TV. Twister Holder Arrange the wires with the twister holder. PIP ADJUST CH+ PIP EZ SWAP SOUND EJECT FLASHBK INPUT 9 6 1.5V 1.5V Remote...
... ENTER VOL MUTE MARK PAGE INFO i 1 FAV 4 7 2 PAGE CH 5 8 3 CC PIP SFARPEETZIMEEEZARUPTIOCRDEAMTOIAOPPMIP M/C 0 CH- Power Cord 75Ω Round Cable G-LINK Cable Polishing Cloth Polish the screen with your TV. Twister Holder Arrange the wires with the twister holder. PIP ADJUST CH+ PIP EZ SWAP SOUND EJECT FLASHBK INPUT 9 6 1.5V 1.5V Remote...

Owners Manual
Page 14
... AUDIO DVD MODE CABLE TV/VIDEO VCR STB DAY MENU DAY+ TV GUIDE ENTER POWER Turns your preference. MENU Brings up the TV Guide On Screen system to p.17) External input modes rotate in regular sequence: Antenna, Cable, Video1-2, Component 1-2, RGB-DTV (or RGB-PC), HDMI/DVI). (Video 1-2, Component 1-2 input sources...Cable. Enters or exits a Panel Menu in Component 1-2, RGB and HDMI/DVI mode. THUMBSTICK (Up/Down/Left/Right/ENTER) Allows you to navigate the on-screen menus and adjust the system settings to your TV or any menu. 1394 (Refer to p.36~41) Use it to p.93) When you watch the...
... AUDIO DVD MODE CABLE TV/VIDEO VCR STB DAY MENU DAY+ TV GUIDE ENTER POWER Turns your preference. MENU Brings up the TV Guide On Screen system to p.17) External input modes rotate in regular sequence: Antenna, Cable, Video1-2, Component 1-2, RGB-DTV (or RGB-PC), HDMI/DVI). (Video 1-2, Component 1-2 input sources...Cable. Enters or exits a Panel Menu in Component 1-2, RGB and HDMI/DVI mode. THUMBSTICK (Up/Down/Left/Right/ENTER) Allows you to navigate the on-screen menus and adjust the system settings to your TV or any menu. 1394 (Refer to p.36~41) Use it to p.93) When you watch the...

Owners Manual
Page 15
Control DVHS or camcorders while in 24 hour increments. RATIO (Refer to p.35) Adjusts screen position, size, and phase in M/C EJECT When removing the memory card, this button is not available for multiple program channels such as 2-1, 2-2,etc. ADJUST (Refer ... mode. 15 CHANNEL UP/DOWN Selects available channels found with EZ scan and Manual scan. MARK Selects a photo or music you select the amount of screen information to the Mode. TV INPUT POWER TV AUDIO DVD MODE CABLE TV/VIDEO VCR STB DAY MENU DAY+ TV GUIDE ENTER EXIT 1394 MARK...
Control DVHS or camcorders while in 24 hour increments. RATIO (Refer to p.35) Adjusts screen position, size, and phase in M/C EJECT When removing the memory card, this button is not available for multiple program channels such as 2-1, 2-2,etc. ADJUST (Refer ... mode. 15 CHANNEL UP/DOWN Selects available channels found with EZ scan and Manual scan. MARK Selects a photo or music you select the amount of screen information to the Mode. TV INPUT POWER TV AUDIO DVD MODE CABLE TV/VIDEO VCR STB DAY MENU DAY+ TV GUIDE ENTER EXIT 1394 MARK...

Owners Manual
Page 16
... p.78) Selects the sound appropriate for the program's character. Don't mix old or used batteries with the Daylight, Normal, Night Time and Custom on the screen. EZ SOUND (Refer to prevent environment. with +, - Switches the video window locking or unlocking in DTV mode. SWAP (Refer to p.94) Switches between PIP, POP...
... p.78) Selects the sound appropriate for the program's character. Don't mix old or used batteries with the Daylight, Normal, Night Time and Custom on the screen. EZ SOUND (Refer to prevent environment. with +, - Switches the video window locking or unlocking in DTV mode. SWAP (Refer to p.94) Switches between PIP, POP...
Owners Manual
Page 22
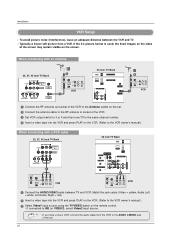
... format is used; If connected to the AUDIO L/MONO jack of the set . 2 Connect the antenna cable to the RF antenna in socket of the screen may remain visible on the VCR. (Refer to the VCR owner's manual.) When connecting with a RCA cable 32, 37, 42 inch TV Back R AUDIO L (MONO... VCR output switch to 3 or 4 and then tune TV to the same channel number. 4 Insert a video tape into the VCR and press PLAY on the screen. Installation VCR Setup - To avoid picture noise (interference), leave an adequate distance between TV and VCR. When connecting with an antenna 32, 37, 42 inch...
... format is used; If connected to the AUDIO L/MONO jack of the set . 2 Connect the antenna cable to the RF antenna in socket of the screen may remain visible on the VCR. (Refer to the VCR owner's manual.) When connecting with a RCA cable 32, 37, 42 inch TV Back R AUDIO L (MONO... VCR output switch to 3 or 4 and then tune TV to the same channel number. 4 Insert a video tape into the VCR and press PLAY on the screen. Installation VCR Setup - To avoid picture noise (interference), leave an adequate distance between TV and VCR. When connecting with an antenna 32, 37, 42 inch...

Owners Manual
Page 30
Refer to operate the TV Guide On Screen system, see page 42~43. Send the TV's audio to external audio equipment (stereo system) via the Digital Audio Output Optical port. 32, 37, 42 ...
Refer to operate the TV Guide On Screen system, see page 42~43. Send the TV's audio to external audio equipment (stereo system) via the Digital Audio Output Optical port. 32, 37, 42 ...

Owners Manual
Page 31
.... To view the premium stations Insert the CableCARDTM received from Cable Service provider to hook up a second TV or monitor. Installation Monitor Out Setup (32LX1D/2D, 32/37/42LP1D only) - Caution: When removing the CableCARDTM, do not drop it as shown. The TV has a special signal output... • Component 1-2, RGB-PC/RGB-DTV, HDMI/DVI input sources can be used with this TV and the CableCARD is automatically displayed on the screen, contact with external audio equipments, such as amplifiers or speakers, please turn the TV speakers off. (Refer to p.80) CableCARDTM Setup 32, 37...
.... To view the premium stations Insert the CableCARDTM received from Cable Service provider to hook up a second TV or monitor. Installation Monitor Out Setup (32LX1D/2D, 32/37/42LP1D only) - Caution: When removing the CableCARDTM, do not drop it as shown. The TV has a special signal output... • Component 1-2, RGB-PC/RGB-DTV, HDMI/DVI input sources can be used with this TV and the CableCARD is automatically displayed on the screen, contact with external audio equipments, such as amplifiers or speakers, please turn the TV speakers off. (Refer to p.80) CableCARDTM Setup 32, 37...

Owners Manual
Page 34
...-B Specification to the Manual of the PC graphic card. 7. In case HDMI/DVI Source Devices is separate. Check the image on the TV's screen for Horizontal and Vertical frequencies is not connected Cable or poor cable connection, "NO SIGNAL" OSD display in HDMI/DVI Source Devices, "INVALID FORMAT...on your service center. 6. The fixed image may be changed, change the refresh rate to another rate or adjust the brightness and contrast on the screen. 8. When Source Devices connected with HDMI1/DVI Input, output PC Resolution (VGA, SVGA, XGA), Position and Size may not work if a HDMI ...
...-B Specification to the Manual of the PC graphic card. 7. In case HDMI/DVI Source Devices is separate. Check the image on the TV's screen for Horizontal and Vertical frequencies is not connected Cable or poor cable connection, "NO SIGNAL" OSD display in HDMI/DVI Source Devices, "INVALID FORMAT...on your service center. 6. The fixed image may be changed, change the refresh rate to another rate or adjust the brightness and contrast on the screen. 8. When Source Devices connected with HDMI1/DVI Input, output PC Resolution (VGA, SVGA, XGA), Position and Size may not work if a HDMI ...

Owners Manual
Page 35
... Position This function is to adjust picture to left/right and up/down as you to remove any vertical bars or stripes visible on the screen background. In HDMI/DVI-PC mode, PHASE is not available. - Phase This function allows you prefer. When RGB connect to PC input and select the... connect to PC input and select HDMI/DVI input, this function is -50 ~ +50. 3 Press ENTER button. * Initializing (Reset to PC input and checking the screen quality. * Adjustment for PC mode - In RGB-DTV mode, SIZE and PHASE is not available. - And the horizontal...
... Position This function is to adjust picture to left/right and up/down as you to remove any vertical bars or stripes visible on the screen background. In HDMI/DVI-PC mode, PHASE is not available. - Phase This function allows you prefer. When RGB connect to PC input and select the... connect to PC input and select HDMI/DVI input, this function is -50 ~ +50. 3 Press ENTER button. * Initializing (Reset to PC input and checking the screen quality. * Adjustment for PC mode - In RGB-DTV mode, SIZE and PHASE is not available. - And the horizontal...

Owners Manual
Page 37
The control panel OSD of DVHS is completely pull out and then connect again. • When searching the screen (FF, GG) , the DVHS may be strangely seen. Supported DVHS List JVC (HM-DH40000K) JVC (HM-DH40000U) JVC (HM-DH5U) MITSUBISHI (HV-HD1000) PANASONIC (NV-...
The control panel OSD of DVHS is completely pull out and then connect again. • When searching the screen (FF, GG) , the DVHS may be strangely seen. Supported DVHS List JVC (HM-DH40000K) JVC (HM-DH40000U) JVC (HM-DH5U) MITSUBISHI (HV-HD1000) PANASONIC (NV-...

Owners Manual
Page 42
... S-VIDEO OUT OUTPUT SWITCH 34 (R) AUDIO (L) VIDEO IN ANT IN 42 The G-LINKTM cable is necessary for information on setting up the TV Guide On Screen system. 1. Antenna Service 32, 37, 42 inch TV Back AC IN HDMI G-LINK DIGITAL AUDIO (OPTICAL) OUTPUT REMOTE RS-232C INPUT CONTROL (CONTROL/SERVICE) DVI... VCR Front VCR Back ANT OUT S-VIDEO OUT OUTPUT SWITCH (R) AUDIO (L) VIDEO 34 IN ANT IN 2. See page 44~50 for the TV Guide On Screen system to work with your Cable Box and VCR.
... S-VIDEO OUT OUTPUT SWITCH 34 (R) AUDIO (L) VIDEO IN ANT IN 42 The G-LINKTM cable is necessary for information on setting up the TV Guide On Screen system. 1. Antenna Service 32, 37, 42 inch TV Back AC IN HDMI G-LINK DIGITAL AUDIO (OPTICAL) OUTPUT REMOTE RS-232C INPUT CONTROL (CONTROL/SERVICE) DVI... VCR Front VCR Back ANT OUT S-VIDEO OUT OUTPUT SWITCH (R) AUDIO (L) VIDEO 34 IN ANT IN 2. See page 44~50 for the TV Guide On Screen system to work with your Cable Box and VCR.

Owners Manual
Page 44
... receives program listings data through your area-which Cable system's program data to watching TV and stops the reminder screen from appearing upon power On. 2 Welcome Screen The TV Guide On Screen system's Welcome Screen appears: - Turn OFF your TV when it back On To make a selection, use . (Do not unplug the... power cord.) 2. by pressing the TV GUIDE button - TV Guide On Screen System TV Guide On ScreenTTM System TV Guide On ScreenTM System Setup - if you have more than one Cable system in use the D / E button to...
... receives program listings data through your area-which Cable system's program data to watching TV and stops the reminder screen from appearing upon power On. 2 Welcome Screen The TV Guide On Screen system's Welcome Screen appears: - Turn OFF your TV when it back On To make a selection, use . (Do not unplug the... power cord.) 2. by pressing the TV GUIDE button - TV Guide On Screen System TV Guide On ScreenTTM System TV Guide On ScreenTM System Setup - if you have more than one Cable system in use the D / E button to...

Owners Manual
Page 45
... a number, and then the F / G button to move to another field. • Press ENTER button to display Screen 3. TV Guide On Screen System 45 How to use 1 Screen 1: Country • This screen asks you the location of your TV. • Use the D / E button to highlight a country. • ...Press ENTER button to display Screen 2. 2 Screen 2: Enter ZIP or Postal Code Option 1 • If you selected USA in Screen 1, you see the Postal Code screen. • You input characters by either pressing the number keys on the remote or using the...
... a number, and then the F / G button to move to another field. • Press ENTER button to display Screen 3. TV Guide On Screen System 45 How to use 1 Screen 1: Country • This screen asks you the location of your TV. • Use the D / E button to highlight a country. • ...Press ENTER button to display Screen 2. 2 Screen 2: Enter ZIP or Postal Code Option 1 • If you selected USA in Screen 1, you see the Postal Code screen. • You input characters by either pressing the number keys on the remote or using the...

Owners Manual
Page 46
...installed. • Press ENTER button to the cable box. TV Guide On Screen System 4 Screen 4: Do you have a Cable Box? • If you select Yes, you see Screen 5. • If you select No, you see Screen 7 . 6 Screen 6: Cable Box Tuning Channel • Select the channel used for the cable... box. • Press ENTER button to display Screen 7. 7 Screen 7: Cable Box Configuration Diagram • The diagram shows ...
...installed. • Press ENTER button to the cable box. TV Guide On Screen System 4 Screen 4: Do you have a Cable Box? • If you select Yes, you see Screen 5. • If you select No, you see Screen 7 . 6 Screen 6: Cable Box Tuning Channel • Select the channel used for the cable... box. • Press ENTER button to display Screen 7. 7 Screen 7: Cable Box Configuration Diagram • The diagram shows ...

Owners Manual
Page 47
...box brand. • Press ENTER button to Channel 9? • If you select Yes, you see Screen 12. • If you select Test this code again, the same code is tested in Screen 10. 47 Many Cable Boxes require testing more than one code. - If you select No, a ...different code is tested again in Screen 10. - TV Guide On Screen System 9 Screen 9: Cable Box Preparation • Follow the on-screen instructions, and press ENTER button to display Screen 10. 10 Screen 10: Cable Box Code Testing • When testing is done, Screen 11 displays automatically. 11 Screen 11: Cable Box Tuned to...
...box brand. • Press ENTER button to Channel 9? • If you select Yes, you see Screen 12. • If you select Test this code again, the same code is tested in Screen 10. 47 Many Cable Boxes require testing more than one code. - If you select No, a ...different code is tested again in Screen 10. - TV Guide On Screen System 9 Screen 9: Cable Box Preparation • Follow the on-screen instructions, and press ENTER button to display Screen 10. 10 Screen 10: Cable Box Code Testing • When testing is done, Screen 11 displays automatically. 11 Screen 11: Cable Box Tuned to...

Owners Manual
Page 48
... basic settings correct? • If you select Yes, you see Screen 14. • If you select No, you see Screen 1. 14 Screen 14: Congratulations • Press ENTER button to receive a channel lineup and listings. - TV Guide On Screen System 12 Screen 12: Do you have an antenna connected? • If you select... Yes, you see Screen 16. • If you select No, you must select Yes in this screen to display Screen 15. 15 Screen 15: Is a VCR Connected? • If you...
... basic settings correct? • If you select Yes, you see Screen 14. • If you select No, you see Screen 1. 14 Screen 14: Congratulations • Press ENTER button to receive a channel lineup and listings. - TV Guide On Screen System 12 Screen 12: Do you have an antenna connected? • If you select... Yes, you see Screen 16. • If you select No, you must select Yes in this screen to display Screen 15. 15 Screen 15: Is a VCR Connected? • If you...


