
Owners Manual
Page 1
Retain this information to your TV. See the label attached on the back cover and relate this manual for future reference. Record model number and serial number of the TV in the spaces provided below. Model Number : Serial Number : LG Electronics U.S.A., Inc. Color television OWNER'S MANUAL MODELS: 30FS4D 32FS4D-UC R TruSurround XT Please read this manual carefully and completely before operating your dealer if you require service.
Retain this information to your TV. See the label attached on the back cover and relate this manual for future reference. Record model number and serial number of the TV in the spaces provided below. Model Number : Serial Number : LG Electronics U.S.A., Inc. Color television OWNER'S MANUAL MODELS: 30FS4D 32FS4D-UC R TruSurround XT Please read this manual carefully and completely before operating your dealer if you require service.
Owners Manual
Page 2
...(OR BACK). connected. • Consult the dealer or an experienced radio/TV technician for proper grounding and, in the literature accompanying the appliance. The lightning flash with the instruction manual, may be of sufficient magnitude to constitute a risk of the following measures... uninsulated "dangerous voltage" within an equilateral triangle is Manufactured under license from Zenith Electronics Corporation. NOTE TO CABLE/TV INSTALLER: This reminder is : LG Electronics U.S.A., Inc 1000 Sylvan Avenue, Englewood Cliffs, NJ 07632 1-800-243-0000 http://www.lgusa.com PAGE ...
...(OR BACK). connected. • Consult the dealer or an experienced radio/TV technician for proper grounding and, in the literature accompanying the appliance. The lightning flash with the instruction manual, may be of sufficient magnitude to constitute a risk of the following measures... uninsulated "dangerous voltage" within an equilateral triangle is Manufactured under license from Zenith Electronics Corporation. NOTE TO CABLE/TV INSTALLER: This reminder is : LG Electronics U.S.A., Inc 1000 Sylvan Avenue, Englewood Cliffs, NJ 07632 1-800-243-0000 http://www.lgusa.com PAGE ...
Owners Manual
Page 5
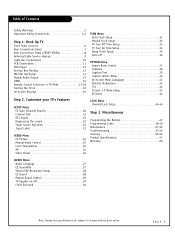
...57 Warranty 60 AUDIO Menu Audio Language 27 EZ SoundRite 27 Stereo/SAP Broadcasts Setup 28 EZ Sound 28 Manual Sound Control 29 TV Speaker on 19 On-Screen Displays 19 Step 2. Customize your TV's Features SETUP Menu EZ Scan (Channel Search 20 Channel Edit 21 DTV Signal 22 Degaussing the screen 22... Control 25 Color Temperature 26 XD 26 Video Preset 26 TIME Menu Auto Clock Setup 31 Manual Clock Setup 32 TV Turn Off Time Setup 33 TV Turn On Time Setup 34 Sleep Timer Setup 35 Auto off 29 Front Surround 30 Note: Design and specifications are subject to change without ...
...57 Warranty 60 AUDIO Menu Audio Language 27 EZ SoundRite 27 Stereo/SAP Broadcasts Setup 28 EZ Sound 28 Manual Sound Control 29 TV Speaker on 19 On-Screen Displays 19 Step 2. Customize your TV's Features SETUP Menu EZ Scan (Channel Search 20 Channel Edit 21 DTV Signal 22 Degaussing the screen 22... Control 25 Color Temperature 26 XD 26 Video Preset 26 TIME Menu Auto Clock Setup 31 Manual Clock Setup 32 TV Turn Off Time Setup 33 TV Turn On Time Setup 34 Sleep Timer Setup 35 Auto off 29 Front Surround 30 Note: Design and specifications are subject to change without ...
Owners Manual
Page 7
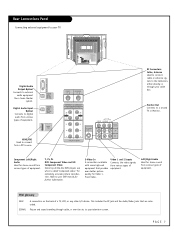
... RF jack and the Audio/Video jacks that provides even better picture quality for Video 1, Front Video. Monitor Out Connects to your TV. Picture and sound traveling through your DVD manual for stereo sound from various types of equipment. PAGE 7 Left/Right Audio Used for further information. Rear Connections Panel Connecting external...
... RF jack and the Audio/Video jacks that provides even better picture quality for Video 1, Front Video. Monitor Out Connects to your TV. Picture and sound traveling through your DVD manual for stereo sound from various types of equipment. PAGE 7 Left/Right Audio Used for further information. Rear Connections Panel Connecting external...
Owners Manual
Page 12
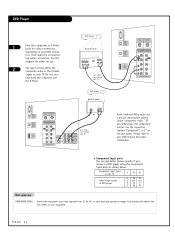
.... 2 You may connect either the composite video or the S-Video cables to your DVD manual for video connections, depending on your TV. DVD player Back AV panel Digital Audio Audio Component Video Optical L R A/V cables not included with TV C A L I B R A T I O N DIGITAL AUDIO OUTPUT OPTICAL DIGITAL ... PR) to your DVD player has component output, use a picture reproduction system called "component video." ing audio connections. Your manual will explain how this relates to more precisely reproduce images. tors. Do not con- Component input jacks on the jack panel. ...
.... 2 You may connect either the composite video or the S-Video cables to your DVD manual for video connections, depending on your TV. DVD player Back AV panel Digital Audio Audio Component Video Optical L R A/V cables not included with TV C A L I B R A T I O N DIGITAL AUDIO OUTPUT OPTICAL DIGITAL ... PR) to your DVD player has component output, use a picture reproduction system called "component video." ing audio connections. Your manual will explain how this relates to more precisely reproduce images. tors. Do not con- Component input jacks on the jack panel. ...
Owners Manual
Page 14
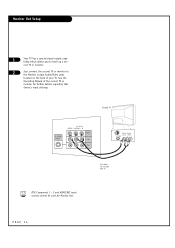
... Operating Manual of your TV. Second TV S-VIDEO INPUT AUDIO VIDEO L(MONO) R MONITOR OUTPUT IN2 IN1 Video Audio S-Video input input LR A/V cables not included with TV DTV, Component 1 - 2 and HDMI/DVI input sources cannot be used for further details regarding that device's input settings. PAGE 14 ond TV or... monitor. 2 Just connect the second TV or monitor to hook up a sec- Monitor Out Setup 1 Your TV has a special signal output capability which allows you to the Monitor output Audio/...
... Operating Manual of your TV. Second TV S-VIDEO INPUT AUDIO VIDEO L(MONO) R MONITOR OUTPUT IN2 IN1 Video Audio S-Video input input LR A/V cables not included with TV DTV, Component 1 - 2 and HDMI/DVI input sources cannot be used for further details regarding that device's input settings. PAGE 14 ond TV or... monitor. 2 Just connect the second TV or monitor to hook up a sec- Monitor Out Setup 1 Your TV has a special signal output capability which allows you to the Monitor output Audio/...
Owners Manual
Page 15
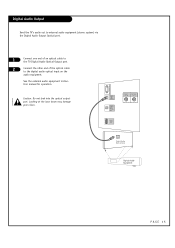
...to external audio equipment (stereo system) via the Digital Audio Output Optical port. 1 Connect one end of an optical cable to the TV Digital Audio Optical Output port. 2 Connect the other end of the optical cable to the digital audio optical input on the audio ...equipment. See the external audio equipment instruction manual for operation. C A L I B R A T I O N DIGITAL AUDIO OUTPUT OPTICAL DIGITAL AUDIO INPUT OPTICAL (DVI) HDMI /DVI CABLE +75 Ω ANTENNA +75 Ω Digital ...
...to external audio equipment (stereo system) via the Digital Audio Output Optical port. 1 Connect one end of an optical cable to the TV Digital Audio Optical Output port. 2 Connect the other end of the optical cable to the digital audio optical input on the audio ...equipment. See the external audio equipment instruction manual for operation. C A L I B R A T I O N DIGITAL AUDIO OUTPUT OPTICAL DIGITAL AUDIO INPUT OPTICAL (DVI) HDMI /DVI CABLE +75 Ω ANTENNA +75 Ω Digital ...
Owners Manual
Page 16
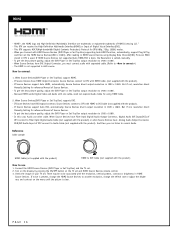
...Multimedia Interface are trademarks or registered trademarks of Digital Visual Interface(DVI). - This DTV supports HDCP(High-bandwidth Digital Contents Protection) Protocol for reference Manual of DTV connect to 1920 x 1080i. - When Source Devices(DVD Player or Set Top Box) support HDMI. - If Source Devices support...DVI Cable (not supplied with separated cable. (Refer to another resolution, change the refresh rate or adjust the brightness and contrast on the TV set . In this case, Audio use 1. PAGE 16 When you must connect audio with the product). - Because HDMI sends Digital Video...
...Multimedia Interface are trademarks or registered trademarks of Digital Visual Interface(DVI). - This DTV supports HDCP(High-bandwidth Digital Contents Protection) Protocol for reference Manual of DTV connect to 1920 x 1080i. - When Source Devices(DVD Player or Set Top Box) support HDMI. - If Source Devices support...DVI Cable (not supplied with separated cable. (Refer to another resolution, change the refresh rate or adjust the brightness and contrast on the TV set . In this case, Audio use 1. PAGE 16 When you must connect audio with the product). - Because HDMI sends Digital Video...
Owners Manual
Page 24
...change the EZ Picture option: Off, Normal, Digital Preset, Night Time, Movie, Weak Signal, Video Game, and Sports. MODE * POWER TV INPUT TV/VIDEO COMP1 COMP2 HDMI FRONT 123 456 789 DASH(-) 0 MUTE FLASHBK FAV EZ SOUND VOL EZ PIC CH RATIO FREEZE SAP SURROUND INFO ...2 Press EXIT to save and return to 'Off'. When adjusting video options (Contrast, Brightness, Color, Sharpness, and Tint) manually, EZ Picture automatically changes to TV viewing. TV VCR CABLE DVD SAT Using the menu 1 Press the MENU button on the program category. Readjust Video menu for good picture...
...change the EZ Picture option: Off, Normal, Digital Preset, Night Time, Movie, Weak Signal, Video Game, and Sports. MODE * POWER TV INPUT TV/VIDEO COMP1 COMP2 HDMI FRONT 123 456 789 DASH(-) 0 MUTE FLASHBK FAV EZ SOUND VOL EZ PIC CH RATIO FREEZE SAP SURROUND INFO ...2 Press EXIT to save and return to 'Off'. When adjusting video options (Contrast, Brightness, Color, Sharpness, and Tint) manually, EZ Picture automatically changes to TV viewing. TV VCR CABLE DVD SAT Using the menu 1 Press the MENU button on the program category. Readjust Video menu for good picture...
Owners Manual
Page 25
You can manually adjust the levels of the picture. Use the UP/DOWN arrow button to select another option. 5 Press EXIT button to return to TV viewing or press MENU button to return to your preference and viewing situations. 1 Press the MENU button on the remote control, then use ...DVD SAT MODE * POWER TV INPUT TV/VIDEO COMP1 COMP2 HDMI FRONT 123 456 789 DASH(-) 0 MUTE FLASHBK FAV EZ SOUND VOL EZ PIC CH RATIO FREEZE SAP SURROUND INFO TIMER CC SIGNAL MENU EXIT PLAY PAUSE STOP RECORD REW FF SKIP 1/3/4 2/3/4 5 PAGE 25 VIDEO Menu Manual Video Control Adjust the ...
You can manually adjust the levels of the picture. Use the UP/DOWN arrow button to select another option. 5 Press EXIT button to return to TV viewing or press MENU button to return to your preference and viewing situations. 1 Press the MENU button on the remote control, then use ...DVD SAT MODE * POWER TV INPUT TV/VIDEO COMP1 COMP2 HDMI FRONT 123 456 789 DASH(-) 0 MUTE FLASHBK FAV EZ SOUND VOL EZ PIC CH RATIO FREEZE SAP SURROUND INFO TIMER CC SIGNAL MENU EXIT PLAY PAUSE STOP RECORD REW FF SKIP 1/3/4 2/3/4 5 PAGE 25 VIDEO Menu Manual Video Control Adjust the ...
Owners Manual
Page 28
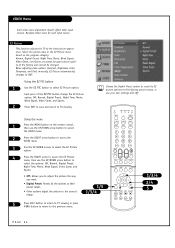
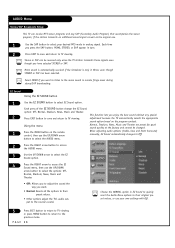
... received if the broadcast is only in EZ Sound to quickly reset the Audio Menu options to their preset values. • Other options adjust the TV's audio output to the source's sound. Each press of the EZ SOUND button change the EZ Sound option: Off, Normal, Stadium, News, Music and...Normal: Resets all the options to their original preset values, or use the UP/DOWN arrow When adjusting audio options (treble, bass and Front Surround) manually, EZ Sound automatically changes to Off. Select MONO if you press the SAP button, MONO, STEREO, or SAP appear in remote fringe areas during stereo...
... received if the broadcast is only in EZ Sound to quickly reset the Audio Menu options to their preset values. • Other options adjust the TV's audio output to the source's sound. Each press of the EZ SOUND button change the EZ Sound option: Off, Normal, Stadium, News, Music and...Normal: Resets all the options to their original preset values, or use the UP/DOWN arrow When adjusting audio options (treble, bass and Front Surround) manually, EZ Sound automatically changes to Off. Select MONO if you press the SAP button, MONO, STEREO, or SAP appear in remote fringe areas during stereo...
Owners Manual
Page 29
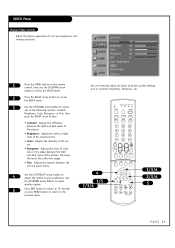
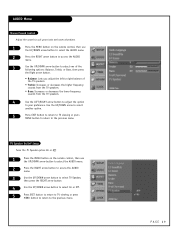
... arrow button to select the AUDIO menu. 2 Press the RIGHT arrow button to access the AUDIO menu. 3 Use the UP/DOWN arrow button to select TV Speaker, then press the RIGHT arrow button. 4 Use the UP/DOWN arrow button to select On or Off. 5 Press EXIT button to return to... TV viewing or press MENU button to return to the previous menu. PAGE 29 AUDIO Menu Manual Sound Control Adjust the sound to suit your taste and room situations. 1 Press the MENU button on the...
... arrow button to select the AUDIO menu. 2 Press the RIGHT arrow button to access the AUDIO menu. 3 Use the UP/DOWN arrow button to select TV Speaker, then press the RIGHT arrow button. 4 Use the UP/DOWN arrow button to select On or Off. 5 Press EXIT button to return to... TV viewing or press MENU button to return to the previous menu. PAGE 29 AUDIO Menu Manual Sound Control Adjust the sound to suit your taste and room situations. 1 Press the MENU button on the...
Owners Manual
Page 31
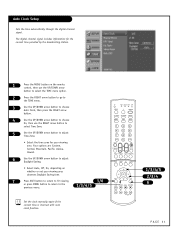
.... 1/3/4/5 MENU EXIT PLAY PAUSE STOP RECORD REW FF SKIP Set the clock manually again if the current time is incorrect with auto clock function. 1/3/4/5 2/3/4 6 PAGE 31 TV VCR CABLE DVD SAT MODE * POWER TV INPUT TV/VIDEO COMP1 COMP2 HDMI FRONT 123 456 789 DASH(-) 0 MUTE FLASHBK FAV ...adjust Time Zone. • Select the time zone for your viewing area observes Daylight Saving time. 7 Press EXIT button to return to TV viewing 1/6 or press MENU button to return to adjust Daylight Saving. The digital channel signal includes information for the current time provided by...
.... 1/3/4/5 MENU EXIT PLAY PAUSE STOP RECORD REW FF SKIP Set the clock manually again if the current time is incorrect with auto clock function. 1/3/4/5 2/3/4 6 PAGE 31 TV VCR CABLE DVD SAT MODE * POWER TV INPUT TV/VIDEO COMP1 COMP2 HDMI FRONT 123 456 789 DASH(-) 0 MUTE FLASHBK FAV ...adjust Time Zone. • Select the time zone for your viewing area observes Daylight Saving time. 7 Press EXIT button to return to TV viewing 1/6 or press MENU button to return to adjust Daylight Saving. The digital channel signal includes information for the current time provided by...
Owners Manual
Page 32
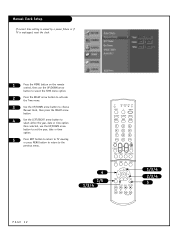
... to activate the Time menu. 3 Use the UP/DOWN arrow button to choose Manual Clock, then press the RIGHT arrow button. 4 Use the LEFT/RIGHT arrow button to the previous menu. 4 1/5 1/3/4 TV VCR CABLE DVD SAT MODE * POWER TV INPUT TV/VIDEO COMP1 COMP2 HDMI FRONT 123 456 789 DASH(-) 0 MUTE FLASHBK FAV EZ...
... to activate the Time menu. 3 Use the UP/DOWN arrow button to choose Manual Clock, then press the RIGHT arrow button. 4 Use the LEFT/RIGHT arrow button to the previous menu. 4 1/5 1/3/4 TV VCR CABLE DVD SAT MODE * POWER TV INPUT TV/VIDEO COMP1 COMP2 HDMI FRONT 123 456 789 DASH(-) 0 MUTE FLASHBK FAV EZ...

Owners Manual
Page 54
.... Menu options can't be available. • Make sure the time was lost. • Reset clock manually. Time is selected. POSSIBLE SOLUTIONS • Make sure the batteries are fresh and installed properly. • Try unplugging your TV for a few minutes, then plug it back in. • Check to see if the source equipment... has been turned on. • Make sure that the connections are secure on the back of your TV and on the source equipment. • Check to see if all the connections are secure. • Look in the Audio mode menu to see if...
.... Menu options can't be available. • Make sure the time was lost. • Reset clock manually. Time is selected. POSSIBLE SOLUTIONS • Make sure the batteries are fresh and installed properly. • Try unplugging your TV for a few minutes, then plug it back in. • Check to see if the source equipment... has been turned on. • Make sure that the connections are secure on the back of your TV and on the source equipment. • Check to see if all the connections are secure. • Look in the Audio mode menu to see if...


