
Owners Manual
Page 2
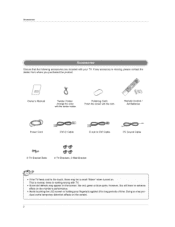
Polishing Cloth Potish the screen with the cloth, Remote Control / AA Batteries Power Cord DVI-D Cable D sub to DVI Cable @@ 2-TV Bracket Bolts 2-TV Brackets, 2-Walt Bracket PC Sound Cable • If the TV feels cold to the ...
Polishing Cloth Potish the screen with the cloth, Remote Control / AA Batteries Power Cord DVI-D Cable D sub to DVI Cable @@ 2-TV Bracket Bolts 2-TV Brackets, 2-Walt Bracket PC Sound Cable • If the TV feels cold to the ...

Owners Manual
Page 3
... similar su#ace This television receiver should never be abused by placing the television receiver on it from disturbing colors purity (uniformity) on the power cord. Serial No, 3 Do not use this television receiver where the cord will be blocked by persons walking on a bed, sofa, ... a fire or electric shock Never spill tiquid of any kind into this television receiver through cabinet slots as your television deater or Iocat power company. Slots and openings in fire or electric shock. Do not use a mounting kit approved by the television receiver manufacturer as this...
... similar su#ace This television receiver should never be abused by placing the television receiver on it from disturbing colors purity (uniformity) on the power cord. Serial No, 3 Do not use this television receiver where the cord will be blocked by persons walking on a bed, sofa, ... a fire or electric shock Never spill tiquid of any kind into this television receiver through cabinet slots as your television deater or Iocat power company. Slots and openings in fire or electric shock. Do not use a mounting kit approved by the television receiver manufacturer as this...
Owners Manual
Page 4
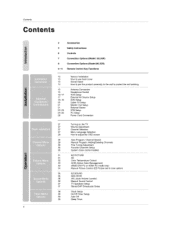
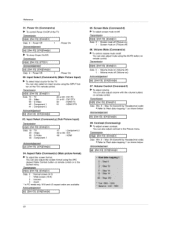
Contents 4 2 3 6 7 8 9_1;1 Acc_essori_ Safety Instructions Controls Connection Options (Model: 32LX2R) Connection Options (Model:26LX2R) Remote Control Key Functions 12 13 13 14 15 15 16-17 17 18_19 20 21 21 22--23 24_25 26 Various Installation How to ... tumbling Antenna Connection Headphone Socket VCR Setup ExternaJ AV Source Setup DVD Setup CabJe TV Setup Monitor Out Setup ExtemaJ Stereo ST8 Setup PC Setup Power Cord Connec_on 27 Turning on the TV 27 Volu_ Adjustment 27 Channel Selection 27 Menu Language Sol.ion 28 How to adjust the OSD screen...
Contents 4 2 3 6 7 8 9_1;1 Acc_essori_ Safety Instructions Controls Connection Options (Model: 32LX2R) Connection Options (Model:26LX2R) Remote Control Key Functions 12 13 13 14 15 15 16-17 17 18_19 20 21 21 22--23 24_25 26 Various Installation How to ... tumbling Antenna Connection Headphone Socket VCR Setup ExternaJ AV Source Setup DVD Setup CabJe TV Setup Monitor Out Setup ExtemaJ Stereo ST8 Setup PC Setup Power Cord Connec_on 27 Turning on the TV 27 Volu_ Adjustment 27 Channel Selection 27 Menu Language Sol.ion 28 How to adjust the OSD screen...
Owners Manual
Page 6
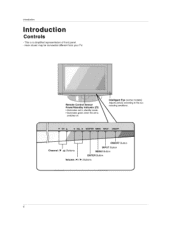
models) to the sur- Introduction This is switched on, Intelligent Eye (some Adjusts picture according rounding conditions. Remote Control Sensor Power/S_ndby indicator ((b) * i_[uminatesred in standby mode. * illuminates green when the set is a simplified representation of front panel Here shown may be somewhat different from your TV. ON/OFF Button Channel (TfA) Buttons INPUT Button MENU Button ENTER Button Volume (4 / I_) But:tons 6
models) to the sur- Introduction This is switched on, Intelligent Eye (some Adjusts picture according rounding conditions. Remote Control Sensor Power/S_ndby indicator ((b) * i_[uminatesred in standby mode. * illuminates green when the set is a simplified representation of front panel Here shown may be somewhat different from your TV. ON/OFF Button Channel (TfA) Buttons INPUT Button MENU Button ENTER Button Volume (4 / I_) But:tons 6

Owners Manual
Page 26
... (VGA, SVGA, etc.) or refresh rates may not work. * In HDMI PC mode, DPM mode is separate, DPM (Display Power Management) mode If the PC goes to power saving mode, the monitor automatically switches to DPM mode. b, If the message No s_n_ appears on the screen, adjust the PC output... to the operating manual for Horizontal and Vertical frequencies is not available, Connect the power cord as shown. 26 c The synchronization input form for the computer you don't use standard WXGA 1360x768 computer output at a 60Hz refresh rate....
... (VGA, SVGA, etc.) or refresh rates may not work. * In HDMI PC mode, DPM mode is separate, DPM (Display Power Management) mode If the PC goes to power saving mode, the monitor automatically switches to DPM mode. b, If the message No s_n_ appears on the screen, adjust the PC output... to the operating manual for Horizontal and Vertical frequencies is not available, Connect the power cord as shown. 26 c The synchronization input form for the computer you don't use standard WXGA 1360x768 computer output at a 60Hz refresh rate....

Owners Manual
Page 27
..., CH A / T, Number (0 ~ 9) button on the remote control and then the TV will be shown on . 2. Press the OH ,i, / T or NUMBER buttons to , even if the power cord is out. 3. At this point on, the on-screen menus will turn on the screen in :the selected language of your language. When finished... the selected language. First select your choice, 4 Press the EXIT button to save and return to standby mode. This TV is programmed to remember which power state it was last set to select a channel number. - The menus can cancel this function by using the TV, press the...
..., CH A / T, Number (0 ~ 9) button on the remote control and then the TV will be shown on . 2. Press the OH ,i, / T or NUMBER buttons to , even if the power cord is out. 3. At this point on, the on-screen menus will turn on the screen in :the selected language of your language. When finished... the selected language. First select your choice, 4 Press the EXIT button to save and return to standby mode. This TV is programmed to remember which power state it was last set to select a channel number. - The menus can cancel this function by using the TV, press the...

Owners Manual
Page 40
This function is turned off, press the POWER, INPUT, OH A iV button on and XD Demo off. - V button to select the S_CI_ menu. 2 Press the I_ button and then use A l T button to select ...XD Demo, 3 Press the I_ button to begin _ Demo. 4 Press the EXIT button to see the difference between XD Demo on the set or POWER, - V button to select On or Off. 4 Press the EXIT button to return to normal TV viewing. • TMs feature can only be used with the...
This function is turned off, press the POWER, INPUT, OH A iV button on and XD Demo off. - V button to select the S_CI_ menu. 2 Press the I_ button and then use A l T button to select ...XD Demo, 3 Press the I_ button to begin _ Demo. 4 Press the EXIT button to see the difference between XD Demo on the set or POWER, - V button to select On or Off. 4 Press the EXIT button to return to normal TV viewing. • TMs feature can only be used with the...
Owners Manual
Page 53
... indicates present status da_, If the da_ is data write mo_, it returns the data of the parameter that value of the PC computer, 01. Power k a 0- 1 02` ........b r..o..r Acknowledgem_ #_t 03. Press EXIT button to return to choose the desired TV _D number. I_loTokenLen_h !--2 : If the first argument of the command does...
... indicates present status da_, If the da_ is data write mo_, it returns the data of the parameter that value of the PC computer, 01. Power k a 0- 1 02` ........b r..o..r Acknowledgem_ #_t 03. Press EXIT button to return to choose the desired TV _D number. I_loTokenLen_h !--2 : If the first argument of the command does...
Owners Manual
Page 54
... HDMI PC 91 : HDM_ DTV [[b][ ][Set tD][ ]|OK][Data]Ix] 03. Transmission Data 0 : Power Off 1 : Power On Acknowledgement IN[ l[Set_Ol[][OKl[Oata][×l ] Ii_ To show Power On/Off Transmission Ilk]loll l[_t IDH I[FF][Cr] I Acknowledgement I[a][ l[Set ID][ ][OKl[Data][x ...by Hexadecimal code) • Refer to 'Rea_ _ta n'_pping 1' as shown below , Acknowledgement I[fl{ ][Set 'D][ ][OK][Data][x] I l Data 0 : Power Off 1 : Power On 02. Transmission Data Min: 0 ~ Max: 64 (transmit by Hexadecirrk_t code) • Refer to 'Real data mapping 1' as shown below , Acknow/...
... HDMI PC 91 : HDM_ DTV [[b][ ][Set tD][ ]|OK][Data]Ix] 03. Transmission Data 0 : Power Off 1 : Power On Acknowledgement IN[ l[Set_Ol[][OKl[Oata][×l ] Ii_ To show Power On/Off Transmission Ilk]loll l[_t IDH I[FF][Cr] I Acknowledgement I[a][ l[Set ID][ ][OKl[Data][x ...by Hexadecimal code) • Refer to 'Rea_ _ta n'_pping 1' as shown below , Acknowledgement I[fl{ ][Set 'D][ ][OK][Data][x] I l Data 0 : Power Off 1 : Power On 02. Transmission Data Min: 0 ~ Max: 64 (transmit by Hexadecirrk_t code) • Refer to 'Real data mapping 1' as shown below , Acknow/...

Owners Manual
Page 55
Acknowledqement [[h][ ][Set Ig][ ][OK][gata][x] ] 10. See page 54. OSD Select (Command:l) • To select OSD (On Screen Display) mute on /off . When main power is on /off , remote control lock is released. 15. Balance (Command:t) • To adjust balance. Transmission [[k][t][ ][Set Ig][ ][gata][Cr] ] Data Min: 0 ~ Max: 64 (transmit ...
Acknowledqement [[h][ ][Set Ig][ ][OK][gata][x] ] 10. See page 54. OSD Select (Command:l) • To select OSD (On Screen Display) mute on /off . When main power is on /off , remote control lock is released. 15. Balance (Command:t) • To adjust balance. Transmission [[k][t][ ][Set Ig][ ][gata][Cr] ] Data Min: 0 ~ Max: 64 (transmit ...

Owners Manual
Page 57
... INPUT Remote Remote Remote Control Button Control Button Control: Sutton ...........C...4 P..O...W...E...R.......O..N D..i.s..c..r.e..t.e.......I.R.....C..e..d..e......(.O...n..l.y. ...........C POWER OFF 60 PIP Remote Control Button 5D ZOOM- Remote Control Button 5C ZOOM+ Remote Control: Sutton ... CC Remote Controt Button 52 EZ SOUND Remote Control Button 4D EZ PIC Remote Control Sutton OA MTS Remote Control Button P£we[ Power On OFF_ 43 MEN U 79 ARC 5B EXIT ....R...e.mgte G£n tr£!.Bu_o n Remote Control Sutton Remote Control Sutton 07 <...
... INPUT Remote Remote Remote Control Button Control Button Control: Sutton ...........C...4 P..O...W...E...R.......O..N D..i.s..c..r.e..t.e.......I.R.....C..e..d..e......(.O...n..l.y. ...........C POWER OFF 60 PIP Remote Control Button 5D ZOOM- Remote Control Button 5C ZOOM+ Remote Control: Sutton ... CC Remote Controt Button 52 EZ SOUND Remote Control Button 4D EZ PIC Remote Control Sutton OA MTS Remote Control Button P£we[ Power On OFF_ 43 MEN U 79 ARC 5B EXIT ....R...e.mgte G£n tr£!.Bu_o n Remote Control Sutton Remote Control Sutton 07 <...

Owners Manual
Page 58
... the component responds properly. If not, repeat from step 2, 4 Enter a code number using the number buttons on the remote. C_E) CED _ C_D 58 Test the POWER button to operate most Test your remote control can operate the component without programming, turn on the component such as a VCR and press the corresponding...
... the component responds properly. If not, repeat from step 2, 4 Enter a code number using the number buttons on the remote. C_E) CED _ C_D 58 Test the POWER button to operate most Test your remote control can operate the component without programming, turn on the component such as a VCR and press the corresponding...
Owners Manual
Page 61
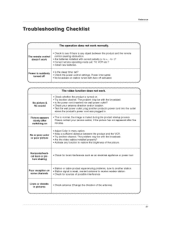
...shaking • Check for sources of possible interference Lines or streaks in pictures • Check antenna (Change the direction of the picture. Power is suddenly tu rned off activated. Poor reception on station tuned with correct polarity (+ to +_ o to -)? - The problem may... be with the broadcast. • Is the power cord inserted into wall power outlet? • Check your antenna direction and/or iocat[on • Try another channel. Reference Troubleshooting Checklist The remote control...
...shaking • Check for sources of possible interference Lines or streaks in pictures • Check antenna (Change the direction of the picture. Power is suddenly tu rned off activated. Poor reception on station tuned with correct polarity (+ to +_ o to -)? - The problem may... be with the broadcast. • Is the power cord inserted into wall power outlet? • Check your antenna direction and/or iocat[on • Try another channel. Reference Troubleshooting Checklist The remote control...

Owners Manual
Page 63
Reference Power Requirement Power Consumption Television System Program Coverage External Antenna Impedance AC 100_240V~ 50/60Hz 1.5A AC 100-240V~ 50!60Hz 2.0A t15W 140W NTSC, PAL _ MiN VHF2 - 13, UHF 14 - 69, Cable 1 - 125 75 _ • The specifications shown above may be changed without prior notice for quality improvement. 63
Reference Power Requirement Power Consumption Television System Program Coverage External Antenna Impedance AC 100_240V~ 50/60Hz 1.5A AC 100-240V~ 50!60Hz 2.0A t15W 140W NTSC, PAL _ MiN VHF2 - 13, UHF 14 - 69, Cable 1 - 125 75 _ • The specifications shown above may be changed without prior notice for quality improvement. 63


