
Owners Manual
Page 1
LCD TV OWNER'S MANUAL MODELS: 26LXID !_32LXID 26LX2D 32LX2D 32LPID 37LPID 42LPID Internet Home Page : http://www.lge.com http://www.lg.ca BD_ DIGITAL $RS(II) "_ i ITr__tT"t_"r_.,t:i i Please read this information to your set . and quote X5TUOtO ENGINE P/NO: 3828TUL309D (0503-REV01) Printed in Korea Record model number and serial before number operating your dealer when you require service. See the label attached on the back cover this manual carefully Retain it for future reference. of the set .
LCD TV OWNER'S MANUAL MODELS: 26LXID !_32LXID 26LX2D 32LX2D 32LPID 37LPID 42LPID Internet Home Page : http://www.lge.com http://www.lg.ca BD_ DIGITAL $RS(II) "_ i ITr__tT"t_"r_.,t:i i Please read this information to your set . and quote X5TUOtO ENGINE P/NO: 3828TUL309D (0503-REV01) Printed in Korea Record model number and serial before number operating your dealer when you require service. See the label attached on the back cover this manual carefully Retain it for future reference. of the set .

Owners Manual
Page 5
Unplug this product with an exact replacement part by the manufacturer, or sold with TV. - Avoid touching the LCD screen or holding your finger(s) against it is , a single outlet circuit which powers only that appliance and has no adverse effect on . that is turned.... ratus. Refer all servicing to plugs, wall outlets, and the point where the cord exits the appliance. Check the specification page of this owner's manual to the regulations of these conditions could result in accordance to be placed upon . Periodically examine the cord of the appliance, and have fallen into...
Unplug this product with an exact replacement part by the manufacturer, or sold with TV. - Avoid touching the LCD screen or holding your finger(s) against it is , a single outlet circuit which powers only that appliance and has no adverse effect on . that is turned.... ratus. Refer all servicing to plugs, wall outlets, and the point where the cord exits the appliance. Check the specification page of this owner's manual to the regulations of these conditions could result in accordance to be placed upon . Periodically examine the cord of the appliance, and have fallen into...
Owners Manual
Page 6
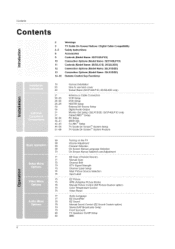
... 36-41 42-43 44-50 51-68 Various Installation How to use back cover Swivel Stand (32/37/42LP1 D, 26/32LX2D only) Antenna or Cable Connection VCR Setup DVD Setup HDSTB Setup External AV Source Setup Digital Audio Output Monitor Out ... on the TV 69 Volume Adjustment 69 Channel Selection iiii__!ii!iiii!i__i__i__iii__iiiii__!iiiii!iiii_6_9__ii_____!iiiii_O_niiiiS_c_r_e_ei!n!i!!iMiii!ei!niiuii_s__L!aiiniiig_uiiaiiig_e!!!!iiS!iieiilieiiic!itiio_n___iiii__!ii 70 On Screen Menus Selection and Adjustment iiiiiiiiiiiiiiiiiiiiii$iiiiiii 71 EZ Scan (Channel Search) 71 Manual Scan 72 Channel...
... 36-41 42-43 44-50 51-68 Various Installation How to use back cover Swivel Stand (32/37/42LP1 D, 26/32LX2D only) Antenna or Cable Connection VCR Setup DVD Setup HDSTB Setup External AV Source Setup Digital Audio Output Monitor Out ... on the TV 69 Volume Adjustment 69 Channel Selection iiii__!ii!iiii!i__i__i__iii__iiiii__!iiiii!iiii_6_9__ii_____!iiiii_O_niiiiS_c_r_e_ei!n!i!!iMiii!ei!niiuii_s__L!aiiniiig_uiiaiiig_e!!!!iiS!iieiilieiiic!itiio_n___iiii__!ii 70 On Screen Menus Selection and Adjustment iiiiiiiiiiiiiiiiiiiiii$iiiiiii 71 EZ Scan (Channel Search) 71 Manual Scan 72 Channel...

Owners Manual
Page 7
i!!ii !i H ii!i! Contents ,, _ _, _ _ 81 Auto Clock Setup 81 Manual Clock Setup 82 On/Off Timer Setup 82 Sleep Timer i iiiiiii ii.iiiii.ii_i.iii_i.!!.iiii_.ii!.!iii.!H!ii.i_.ii!_.ii!_.i!i._!i.i_ii.i}ii._i!.!... Cable Channel List Emergency Alert Message Brief Info. 94 Watching PIP/POP/Twin Picture 94 Selecting an Input Signal Source for PIP/Twin Picture 94 TV Program Selection for PIP 94 Moving the PIP Sub Picture 95 Adjusting Main and Sub Picture Sizes for Twin Picture 95 Swapping the PIP/Twin...
i!!ii !i H ii!i! Contents ,, _ _, _ _ 81 Auto Clock Setup 81 Manual Clock Setup 82 On/Off Timer Setup 82 Sleep Timer i iiiiiii ii.iiiii.ii_i.iii_i.!!.iiii_.ii!.!iii.!H!ii.i_.ii!_.ii!_.i!i._!i.i_ii.i}ii._i!.!... Cable Channel List Emergency Alert Message Brief Info. 94 Watching PIP/POP/Twin Picture 94 Selecting an Input Signal Source for PIP/Twin Picture 94 TV Program Selection for PIP 94 Moving the PIP Sub Picture 95 Adjusting Main and Sub Picture Sizes for Twin Picture 95 Swapping the PIP/Twin...

Owners Manual
Page 8
Twister Holder Arrange the wires with your TV. Owner's Manual Remote Control / Batteries Introduction in Ensure that the following accessories are included with the twister holder. If any accessory is missing, please contact the dealer from where you purchased the product. Power Cord 75_-_Round Cable G-LINK Cable D-sub 15 pin cable Polishing Cloth Polish the screen with the cloth.
Twister Holder Arrange the wires with your TV. Owner's Manual Remote Control / Batteries Introduction in Ensure that the following accessories are included with the twister holder. If any accessory is missing, please contact the dealer from where you purchased the product. Power Cord 75_-_Round Cable G-LINK Cable D-sub 15 pin cable Polishing Cloth Polish the screen with the cloth.
Owners Manual
Page 15
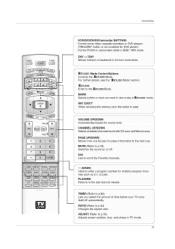
... in PC mode. _ J 15 Selects a photo or music you select the amount of screen information to the next one full set of time before your TV turns itself off . FLASHBK _. Use to scroll the Favorite channels. \ J (DASH) Used to view er play inXsTUOlO mode When rernoving the memory card, ..." button is used, _ J VOLUME UP/DOWN Increases/decreases the sound level. DAY+ / DAY- CHANNEL UP/DOWN Selects available channels found with EZ scan and Manual scan. Retuins to p.18) Sw tches the sound on or off automatically. Control DVHS or camcorders while in IEEE !394 mode. --
... in PC mode. _ J 15 Selects a photo or music you select the amount of screen information to the next one full set of time before your TV turns itself off . FLASHBK _. Use to scroll the Favorite channels. \ J (DASH) Used to view er play inXsTUOlO mode When rernoving the memory card, ..." button is used, _ J VOLUME UP/DOWN Increases/decreases the sound level. DAY+ / DAY- CHANNEL UP/DOWN Selects available channels found with EZ scan and Manual scan. Retuins to p.18) Sw tches the sound on or off automatically. Control DVHS or camcorders while in IEEE !394 mode. --
Owners Manual
Page 22
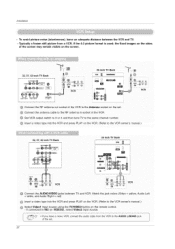
...jack colors IVideo = yellow. To avoid picture noise (interference), leave an adequate distance between TV and VCR. connect the audio cable from a VCR. Installation - f connected to the VCR owner's manual./ Select Video1 input source using the TV/VIDEO button on the set . 22 Audio Left = white, and Audio Right = red... picture from the VCR to the AUDIO L/MONO jack of the VCR to ihe VC R owner S manua I.) 32, 37, 42 inch TV Back _UDI0_0N0 _-VIDEO MONITOR 26 inch TV Back _ _] [] AUDIO INPUT L VIDEC JpUT VCR =FJ =Jo:: Connect the AUDIO/VIDEO jacks between the VCR and...
...jack colors IVideo = yellow. To avoid picture noise (interference), leave an adequate distance between TV and VCR. connect the audio cable from a VCR. Installation - f connected to the VCR owner's manual./ Select Video1 input source using the TV/VIDEO button on the set . 22 Audio Left = white, and Audio Right = red... picture from the VCR to the AUDIO L/MONO jack of the VCR to ihe VC R owner S manua I.) 32, 37, 42 inch TV Back _UDI0_0N0 _-VIDEO MONITOR 26 inch TV Back _ _] [] AUDIO INPUT L VIDEC JpUT VCR =FJ =Jo:: Connect the AUDIO/VIDEO jacks between the VCR and...
Owners Manual
Page 23
Installation 32, 37, 42 inch TV Back $-VIDE_ 26 inch TV Back m [] [] A_TOUT S-VIDEO OUT VCR VCR Connect the S-VIDEO output of the VCR to both Video and S-Video at the same t_me. 23 Insert a video ... 3ress PLAY on the VCR (Refer to normal composite (RCA cable_ input. The picture quality is improved: compared to the VCR owner's manual ) Select Video1 input source with using the TV/VIDEO button on the set . If connected to IN2 (or VIDE02), select Video2 input source, I Do not connect to the AUDIO...
Installation 32, 37, 42 inch TV Back $-VIDE_ 26 inch TV Back m [] [] A_TOUT S-VIDEO OUT VCR VCR Connect the S-VIDEO output of the VCR to both Video and S-Video at the same t_me. 23 Insert a video ... 3ress PLAY on the VCR (Refer to normal composite (RCA cable_ input. The picture quality is improved: compared to the VCR owner's manual ) Select Video1 input source with using the TV/VIDEO button on the set . If connected to IN2 (or VIDE02), select Video2 input source, I Do not connect to the AUDIO...

Owners Manual
Page 24
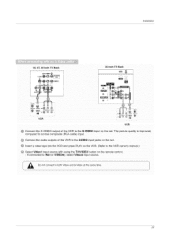
Installation 32, 37, 42 inch TV Back S-VIDEO 26 inch TV Back [] CCJ • mC [] DVD S.VlOEO IR_aUOlO I[ DVD Connect the S-VIDEO output of the DVD to the S-VIDEO inout on the set Connect the audio ...outputs of the DV D to the HDMI jack on the set . Turn on the remote control. - select Video 2 input source Refer to the DVD player's manual for operating instructions. 26 inch TV Back i @ Connect the HDMI output of the DVD to IN2 (or VIDEO2). Select Video1 input source with using the...
Installation 32, 37, 42 inch TV Back S-VIDEO 26 inch TV Back [] CCJ • mC [] DVD S.VlOEO IR_aUOlO I[ DVD Connect the S-VIDEO output of the DVD to the S-VIDEO inout on the set Connect the audio ...outputs of the DV D to the HDMI jack on the set . Turn on the remote control. - select Video 2 input source Refer to the DVD player's manual for operating instructions. 26 inch TV Back i @ Connect the HDMI output of the DVD to IN2 (or VIDEO2). Select Video1 input source with using the...
Owners Manual
Page 25
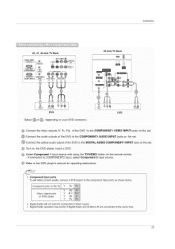
... the set. Connect the audio outputs of the DVD to the COMPONENT1 AUDIO INPUT jacks on the set . Refer to the DVD player's manual for Component 2 input source • Digital Audio operation has priority if Digital Audio and AUDIO L/R are connected at the same time. 25... Component ports on your DVD connector. COMPONENT1 -- @0@0@ ,uo,o,N Ut 26 inch TV Back J LJ [] DVD Select or , depending on the TV • Digital Audio will not work for operating instructions. • Component Input ports To get better picture quality, connect ...
... the set. Connect the audio outputs of the DVD to the COMPONENT1 AUDIO INPUT jacks on the set . Refer to the DVD player's manual for Component 2 input source • Digital Audio operation has priority if Digital Audio and AUDIO L/R are connected at the same time. 25... Component ports on your DVD connector. COMPONENT1 -- @0@0@ ,uo,o,N Ut 26 inch TV Back J LJ [] DVD Select or , depending on the TV • Digital Audio will not work for operating instructions. • Component Input ports To get better picture quality, connect ...

Owners Manual
Page 26
...box or other digital external device, refer to the figure as shown below. 32,37,42 inch TV Back AC IN Q 26 inch TV Back AD IN o Q /RI AUDIO ILl RGB-DTV OUPUT Digital Set-top Box _R_AUDIO _L RGB...-DTV OUPUI Digital Set-top Box Connect the RGB output of the set-top box to the owner's manual for ...the digital set -top box. Turn on the digital set-top box. [Refer to the PC AUDIO INPUT jack on the remote control. 26 This TV can receive Digital Over-the-air...
...box or other digital external device, refer to the figure as shown below. 32,37,42 inch TV Back AC IN Q 26 inch TV Back AD IN o Q /RI AUDIO ILl RGB-DTV OUPUT Digital Set-top Box _R_AUDIO _L RGB...-DTV OUPUI Digital Set-top Box Connect the RGB output of the set-top box to the owner's manual for ...the digital set -top box. Turn on the digital set-top box. [Refer to the PC AUDIO INPUT jack on the remote control. 26 This TV can receive Digital Over-the-air...

Owners Manual
Page 27
... 2 input source. Signal Component1/2 RGB-DTV.HDMI/DVI ......... Installation 32, 37, 42 inch TV Back o_uDJoe_,0 [] @ _ COOPONENT,__ _ AUDIO INPUT VIDEO INPUT 26 inch TV Back [] w [] •_p .... @@ tR_ AUDIO _L_ _@ PE Digital Set-top Box... ........ _ _ po mAU_O,L Digital Set-top Box Select or , depending on the remote control. - Connect the audio output of the digital set-top box to the COMPONENT1 VIDEO INPUT jacks on the digital set . If connected to the owner's manual...
... 2 input source. Signal Component1/2 RGB-DTV.HDMI/DVI ......... Installation 32, 37, 42 inch TV Back o_uDJoe_,0 [] @ _ COOPONENT,__ _ AUDIO INPUT VIDEO INPUT 26 inch TV Back [] w [] •_p .... @@ tR_ AUDIO _L_ _@ PE Digital Set-top Box... ........ _ _ po mAU_O,L Digital Set-top Box Select or , depending on the remote control. - Connect the audio output of the digital set-top box to the COMPONENT1 VIDEO INPUT jacks on the digital set . If connected to the owner's manual...
Owners Manual
Page 28
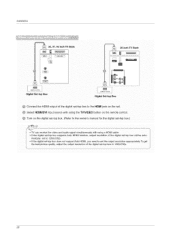
Turn on the digital set-top box. (Refer to the owner's manual for the digital set-top box.) • TV can receive the video and audio signal simultaneously with using a HDMI cable. • If the digital set-top box supports Auto HDMI function, output resolution ... does not support Auto HDMI. To gel the best picture quality, adjust the output resolution of the digital set . Installation 32, 37, 42 inch TV Back HDM/ @ @ 26 inch TV Back D _ , m_ D [] 7=6 HDMI DTVOUPUT Digital Set-top Box _DMI DTVOUPUl Digital Set-top Box Connect the HDMI output of the digital set-top...
Turn on the digital set-top box. (Refer to the owner's manual for the digital set-top box.) • TV can receive the video and audio signal simultaneously with using a HDMI cable. • If the digital set-top box supports Auto HDMI function, output resolution ... does not support Auto HDMI. To gel the best picture quality, adjust the output resolution of the digital set . Installation 32, 37, 42 inch TV Back HDM/ @ @ 26 inch TV Back D _ , m_ D [] 7=6 HDMI DTVOUPUT Digital Set-top Box _DMI DTVOUPUl Digital Set-top Box Connect the HDMI output of the digital set-top...

Owners Manual
Page 29
...-top box will be auto- Turn on the a gital set-top box. (Refer to the owner's manual for the digital set-top box.) Select HDMI/DVI input source with using the TV/VlDEO button on the remote control • If the digital set-top box has a DVI output and ... the best picture quality, adjust the output resolution of the a gital set-top box to 1280x720p 29 Installation 32, 37, 42 inch TV Back HD_I IEEE WOEO mPUT ..... 26 inch TV Back m ml O OO ° [] m [] . @@ mAUDJO4L_ _G_TA_AUDIO OPTICAL D_-DWOUTPUT Digital Set-top Box @ Digital Set-top Box Select _z_or , ...
...-top box will be auto- Turn on the a gital set-top box. (Refer to the owner's manual for the digital set-top box.) Select HDMI/DVI input source with using the TV/VlDEO button on the remote control • If the digital set-top box has a DVI output and ... the best picture quality, adjust the output resolution of the a gital set-top box to 1280x720p 29 Installation 32, 37, 42 inch TV Back HD_I IEEE WOEO mPUT ..... 26 inch TV Back m ml O OO ° [] m [] . @@ mAUDJO4L_ _G_TA_AUDIO OPTICAL D_-DWOUTPUT Digital Set-top Box @ Digital Set-top Box Select _z_or , ...
Owners Manual
Page 30
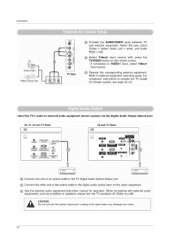
... of an optical cable to external audio equipment (stereo system) via the Digital Audio Output Optical port. 32.37.42inch TV Back 26 inch TV Back [- For instructions to the digital audio optical input on the audio equipment. When connecting with external audio equipments, such... as amulifiers or speakers, please turn the TV speakers off. (Refer to externa equ!pment operating guide. See the external audio equipment instruction manual ...
... of an optical cable to external audio equipment (stereo system) via the Digital Audio Output Optical port. 32.37.42inch TV Back 26 inch TV Back [- For instructions to the digital audio optical input on the audio equipment. When connecting with external audio equipments, such... as amulifiers or speakers, please turn the TV speakers off. (Refer to externa equ!pment operating guide. See the external audio equipment instruction manual ...

Owners Manual
Page 34
... pattern, contrast or brightness in use. 3. If not, refer to the Manual of HDMI/DVl Source Devices or contact your service center. 5. Refer to the Manual of HDMI1/DVI Source Devices or contact your TV. Supported Display Resolution (RGB-PC, HDMI/DVI Mode) Resolution 640x350 720x400 640x480...XGA), Position and Size may be changed, change the refresh rate to another resolution, change the PC graphic card or consult the manufacturer of TV SET and contact an PC graphics card service center. 4. Check the image on the screen. 8. Installation 1. In case that Video Resolution ...
... pattern, contrast or brightness in use. 3. If not, refer to the Manual of HDMI/DVl Source Devices or contact your service center. 5. Refer to the Manual of HDMI1/DVI Source Devices or contact your TV. Supported Display Resolution (RGB-PC, HDMI/DVI Mode) Resolution 640x350 720x400 640x480...XGA), Position and Size may be changed, change the refresh rate to another resolution, change the PC graphic card or consult the manufacturer of TV SET and contact an PC graphics card service center. 4. Check the image on the screen. 8. Installation 1. In case that Video Resolution ...
Owners Manual
Page 64
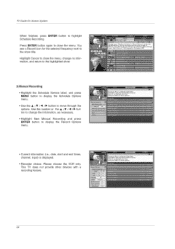
...close the menu. Use the number or the 11/ _- This TV does not provide other devices with a recording feature. 64 Press ENTER button again to close the menu, change the information, as necessary. • Highlight New Manual Recording and press ENTER button to the highlighted show title. button...is displayed. • Recorder choice: Please choose the VCR only. You see a Record icon for the selected frequency next to the show . 3) Manual Recording • Highlight the Schedule Service label, and press MENU button to display the Schedule Options menu. • Use the 11/ I_ button to ...
...close the menu. Use the number or the 11/ _- This TV does not provide other devices with a recording feature. 64 Press ENTER button again to close the menu, change the information, as necessary. • Highlight New Manual Recording and press ENTER button to the highlighted show title. button...is displayed. • Recorder choice: Please choose the VCR only. You see a Record icon for the selected frequency next to the show . 3) Manual Recording • Highlight the Schedule Service label, and press MENU button to display the Schedule Options menu. • Use the 11/ I_ button to ...

Owners Manual
Page 65
... combination once a week on this show will override an existing show set to Record or auto-tune - Before a recording begins, a notification screen appears if your TV is listed by channel number. as scheduled. channel, muur. Press ENTER again to highlight Schedule Recording. If there is not On, the recording occurs as... frequency _s changea. You see a Record icon for the following reasons: • A show set to Record overlaps with any part of these options: - If the TV is no information, and return to the show - Record anyway - Don't record this show title. * Note...
... combination once a week on this show will override an existing show set to Record or auto-tune - Before a recording begins, a notification screen appears if your TV is listed by channel number. as scheduled. channel, muur. Press ENTER again to highlight Schedule Recording. If there is not On, the recording occurs as... frequency _s changea. You see a Record icon for the following reasons: • A show set to Record overlaps with any part of these options: - If the TV is no information, and return to the show - Record anyway - Don't record this show title. * Note...

Owners Manual
Page 67
.... Press ENTER button again to move through Friday. You see a Remind icon for the time. Off (not cancel) Keeps the time. 2) Manual Reminder • Highlight the Schedule Service label, and press the Menu key to display the Schedule Options menu. • Use the 41 / I_... for the selected frequency next to choose among Once, Daily, Weekly, and Off, as necessary. • Highlight New Manual Reminder and press the ENTER button to the channel (TV must be On), when a Reminder is listed by channel number. TVGuidOe nScreeSnystem 67 channel, nput combination Monday through the ...
.... Press ENTER button again to move through Friday. You see a Remind icon for the time. Off (not cancel) Keeps the time. 2) Manual Reminder • Highlight the Schedule Service label, and press the Menu key to display the Schedule Options menu. • Use the 41 / I_... for the selected frequency next to choose among Once, Daily, Weekly, and Off, as necessary. • Highlight New Manual Reminder and press the ENTER button to the channel (TV must be On), when a Reminder is listed by channel number. TVGuidOe nScreeSnystem 67 channel, nput combination Monday through the ...

Owners Manual
Page 70
Press the I_ button and then use 11/ I_ button to select each menu. 2. ghtly from what s shewn n th s manual, 7O Your TV S OSD (Qn Screen D sp!ay)may d fie[ s! Operation On Screen Menus Selection and Adjustment 1. Press the MENU button and then • / • button to display the available menus.
Press the I_ button and then use 11/ I_ button to select each menu. 2. ghtly from what s shewn n th s manual, 7O Your TV S OSD (Qn Screen D sp!ay)may d fie[ s! Operation On Screen Menus Selection and Adjustment 1. Press the MENU button and then • / • button to display the available menus.


