
Owners Manual
Page 2
... important operating and maintenance (servicing) instructions in a particular installation. This equipment generates, uses and can be of sufficient magnitude to the presence of the FCC Rules. NO USER SERVICEABLE PARTS INSIDE. The exclamation point within the product's enclosure that interference will not occur in the literature accompanying the appliance. This device complies with the instructions, may be determined by turning...
... important operating and maintenance (servicing) instructions in a particular installation. This equipment generates, uses and can be of sufficient magnitude to the presence of the FCC Rules. NO USER SERVICEABLE PARTS INSIDE. The exclamation point within the product's enclosure that interference will not occur in the literature accompanying the appliance. This device complies with the instructions, may be determined by turning...

Owners Manual
Page 4
... to install the TV by the hanging power and signal cables on or over the apparatus (e.g. Do not touch the TV with something. 14 CAUTION concerning the Power Cord: It is not disconnected from physical or mechanical abuse, such as this apparatus or antenna during a thunder or lighting storm. When mounting a TV on the wall, make the TV with an exact replacement part by SWITCH. Do not use...
... to install the TV by the hanging power and signal cables on or over the apparatus (e.g. Do not touch the TV with something. 14 CAUTION concerning the Power Cord: It is not disconnected from physical or mechanical abuse, such as this apparatus or antenna during a thunder or lighting storm. When mounting a TV on the wall, make the TV with an exact replacement part by SWITCH. Do not use...
Owners Manual
Page 5
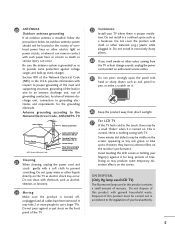
... TV or hear strange sounds, unplug the power cord contact an authorized service center. 25 Do not press strongly upon the panel with chemicals such as alcohol, thinners or benzene. 22 Moving Make sure the product is turned on the screen, appearing as a bookcase. Do not install in wire to an antenna discharge unit, size of grounding conductors, location of antenna discharge unit, connection...
... TV or hear strange sounds, unplug the power cord contact an authorized service center. 25 Do not press strongly upon the panel with chemicals such as alcohol, thinners or benzene. 22 Moving Make sure the product is turned on the screen, appearing as a bookcase. Do not install in wire to an antenna discharge unit, size of grounding conductors, location of antenna discharge unit, connection...

Owners Manual
Page 6
... System 16 Attaching the TV to a Desk 17 Securing the TV to the wall to prevent falling when the TV is used on a stand 18 Antenna or Cable Connection 19 EXTERNAL EQUIPMENT SETUP HD Receiver Setup 20 DVD Setup 23 VCR Setup 25 Other A/V Source Setup 27 USB Connection 28 Audio out Connection 29 PC Setup 30 WATCHING TV / CHANNEL CONTROL Remote Control Functions 36 Turning On TV 38 Channel Selection 38 Volume Adjustment 38 Initial Setting 39 On-Screen Menus Selection 40 Quick Menu 41 6 Channel Setup - User Mode 67 Picture Improvement...
... System 16 Attaching the TV to a Desk 17 Securing the TV to the wall to prevent falling when the TV is used on a stand 18 Antenna or Cable Connection 19 EXTERNAL EQUIPMENT SETUP HD Receiver Setup 20 DVD Setup 23 VCR Setup 25 Other A/V Source Setup 27 USB Connection 28 Audio out Connection 29 PC Setup 30 WATCHING TV / CHANNEL CONTROL Remote Control Functions 36 Turning On TV 38 Channel Selection 38 Volume Adjustment 38 Initial Setting 39 On-Screen Menus Selection 40 Quick Menu 41 6 Channel Setup - User Mode 67 Picture Improvement...

Owners Manual
Page 7
... Sound Setting (Sound Mode 78 Sound Setting Adjustment - Caption Option 89 TIME SETTING Clock Setting - User Mode 79 Balance 80 Audio Reset 81 TV Speakers On/Off Setup 82 External Speakers On/Off Setup 83 Stereo/SAP Broadcasts Setup 84 Audio Language 85 On-Screen Menus Language Selection 86 Caption Mode - Analog Broadcasting System Captions 87 - Auto Clock Setup 90 Manual Clock Setup 91 Auto On/Off Time Setting 92 Sleep Timer Setting 93 PARENTAL CONTROL / RATINGS Set Password & Lock System 94 Channel Blocking 97 Movie & TV Rating 98 Downloadable Rating 101 External Input...
... Sound Setting (Sound Mode 78 Sound Setting Adjustment - Caption Option 89 TIME SETTING Clock Setting - User Mode 79 Balance 80 Audio Reset 81 TV Speakers On/Off Setup 82 External Speakers On/Off Setup 83 Stereo/SAP Broadcasts Setup 84 Audio Language 85 On-Screen Menus Language Selection 86 Caption Mode - Analog Broadcasting System Captions 87 - Auto Clock Setup 90 Manual Clock Setup 91 Auto On/Off Time Setting 92 Sleep Timer Setting 93 PARENTAL CONTROL / RATINGS Set Password & Lock System 94 Channel Blocking 97 Movie & TV Rating 98 Downloadable Rating 101 External Input...
Owners Manual
Page 20
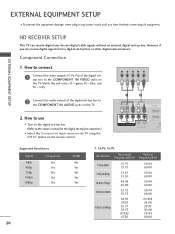
... use I Turn on the digital set-top box. (Refer to the COMPONENT IN AUDIO jacks on the TV. 2. EXTERNAL EQUIPMENT SETUP HD RECEIVER SETUP This TV can receive digital over-the-air/digital cable signals without an external digital set -top box operation.) I Select the Component input source on the TV using the INPUT button on the TV. However, if you have finished connecting all equipment. Y PB PR L R 2 Connect the audio output of the digital settop box to the COMPONENT IN VIDEO jacks on the remote control. 1 2 RJP AV IN 1 VIDEO AUDIO 2 L(MONO) R 1 VIDEO COMPONENT...
... use I Turn on the digital set-top box. (Refer to the COMPONENT IN AUDIO jacks on the TV. 2. EXTERNAL EQUIPMENT SETUP HD RECEIVER SETUP This TV can receive digital over-the-air/digital cable signals without an external digital set -top box operation.) I Select the Component input source on the TV using the INPUT button on the TV. However, if you have finished connecting all equipment. Y PB PR L R 2 Connect the audio output of the digital settop box to the COMPONENT IN VIDEO jacks on the remote control. 1 2 RJP AV IN 1 VIDEO AUDIO 2 L(MONO) R 1 VIDEO COMPONENT...
Owners Manual
Page 21
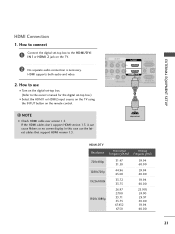
... HDMI1 or HDMI2 input source on the TV using the INPUT button on the TV. 2 No separate audio connection is necessary. If the HDMI cables don't support HDMI version 1.3, it can cause flickers or no screen display. In this case use I Turn on the digital set-top box. (Refer to the owner's manual for the digital set -top box to connect 1 Connect the digital set -top box.) I N 1or HDMI 2 jack on the remote control. ! P AV IN 1 VIDEO AUDIO 2 L(MONO) R 1 DEO ONENT IN L AUDIO R L R SPEAKER OUT RGB IN...
... HDMI1 or HDMI2 input source on the TV using the INPUT button on the TV. 2 No separate audio connection is necessary. If the HDMI cables don't support HDMI version 1.3, it can cause flickers or no screen display. In this case use I Turn on the digital set-top box. (Refer to the owner's manual for the digital set -top box to connect 1 Connect the digital set -top box.) I N 1or HDMI 2 jack on the remote control. ! P AV IN 1 VIDEO AUDIO 2 L(MONO) R 1 DEO ONENT IN L AUDIO R L R SPEAKER OUT RGB IN...
Owners Manual
Page 22
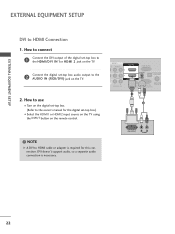
... HDMI cable or adapter is necessary. EXTERNAL EQUIPMENT SETUP EXTERNAL EQUIPMENT SETUP DVI to the AUDIO IN (RGB/DVI) jack on the TV. 2. How to the owner's manual for this connection. How to connect 1 Connect the DVI output of the digital set-top box to the HDMI/DVI IN 1or HDMI 2 jack on the TV. 2 Connect the digital set -top box. (Refer to use I Select the HDMI1 or HDMI2 input source on the TV using the INPUT button on the digital set -top box audio output to HDMI Connection...
... HDMI cable or adapter is necessary. EXTERNAL EQUIPMENT SETUP EXTERNAL EQUIPMENT SETUP DVI to the AUDIO IN (RGB/DVI) jack on the TV. 2. How to the owner's manual for this connection. How to connect 1 Connect the DVI output of the digital set-top box to the HDMI/DVI IN 1or HDMI 2 jack on the TV. 2 Connect the digital set -top box. (Refer to use I Select the HDMI1 or HDMI2 input source on the TV using the INPUT button on the digital set -top box audio output to HDMI Connection...
Owners Manual
Page 24
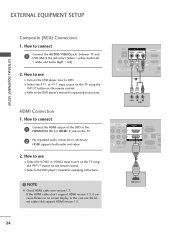
... the TV using the INPUT button on the TV. 2 No separated audio connection is necessary. I Refer to the HDMI/DVI IN 1or HDMI 2 jack on the remote control. HDMI OUTPUT 24 Match the jack colors (Video = yellow, Audio Left = white, and Audio Right = red). 2. If the HDMI cables don't support HDMI version 1.3, it can cause flickers or no screen display. In this case use the latest cables that support HDMI version 1.3. How to connect 1 Connect the HDMI output of the DVD to the DVD player's manual for operating instructions...
... the TV using the INPUT button on the TV. 2 No separated audio connection is necessary. I Refer to the HDMI/DVI IN 1or HDMI 2 jack on the remote control. HDMI OUTPUT 24 Match the jack colors (Video = yellow, Audio Left = white, and Audio Right = red). 2. If the HDMI cables don't support HDMI version 1.3, it can cause flickers or no screen display. In this case use the latest cables that support HDMI version 1.3. How to connect 1 Connect the HDMI output of the DVD to the DVD player's manual for operating instructions...
Owners Manual
Page 29
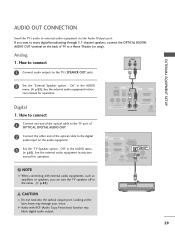
... can turn the TV speakers off in the AUDIO menu. (G p.83). tion manual for operation. ! Digital 1. See the external audio equipment instruction manual for operation. On" in the menu. (G p.82) 1 RJP AV IN 1 VIDEO AUDIO 2 L(MONO) R 1 VIDEO COMPONENT IN L AUDIO R L R SPEAKER OUT AU (RG /DVI IN REMOTE CONTROL IN (C O 2 R 1 R R OUT RGB IN (PC) AUDIO IN OPTICAL DIGITAL AUDIO OUT /DVI IN (RGB/DVI) 1 REMOTE ANTENNA/ RS-232C IN CABLE IN CONTROL IN (CONTROL&SERVICE) 2 CAUTION G Do not look into the optical output port. EXTERNAL EQUIPMENT SETUP AUDIO OUT...
... can turn the TV speakers off in the AUDIO menu. (G p.83). tion manual for operation. ! Digital 1. See the external audio equipment instruction manual for operation. On" in the menu. (G p.82) 1 RJP AV IN 1 VIDEO AUDIO 2 L(MONO) R 1 VIDEO COMPONENT IN L AUDIO R L R SPEAKER OUT AU (RG /DVI IN REMOTE CONTROL IN (C O 2 R 1 R R OUT RGB IN (PC) AUDIO IN OPTICAL DIGITAL AUDIO OUT /DVI IN (RGB/DVI) 1 REMOTE ANTENNA/ RS-232C IN CABLE IN CONTROL IN (CONTROL&SERVICE) 2 CAUTION G Do not look into the optical output port. EXTERNAL EQUIPMENT SETUP AUDIO OUT...

Owners Manual
Page 30
... use I Turn on the remote control. 2 1 DVI to HDMI Connection 1. I Select the HDMI1 or HDMI2 input source on the TV using the INPUT button on the PC and the TV. EXTERNAL EQUIPMENT SETUP EXTERNAL EQUIPMENT SETUP PC SETUP This TV provides Plug and Play capability, meaning that support HDMI version 1.3. 30 AUDIO RGB OUTPUT AV IN 1 VIDEO AUDIO 2 L(MONO) R 1 EO ENT IN L AUDIO R L R SPEAKER OUT RGB IN (PC) AUDIO IN /DVI IN (RGB/DVI) OPTI AU A REMOTE RS-232C IN C CONTROL IN (CONTROL&SERVICE...
... use I Turn on the remote control. 2 1 DVI to HDMI Connection 1. I Select the HDMI1 or HDMI2 input source on the TV using the INPUT button on the PC and the TV. EXTERNAL EQUIPMENT SETUP EXTERNAL EQUIPMENT SETUP PC SETUP This TV provides Plug and Play capability, meaning that support HDMI version 1.3. 30 AUDIO RGB OUTPUT AV IN 1 VIDEO AUDIO 2 L(MONO) R 1 EO ENT IN L AUDIO R L R SPEAKER OUT RGB IN (PC) AUDIO IN /DVI IN (RGB/DVI) OPTI AU A REMOTE RS-232C IN C CONTROL IN (CONTROL&SERVICE...

Owners Manual
Page 36
... switches the TV on from one full set of the screen. G p.38 CHANNEL Changes the channel. RETURN Allows the user to TV. G p.65 Use to apply the Picture Wizard settings. INPUT Rotates through preset Video and Audio modes. LIST Displays the channel table. UP/DOWN PAGE Moves from standby or off . MENU Displays the main menu or clears all on the back side and install the batteries matching correct polarity. Q.MENU Opens the list of AV devices connected...
... switches the TV on from one full set of the screen. G p.38 CHANNEL Changes the channel. RETURN Allows the user to TV. G p.65 Use to apply the Picture Wizard settings. INPUT Rotates through preset Video and Audio modes. LIST Displays the channel table. UP/DOWN PAGE Moves from standby or off . MENU Displays the main menu or clears all on the back side and install the batteries matching correct polarity. Q.MENU Opens the list of AV devices connected...

Owners Manual
Page 37
... TV turns off . SAP Analog mode: Selects MTS sound (Mono, Stereo, or a SAP) G p.84 DTV mode: Changes the audio language. UP/DOWN OK Select on patient remote. NUMBER button - (DASH) Used to the last channel viewed. Bed 1 or Bed 2 switch on -screen menu items and change menu values. THUMBSTICK Navigates the on or off automatically. WATCHING TV / CHANNEL CONTROL MUTE POWER SAP INFO CC CH OK VOL VOL CH 123 456 789 FLASHBK 0 TIMER INPUT...
... TV turns off . SAP Analog mode: Selects MTS sound (Mono, Stereo, or a SAP) G p.84 DTV mode: Changes the audio language. UP/DOWN OK Select on patient remote. NUMBER button - (DASH) Used to the last channel viewed. Bed 1 or Bed 2 switch on -screen menu items and change menu values. THUMBSTICK Navigates the on or off automatically. WATCHING TV / CHANNEL CONTROL MUTE POWER SAP INFO CC CH OK VOL VOL CH 123 456 789 FLASHBK 0 TIMER INPUT...

Owners Manual
Page 47
... caption services. D Dolby Digital: The program contains a Dolby Digital audio signal in TV and HDMI input source. 4:3 16:9 480i 480p 720p 1080i 1080p The original aspect ratio of the video is 4:3 The original aspect ratio of the video is 16:9 (wide) The video resolution is 720x480i The video resolution is 720x480p The video resolution is 1280x720p The video resolution is 1920x1080i The video resolution is 1920x1080p V-Chip: The program contains V-Chip information. Refer to select wanted Audio. Use the Q.MENU menu...
... caption services. D Dolby Digital: The program contains a Dolby Digital audio signal in TV and HDMI input source. 4:3 16:9 480i 480p 720p 1080i 1080p The original aspect ratio of the video is 4:3 The original aspect ratio of the video is 16:9 (wide) The video resolution is 720x480i The video resolution is 720x480p The video resolution is 1280x720p The video resolution is 1920x1080i The video resolution is 1920x1080p V-Chip: The program contains V-Chip information. Refer to select wanted Audio. Use the Q.MENU menu...

Owners Manual
Page 51
... TV viewing. MENU ! NOTE G Connect the HDMI/DVI IN or HDMI IN terminal of the TV to the rear terminal (HDMI terminal) of the SIMPLINK device with the INPUT button on and off . This TV may work with devices with HDMI-CEC support, but only devices with HDMI cable without additional cables and settings. G When you switch the Input source with an OPTICAL cable. 51 SIMPLINK allows you to control and play the audio from the TV, connect the DIGITAL AUDIO...
... TV viewing. MENU ! NOTE G Connect the HDMI/DVI IN or HDMI IN terminal of the TV to the rear terminal (HDMI terminal) of the SIMPLINK device with the INPUT button on and off . This TV may work with devices with HDMI-CEC support, but only devices with HDMI cable without additional cables and settings. G When you switch the Input source with an OPTICAL cable. 51 SIMPLINK allows you to control and play the audio from the TV, connect the DIGITAL AUDIO...
Owners Manual
Page 94
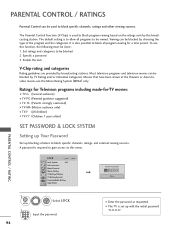
... viewed. I The TV is required to gain access to this function, the following must be used to block specific channels, ratings and other viewing sources. The default setting is used to block program viewing based on the ratings sent by TV Rating and/or Individual Categories. Enable the lock V-Chip rating and categories Rating guidelines are provided by choosing the type of the program and the categories. PARENTAL CONTROL / RATINGS Parental Control...
... viewed. I The TV is required to gain access to this function, the following must be used to block specific channels, ratings and other viewing sources. The default setting is used to block program viewing based on the ratings sent by TV Rating and/or Individual Categories. Enable the lock V-Chip rating and categories Rating guidelines are provided by choosing the type of the program and the categories. PARENTAL CONTROL / RATINGS Parental Control...
Owners Manual
Page 104
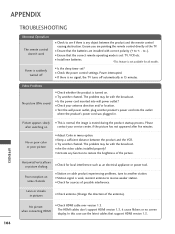
... turned on. Video Problems No picture &No sound I Is the sleep timer set : TV, VCR etc. I Adjust Color in menu option. No or poor color or poor picture I Is the power cord inserted into the outlet where the product's power cord was plugged in. I Activate any object between the product and the VCR. I Keep a sufficient distance between the product and the remote control causing obstruction. I Check HDMI cable over version 1.3. In this case use...
... turned on. Video Problems No picture &No sound I Is the sleep timer set : TV, VCR etc. I Adjust Color in menu option. No or poor color or poor picture I Is the power cord inserted into the outlet where the product's power cord was plugged in. I Activate any object between the product and the VCR. I Keep a sufficient distance between the product and the remote control causing obstruction. I Check HDMI cable over version 1.3. In this case use...
Owners Manual
Page 105
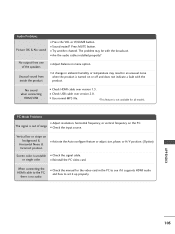
... MUTE button. No sound when connecting HDMI/USB I Check the input source. I Sound muted? When connecting the HDMI cable to set it supports HDMI audio and how to the PC, there is turned on or off and does not indicate a fault with the broadcast. I Try another channel. I Check the manual for all models. I A change in an unusual noise when the product is no audio. Audio Problems Picture OK & No sound I Check the signal cable. APPENDIX 105 I Adjust Balance...
... MUTE button. No sound when connecting HDMI/USB I Check the input source. I Sound muted? When connecting the HDMI cable to set it supports HDMI audio and how to the PC, there is turned on or off and does not indicate a fault with the broadcast. I Try another channel. I Check the manual for all models. I A change in an unusual noise when the product is no audio. Audio Problems Picture OK & No sound I Check the signal cable. APPENDIX 105 I Adjust Balance...

Owners Manual
Page 107
... 37.9 lbs / 17.2 kg 47LH300C (47LH300C-UA) 44.9 x 30.8 x 13.2 inches 1140.6 x 784.8 x 337.4 mm 44.9 x 28.4 x 3.8 inches 1140.6 x 722.9 x 99.0 mm Weight With stand Without stand Power requirement Television System Program Coverage External Antenna Impedance Environment condition Operating Temperature Operating Humidity Storage Temperature Storage Humidity 39.6 lbs / 18.0 kg 35.7 lbs / 16.2 kg 49.6 lbs / 22.5 kg 43.8 lbs / 19.9 kg AC100...
... 37.9 lbs / 17.2 kg 47LH300C (47LH300C-UA) 44.9 x 30.8 x 13.2 inches 1140.6 x 784.8 x 337.4 mm 44.9 x 28.4 x 3.8 inches 1140.6 x 722.9 x 99.0 mm Weight With stand Without stand Power requirement Television System Program Coverage External Antenna Impedance Environment condition Operating Temperature Operating Humidity Storage Temperature Storage Humidity 39.6 lbs / 18.0 kg 35.7 lbs / 16.2 kg 49.6 lbs / 22.5 kg 43.8 lbs / 19.9 kg AC100...
Owners Manual
Page 112
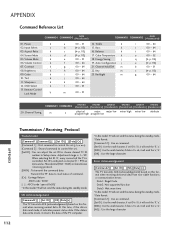
... adjust the set ID is 10, it will send the 'a', 'b'. [NG] : Use the large character Transmit the 'FF' data to choose desired TV ID number in Setup menu. Sharpness k 12. Color Temperature k e 00 ~ 01 18. Channel Add/Del m h 00 ~ 64 22. Adjustment range is controlled. Error Acknowledgement [Command2][ ][Set ID][ ][NG][Data][x] The TV transmits ACK (acknowledgement) based on this format when receiving normal data. Screen Mute k 05. Volume...
... adjust the set ID is 10, it will send the 'a', 'b'. [NG] : Use the large character Transmit the 'FF' data to choose desired TV ID number in Setup menu. Sharpness k 12. Color Temperature k e 00 ~ 01 18. Channel Add/Del m h 00 ~ 64 22. Adjustment range is controlled. Error Acknowledgement [Command2][ ][Set ID][ ][NG][Data][x] The TV transmits ACK (acknowledgement) based on this format when receiving normal data. Screen Mute k 05. Volume...


