
Owners Manual
Page 1
LCD TV OWNER'S MANUAL 19LG30 19LG31 22LG30 22LG31 22LG30DC 26LG30 26LG30DC Please read this manual carefully before operating your set of this manual. 0 (% ENERGY STAR is a set and retain it for energy efficiency. P/NO : SAC30708022 (OSOS-REVOS) S. Write the model number and serial number from the label on the back cabi of power-saving guidelines issued by the U.S. has determined that this product meets the ENERGY STAR guidelines for future reference. As an ENERGY STAR Partner LGE U. A.,Inc. Environmental Protection Agency(EPA).
LCD TV OWNER'S MANUAL 19LG30 19LG31 22LG30 22LG31 22LG30DC 26LG30 26LG30DC Please read this manual carefully before operating your set of this manual. 0 (% ENERGY STAR is a set and retain it for energy efficiency. P/NO : SAC30708022 (OSOS-REVOS) S. Write the model number and serial number from the label on the back cabi of power-saving guidelines issued by the U.S. has determined that this product meets the ENERGY STAR guidelines for future reference. As an ENERGY STAR Partner LGE U. A.,Inc. Environmental Protection Agency(EPA).

Owners Manual
Page 4
...unit). To reduce the risk of this product near flammable objects such as vases, cups, etc. Do not install this owner's manual to unplug the TV. O WARNING - on the power cord to be placed upon . SAFETYINSTRUCTIONS Na ethvuenr dteoruchor tlhigishtinagppasratoturms . Overloaded wall outlets, loose... air conditioning. on the back of your appliance, and if its appearance indicates damage or deterioration, unplug it to install the TV by an authorized servicer. Power Supply O DISCONNECTING DEVICE FROM MAINS Mains plug is , a single outlet circuit which powers only that...
...unit). To reduce the risk of this product near flammable objects such as vases, cups, etc. Do not install this owner's manual to unplug the TV. O WARNING - on the power cord to be placed upon . SAFETYINSTRUCTIONS Na ethvuenr dteoruchor tlhigishtinagppasratoturms . Overloaded wall outlets, loose... air conditioning. on the back of your appliance, and if its appearance indicates damage or deterioration, unplug it to install the TV by an authorized servicer. Power Supply O DISCONNECTING DEVICE FROM MAINS Mains plug is , a single outlet circuit which powers only that...

Owners Manual
Page 6
... 17 HD Receiver Setup 18 DVD Setup 23 VCR Setup 26 Headphone Setup 29 Other A/V Source Setup 29 Audio out Connection 30 PC Setup 31 Remote Control Functions 38 Turning On TV 40 Channel Selection 40 Volume Adjustment 40 Quick Menu 41 ...Initial Setting 42 On-Screen Menus Selection 44 Channel Setup - User Mode 54 Picture Improvement Technology 55 Advanced Control- Preset 53 Manual Picture Adjustment - Analog Broadcasting System Captions...
... 17 HD Receiver Setup 18 DVD Setup 23 VCR Setup 26 Headphone Setup 29 Other A/V Source Setup 29 Audio out Connection 30 PC Setup 31 Remote Control Functions 38 Turning On TV 40 Channel Selection 40 Volume Adjustment 40 Quick Menu 41 ...Initial Setting 42 On-Screen Menus Selection 44 Channel Setup - User Mode 54 Picture Improvement Technology 55 Advanced Control- Preset 53 Manual Picture Adjustment - Analog Broadcasting System Captions...

Owners Manual
Page 7
Clock Setting - Manual Clock Setup 74 Auto On/Off Time Setting 75 Sleep Timer Setting 76 Auto Shut-off Setting 77 Set Password & Lock System 78 Channel Blocking 81 Movie & TV Rating 82 Downloadable Rating 87 External Input Blocking 88 Key Lock 89 Troubleshooting 90 Maintenance 92 Product Specifications 93 External Control Through RS-232C 94 Open Source License 100 S Auto Clock Setup 73 -
Clock Setting - Manual Clock Setup 74 Auto On/Off Time Setting 75 Sleep Timer Setting 76 Auto Shut-off Setting 77 Set Password & Lock System 78 Channel Blocking 81 Movie & TV Rating 82 Downloadable Rating 87 External Input Blocking 88 Key Lock 89 Troubleshooting 90 Maintenance 92 Product Specifications 93 External Control Through RS-232C 94 Open Source License 100 S Auto Clock Setup 73 -
Owners Manual
Page 9
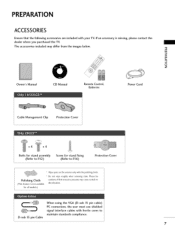
"O _o rT1 _o © z Owner's Manual CD Manual Remote Control, Batteries Power Cord Cable Management Clip Protection Cover x4 x4 Bolts for stand assembly (Refer to P.12) ... with ferrite cores to R16) Protection Cover Polishing Cloth (This feature is missing, please contact the dealer where you purchased the TV. PREPARATION ACCESSORIES Ensure that excessive pressure may differ from the images below. If an accessory is not available for stand fixing (... the VGA (D-sub 15 pin cable) PC connection, the user must use shielded signal interface cables with your TV.
"O _o rT1 _o © z Owner's Manual CD Manual Remote Control, Batteries Power Cord Cable Management Clip Protection Cover x4 x4 Bolts for stand assembly (Refer to P.12) ... with ferrite cores to R16) Protection Cover Polishing Cloth (This feature is missing, please contact the dealer where you purchased the TV. PREPARATION ACCESSORIES Ensure that excessive pressure may differ from the images below. If an accessory is not available for stand fixing (... the VGA (D-sub 15 pin cable) PC connection, the user must use shielded signal interface cables with your TV.

Owners Manual
Page 17
... a clearance of 4 inches on a solid wall perpendicular to the floor. Install your wall mount on all four sides from your TV. DESKTOPPEDESTAL VESAWALL MOUNTING INSTALLATION ,,,IImage shown may fall and result in severe personal injury. _e m We recommend that you use an... LG brand wall mount when mounting the TV to a wall. _e LG recommends that wall mounting be performed by a qualified professional installer. 0 z 4 inches SWIVEL STAND (Only 26LG3'*) After installing the TV, you can adjust the TV set manually to the left or right direction by ...
... a clearance of 4 inches on a solid wall perpendicular to the floor. Install your wall mount on all four sides from your TV. DESKTOPPEDESTAL VESAWALL MOUNTING INSTALLATION ,,,IImage shown may fall and result in severe personal injury. _e m We recommend that you use an... LG brand wall mount when mounting the TV to a wall. _e LG recommends that wall mounting be performed by a qualified professional installer. 0 z 4 inches SWIVEL STAND (Only 26LG3'*) After installing the TV, you can adjust the TV set manually to the left or right direction by ...

Owners Manual
Page 20
...audio output of the digital set-top box to connect > m _D c O Connect the video outputs (Y, PB, PR) of the digital set- HD RECEIVERSETUP This TV can receive Digital Over-the-air/Cable signals without an external digital set-top box. However, if you have finished connecting all equipment. How to... plug in any power cords until you do receive digital signals from a digital set-top box or other digital external device, refer to the owner's manual for the digital set-top box. top box to the COMPONENT IN VIDEO jacks on the remote control. Match the jack colors (Y = green, PB =...
...audio output of the digital set-top box to connect > m _D c O Connect the video outputs (Y, PB, PR) of the digital set- HD RECEIVERSETUP This TV can receive Digital Over-the-air/Cable signals without an external digital set-top box. However, if you have finished connecting all equipment. How to... plug in any power cords until you do receive digital signals from a digital set-top box or other digital external device, refer to the owner's manual for the digital set-top box. top box to the COMPONENT IN VIDEO jacks on the remote control. Match the jack colors (Y = green, PB =...

Owners Manual
Page 22
m z 2. "0 (Refer to the owner's manual for the digital set-top box.) 01S_elect the HDMI input source on the TV using the INPUT button on the TV. EXTERNALEQUIPMENT SETUP HDMI Connection 19/22LG3'* m x 1. HDMI supports both audio and video. HDMI/DVINI iiiiiiii_)iiiiiiiiii/iiiiiiiiii/_ili_ HDMI-DTV 31.47 31.50 59....
m z 2. "0 (Refer to the owner's manual for the digital set-top box.) 01S_elect the HDMI input source on the TV using the INPUT button on the TV. EXTERNALEQUIPMENT SETUP HDMI Connection 19/22LG3'* m x 1. HDMI supports both audio and video. HDMI/DVINI iiiiiiii_)iiiiiiiiii/iiiiiiiiii/_ili_ HDMI-DTV 31.47 31.50 59....

Owners Manual
Page 23
How to use m z 0i_Turn on the remote control. HDMI-DTV 31.47 31.50 44.96 45.00 53.72 35.75 26.97 2ZOO 33.71 33.75 6Z432 6Z50 59.94 60.00 59.94 60.00 59.94 60.00 23.976 24.00 29.... 60.00 21 26LG3'* 1. How to connect m X O 2,ononr e3ct jatchke odnigtithael TsVe.t-top box to the owner's manual for the digital set-top box.) m 0i_Select the HDMI1, HDMI2, or HDMI3 input source on the C TV using the INPUT button on the digital set-top box. (Refer to HDMI/DVI IN1, m z O No separate...
How to use m z 0i_Turn on the remote control. HDMI-DTV 31.47 31.50 44.96 45.00 53.72 35.75 26.97 2ZOO 33.71 33.75 6Z432 6Z50 59.94 60.00 59.94 60.00 59.94 60.00 23.976 24.00 29.... 60.00 21 26LG3'* 1. How to connect m X O 2,ononr e3ct jatchke odnigtithael TsVe.t-top box to the owner's manual for the digital set-top box.) m 0i_Select the HDMI1, HDMI2, or HDMI3 input source on the C TV using the INPUT button on the digital set-top box. (Refer to HDMI/DVI IN1, m z O No separate...

Owners Manual
Page 24
O Connect the PC audio output to the HDMI/DVI IN or HDMI/DVI IN 1/2/3 jack on the TV. How to use Turn on the digital set-top box. (Refer to the owner's manual for the digital set -top box to the AUDIO IN (RGB/DVI) or AUDIO (RGB/DVI) jack on the remote control. 22 EXTERNALEQUIPMENT SETUP DVI to connect O Connect the DVl output ofthe digital set -top box.) Select the HDMI or HDMI1/2/3 input source on the TV using the INPUT button on the TV. 2. How to HDMI Connection 19/22LG3'* m x .-t I'I"1 z m c I'I"1 z .-t m .-t c "0 26LG3'* 1.
O Connect the PC audio output to the HDMI/DVI IN or HDMI/DVI IN 1/2/3 jack on the TV. How to use Turn on the digital set-top box. (Refer to the owner's manual for the digital set -top box to the AUDIO IN (RGB/DVI) or AUDIO (RGB/DVI) jack on the remote control. 22 EXTERNALEQUIPMENT SETUP DVI to connect O Connect the DVl output ofthe digital set -top box.) Select the HDMI or HDMI1/2/3 input source on the TV using the INPUT button on the TV. 2. How to HDMI Connection 19/22LG3'* m x .-t I'I"1 z m c I'I"1 z .-t m .-t c "0 26LG3'* 1.

Owners Manual
Page 25
... ports on the TV Video output ports on the TV. DVD SETUP Component Connection 19/22LG3'* 26LG3'* x r_l _o z r_l X:) c "0 r_l z r_l c "0 1. Match the jack colors (Y = green, PB = blue, and PR = red). O onnect the audio outputs of the DVD to the DVD player's manual for operating instructions.... or Component 1 input source on the TV using the INPUT button on the 0_If connected to COMPONENT IN 2 input, select the Component 2 input source on the...
... ports on the TV Video output ports on the TV. DVD SETUP Component Connection 19/22LG3'* 26LG3'* x r_l _o z r_l X:) c "0 r_l z r_l c "0 1. Match the jack colors (Y = green, PB = blue, and PR = red). O onnect the audio outputs of the DVD to the DVD player's manual for operating instructions.... or Component 1 input source on the TV using the INPUT button on the 0_If connected to COMPONENT IN 2 input, select the Component 2 input source on the...

Owners Manual
Page 26
How to the S-VIDEO input on the DVD player, insert a DVD. How to connect O Connect the S-VIDEO output of the DVD to the DVD player's manual for operating instructions. button on the TV. 2. O Connect the audio outputs of the DVD to use Turn on the TV. EXTERNALEQUIPMENT SETUP S-Video Connection 19/22LG3'* m x m _o z m X:) c "O m z m c "O 26LG3'* 1. Select the AV or AV1 input source on the TV using the INPUT Refer to the AUDIO input jacks on the remote control. 24
How to the S-VIDEO input on the DVD player, insert a DVD. How to connect O Connect the S-VIDEO output of the DVD to the DVD player's manual for operating instructions. button on the TV. 2. O Connect the audio outputs of the DVD to use Turn on the TV. EXTERNALEQUIPMENT SETUP S-Video Connection 19/22LG3'* m x m _o z m X:) c "O m z m c "O 26LG3'* 1. Select the AV or AV1 input source on the TV using the INPUT Refer to the AUDIO input jacks on the remote control. 24

Owners Manual
Page 27
HDMI supports both audio and video. 2. m Refer to the HDMI/DVI IN or HDMI/DVI IN 1/2/3 jack on the remote control. How to connect O Connect the HDMI output of the DVD to the DVD player's manual for operating instructions. 25 HDMI Connection m x 19/22LG3'* 26LG3'* ---t m z > r"-- m c m z ---t m --t c 1. No separated audio connection is necessary. How to use m Select the HDMI or HDMI1/2/3 input source on the TV using the INPUT button on the TV.
HDMI supports both audio and video. 2. m Refer to the HDMI/DVI IN or HDMI/DVI IN 1/2/3 jack on the remote control. How to connect O Connect the HDMI output of the DVD to the DVD player's manual for operating instructions. 25 HDMI Connection m x 19/22LG3'* 26LG3'* ---t m z > r"-- m c m z ---t m --t c 1. No separated audio connection is necessary. How to use m Select the HDMI or HDMI1/2/3 input source on the TV using the INPUT button on the TV.

Owners Manual
Page 28
... Antenna Connection z r_l X:) 19/22LG3'* c "0 r_l z r_l c "0 Wall Jack 26LG3'* Wall Jack Antenna 1. How to use ,i_Set VCR output switch to 3 or 4 and then tune TV to the same channel number. ,i_Insert a video tape into the VCR and press PLAY on the VCR. (Refer to the RF antenna in socket of... the VCR. the fixed images on the sides of the VCR to the ANTENNA/CABLE e Connect the antenna cable to the VCR owner's manual.) 26 If the 4:3 picture format is not covered by warranty. How to connect O Connect the RF antenna out socket of the screen may remain visible on...
... Antenna Connection z r_l X:) 19/22LG3'* c "0 r_l z r_l c "0 Wall Jack 26LG3'* Wall Jack Antenna 1. How to use ,i_Set VCR output switch to 3 or 4 and then tune TV to the same channel number. ,i_Insert a video tape into the VCR and press PLAY on the VCR. (Refer to the RF antenna in socket of... the VCR. the fixed images on the sides of the VCR to the ANTENNA/CABLE e Connect the antenna cable to the VCR owner's manual.) 26 If the 4:3 picture format is not covered by warranty. How to connect O Connect the RF antenna out socket of the screen may remain visible on...

Owners Manual
Page 29
... ii_ 27 How to use 01I_nsert a video tape into the VCR and press PLAY on the VCR. (Refer to the VCR owner's manual.) 01S_elect the AV or AV 1 input source on the TV using the IN PUT button on the remote control. 01_If connected to connect O Connect the AUDIO/VIDEO jacks between... TV and VCR. Match the jack colors (Video = yellow, Audio Left = white, and Audio Right = red) 2. Composite (RCA) Connection 19/22LG3 _ 26LG3 _ m X m _o z m x:) C "O m z m C "O 1. How to AV ...
... ii_ 27 How to use 01I_nsert a video tape into the VCR and press PLAY on the VCR. (Refer to the VCR owner's manual.) 01S_elect the AV or AV 1 input source on the TV using the IN PUT button on the remote control. 01_If connected to connect O Connect the AUDIO/VIDEO jacks between... TV and VCR. Match the jack colors (Video = yellow, Audio Left = white, and Audio Right = red) 2. Composite (RCA) Connection 19/22LG3 _ 26LG3 _ m X m _o z m x:) C "O m z m C "O 1. How to AV ...

Owners Manual
Page 30
How to use Insert a video tape into the VCR and press PLAY on the VCR. (Refer to the VCR owner's manual.) Select the AV or AVI input source on the TV using the INPUT button on the TV. 2. e Connect the audio outputs of the VCR to the AUDIO input jacks on the remote control. 28 EXTERNALEQUIPMENT SETUP S-Video Connection 19/22LG3'* m x !I AMIN m _o S-VIDEO V _}I_(: z LIM m X:) c m z m c "0 26LG3'* S-VIDEO V:} 0 L_0N0)-AUDIO-R 1. How to connect O Connect the S-VIDEO output of the VCR to the S-VIDEO input on the TV.
How to use Insert a video tape into the VCR and press PLAY on the VCR. (Refer to the VCR owner's manual.) Select the AV or AVI input source on the TV using the INPUT button on the TV. 2. e Connect the audio outputs of the VCR to the AUDIO input jacks on the remote control. 28 EXTERNALEQUIPMENT SETUP S-Video Connection 19/22LG3'* m x !I AMIN m _o S-VIDEO V _}I_(: z LIM m X:) c m z m c "0 26LG3'* S-VIDEO V:} 0 L_0N0)-AUDIO-R 1. How to connect O Connect the S-VIDEO output of the VCR to the S-VIDEO input on the TV.

Owners Manual
Page 32
c (_ p.65). See the external audio equipment instruction manual for operation. z m XD O Set the "TV Speaker option - Off" in the AUDIO menu. (_ p.65). EXTERNALEQUIPMENT SETUP AUDIO OUT CONNECTION (O.ly26LG3'*) Send the TV's audio to the digital audio input on the audio equipment. m z m Digital c 1. ...connect O Connect one end of DIGITAL AUDIO OUT. See the external audio equipment instruction manual for operation. 3O Off" in the AUDIO menu. How to connect m x m O Connect audio outputs to the TV's OPTICAL port of the optical or coaxial cable to the...
c (_ p.65). See the external audio equipment instruction manual for operation. z m XD O Set the "TV Speaker option - Off" in the AUDIO menu. (_ p.65). EXTERNALEQUIPMENT SETUP AUDIO OUT CONNECTION (O.ly26LG3'*) Send the TV's audio to the digital audio input on the audio equipment. m z m Digital c 1. ...connect O Connect one end of DIGITAL AUDIO OUT. See the external audio equipment instruction manual for operation. 3O Off" in the AUDIO menu. How to connect m x m O Connect audio outputs to the TV's OPTICAL port of the optical or coaxial cable to the...

Owners Manual
Page 37
r'_ x m z m c m z m c Select PICTURE. Auto Configure Automatically adjusts picture position and minimizes image instability. Select Screen (RGB-PC). Select Yes. After adjustment, if the image is still not correct, try using the manual settings or a different resolution or refresh rate on the PC. Select Auto config.. Start Auto Configuration. 01_If the position of the image is still not correct, try Auto adjustment again. 011If_ picture needs to be adjusted again after Auto adjustment in RGB-PC, you can adjust the Position, Phase. Size or 35
r'_ x m z m c m z m c Select PICTURE. Auto Configure Automatically adjusts picture position and minimizes image instability. Select Screen (RGB-PC). Select Yes. After adjustment, if the image is still not correct, try using the manual settings or a different resolution or refresh rate on the PC. Select Auto config.. Start Auto Configuration. 01_If the position of the image is still not correct, try Auto adjustment again. 011If_ picture needs to be adjusted again after Auto adjustment in RGB-PC, you can adjust the Position, Phase. Size or 35

Owners Manual
Page 38
... c m z m c Select PICTURE. Make appropriate adjustments. _ Position: This function is not clear after auto adjustment and especially if characters are still trembling, adjust the picture phase manually. EXTERNALEQUIPMENT SETUP Adjustment for screen Position, Size, and Phase If the picture is to adjust picture to left/right and up/down as you to...
... c m z m c Select PICTURE. Make appropriate adjustments. _ Position: This function is not clear after auto adjustment and especially if characters are still trembling, adjust the picture phase manually. EXTERNALEQUIPMENT SETUP Adjustment for screen Position, Size, and Phase If the picture is to adjust picture to left/right and up/down as you to...

Owners Manual
Page 43
Backlight: Adjust the brightness of LCD panel to control the brightness of features which users might use frequently. QUICK MENU Your TV's OSD (On Screen Display) may differ slightly from what is a menu of the screen. SAP: Selects MTS sound (Analog signal). N z < N I > z z fT1 N ...© Z © Display each menu. Return to the Favorite List. Q.Menu (Quick Menu) is shown in this manual. Picture Mode: ...
Backlight: Adjust the brightness of LCD panel to control the brightness of features which users might use frequently. QUICK MENU Your TV's OSD (On Screen Display) may differ slightly from what is a menu of the screen. SAP: Selects MTS sound (Analog signal). N z < N I > z z fT1 N ...© Z © Display each menu. Return to the Favorite List. Q.Menu (Quick Menu) is shown in this manual. Picture Mode: ...


