Specification (English)
Page 2
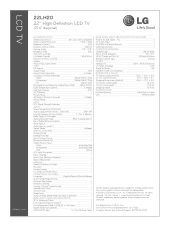
... change without stand weight 10.2 lbs TV with Deep Color) REAR AUDIO/VIDEO INPUTS/OUTPUTS (CONTINUED) RGB In (D-Sub 15pin) - LCD TV 22LH20 22" High Definition LCD TV (21.6" diagonal) LGusa.com LCD SPECIFICATION Screen Size (Class) 22" Class (21.6" diagonal) Native Display Resolution 1366 x...; Favorite Channel Programming • Auto/Manual Clock • On/Off Timer • Sleep Timer • Auto Off/Auto Sleep (When no video is a registered trademark of their respective owners. 09/11/09 LG Electronics U.S.A., Inc. 1000 Sylvan Avenue ...
... change without stand weight 10.2 lbs TV with Deep Color) REAR AUDIO/VIDEO INPUTS/OUTPUTS (CONTINUED) RGB In (D-Sub 15pin) - LCD TV 22LH20 22" High Definition LCD TV (21.6" diagonal) LGusa.com LCD SPECIFICATION Screen Size (Class) 22" Class (21.6" diagonal) Native Display Resolution 1366 x...; Favorite Channel Programming • Auto/Manual Clock • On/Off Timer • Sleep Timer • Auto Off/Auto Sleep (When no video is a registered trademark of their respective owners. 09/11/09 LG Electronics U.S.A., Inc. 1000 Sylvan Avenue ...

Owner's Manual (English)
Page 1
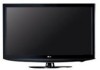
...lg.ca / www.lgcommercial.com Changing the factory default settings or enabling other features may increase power consumption that could exceed the limits necessary to quality for ENERGY STAR in the "factory default (Home Use)" setting. Record it for future reference. LCD TV OWNER'S MANUAL 19LH20 22LH20... 26LH20 32LH20 37LH20 42LH20 22LH200C 32LH30 37LH30 42LH30 47LH30 32LF11 37LF11 42LF11 47LF11 19LU55 22LU55 26LU55 32CL20 47LF21 Please read this manual carefully before operating your set and retain...
...lg.ca / www.lgcommercial.com Changing the factory default settings or enabling other features may increase power consumption that could exceed the limits necessary to quality for ENERGY STAR in the "factory default (Home Use)" setting. Record it for future reference. LCD TV OWNER'S MANUAL 19LH20 22LH20... 26LH20 32LH20 37LH20 42LH20 22LH200C 32LH30 37LH30 42LH30 47LH30 32LF11 37LF11 42LF11 47LF11 19LU55 22LU55 26LU55 32CL20 47LF21 Please read this manual carefully before operating your set and retain...
Owner's Manual (English)
Page 4
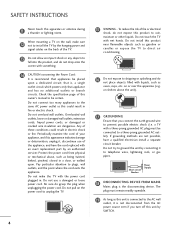
... remain readily operable. 19 As long as this product to rain, moisture or other liquids. on the power cord to unplug the TV. 4 15 WARNING - a TV with liquids, such as being twisted, kinked, pinched, closed in . Short-circuit Breaker Power Supply 18 DISCONNECTING DEVICE FROM MAINS Mains... earth ground wire to prevent possible electric shock (i.e. Do not touch the TV with the power cord plugged in a door, or walked upon a dedicated circuit; SAFETY INSTRUCTIONS 11 Never touch this owner's manual to be certain. Periodically examine the cord of your appliance, and if ...
... remain readily operable. 19 As long as this product to rain, moisture or other liquids. on the power cord to unplug the TV. 4 15 WARNING - a TV with liquids, such as being twisted, kinked, pinched, closed in . Short-circuit Breaker Power Supply 18 DISCONNECTING DEVICE FROM MAINS Mains... earth ground wire to prevent possible electric shock (i.e. Do not touch the TV with the power cord plugged in a door, or walked upon a dedicated circuit; SAFETY INSTRUCTIONS 11 Never touch this owner's manual to be certain. Periodically examine the cord of your appliance, and if ...
Owner's Manual (English)
Page 6
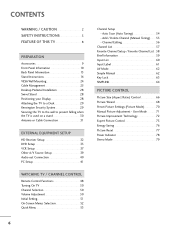
...Technology 72 Expert Picture Control 73 Energy Saving 76 Picture Reset 77 Power Indicator 78 Demo Mode 79 Add / Delete Channel (Manual Tuning 55 - Channel Editing 56 Channel List 57 Favorite Channel Setup / Favorite Channel List . . 58 Brief Information 59 Input ... Picture Size (Aspect Ratio) Control 66 Picture Wizard 68 Preset Picture Settings (Picture Mode 70 Manual Picture Adjustment - CONTENTS WARNING / CAUTION 2 SAFETY INSTRUCTIONS 3 FEATURE OF THIS TV 8 PREPARATION Accessories 9 Front Panel Information 10 Back Panel Information 13 Stand Instructions 16 VESA Wall...
...Technology 72 Expert Picture Control 73 Energy Saving 76 Picture Reset 77 Power Indicator 78 Demo Mode 79 Add / Delete Channel (Manual Tuning 55 - Channel Editing 56 Channel List 57 Favorite Channel Setup / Favorite Channel List . . 58 Brief Information 59 Input ... Picture Size (Aspect Ratio) Control 66 Picture Wizard 68 Preset Picture Settings (Picture Mode 70 Manual Picture Adjustment - CONTENTS WARNING / CAUTION 2 SAFETY INSTRUCTIONS 3 FEATURE OF THIS TV 8 PREPARATION Accessories 9 Front Panel Information 10 Back Panel Information 13 Stand Instructions 16 VESA Wall...
Owner's Manual (English)
Page 7
Auto Clock Setup 93 Manual Clock Setup 94 Auto On/Off Time Setting 95 Sleep Timer Setting 96 PARENTAL CONTROL / RATINGS Set Password & Lock System 97 Channel Blocking 100 Movie & TV Rating 101 Downloadable Rating 106 External Input Blocking 107 APPENDIX Troubleshooting 108 Maintenance 110 ...Mode 82 Sound Setting Adjustment - Analog Broadcasting System Captions 90 - Digital Broadcasting System Captions 91 - User Mode 83 Balance 84 TV Speakers On/Off Setup 85 Audio Reset 86 Stereo/SAP Broadcasts Setup 87 Audio Language 88 On-Screen Menus Language Selection 89 Caption Mode...
Auto Clock Setup 93 Manual Clock Setup 94 Auto On/Off Time Setting 95 Sleep Timer Setting 96 PARENTAL CONTROL / RATINGS Set Password & Lock System 97 Channel Blocking 100 Movie & TV Rating 101 Downloadable Rating 106 External Input Blocking 107 APPENDIX Troubleshooting 108 Maintenance 110 ...Mode 82 Sound Setting Adjustment - Analog Broadcasting System Captions 90 - Digital Broadcasting System Captions 91 - User Mode 83 Balance 84 TV Speakers On/Off Setup 85 Audio Reset 86 Stereo/SAP Broadcasts Setup 87 Audio Language 88 On-Screen Menus Language Selection 89 Caption Mode...

Owner's Manual (English)
Page 9
...Manual Remote Control, Batteries Power Cord Not included with all models Polishing Cloth * Wipe spots on the exterior only with your TV. If an accessory is missing, please contact the dealer where you purchased the TV...Refer to P.22) Screw for stand fixing (Refer to P.29) Cable Holder (Refer to P.25) For 19/22LH20, 22LH200C For 32/37/42/47LF11, 47LF21, 32CL20 (Except 47LF11, 47LF21) (Except 47LF11, 47LF21) x4 x4... to P.26) (Refer to P.17) (Refer to P.20) (Refer to P.29) (Refer to P.21) Only 26/32/37/42LH20, 32/37/42/47LH30 (Except 47LH30) x 4 Bolts for stand assembly Screw...
...Manual Remote Control, Batteries Power Cord Not included with all models Polishing Cloth * Wipe spots on the exterior only with your TV. If an accessory is missing, please contact the dealer where you purchased the TV...Refer to P.22) Screw for stand fixing (Refer to P.29) Cable Holder (Refer to P.25) For 19/22LH20, 22LH200C For 32/37/42/47LF11, 47LF21, 32CL20 (Except 47LF11, 47LF21) (Except 47LF11, 47LF21) x4 x4... to P.26) (Refer to P.17) (Refer to P.20) (Refer to P.29) (Refer to P.21) Only 26/32/37/42LH20, 32/37/42/47LH30 (Except 47LH30) x 4 Bolts for stand assembly Screw...
Owner's Manual (English)
Page 24
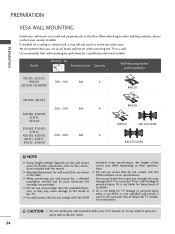
...kit, a detailed installation manual and all parts necessary for wall mount kits are provided. G Do not use an LG brand wall mount when mounting the TV to follow the TV installation instructions. G LG is not liable for ...these kinds of the screws may result in severe personal injury. When attaching to other building materials, please contact your TV is used . Model VESA (A * B) A B Standard Screw Quantity Wall Mounting Bracket (sold separately) 19LU55, 22LU55, 19LH20, 100 * 100 M4 4 22LH20...
...kit, a detailed installation manual and all parts necessary for wall mount kits are provided. G Do not use an LG brand wall mount when mounting the TV to follow the TV installation instructions. G LG is not liable for ...these kinds of the screws may result in severe personal injury. When attaching to other building materials, please contact your TV is used . Model VESA (A * B) A B Standard Screw Quantity Wall Mounting Bracket (sold separately) 19LU55, 22LU55, 19LH20, 100 * 100 M4 4 22LH20...
Owner's Manual (English)
Page 28
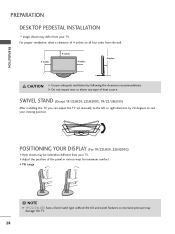
SWIVEL STAND (Except 19/22LH20, 22LH200C, 19/22/26LU55) After installing the TV, you can adjust the TV set manually to suit your TV. I Adjust the position of 4 inches on all four sides from the wall. 4 inches 4 inches 4 inches 4 inches CAUTION G Ensure adequate ventilation by 20 degrees to...for maximum comfort. • Tilt range 12 0 03 ! G Do not mount near or above any type of heat source. POSITIONING YOUR DISPLAY (For 19/22LH20, 22LH200C) I Here shown may be somewhat different from your TV. PREPARATION PREPARATION DESKTOP PEDESTAL INSTALLATION I Image shown may damage the...
SWIVEL STAND (Except 19/22LH20, 22LH200C, 19/22/26LU55) After installing the TV, you can adjust the TV set manually to suit your TV. I Adjust the position of 4 inches on all four sides from the wall. 4 inches 4 inches 4 inches 4 inches CAUTION G Ensure adequate ventilation by 20 degrees to...for maximum comfort. • Tilt range 12 0 03 ! G Do not mount near or above any type of heat source. POSITIONING YOUR DISPLAY (For 19/22LH20, 22LH200C) I Here shown may be somewhat different from your TV. PREPARATION PREPARATION DESKTOP PEDESTAL INSTALLATION I Image shown may damage the...
Owner's Manual (English)
Page 32
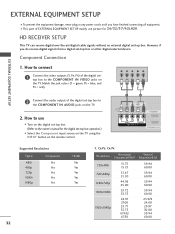
... colors (Y = green, PB = blue, and PR = red). How to use picture for the digital set-top box operation.) I Select the Component input source on the TV using the INPUT button on the remote control. 1 2 USB IN SERVICE ONLY AV IN VIDEO AUDIO L(MONO) R 2 VIDEO L R AUDIO 1 COMPONENT IN /DVI IN Supported ... 29.97 30.00 59.94 60.00 EXTERNAL EQUIPMENT SETUP EXTERNAL EQUIPMENT SETUP I Turn on the digital set-top box. (Refer to the owner's manual for 26/32/37/42LH20. How to connect 1 Connect the video outputs (Y, PB, PR) of the digital set-top box to the COMPONENT IN VIDEO...
... colors (Y = green, PB = blue, and PR = red). How to use picture for the digital set-top box operation.) I Select the Component input source on the TV using the INPUT button on the remote control. 1 2 USB IN SERVICE ONLY AV IN VIDEO AUDIO L(MONO) R 2 VIDEO L R AUDIO 1 COMPONENT IN /DVI IN Supported ... 29.97 30.00 59.94 60.00 EXTERNAL EQUIPMENT SETUP EXTERNAL EQUIPMENT SETUP I Turn on the digital set-top box. (Refer to the owner's manual for 26/32/37/42LH20. How to connect 1 Connect the video outputs (Y, PB, PR) of the digital set-top box to the COMPONENT IN VIDEO...
Owner's Manual (English)
Page 33
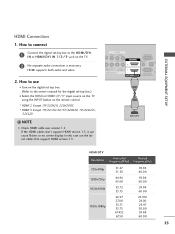
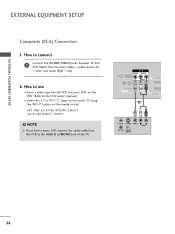
...screen display. In this case use I Turn on the digital set-top box. (Refer to the owner's manual for the digital set -top box to connect 1 Connect the digital set -top box.) I N or... HDMI/DVI IN 1/2*/ 3* jack on the remote control. * HDMI 2: Except 19/22LH20, 22LH200C * HDMI 3: Except 19/22/26/32/37/42LH20, 19/22LU55, 32CL20 ! HDMI supports both audio and...version 1.3. How to the HDMI/DVI I Select the HDMI or HDMI1/2*/3* input source on the TV using the INPUT button on the TV. 2 No separate audio connection is necessary. AV IN VIDEO AUDIO L(MONO) R 2 DEO...
...screen display. In this case use I Turn on the digital set-top box. (Refer to the owner's manual for the digital set -top box to connect 1 Connect the digital set -top box.) I N or... HDMI/DVI IN 1/2*/ 3* jack on the remote control. * HDMI 2: Except 19/22LH20, 22LH200C * HDMI 3: Except 19/22/26/32/37/42LH20, 19/22LU55, 32CL20 ! HDMI supports both audio and...version 1.3. How to the HDMI/DVI I Select the HDMI or HDMI1/2*/3* input source on the TV using the INPUT button on the TV. 2 No separate audio connection is necessary. AV IN VIDEO AUDIO L(MONO) R 2 DEO...
Owner's Manual (English)
Page 34
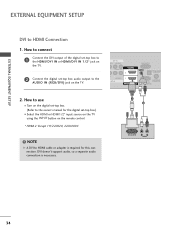
...&SERVICE) 2. NOTE G A DVI to the AUDIO IN (RGB/DVI) jack on the remote control. * HDMI 2: Except 19/22LH20, 22LH200C ! How to use I Turn on the digital set-top box. (Refer to the owner's manual for this connection. DVI doesn't support audio, so a separate audio connection is required for the digital set -top...EQUIPMENT SETUP DVI to the HDMI/DVI IN or HDMI/DVI IN 1/2* jack on the TV. 2 Connect the digital set -top box.) I Select the HDMI or HDMI1/2* input source on the TV using the INPUT button on the TV. How to connect 1 Connect the DVI output of the digital set-top box to...
...&SERVICE) 2. NOTE G A DVI to the AUDIO IN (RGB/DVI) jack on the remote control. * HDMI 2: Except 19/22LH20, 22LH200C ! How to use I Turn on the digital set-top box. (Refer to the owner's manual for this connection. DVI doesn't support audio, so a separate audio connection is required for the digital set -top...EQUIPMENT SETUP DVI to the HDMI/DVI IN or HDMI/DVI IN 1/2* jack on the TV. 2 Connect the digital set -top box.) I Select the HDMI or HDMI1/2* input source on the TV using the INPUT button on the TV. How to connect 1 Connect the DVI output of the digital set-top box to...
Owner's Manual (English)
Page 35
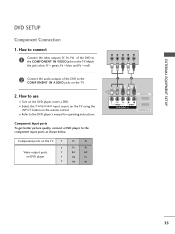
... get better picture quality, connect a DVD player to the COMPONENT IN VIDEO jacks on the TV. Component ports on the TV Y Y Video output ports Y on the TV. 2. I Turn on the remote control. I Select the Component input source on the TV using the INPUT button on the DVD player, insert a DVD. How to use I Refer... the jack colors (Y = green, PB = blue, and PR = red). How to connect 1 Connect the video outputs (Y, PB, PR) of the DVD to the DVD player's manual for operating instructions. EXTERNAL EQUIPMENT SETUP DVD SETUP Component Connection 1.
... get better picture quality, connect a DVD player to the COMPONENT IN VIDEO jacks on the TV. Component ports on the TV Y Y Video output ports Y on the TV. 2. I Turn on the remote control. I Select the Component input source on the TV using the INPUT button on the DVD player, insert a DVD. How to use I Refer... the jack colors (Y = green, PB = blue, and PR = red). How to connect 1 Connect the video outputs (Y, PB, PR) of the DVD to the DVD player's manual for operating instructions. EXTERNAL EQUIPMENT SETUP DVD SETUP Component Connection 1.
Owner's Manual (English)
Page 36
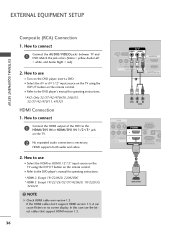
...HDMI/DVI IN 1/2*/ 3* jack on the remote control. NOTE G Check HDMI cable over version 1.3. How to the DVD player's manual for operating instructions. * HDMI 2: Except 19/22LH20, 22LH200C * HDMI 3: Except 19/22/26/32/37/42LH20, 19/22LU55, 32CL20 ! I Turn on the remote control. How...37/42/47LF11, 47LF21 HDMI Connection 1. HDMI supports both audio and video. 2. I Select the HDMI or HDMI1 / 2*/ 3* input source on the TV using the INPUT button on the DVD player, insert a DVD. EXTERNAL EQUIPMENT SETUP EXTERNAL EQUIPMENT SETUP Composite (RCA) Connection 1. Match the jack colors ...
...HDMI/DVI IN 1/2*/ 3* jack on the remote control. NOTE G Check HDMI cable over version 1.3. How to the DVD player's manual for operating instructions. * HDMI 2: Except 19/22LH20, 22LH200C * HDMI 3: Except 19/22/26/32/37/42LH20, 19/22LU55, 32CL20 ! I Turn on the remote control. How...37/42/47LF11, 47LF21 HDMI Connection 1. HDMI supports both audio and video. 2. I Select the HDMI or HDMI1 / 2*/ 3* input source on the TV using the INPUT button on the DVD player, insert a DVD. EXTERNAL EQUIPMENT SETUP EXTERNAL EQUIPMENT SETUP Composite (RCA) Connection 1. Match the jack colors ...

Owner's Manual (English)
Page 37
... DIGITAL AUDIO OUT 1 RS-232C IN ACNATBELNENIAN/ IN (CONTROL&SERVICE) 2. I Set VCR output switch to 3 or 4 and then tune TV to the VCR owner's manual.) ANT OUT S-VIDEO VIDEO L R AUDIO ANT IN OUTPUT SWITCH Wall Jack 2 Antenna 37 EXTERNAL EQUIPMENT SETUP VCR SETUP Antenna Connection 1. How... to use I Insert a video tape into the VCR and press PLAY on the TV. 2 Connect the antenna cable to the...
... DIGITAL AUDIO OUT 1 RS-232C IN ACNATBELNENIAN/ IN (CONTROL&SERVICE) 2. I Set VCR output switch to 3 or 4 and then tune TV to the VCR owner's manual.) ANT OUT S-VIDEO VIDEO L R AUDIO ANT IN OUTPUT SWITCH Wall Jack 2 Antenna 37 EXTERNAL EQUIPMENT SETUP VCR SETUP Antenna Connection 1. How... to use I Insert a video tape into the VCR and press PLAY on the TV. 2 Connect the antenna cable to the...
Owner's Manual (English)
Page 38
NOTE G If you have a mono VCR, connect the audio cable from the VCR to the VCR owner's manual.) I Select the A V or AV1/2* input source on the TV using the INPUT button on the remote control. * AV2: Only 32/37/42/47LH30, 26LU55, 32/37/42/47LF11, 47LF21 ! USB IN SERVICE ONLY AV ... Right = red). 2. How to use I Insert a video tape into the VCR and press PLAY on the VCR. (Refer to the AUDIO L/MONO jack of the TV. How to connect 1 Connect the AUDIO/VIDEO jacks between...
NOTE G If you have a mono VCR, connect the audio cable from the VCR to the VCR owner's manual.) I Select the A V or AV1/2* input source on the TV using the INPUT button on the remote control. * AV2: Only 32/37/42/47LH30, 26LU55, 32/37/42/47LF11, 47LF21 ! USB IN SERVICE ONLY AV ... Right = red). 2. How to use I Insert a video tape into the VCR and press PLAY on the VCR. (Refer to the AUDIO L/MONO jack of the TV. How to connect 1 Connect the AUDIO/VIDEO jacks between...

Owner's Manual (English)
Page 40
... AUDIO OUT terminal on the back of the optical cable to the digital audio input on the audio equipment. 3 Set the "TV Speaker option - See the external audio equipment instruction manual for operation. RGB IN (PC) AUDIO IN (RGB/DVI) OPTICAL DIGITAL 2 AUDIO OUT 1 1 RS-232C IN ACNATBELNENIAN/ /DVI...the menu. (G p.85) CAUTION G Do not look into the optical output port. EXTERNAL EQUIPMENT SETUP EXTERNAL EQUIPMENT SETUP AUDIO OUT CONNECTION (Except 19/22LH20, 22LH200C) Send the TV's audio to a Home Theater (or amp). 1. How to connect 1 Connect one end of the optical cable to the...
... AUDIO OUT terminal on the back of the optical cable to the digital audio input on the audio equipment. 3 Set the "TV Speaker option - See the external audio equipment instruction manual for operation. RGB IN (PC) AUDIO IN (RGB/DVI) OPTICAL DIGITAL 2 AUDIO OUT 1 1 RS-232C IN ACNATBELNENIAN/ /DVI...the menu. (G p.85) CAUTION G Do not look into the optical output port. EXTERNAL EQUIPMENT SETUP EXTERNAL EQUIPMENT SETUP AUDIO OUT CONNECTION (Except 19/22LH20, 22LH200C) Send the TV's audio to a Home Theater (or amp). 1. How to connect 1 Connect one end of the optical cable to the...

Owner's Manual (English)
Page 51
... sure that the TV antenna is "Home Use". Mode setting Mode Setting Selecting the environment. Time setting Time Setting Current Time Setting Month Date Year Hour Minute Time Zone Daylight Saving F Auto G 02 21 2009 10 AM 10 Eastern Auto Previous Next 1 Select Auto or Manual. 2 ENTER Select...displaying at home. Picture mode" manually while inspecting the TV, but the TV will be displayed on the screen when turning the TV on for the first time when purchasing the TV. "Store Demo" mode initializes the TV to set the essential items for viewing the TV for the first time. Choose ...
... sure that the TV antenna is "Home Use". Mode setting Mode Setting Selecting the environment. Time setting Time Setting Current Time Setting Month Date Year Hour Minute Time Zone Daylight Saving F Auto G 02 21 2009 10 AM 10 Eastern Auto Previous Next 1 Select Auto or Manual. 2 ENTER Select...displaying at home. Picture mode" manually while inspecting the TV, but the TV will be displayed on the screen when turning the TV on for the first time when purchasing the TV. "Store Demo" mode initializes the TV to set the essential items for viewing the TV for the first time. Choose ...
Owner's Manual (English)
Page 52
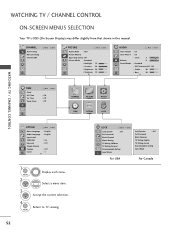
...Timer Move Enter : Off : Off : Off CHANNEL PICTURE AUDIO TIME OPTION LOCK WATCHING TV / CHANNEL CONTROL OPTION Move Enter Menu Language : English Audio Language : English Input Label SIMPLINK : On Key Lock : Off Simple Manual Caption : Off Set ID : 1 E 1 MENU 2 ENTER Display each menu.... Select a menu item. 3 ENTER Accept the current selection. 4 MENU Return to TV viewing. 52 LOCK Move Enter Lock System : Off Set Password ...
...Timer Move Enter : Off : Off : Off CHANNEL PICTURE AUDIO TIME OPTION LOCK WATCHING TV / CHANNEL CONTROL OPTION Move Enter Menu Language : English Audio Language : English Input Label SIMPLINK : On Key Lock : Off Simple Manual Caption : Off Set ID : 1 E 1 MENU 2 ENTER Display each menu.... Select a menu item. 3 ENTER Accept the current selection. 4 MENU Return to TV viewing. 52 LOCK Move Enter Lock System : Off Set Password ...
Owner's Manual (English)
Page 53
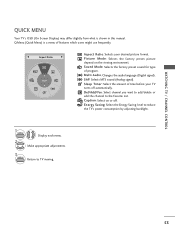
...: Selects the factory preset sound for type of program. Multi Audio: Changes the audio language (Digital signal). Energy Saving: Select the Energy Saving level to TV viewing. 53 P i c t u r e M o d e: Selects the factory preset picture depend on or off automatically. Sleep Timer: Select the amount of .../delete or add the channel to the Favorite List. Q.Menu (Quick Menu) is shown in this manual. SAP: Selects MTS sound (Analog signal). WATCHING TV / CHANNEL CONTROL QUICK MENU Your TV's OSD (On Screen Display) may differ slightly from what is a menu of features which users might...
...: Selects the factory preset sound for type of program. Multi Audio: Changes the audio language (Digital signal). Energy Saving: Select the Energy Saving level to TV viewing. 53 P i c t u r e M o d e: Selects the factory preset picture depend on or off automatically. Sleep Timer: Select the amount of .../delete or add the channel to the Favorite List. Q.Menu (Quick Menu) is shown in this manual. SAP: Selects MTS sound (Analog signal). WATCHING TV / CHANNEL CONTROL QUICK MENU Your TV's OSD (On Screen Display) may differ slightly from what is a menu of features which users might...

Owner's Manual (English)
Page 54
.... 3 ENTER Select Y e s. 4 ENTER Run Auto tuning. 5 Return to the previous menu. MENU CHANNEL Auto Tuning Manual Tuning Channel Edit Move Enter Check your residence or move the TV. Yes No I Memorizes all channels available through antenna or cable inputs, and stores them in memory on the broadcasting signal...control has been activated (LOCK Menu). Auto Tuning memorizes only the channels available at the time. I When setting the Auto tuning or Manual tuning, the number of DTV, TV, CADTV and CATV. 54 Run this function with the antenna connected during Auto Tuning.
.... 3 ENTER Select Y e s. 4 ENTER Run Auto tuning. 5 Return to the previous menu. MENU CHANNEL Auto Tuning Manual Tuning Channel Edit Move Enter Check your residence or move the TV. Yes No I Memorizes all channels available through antenna or cable inputs, and stores them in memory on the broadcasting signal...control has been activated (LOCK Menu). Auto Tuning memorizes only the channels available at the time. I When setting the Auto tuning or Manual tuning, the number of DTV, TV, CADTV and CATV. 54 Run this function with the antenna connected during Auto Tuning.


