
KX Driver User Guide Version 5.90
Page 9
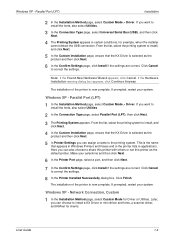
...now complete. Here you want to install a KX Driver or mini-driver and fonts, a scanner driver, and KMnet for Driver or Utilities. From the list, select the printing system to install the fonts, also select Utilities. 2 In the Connection Type page, select Parallel Port (LPT), then click Next. 2 3... 2 In the Installation Method page, select Custom Mode > Driver. Windows XP - If you can choose to install the fonts, also select Utilities. 3 In the Connection Type page, select Universal Serial Bus (USB), and then click Next. 3 4 The Printing System appears in applications.
...now complete. Here you want to install a KX Driver or mini-driver and fonts, a scanner driver, and KMnet for Driver or Utilities. From the list, select the printing system to install the fonts, also select Utilities. 2 In the Connection Type page, select Parallel Port (LPT), then click Next. 2 3... 2 In the Installation Method page, select Custom Mode > Driver. Windows XP - If you can choose to install the fonts, also select Utilities. 3 In the Connection Type page, select Universal Serial Bus (USB), and then click Next. 3 4 The Printing System appears in applications.
iTag Specification/Setup/Operation Guide Ver. 8.0
Page 16
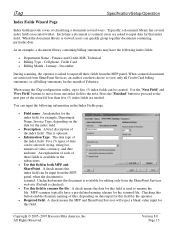
...both MFP and SharePoint. Five (5) types of February. A check means the data for the scanned file. MFP scanners typically have the following information in the Index Fields page. • Field name. Checking this field by the ...input from the MFP panel. Cell phone, Credit Card • Billing Month - When using the iTag configuration utility, up to rename the file. This is available for the month of data can be created. January - ... optional. • Information Type. Copyright © 2005~2007 Kyocera Mita America, Inc All Rights Reserved. Version 8.0 Page 15
...both MFP and SharePoint. Five (5) types of February. A check means the data for the scanned file. MFP scanners typically have the following information in the Index Fields page. • Field name. Checking this field by the ...input from the MFP panel. Cell phone, Credit Card • Billing Month - When using the iTag configuration utility, up to rename the file. This is available for the month of data can be created. January - ... optional. • Information Type. Copyright © 2005~2007 Kyocera Mita America, Inc All Rights Reserved. Version 8.0 Page 15
iTag Specification/Setup/Operation Guide Ver. 8.0
Page 22
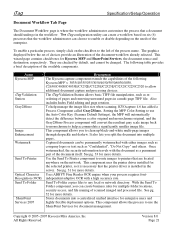
...file. They are located anywhere on the checkbox to use the Auto Color Key (Scanner Default Settings), the MFP will automatically detect the difference between a color original and monochrome.... See pg. 31 for Kyocera MFP and SharePoint Services, the document source and destination, respectively. The following Kyocera MFP's: 3035/4035/5035/3050/4050/5050/6030/8030, C2630/C4008/C4035E/C3232E... choose to enable or disable depending on the needs of the enterprise. The iTag configuration utility can create a workflow based on six (6) processes that a document should undergo in the...
...file. They are located anywhere on the checkbox to use the Auto Color Key (Scanner Default Settings), the MFP will automatically detect the difference between a color original and monochrome.... See pg. 31 for Kyocera MFP and SharePoint Services, the document source and destination, respectively. The following Kyocera MFP's: 3035/4035/5035/3050/4050/5050/6030/8030, C2630/C4008/C4035E/C3232E... choose to enable or disable depending on the needs of the enterprise. The iTag configuration utility can create a workflow based on six (6) processes that a document should undergo in the...

iTag Specification/Setup/Operation Guide Ver. 8.0
Page 60
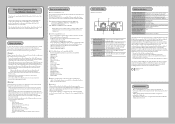
...In addition, it is still necessary to the iTag workflow from the iTag Configuration Utility Wizard as follows: From the MFP Operation panel select: 1. System Menu / Counter System Menu Copy Default > Scanner Default > Printer Default > Machine Default > Document Management > 3. This will ...Component instructions on the operation panel of this document. Select the Scanner Default setting button. Using the numeric keys, enter the code 6 4 8 2 Enter the administrator number Copyright © 2005~2007 Kyocera Mita America, Inc All Rights Reserved. Version 8.0 Page 59 ...
...In addition, it is still necessary to the iTag workflow from the iTag Configuration Utility Wizard as follows: From the MFP Operation panel select: 1. System Menu / Counter System Menu Copy Default > Scanner Default > Printer Default > Machine Default > Document Management > 3. This will ...Component instructions on the operation panel of this document. Select the Scanner Default setting button. Using the numeric keys, enter the code 6 4 8 2 Enter the administrator number Copyright © 2005~2007 Kyocera Mita America, Inc All Rights Reserved. Version 8.0 Page 59 ...
IB-40 User Guide
Page 1
...off and on a circuit different from that interference will not occur in the Conversion Address List. KPrint - KM-NET for Accounting - KM-NET for Clients - Name resolution functions (address and host name conversion protocols) on general safety issues. EN55022...an outlet on , the user is connected. - Exposure to radio communications. Scanner File Utility - Address Editor - This equipment generates, uses, and can use the same communication method for Scanner - AirMac, AirPort, Macintosh, Mac OS and Safari are registered trademarks or trademarks...
...off and on a circuit different from that interference will not occur in the Conversion Address List. KPrint - KM-NET for Accounting - KM-NET for Clients - Name resolution functions (address and host name conversion protocols) on general safety issues. EN55022...an outlet on , the user is connected. - Exposure to radio communications. Scanner File Utility - Address Editor - This equipment generates, uses, and can use the same communication method for Scanner - AirMac, AirPort, Macintosh, Mac OS and Safari are registered trademarks or trademarks...
Scan System Operation Guide (Functions Edition) Rev-9
Page 2
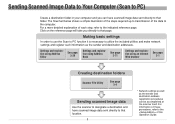
... take you can have scanned image data sent directly to utilize the included utilities and make network settings and register such information as the sender and destination address registration procedures can be accomplished at the scanner itself. i * Network settings as well as the sender... See page 3-71 Settings and registration using an Internet Web browser See page 2-1 Creating destination folders Scanner File Utility See page 3-4 Sending scanned image data Use the scanner to designate a destination and have scanned image data sent directly to that location. For a more ...
... take you can have scanned image data sent directly to utilize the included utilities and make network settings and register such information as the sender and destination address registration procedures can be accomplished at the scanner itself. i * Network settings as well as the sender... See page 3-71 Settings and registration using an Internet Web browser See page 2-1 Creating destination folders Scanner File Utility See page 3-4 Sending scanned image data Use the scanner to designate a destination and have scanned image data sent directly to that location. For a more ...

Scan System Operation Guide (Functions Edition) Rev-9
Page 3
... information on the reference page will take you directly to utilize the included utilities and make network settings and register such information as the sender and destination address registration procedures can be accomplished at the scanner itself. Click on these procedures, refer to the indicated ...using Address Book See page 3-71 Settings and registration using an Internet Web browser See page 2-1 Sending scanned image data Use the scanner to designate a destination and have scanned image data sent directly to a registered email address. Sending Scanned Image Data by Email (...
... information on the reference page will take you directly to utilize the included utilities and make network settings and register such information as the sender and destination address registration procedures can be accomplished at the scanner itself. Click on these procedures, refer to the indicated ...using Address Book See page 3-71 Settings and registration using an Internet Web browser See page 2-1 Sending scanned image data Use the scanner to designate a destination and have scanned image data sent directly to a registered email address. Sending Scanned Image Data by Email (...

Scan System Operation Guide (Functions Edition) Rev-9
Page 8
Contents Sending Scanned Image Data to Your Computer (Scan to PC i Sending Scanned Image Data by Email (Send E-mail ii Using TWAIN Capabilities (TWAIN iii Adding File Information to Scanned Image Data iv Sending Scanned Image Data to FTP server v Trademark Information vi Contents ...vii Section 1 What is the Network Scanning System 1-1 Outline ...1-2 Using the Scanner Utilities CD-ROM 1-3 Contents of the CD-ROM 1-4 (1) Scanner Utilities 1-5 (2) TWAIN Source 1-6 (3) Configuration Tool 1-6 (4) Documents 1-6 (5) Select Language 1-6 On-Line Manual 1-7 vii
Contents Sending Scanned Image Data to Your Computer (Scan to PC i Sending Scanned Image Data by Email (Send E-mail ii Using TWAIN Capabilities (TWAIN iii Adding File Information to Scanned Image Data iv Sending Scanned Image Data to FTP server v Trademark Information vi Contents ...vii Section 1 What is the Network Scanning System 1-1 Outline ...1-2 Using the Scanner Utilities CD-ROM 1-3 Contents of the CD-ROM 1-4 (1) Scanner Utilities 1-5 (2) TWAIN Source 1-6 (3) Configuration Tool 1-6 (4) Documents 1-6 (5) Select Language 1-6 On-Line Manual 1-7 vii
Scan System Operation Guide (Functions Edition) Rev-9
Page 22
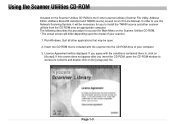
...your computer. 3. Page 1-3 Quit all other applications that is the 5 other scanner utilities from the CD-ROM onto an appropriate computer. In order to install the TWAIN source and other scanner utilities (Scanner File Utility, Address Editor, Address Book,DB Assistant and TWAIN source) as well as ... The following describes the procedure to access its contents and double-click on the [setup.exe] file. Using the Scanner Utilities CD-ROM Included on the Scanner Utilities CD-ROM is included with the conditions contained there in, click on [Accept]. Insert the CD-ROM that may be...
...your computer. 3. Page 1-3 Quit all other applications that is the 5 other scanner utilities from the CD-ROM onto an appropriate computer. In order to install the TWAIN source and other scanner utilities (Scanner File Utility, Address Editor, Address Book,DB Assistant and TWAIN source) as well as ... The following describes the procedure to access its contents and double-click on the [setup.exe] file. Using the Scanner Utilities CD-ROM Included on the Scanner Utilities CD-ROM is included with the conditions contained there in, click on [Accept]. Insert the CD-ROM that may be...
Scan System Operation Guide (Functions Edition) Rev-9
Page 23
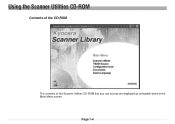
Using the Scanner Utilities CD-ROM Contents of the CD-ROM The contents of the Scanner Utilities CD-ROM that you can access are displayed as selectable items in the Main Menu screen. Page 1-4
Using the Scanner Utilities CD-ROM Contents of the CD-ROM The contents of the Scanner Utilities CD-ROM that you can access are displayed as selectable items in the Main Menu screen. Page 1-4
Scan System Operation Guide (Functions Edition) Rev-9
Page 24
...be multiple destination computers designated for that data. Using the Scanner Utilities CD-ROM The following offers a basic outline of each of these scanners. Using this utility enables you to be used by the administrator in the scanner's operation panel, you use the DB Assistant to select ...folder on the desired item to access it. (1) Scanner Utilities • Address Editor This item installs the "Address Editor" in only one computer on the scanner's operation panel, the personal Address Book that computer. Using this utility enables you to have scanned image data sent from...
...be multiple destination computers designated for that data. Using the Scanner Utilities CD-ROM The following offers a basic outline of each of these scanners. Using this utility enables you to be used by the administrator in the scanner's operation panel, you use the DB Assistant to select ...folder on the desired item to access it. (1) Scanner Utilities • Address Editor This item installs the "Address Editor" in only one computer on the scanner's operation panel, the personal Address Book that computer. Using this utility enables you to have scanned image data sent from...

Scan System Operation Guide (Functions Edition) Rev-9
Page 25
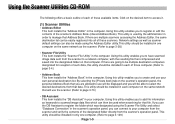
...to page 3-121.) (4) Documents This item allows you to page 1-7.) (5) Select Language This item lets you select the language that is installed. Using the Scanner Utilities CD-ROM (2) TWAIN Source This item installs the "TWAIN Source" in each of those computers. (Refer to page 3-101.) (3) Configuration Tool This item ... use the scanned image data right away using a TWAIN-compatible application on the computer in which the TWAIN source is included on the Scanner Utilities CD-ROM (Refer to view the On-Line Manual for the software that you will be used on-screen. Once this capability, the...
...to page 3-121.) (4) Documents This item allows you to page 1-7.) (5) Select Language This item lets you select the language that is installed. Using the Scanner Utilities CD-ROM (2) TWAIN Source This item installs the "TWAIN Source" in each of those computers. (Refer to page 3-101.) (3) Configuration Tool This item ... use the scanned image data right away using a TWAIN-compatible application on the computer in which the TWAIN source is included on the Scanner Utilities CD-ROM (Refer to view the On-Line Manual for the software that you will be used on-screen. Once this capability, the...

Scan System Operation Guide (Functions Edition) Rev-9
Page 26
Adobe Acrobat Reader should be used in a PDF (Portable Description File) format and can only be viewed using the Adobe Acrobat Reader application. Using the Scanner Utilities CD-ROM On-Line Manual The On-Line Manual that is prepared in accordance with the contract conditions set forth by Adobe Systems Incorporated. Page 1-7 Thus, prior to reading the On-Line Manual, you will first need to install Adobe Acrobat Reader on your computer. (The Adobe Acrobat Reader installer application is included on this Scanner Utilities CD-ROM is on the CD-ROM as well.) IMPORTANT!
Adobe Acrobat Reader should be used in a PDF (Portable Description File) format and can only be viewed using the Adobe Acrobat Reader application. Using the Scanner Utilities CD-ROM On-Line Manual The On-Line Manual that is prepared in accordance with the contract conditions set forth by Adobe Systems Incorporated. Page 1-7 Thus, prior to reading the On-Line Manual, you will first need to install Adobe Acrobat Reader on your computer. (The Adobe Acrobat Reader installer application is included on this Scanner Utilities CD-ROM is on the CD-ROM as well.) IMPORTANT!
Scan System Operation Guide (Functions Edition) Rev-9
Page 103
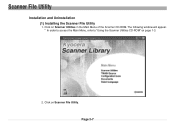
Click on page 1-3. 2. The following window will appear. * In order to access the Main Menu, refer to "Using the Scanner Utilities CD-ROM" on Scanner File Utility. Scanner File Utility Installation and Uninstallation (1) Installing the Scanner File Utility 1. Click on Scanner Utilities in the Main Menu of the Scanner CD-ROM. Page 3-7
Click on page 1-3. 2. The following window will appear. * In order to access the Main Menu, refer to "Using the Scanner Utilities CD-ROM" on Scanner File Utility. Scanner File Utility Installation and Uninstallation (1) Installing the Scanner File Utility 1. Click on Scanner Utilities in the Main Menu of the Scanner CD-ROM. Page 3-7

Scan System Operation Guide (Functions Edition) Rev-9
Page 125
Follow the instructions indicated in the Main Menu of the Scanner CD-ROM. * In order to access the Main Menu, refer to continue the installation procedure. Address Editor Installation and Uninstallation (1) Installing the Address Editor 1. Click on page 1-3. 2. Page 3-29 Click on Scanner Utilities in the wizard to "Using the Scanner Utilities CD-ROM" on Address Editor. 3.
Follow the instructions indicated in the Main Menu of the Scanner CD-ROM. * In order to access the Main Menu, refer to continue the installation procedure. Address Editor Installation and Uninstallation (1) Installing the Address Editor 1. Click on page 1-3. 2. Page 3-29 Click on Scanner Utilities in the wizard to "Using the Scanner Utilities CD-ROM" on Address Editor. 3.
Scan System Operation Guide (Functions Edition) Rev-9
Page 171
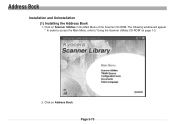
Page 3-75 Click on page 1-3. 2. The following window will appear. * In order to access the Main Menu, refer to "Using the Scanner Utilities CD-ROM" on Address Book. Address Book Installation and Uninstallation (1) Installing the Address Book 1. Click on Scanner Utilities in the Main Menu of the Scanner CD-ROM.
Page 3-75 Click on page 1-3. 2. The following window will appear. * In order to access the Main Menu, refer to "Using the Scanner Utilities CD-ROM" on Address Book. Address Book Installation and Uninstallation (1) Installing the Address Book 1. Click on Scanner Utilities in the Main Menu of the Scanner CD-ROM.
Scan System Operation Guide (Functions Edition) Rev-9
Page 203
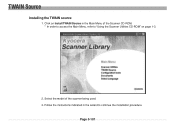
Select the model of the Scanner CD-ROM. * In order to access the Main Menu, refer to continue the installation procedure. Follow the instructions indicated in the Main Menu of the scanner being used. 3. Page 3-107 TWAIN Source Installing the TWAIN source 1. Click on Install TWAIN Source in the wizard to "Using the Scanner Utilities CD-ROM" on page 1-3. 2.
Select the model of the Scanner CD-ROM. * In order to access the Main Menu, refer to continue the installation procedure. Follow the instructions indicated in the Main Menu of the scanner being used. 3. Page 3-107 TWAIN Source Installing the TWAIN source 1. Click on Install TWAIN Source in the wizard to "Using the Scanner Utilities CD-ROM" on page 1-3. 2.
Scan System Operation Guide (Functions Edition) Rev-9
Page 229
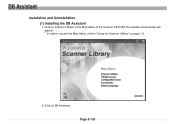
DB Assistant Installation and Uninstallation (1) Installing the DB Assistant 1. Page 3-133 Click on Scanner Utilities in the Main Menu of the Scanner CD-ROM. Click on DB Assistant. The window shown below will appear. * In order to access the Main Menu, refer to "Using the Scanner Utilities" on page 1-3. 2.
DB Assistant Installation and Uninstallation (1) Installing the DB Assistant 1. Page 3-133 Click on Scanner Utilities in the Main Menu of the Scanner CD-ROM. Click on DB Assistant. The window shown below will appear. * In order to access the Main Menu, refer to "Using the Scanner Utilities" on page 1-3. 2.

Scan System (G) Operation Guide (Setup Edition)
Page 23
... on the setup.exe file. 3 Click on [Scanner Utilities] in the Main Menu. 4 Click on installation. 15 Refer to the Functions Edition of the Operation Guide (On-Line Manual) for information on using DB Assistant, Scanner File Utility or your PC. Set-up Note Refer to the... Functions Edition of the Operation Guide (On-Line Manual) for more detailed information on using the included utilities. • Scanner File Utility • Address Book • Address Editor (Management Tool) • DB Assistant (Management Tool) 1 Run Windows. Follow the instructions...
... on the setup.exe file. 3 Click on [Scanner Utilities] in the Main Menu. 4 Click on installation. 15 Refer to the Functions Edition of the Operation Guide (On-Line Manual) for information on using DB Assistant, Scanner File Utility or your PC. Set-up Note Refer to the... Functions Edition of the Operation Guide (On-Line Manual) for more detailed information on using the included utilities. • Scanner File Utility • Address Book • Address Editor (Management Tool) • DB Assistant (Management Tool) 1 Run Windows. Follow the instructions...
Scanner File Utility Quick Guide
Page 1
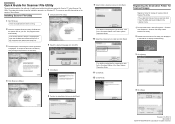
...KYOCERA MITA Corporation All rights reserved. The screens may differ depending on Windows XP. Registering the Destination Folder for Scanned Images Register a folder for Scan to the Functions Edition of the Scan System Operation Guide. 10 Select the components to the next step. 6 Select the desired language and click [OK]. 4 Click [Scanner Utilities...]. 7 Click [Next]. 8 Confirm the installation folder and click [Next]. 9 Select Install a desktop mode and click [Next]. Installing Scanner File Utility 5 Click [Scanner File Utility]. 1 Start Windows. The...
...KYOCERA MITA Corporation All rights reserved. The screens may differ depending on Windows XP. Registering the Destination Folder for Scanned Images Register a folder for Scan to the Functions Edition of the Scan System Operation Guide. 10 Select the components to the next step. 6 Select the desired language and click [OK]. 4 Click [Scanner Utilities...]. 7 Click [Next]. 8 Confirm the installation folder and click [Next]. 9 Select Install a desktop mode and click [Next]. Installing Scanner File Utility 5 Click [Scanner File Utility]. 1 Start Windows. The...


