
1650/2050/2550 Operation Guide Rev-4 (Basic)
Page 4
Network Scanner Kit ...4-10 Memory Card (CompactFlash 4-11 Hard Disk ...4-11 Additional Memory ...4-11 Optional Equipment ...4-12 5 Maintenance 5-1 Cleaning the Machine ...5-1 Replacing the Toner Container and the Waste Toner Box 5-5 6 Troubleshooting 6-1 If Trouble Occurs ...6-1 Displayed Messages ...6-4 Paper Jams ...6-8 Jam Location Indicators ...6-8 Notes ...6-9 Removal Procedures ...6-9 Appendix ...Appendix-1 Specifications ...Appendix-1 Main Body ...Appendix-1 Copier Functions Appendix-2 Printer...
Network Scanner Kit ...4-10 Memory Card (CompactFlash 4-11 Hard Disk ...4-11 Additional Memory ...4-11 Optional Equipment ...4-12 5 Maintenance 5-1 Cleaning the Machine ...5-1 Replacing the Toner Container and the Waste Toner Box 5-5 6 Troubleshooting 6-1 If Trouble Occurs ...6-1 Displayed Messages ...6-4 Paper Jams ...6-8 Jam Location Indicators ...6-8 Notes ...6-9 Removal Procedures ...6-9 Appendix ...Appendix-1 Specifications ...Appendix-1 Main Body ...Appendix-1 Copier Functions Appendix-2 Printer...

1650/2050/2550 Operation Guide Rev-4 (Basic)
Page 16
... (for a prolonged period of time, remove all consumables in accordance with Federal, State and Local rules and regulations. If toner happens to spill from the toner container or the waste toner box, avoid inhalation and ingestion, as well as contact with your eyes and skin. • If you do happen to force... open or destroy the toner container or the waste toner box. Do not look directly at the light from the cassette and the multi-bypass tray and seal in its original packaging. If...
... (for a prolonged period of time, remove all consumables in accordance with Federal, State and Local rules and regulations. If toner happens to spill from the toner container or the waste toner box, avoid inhalation and ingestion, as well as contact with your eyes and skin. • If you do happen to force... open or destroy the toner container or the waste toner box. Do not look directly at the light from the cassette and the multi-bypass tray and seal in its original packaging. If...

1650/2050/2550 Operation Guide Rev-4 (Basic)
Page 20
.... 3 Basic Operation This chapter contains explanations on the basic procedures of simple copying and printing. 4 Optional Equipment This chapter contains explanations on replacement of the toner container and the waste toner box and maintenance of this product.
.... 3 Basic Operation This chapter contains explanations on the basic procedures of simple copying and printing. 4 Optional Equipment This chapter contains explanations on replacement of the toner container and the waste toner box and maintenance of this product.

1650/2050/2550 Operation Guide Rev-4 (Basic)
Page 26
... it on the platen. 14 Left cover - Set an original here for copying. Pull this cover if a paper jam occurs inside the machine. 15 Waste toner box 16 Toner container release lever - Be sure to set an original along these plates when setting it back again after replacing the... or when images become dirty. 19 Front cover - Open this cover when replacing the toner container and the waste toner box or when cleaning this lever when replacing the toner container. 17 Toner container 18 Charger cleaner rod - Be sure to lay the original face-down and align the edge of the original flush up...
... it on the platen. 14 Left cover - Set an original here for copying. Pull this cover if a paper jam occurs inside the machine. 15 Waste toner box 16 Toner container release lever - Be sure to set an original along these plates when setting it back again after replacing the... or when images become dirty. 19 Front cover - Open this cover when replacing the toner container and the waste toner box or when cleaning this lever when replacing the toner container. 17 Toner container 18 Charger cleaner rod - Be sure to lay the original face-down and align the edge of the original flush up...

1650/2050/2550 Operation Guide Rev-4 (Basic)
Page 98
Maintenance Cleaning the Slit Glass If copies appear soiled, such as black lines appearing on page 5-5. A Important! Wipe the slit glass with a dry soft cloth. Note For cleaning the inside of the main body, see Replacing the Toner Container and the Waste Toner Box on the copy image while using the optional document processor, the slit glass A is dirty. Never use water, thinner, organic solvents or alcohol. Cleaning the Separation Needle 1 Open the front cover. 2 Remove the cleaning brush. 3 Pull the left cover handle up to open the cover. 5-2
Maintenance Cleaning the Slit Glass If copies appear soiled, such as black lines appearing on page 5-5. A Important! Wipe the slit glass with a dry soft cloth. Note For cleaning the inside of the main body, see Replacing the Toner Container and the Waste Toner Box on the copy image while using the optional document processor, the slit glass A is dirty. Never use water, thinner, organic solvents or alcohol. Cleaning the Separation Needle 1 Open the front cover. 2 Remove the cleaning brush. 3 Pull the left cover handle up to open the cover. 5-2

1650/2050/2550 Operation Guide Rev-4 (Basic)
Page 101
... the old waste toner box. 5-5 Replace the toner container together with the waste toner box. Add toner, resume copying.] is displayed on the message display and the machine stops, add toner. Unable to incinerate the toner container or the waste toner box. Caution Do not attempt to copy. Important! Whenever the toner container is left , remove the waste toner box. Maintenance Replacing the Toner Container and the Waste Toner Box When...
... the old waste toner box. 5-5 Replace the toner container together with the waste toner box. Add toner, resume copying.] is displayed on the message display and the machine stops, add toner. Unable to incinerate the toner container or the waste toner box. Caution Do not attempt to copy. Important! Whenever the toner container is left , remove the waste toner box. Maintenance Replacing the Toner Container and the Waste Toner Box When...

1650/2050/2550 Operation Guide Rev-4 (Basic)
Page 102
... or destroy the toner container or the waste toner box. 5 Place the old waste toner box in the charger section. Maintenance Warning High voltage is a danger of electrical shock. 3 Use the cap attached to the center of the old waste toner box to cover the opening. 4 Turn the toner container release lever ...A to the left to pull out the toner container. Caution Do not attempt to incinerate the toner container or the waste toner box. Take sufficient care when working in this ...
... or destroy the toner container or the waste toner box. 5 Place the old waste toner box in the charger section. Maintenance Warning High voltage is a danger of electrical shock. 3 Use the cap attached to the center of the old waste toner box to cover the opening. 4 Turn the toner container release lever ...A to the left to pull out the toner container. Caution Do not attempt to incinerate the toner container or the waste toner box. Take sufficient care when working in this ...
1650/2050/2550 Operation Guide Rev-4 (Basic)
Page 105
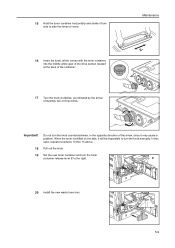
...Install the new waste toner box. 5-9 In this case, repeat procedures 13 thru 15 above. 15 Hold the toner container horizontally and shake it may cause a problem. Set the new toner container and turn the knob manually. When the toner is shifted to one side, it will be impossible to turn the toner container release ...the knob clockwise, as indicated by the arrow, completely two or three times. Maintenance 16 Insert the knob, which comes with the toner container, into the middle white gear of the drive section located at the back of the arrow, since it from side to the right...
...Install the new waste toner box. 5-9 In this case, repeat procedures 13 thru 15 above. 15 Hold the toner container horizontally and shake it may cause a problem. Set the new toner container and turn the knob manually. When the toner is shifted to one side, it will be impossible to turn the toner container release ...the knob clockwise, as indicated by the arrow, completely two or three times. Maintenance 16 Insert the knob, which comes with the toner container, into the middle white gear of the drive section located at the back of the arrow, since it from side to the right...

1650/2050/2550 Operation Guide Rev-4 (Basic)
Page 106
Note In order to ensure the best copying quality, in accordance with Federal, State and Local rules and regulations. Maintenance 21 Close the front cover. After use, always dispose of the toner container and the waste toner box in addition to the cleaning done when changing the toner container, regularly (about once per month) carry out step 7 on page 5-7 and step 4 on page 5-4. 5-10
Note In order to ensure the best copying quality, in accordance with Federal, State and Local rules and regulations. Maintenance 21 Close the front cover. After use, always dispose of the toner container and the waste toner box in addition to the cleaning done when changing the toner container, regularly (about once per month) carry out step 7 on page 5-7 and step 4 on page 5-4. 5-10

1650/2050/2550 Operation Guide Rev-4 (Basic)
Page 110
...possible. Message Procedure Reference page Close ## cover. CANCEL: Stops printing. Set cassette. Add toner Toner remaining in P cassette.] Add paper. Add toner, resume copying.] Replace Waste Toner Box The waste toner box is no paper loaded of a size that can be used . Close all the way ...To change cassette. GO: Prints onto the currently selected paper. The toner container is not set in the department management mode Chapter 4 in and copying is full. 5-5 Replace the waste toner box with your management code has Refer to clear the copy count. ...
...possible. Message Procedure Reference page Close ## cover. CANCEL: Stops printing. Set cassette. Add toner Toner remaining in P cassette.] Add paper. Add toner, resume copying.] Replace Waste Toner Box The waste toner box is no paper loaded of a size that can be used . Close all the way ...To change cassette. GO: Prints onto the currently selected paper. The toner container is not set in the department management mode Chapter 4 in and copying is full. 5-5 Replace the waste toner box with your management code has Refer to clear the copy count. ...

1650/2050/2550 Operation Guide Rev-4 (Basic)
Page 134
Index T Text ...3-2 Text + Photo ...3-2 Time ...2-20 Time difference ...2-20 Toner container ...1-2, 5-5 Turning the power on ...2-14 U USB cable ...2-11 USB interface connector 1-3, 2-12 W Warm up ...2-14, 3-1 Waste toner box ...1-2, 5-5 Z Zoom copying ...3-5 Zoom mode ...3-6 Index-4
Index T Text ...3-2 Text + Photo ...3-2 Time ...2-20 Time difference ...2-20 Toner container ...1-2, 5-5 Turning the power on ...2-14 U USB cable ...2-11 USB interface connector 1-3, 2-12 W Warm up ...2-14, 3-1 Waste toner box ...1-2, 5-5 Z Zoom copying ...3-5 Zoom mode ...3-6 Index-4

Fax System (L) Operation Guide
Page 12
... direct sunlight. „ Power supply/Grounding the product DO NOT connect this machine. CAUTION LABELS INSTALLATION PRECAUTIONS PRECAUTIONS FOR USE Loading Paper Replacing the Toner Container and Waste Toner Box Paper Jams If Trouble Occers Cleaning the Machine INSTALLATION PRECAUTIONS „ Environment Avoid installing this product in locations where the top or upper rear...
... direct sunlight. „ Power supply/Grounding the product DO NOT connect this machine. CAUTION LABELS INSTALLATION PRECAUTIONS PRECAUTIONS FOR USE Loading Paper Replacing the Toner Container and Waste Toner Box Paper Jams If Trouble Occers Cleaning the Machine INSTALLATION PRECAUTIONS „ Environment Avoid installing this product in locations where the top or upper rear...

Basic Guide
Page 15
... CAUTION: Do not attempt to force open or destroy the Toner Container or Waste Toner Box. Store all consumables in accordance with a large amount of time, remove the paper from the Toner Container or Waste Toner Box, avoid inhalation and ingestion, as well as contact with soap... water. Keep the Toner Container and Waste Toner Box out of the reach of the Toner Container and Waste Toner Box in a cool, dark location. If you do happen to ingest toner, rinse your eyes and skin. Do not attempt to incinerate the Toner Container or Waste Toner Box. Dangerous sparks may ...
... CAUTION: Do not attempt to force open or destroy the Toner Container or Waste Toner Box. Store all consumables in accordance with a large amount of time, remove the paper from the Toner Container or Waste Toner Box, avoid inhalation and ingestion, as well as contact with soap... water. Keep the Toner Container and Waste Toner Box out of the reach of the Toner Container and Waste Toner Box in a cool, dark location. If you do happen to ingest toner, rinse your eyes and skin. Do not attempt to incinerate the Toner Container or Waste Toner Box. Dangerous sparks may ...

Basic Guide
Page 24
Contents 4 Optional Equipment Optional Equipment Overview 4-2 Document Processor 4-3 Paper Feeder 4-7 Duplex Unit 4-8 Finisher 4-8 Job Separator 4-12 Key Counter 4-13 Fax Kit 4-14 Network Scanner Kit 4-14 Memory Card (CompactFlash 4-14 Hard Disk 4-15 Expansion Memory 4-15 5 Maintenance Cleaning the Machine 5-2 Replacing the Toner Container and Waste Toner Box 5-5 6 Troubleshooting Problem Solving 6-2 Error Messages and Correction 6-5 Paper Jams 6-10 Appendix Specifications Appendix-2 xxii BASIC OPERATION GUIDE
Contents 4 Optional Equipment Optional Equipment Overview 4-2 Document Processor 4-3 Paper Feeder 4-7 Duplex Unit 4-8 Finisher 4-8 Job Separator 4-12 Key Counter 4-13 Fax Kit 4-14 Network Scanner Kit 4-14 Memory Card (CompactFlash 4-14 Hard Disk 4-15 Expansion Memory 4-15 5 Maintenance Cleaning the Machine 5-2 Replacing the Toner Container and Waste Toner Box 5-5 6 Troubleshooting Problem Solving 6-2 Error Messages and Correction 6-5 Paper Jams 6-10 Appendix Specifications Appendix-2 xxii BASIC OPERATION GUIDE

Basic Guide
Page 27
Machine Parts 13 14 12 16 17 15 18 19 12 Platen 13 Original Size Indicator Plates 14 Left Cover 15 Waste Toner Box 16 Toner Container Release Lever 17 Toner Container 18 Charger Cleaner Rod 19 Front Cover BASIC OPERATION GUIDE 1-3
Machine Parts 13 14 12 16 17 15 18 19 12 Platen 13 Original Size Indicator Plates 14 Left Cover 15 Waste Toner Box 16 Toner Container Release Lever 17 Toner Container 18 Charger Cleaner Rod 19 Front Cover BASIC OPERATION GUIDE 1-3

Basic Guide
Page 89
5 Maintenance This chapter explains the following topics: • Cleaning the Machine 5-2 • Replacing the Toner Container and Waste Toner Box.. 5-5 BASIC OPERATION GUIDE 5-1
5 Maintenance This chapter explains the following topics: • Cleaning the Machine 5-2 • Replacing the Toner Container and Waste Toner Box.. 5-5 BASIC OPERATION GUIDE 5-1

Basic Guide
Page 93
... cap attached to the center of the used Waste Toner Box to the left, remove the Waste Toner Box. IMPORTANT: Do not invert the old waste toner box. Set toner container. BASIC OPERATION GUIDE 5-5 Maintenance Replacing the Toner Container and Waste Toner Box If Unable to incinerate the Toner Container. Please Add Toner displays, replace the Toner Container and Waste Toner Box. Take sufficient care when working in the charger...
... cap attached to the center of the used Waste Toner Box to the left, remove the Waste Toner Box. IMPORTANT: Do not invert the old waste toner box. Set toner container. BASIC OPERATION GUIDE 5-5 Maintenance Replacing the Toner Container and Waste Toner Box If Unable to incinerate the Toner Container. Please Add Toner displays, replace the Toner Container and Waste Toner Box. Take sufficient care when working in the charger...

Basic Guide
Page 94
... times. IMPORTANT: Do not use excessive force to pull out the rod or attempt to the left and pull out A the Toner Container. 5 Place the used Toner Container and the used Waste Toner Box in the plastic bags provided for disposal. 6 Hold the charger cleaner rod and gently pull it out as far as it...
... times. IMPORTANT: Do not use excessive force to pull out the rod or attempt to the left and pull out A the Toner Container. 5 Place the used Toner Container and the used Waste Toner Box in the plastic bags provided for disposal. 6 Hold the charger cleaner rod and gently pull it out as far as it...

Basic Guide
Page 96
Maintenance 13 Install the new Waste Toner Box. 14 Close the Front Cover. NOTE: After use, always dispose of the Toner Container and Waste Toner Box in accordance with local rules and regulations. 5-8 BASIC OPERATION GUIDE
Maintenance 13 Install the new Waste Toner Box. 14 Close the Front Cover. NOTE: After use, always dispose of the Toner Container and Waste Toner Box in accordance with local rules and regulations. 5-8 BASIC OPERATION GUIDE

Basic Guide
Page 102
Replace the Waste Toner Box. or Clean the slit glass original fed from DP. The Slit Glass is required to copy. If the message displays again, press [Stop/Clear] and ... the main power ({) and contact your Service Representative or Authorized Service Center immediately. Time for maintenance Periodic maintenance is dirty. Replace Waste Toner Box The Waste Toner Box is used. Please Add Toner Replace the Toner Container. Clean the Slit Glass as black lines may appear when the optional Document Processor is full. Contact your Service Representative or...
Replace the Waste Toner Box. or Clean the slit glass original fed from DP. The Slit Glass is required to copy. If the message displays again, press [Stop/Clear] and ... the main power ({) and contact your Service Representative or Authorized Service Center immediately. Time for maintenance Periodic maintenance is dirty. Replace Waste Toner Box The Waste Toner Box is used. Please Add Toner Replace the Toner Container. Clean the Slit Glass as black lines may appear when the optional Document Processor is full. Contact your Service Representative or...


