KM-NET Viewer Operation Guide Rev-5.2-2010.10
Page 70
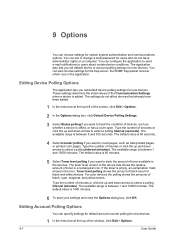
...of the window, click Edit > Options. 9-1 User Guide The available range is offline, or has a cover open. The available range is 60 minutes. 5 Select Toner level polling if you want to select a ...administrator rights on a computer. The available range is 1440 minutes. 6 To save your settings and close the Options dialog box, click OK. Toner level polling shows the amount of black toner for new... added. 1 In the menu bar at the top of toner available in the devices. For color devices the polling shows the amounts of toner in the icon. The default value is between 1...
...of the window, click Edit > Options. 9-1 User Guide The available range is offline, or has a cover open. The available range is 60 minutes. 5 Select Toner level polling if you want to select a ...administrator rights on a computer. The available range is 1440 minutes. 6 To save your settings and close the Options dialog box, click OK. Toner level polling shows the amount of black toner for new... added. 1 In the menu bar at the top of toner available in the devices. For color devices the polling shows the amounts of toner in the icon. The default value is between 1...
KM-NET Viewer Operation Guide Rev-5.2-2010.10
Page 72
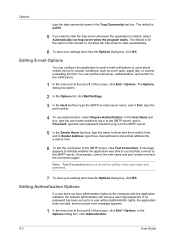
...access error message appears. 1 In the menu bar at the top left of the user name and password. 7 To save your settings and close the Options dialog box, click OK. You can set the mail server, authentication, and sender for the option to be cleared: to not allow... Test Connection. A message appears to indicate whether the application was able to successfully connect to users about certain device or counter conditions, such as cover open, paper jam, or counter exceeding the limit. In the Options dialog box, click Authentication. 9-3 User Guide Editing E-mail Options You can ...
...access error message appears. 1 In the menu bar at the top left of the user name and password. 7 To save your settings and close the Options dialog box, click OK. You can set the mail server, authentication, and sender for the option to be cleared: to not allow... Test Connection. A message appears to indicate whether the application was able to successfully connect to users about certain device or counter conditions, such as cover open, paper jam, or counter exceeding the limit. In the Options dialog box, click Authentication. 9-3 User Guide Editing E-mail Options You can ...

FS-C5020/C5030 Operation Guide (Advanced Edition)
Page 32
... The printer is currently being replenished. Jobs inside the printer are being performed automatically as with photographs, etc. Pressing [GO] allows you powered on the operator panel and [GO] is pressed, the cover is opened or closed, or... a print job is being canceled. Error codes See the Troubleshooting section in Auto Sleep. This message may be displayed during continuous printing of a large volume of pages which require a large amount of print job before completing the last page. The color calibration function is received. The printer...
... The printer is currently being replenished. Jobs inside the printer are being performed automatically as with photographs, etc. Pressing [GO] allows you powered on the operator panel and [GO] is pressed, the cover is opened or closed, or... a print job is being canceled. Error codes See the Troubleshooting section in Auto Sleep. This message may be displayed during continuous printing of a large volume of pages which require a large amount of print job before completing the last page. The color calibration function is received. The printer...
FS-C5020/C5030 Operation Guide (Basic Edition)
Page 28
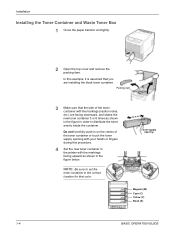
Do not forcefully push in the printer with the markings (caution notes, etc.) are installing the black toner container. In this procedure. 4 Set the new toner container in on the center of ... supply opening Magenta (M) Cyan (C) Yellow (Y) Black (K) 1-4 BASIC OPERATION GUIDE NOTE: Be sure to distribute the toner evenly inside the container. Packing item 3 Make sure that color. Installation Installing the Toner Container and Waste Toner Box 1 Close the paper transfer unit tightly. 2 Open the top cover and remove the packing item.
Do not forcefully push in the printer with the markings (caution notes, etc.) are installing the black toner container. In this procedure. 4 Set the new toner container in on the center of ... supply opening Magenta (M) Cyan (C) Yellow (Y) Black (K) 1-4 BASIC OPERATION GUIDE NOTE: Be sure to distribute the toner evenly inside the container. Packing item 3 Make sure that color. Installation Installing the Toner Container and Waste Toner Box 1 Close the paper transfer unit tightly. 2 Open the top cover and remove the packing item.
FS-C5020/C5030 Operation Guide (Basic Edition)
Page 29
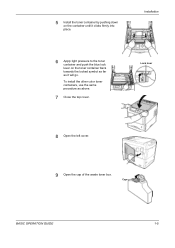
Cap BASIC OPERATION GUIDE 1-5 Lock lever 8 Open the left cover. 9 Open the cap of the waste toner box. To install the other color toner containers, use the same procedure as it clicks firmly into place. Installation 6 Apply light pressure to the toner container and push the blue lock lever on the container until it will go. 5 Install the toner container by pushing down on the toner container back towards the locked symbol as far as above. 7 Close the top cover.
Cap BASIC OPERATION GUIDE 1-5 Lock lever 8 Open the left cover. 9 Open the cap of the waste toner box. To install the other color toner containers, use the same procedure as it clicks firmly into place. Installation 6 Apply light pressure to the toner container and push the blue lock lever on the container until it will go. 5 Install the toner container by pushing down on the toner container back towards the locked symbol as far as above. 7 Close the top cover.
FS-C5020/C5030 Operation Guide (Basic Edition)
Page 30
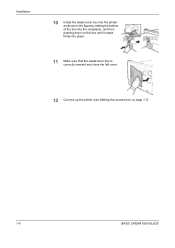
Installation 10 Install the waste toner box into the printer as shown in the figure by setting the bottom of the box into the receptacle, and then pushing down on the box until it snaps firmly into place. 11 Make sure that the waste toner box is correctly inserted and close the left cover. 12 Connect up the printer (see Making the connections on page 1-7). 1-6 BASIC OPERATION GUIDE
Installation 10 Install the waste toner box into the printer as shown in the figure by setting the bottom of the box into the receptacle, and then pushing down on the box until it snaps firmly into place. 11 Make sure that the waste toner box is correctly inserted and close the left cover. 12 Connect up the printer (see Making the connections on page 1-7). 1-6 BASIC OPERATION GUIDE

FS-C5020/C5030 Operation Guide (Basic Edition)
Page 49
BASIC OPERATION GUIDE 4-7 Proceed to install it firmly in place. 9 Pull the blue lock lever on the toner container back towards the locked symbol as far as it will go. Maintenance 8 Push down on the top of the toner container to the next section. Lock Lever 10 Use the same procedure to replace the other color toner containers. 11 Close the top cover.
BASIC OPERATION GUIDE 4-7 Proceed to install it firmly in place. 9 Pull the blue lock lever on the toner container back towards the locked symbol as far as it will go. Maintenance 8 Push down on the top of the toner container to the next section. Lock Lever 10 Use the same procedure to replace the other color toner containers. 11 Close the top cover.

FS-C5020/C5030 Operation Guide (Basic Edition)
Page 55
Maintenance 3 Once you must use the cleaning cloth included in the toner kit. 1 While pulling the green paper transfer unit release lever, pull out the paper transfer unit. To clean the paper transfer unit, you are finished cleaning all 4 lenses, close the left cover. Paper Transfer Unit Release Lever Paper Transfer Unit BASIC OPERATION GUIDE 4-13 Cleaning the Paper Transfer Unit Print problems such as soiling of the reverse side of printed pages may occur if the paper transfer unit becomes dirty.
Maintenance 3 Once you must use the cleaning cloth included in the toner kit. 1 While pulling the green paper transfer unit release lever, pull out the paper transfer unit. To clean the paper transfer unit, you are finished cleaning all 4 lenses, close the left cover. Paper Transfer Unit Release Lever Paper Transfer Unit BASIC OPERATION GUIDE 4-13 Cleaning the Paper Transfer Unit Print problems such as soiling of the reverse side of printed pages may occur if the paper transfer unit becomes dirty.
FS-C5020/C5030 Operation Guide (Basic Edition)
Page 59
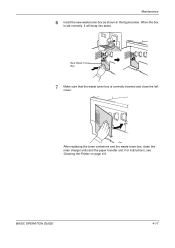
When the box is correctly inserted and close the left cover. New Waste Toner Box 7 Make sure that the waste toner box is set correctly, it will snap into place. After replacing the toner containers and the waste toner box, clean the main charger units and the paper transfer unit. For instructions, see Cleaning the Printer on page 4-8. Maintenance 6 Insert the new waste toner box as shown in the figure below. BASIC OPERATION GUIDE 4-17
When the box is correctly inserted and close the left cover. New Waste Toner Box 7 Make sure that the waste toner box is set correctly, it will snap into place. After replacing the toner containers and the waste toner box, clean the main charger units and the paper transfer unit. For instructions, see Cleaning the Printer on page 4-8. Maintenance 6 Insert the new waste toner box as shown in the figure below. BASIC OPERATION GUIDE 4-17
FS-C5020/C5030 Operation Guide (Basic Edition)
Page 67
... controller error (#=0, 1, 2, ...). Install the cassette. Install the new waste toner box. Close duplexer top cover The top cover of the optional duplexer is open . Close left cover The left cover. The printer does not operate when this message is full. The cassette number can be ready for printing... The waste toner box is displayed. Call for service. Close the left cover of the printer, press [GO] and the printer will be 1 (topmost) to 4 (bottom). If Call service appears, turn off the printer, disconnect the power cord, and contact your service technician....
... controller error (#=0, 1, 2, ...). Install the cassette. Install the new waste toner box. Close duplexer top cover The top cover of the optional duplexer is open . Close left cover The left cover. The printer does not operate when this message is full. The cassette number can be ready for printing... The waste toner box is displayed. Call for service. Close the left cover of the printer, press [GO] and the printer will be 1 (topmost) to 4 (bottom). If Call service appears, turn off the printer, disconnect the power cord, and contact your service technician....

FS-C5020/C5030 Operation Guide (Basic Edition)
Page 68
...and refer to print with a paper size and paper type that is open . The user ID entered for duplex printing. The printer again reads it from the beginning of the hard disk. Close the printer rear cover. Duplex disabled Press GO You attempted to Storage Error Codes on the interface from the... printer's memory card slot and insert the correct memory card. Press [GO] to Using the Operator Panel, section of the paper only...
...and refer to print with a paper size and paper type that is open . The user ID entered for duplex printing. The printer again reads it from the beginning of the hard disk. Close the printer rear cover. Duplex disabled Press GO You attempted to Storage Error Codes on the interface from the... printer's memory card slot and insert the correct memory card. Press [GO] to Using the Operator Panel, section of the paper only...

FS-C5020/C5030 Operation Guide (Basic Edition)
Page 78
Troubleshooting Fuser Cover Rear Cover CAUTION: The fuser unit inside the printer is jammed at the MP tray. 2 Open and close the fuser cover and rear cover. [Paper jam MP Tray] Paper is hot. Do not touch it with your hands as it may result in and close the paper transfer unit (the paper jam error will be reset). 5-18 BASIC OPERATION GUIDE Remove the jammed paper using the procedure given below. 1 Remove the paper jammed at the MP tray. Remove jammed paper carefully. 5 Push the paper transfer unit back in burn injury.
Troubleshooting Fuser Cover Rear Cover CAUTION: The fuser unit inside the printer is jammed at the MP tray. 2 Open and close the fuser cover and rear cover. [Paper jam MP Tray] Paper is hot. Do not touch it with your hands as it may result in and close the paper transfer unit (the paper jam error will be reset). 5-18 BASIC OPERATION GUIDE Remove the jammed paper using the procedure given below. 1 Remove the paper jammed at the MP tray. Remove jammed paper carefully. 5 Push the paper transfer unit back in burn injury.

FS-C5020/C5030 Operation Guide (Basic Edition)
Page 79
...to the User's Manual for the envelope feeder. [Paper jam Duplexer] Paper is jammed at the MP Tray. For details, refer to 4). Then, open and close the paper transfer unit. Refer to the Operation Guide for the optional paper cassette and remove the jammed paper. [Paper jam EF] Paper is jammed... inside the rear cover of the optional duplexer or at the duplexer drawer. BASIC OPERATION GUIDE 5-19 Remove the jammed paper using the same procedure as for the ...
...to the User's Manual for the envelope feeder. [Paper jam Duplexer] Paper is jammed at the MP Tray. For details, refer to 4). Then, open and close the paper transfer unit. Refer to the Operation Guide for the optional paper cassette and remove the jammed paper. [Paper jam EF] Paper is jammed... inside the rear cover of the optional duplexer or at the duplexer drawer. BASIC OPERATION GUIDE 5-19 Remove the jammed paper using the same procedure as for the ...
Clearing Paper Jams
Page 1
Paper jams can occur in and close the fuser cover and rear cover. Paper is hot. Note If the optional face-up tray is also indicated. Do not touch it with your hands as well. • CAUTION Do .... • CAUTION Never use sharp tools like knifes, screwdrivers or cutters to remove and may be reset). The printer automatically goes offline when this message is jammed at the MP Tray. FS-C5015N/FS-C5025N FS-C5030N Clearing Paper Jams If the paper jammed in the paper transport system, or no store paperclips or staples...
Paper jams can occur in and close the fuser cover and rear cover. Paper is hot. Note If the optional face-up tray is also indicated. Do not touch it with your hands as well. • CAUTION Do .... • CAUTION Never use sharp tools like knifes, screwdrivers or cutters to remove and may be reset). The printer automatically goes offline when this message is jammed at the MP Tray. FS-C5015N/FS-C5025N FS-C5030N Clearing Paper Jams If the paper jammed in the paper transport system, or no store paperclips or staples...

Service Manual
Page 27
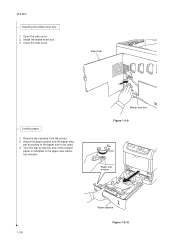
Close the top cover. Install other toner containers in the developer. 2F3/2F4 Black toner container 5. Turn the lock lever backward to the lock position. 6. Figure 1-3-7 Lock lever Magenta Yellow Cyan Black Figure 1-3-8 1-3-5 Push in the black toner container firmly until it locks in the same procedure. 7. 4.
Close the top cover. Install other toner containers in the developer. 2F3/2F4 Black toner container 5. Turn the lock lever backward to the lock position. 6. Figure 1-3-7 Lock lever Magenta Yellow Cyan Black Figure 1-3-8 1-3-5 Push in the black toner container firmly until it locks in the same procedure. 7. 4.
Service Manual
Page 28
Open the side cover. 2. Adjust the paper guides and the paper stop- Waste toner box Figure 1-3-9 Paper size window 1-3-6 Paper cassette Figure 1-3-10 Install the waste toner box. 3. 2F3/2F4 Installing the waste toner box. 1. Side cover Loading paper. 1. Remove the cassette from the printer. 2. Close the side cover. Turn the dial so that the size of the loaded paper is indicated in the paper size indication window. per according to the paper size to be used. 3.
Open the side cover. 2. Adjust the paper guides and the paper stop- Waste toner box Figure 1-3-9 Paper size window 1-3-6 Paper cassette Figure 1-3-10 Install the waste toner box. 3. 2F3/2F4 Installing the waste toner box. 1. Side cover Loading paper. 1. Remove the cassette from the printer. 2. Close the side cover. Turn the dial so that the size of the loaded paper is indicated in the paper size indication window. per according to the paper size to be used. 3.

Service Manual
Page 52
... heat roller or the press roller/belt. 1. Follow the procedure below in the heat roller or the press roller/belt). Cancel misfeed by opening and closing a cover. wait until the message display shows "Ready". 2. Removing the misfed paper will be transferred onto paper). 5. 2F3/2F4 1-4-2 Maintenance (1) Method of more than weight above...
... heat roller or the press roller/belt. 1. Follow the procedure below in the heat roller or the press roller/belt). Cancel misfeed by opening and closing a cover. wait until the message display shows "Ready". 2. Removing the misfed paper will be transferred onto paper). 5. 2F3/2F4 1-4-2 Maintenance (1) Method of more than weight above...

Service Manual
Page 73
... controller PWB (A0004), check the connection YC701 and YC702 connectors of the sensor PWB (A0001) is not cancelled to closing the top cover. (2) "Close side cover" display is bent. Malfunctioning interlock rod that interfaces between engine controller PWB (A0004) and sensor PWB (A0001) or ... (A0001), if there is trouble, remedy or replace. PWB (A0004). 2F3/2F4 1-5-3 Electrical problems Problem (1) "Close top cover" display is not cancelled to closing the top cover. Check the continuity of the harness (S02849), check the connection YC2 connector of the engine controller PWB (A0004), ...
... controller PWB (A0004), check the connection YC701 and YC702 connectors of the sensor PWB (A0001) is not cancelled to closing the top cover. (2) "Close side cover" display is bent. Malfunctioning interlock rod that interfaces between engine controller PWB (A0004) and sensor PWB (A0001) or ... (A0001), if there is trouble, remedy or replace. PWB (A0004). 2F3/2F4 1-5-3 Electrical problems Problem (1) "Close top cover" display is not cancelled to closing the top cover. Check the continuity of the harness (S02849), check the connection YC2 connector of the engine controller PWB (A0004), ...

Service Manual
Page 74
.../2F4 Problem Causes Check procedures/corrective measures (3) "Close paper transfer unit" display is not cancelled to closing the paper cassette. Check to see if the interlock rod malfunctions. Defective cassette size switch. Defective top cover/paper Replace the sensor PWB (A0001). Defective harness...sensor [PWB] (KP-974) the sensor section is trouble, remedy or replace. Defective harness (S02849) between the top cover and the top cover/ paper feed unit switch (SW701). PWB (A0004). 1-5-22 feed unit switch (SW701) of the connector terminals. Check the...
.../2F4 Problem Causes Check procedures/corrective measures (3) "Close paper transfer unit" display is not cancelled to closing the paper cassette. Check to see if the interlock rod malfunctions. Defective cassette size switch. Defective top cover/paper Replace the sensor PWB (A0001). Defective harness...sensor [PWB] (KP-974) the sensor section is trouble, remedy or replace. Defective harness (S02849) between the top cover and the top cover/ paper feed unit switch (SW701). PWB (A0004). 1-5-22 feed unit switch (SW701) of the connector terminals. Check the...

Service Manual
Page 88
Open the top cover. 3. 2F3/2F4 1-6-2 Outer covers (1) Detaching and refitting the top cover Procedure 1. Open the rear cover. 2. Remove the opening and closing axis from the main unit frame and then remove the upper cover. Top cover Figure 1-6-1 1-6-2
Open the top cover. 3. 2F3/2F4 1-6-2 Outer covers (1) Detaching and refitting the top cover Procedure 1. Open the rear cover. 2. Remove the opening and closing axis from the main unit frame and then remove the upper cover. Top cover Figure 1-6-1 1-6-2


