FS-720 Operation Guide
Page 14
... refer to identify the status of the printer. Lit Indicator Action Lit X Attention Indicator (red) Fast Flashing Slow Flashing Off X X On-line / Ready Ready Indicator (green) Fast Flashing X Warm Up X Off-line Slow Flashing X X X Data Processing Off Cover Open, Toner Container Empty, Developer Unit or Drum Unit missing Paper Jam or Waiting...
... refer to identify the status of the printer. Lit Indicator Action Lit X Attention Indicator (red) Fast Flashing Slow Flashing Off X X On-line / Ready Ready Indicator (green) Fast Flashing X Warm Up X Off-line Slow Flashing X X X Data Processing Off Cover Open, Toner Container Empty, Developer Unit or Drum Unit missing Paper Jam or Waiting...
FS-720 Operation Guide
Page 29
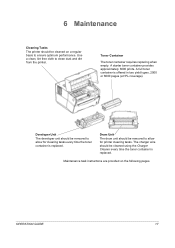
... pages (at 5% coverage). Maintenance task instructions are provided on a regular basis to clean dust and dirt from the printer. 6 Maintenance Cleaning Tasks The printer should be removed to allow for printer cleaning tasks. Drum Unit The drum unit should be cleaned on the following pages. Use a clean, lint free cloth to ensure optimum performance. Toner...
... pages (at 5% coverage). Maintenance task instructions are provided on a regular basis to clean dust and dirt from the printer. 6 Maintenance Cleaning Tasks The printer should be removed to allow for printer cleaning tasks. Drum Unit The drum unit should be cleaned on the following pages. Use a clean, lint free cloth to ensure optimum performance. Toner...
FS-720 Operation Guide
Page 31
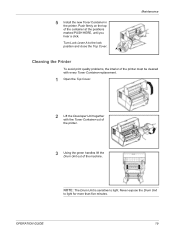
Turn Lock Lever A to light. NOTE: The Drum Unit is sensitive to the lock position and close the Top Cover. A Maintenance Cleaning the Printer To avoid print quality problems, the interior of the printer must be cleaned with every Toner Container replacement. 1 Open the Top Cover. 2 Lift the Developer... Unit together with the Toner Container out of the printer. 3 Using the green handles lift the Drum Unit out of the container at the positions marked PUSH HERE, until you hear a click. OPERATION GUIDE 19 Push firmly...
Turn Lock Lever A to light. NOTE: The Drum Unit is sensitive to the lock position and close the Top Cover. A Maintenance Cleaning the Printer To avoid print quality problems, the interior of the printer must be cleaned with every Toner Container replacement. 1 Open the Top Cover. 2 Lift the Developer... Unit together with the Toner Container out of the printer. 3 Using the green handles lift the Drum Unit out of the container at the positions marked PUSH HERE, until you hear a click. OPERATION GUIDE 19 Push firmly...
FS-720 Operation Guide
Page 32
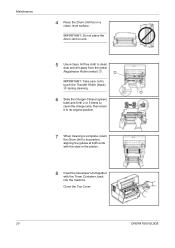
Close the Top Cover. 20 OPERATION GUIDE Maintenance 4 Place the Drum Unit flat on end. 5 Use a clean, lint free cloth to clean dust and dirt away from the metal Registration Roller (metal) c. c 6 Slide the Charger Cleaner (... forth 2 or 3 times to clean the charger wire, then return it to its position, aligning the guides at both ends with the slots in the printer. 8 Insert the Developer Unit together with the Toner Container, back into the machine. d IMPORTANT: Take care not to its original position. 7 When cleaning is complete...
Close the Top Cover. 20 OPERATION GUIDE Maintenance 4 Place the Drum Unit flat on end. 5 Use a clean, lint free cloth to clean dust and dirt away from the metal Registration Roller (metal) c. c 6 Slide the Charger Cleaner (... forth 2 or 3 times to clean the charger wire, then return it to its position, aligning the guides at both ends with the slots in the printer. 8 Insert the Developer Unit together with the Toner Container, back into the machine. d IMPORTANT: Take care not to its original position. 7 When cleaning is complete...
FS-720 Operation Guide
Page 33
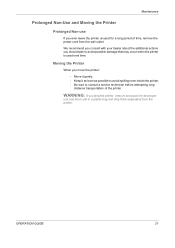
... level as possible to avoid spilling toner inside the printer. - WARNING: If you ever leave the printer unused for a long period of the printer. Maintenance Prolonged Non-Use and Moving the Printer Prolonged Non-use If you ship the printer, remove and pack the developer unit and drum unit in a plastic bag and ship them separately...
... level as possible to avoid spilling toner inside the printer. - WARNING: If you ever leave the printer unused for a long period of the printer. Maintenance Prolonged Non-Use and Moving the Printer Prolonged Non-use If you ship the printer, remove and pack the developer unit and drum unit in a plastic bag and ship them separately...
FS-720 Operation Guide
Page 36
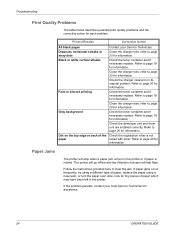
...Check the developer unit and drum unit are installed correctly. Refer to page 20 for information. Dirt on the top edge or back of the Check the registration roller is in its original position. Refer to page 20 for information. The printer will go offline and the ... printing Check the toner container and if necessary replace. Gray background Check the toner container and if necessary replace. Paper Jams The printer will fast flash. Troubleshooting Print Quality Problems The table below describes potential print quality problems and the corrective action for information. Check the...
...Check the developer unit and drum unit are installed correctly. Refer to page 20 for information. Dirt on the top edge or back of the Check the registration roller is in its original position. Refer to page 20 for information. The printer will go offline and the ... printing Check the toner container and if necessary replace. Gray background Check the toner container and if necessary replace. Paper Jams The printer will fast flash. Troubleshooting Print Quality Problems The table below describes potential print quality problems and the corrective action for information. Check the...
FS-720 Operation Guide
Page 38
Never expose the Drum Unit to light for more than five minutes. 4 If the jammed paper appears to be pinched by rollers, remove the paper in the same direction ... step 2. 2 Open the top cover and lift the Developer Unit together with the Toner Container out of the printer. 3 Using the green handles lift the Drum Unit out of the machine. NOTE: The Drum Unit is travelling through the machine. IMPORTANT: Do not try to remove paper that has already been partially fed...
Never expose the Drum Unit to light for more than five minutes. 4 If the jammed paper appears to be pinched by rollers, remove the paper in the same direction ... step 2. 2 Open the top cover and lift the Developer Unit together with the Toner Container out of the printer. 3 Using the green handles lift the Drum Unit out of the machine. NOTE: The Drum Unit is travelling through the machine. IMPORTANT: Do not try to remove paper that has already been partially fed...
FS-720 Operation Guide
Page 39
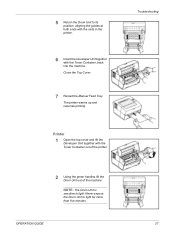
... is sensitive to light for more than five minutes. Never expose the Drum Unit to light. Printer 1 Open the top cover and lift the Developer Unit together with the Toner Container, back into the machine. The printer warms up and resumes printing. Close the Top Cover. 7 Reload the Manual Feed... Tray. OPERATION GUIDE Troubleshooting 27 5 Return the Drum Unit to its position, aligning the guides at both ends with the slots in...
... is sensitive to light for more than five minutes. Never expose the Drum Unit to light. Printer 1 Open the top cover and lift the Developer Unit together with the Toner Container, back into the machine. The printer warms up and resumes printing. Close the Top Cover. 7 Reload the Manual Feed... Tray. OPERATION GUIDE Troubleshooting 27 5 Return the Drum Unit to its position, aligning the guides at both ends with the slots in...
FS-720 Operation Guide
Page 40
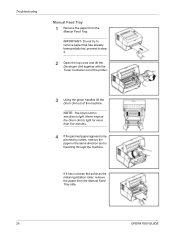
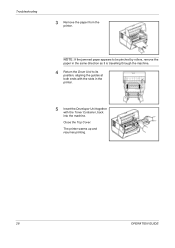
Troubleshooting 3 Remove the paper from the printer. The printer warms up and resumes printing. 28 OPERATION GUIDE Close the Top Cover. NOTE: If the jammed paper appears to be pinched by rollers, remove the paper in the same direction as it is travelling through the machine. 4 Return the Drum Unit to its position, aligning the guides at both ends with the slots in the printer. 5 Insert the Developer Unit together with the Toner Container, back into the machine.
Troubleshooting 3 Remove the paper from the printer. The printer warms up and resumes printing. 28 OPERATION GUIDE Close the Top Cover. NOTE: If the jammed paper appears to be pinched by rollers, remove the paper in the same direction as it is travelling through the machine. 4 Return the Drum Unit to its position, aligning the guides at both ends with the slots in the printer. 5 Insert the Developer Unit together with the Toner Container, back into the machine.


