
Operation Guide
Page 79
...Kyocera Mita Digital Library CD-ROM supplied with the printer. Add printer icon 4 Follow the wizard until the Select printer... dialog box is set to print to a local port. If you use the local parallel port to connect to the following port setting. When the printer is found in the Printer... List, click (highlight) it, then Finish. 1-65 Job Manager will start. 3 Click the Add printer... Printer Utilities > Install KM-NET Job Manager. 1 Browse through Windows Start > Programs > KYOCERA MITA ...
...Kyocera Mita Digital Library CD-ROM supplied with the printer. Add printer icon 4 Follow the wizard until the Select printer... dialog box is set to print to a local port. If you use the local parallel port to connect to the following port setting. When the printer is found in the Printer... List, click (highlight) it, then Finish. 1-65 Job Manager will start. 3 Click the Add printer... Printer Utilities > Install KM-NET Job Manager. 1 Browse through Windows Start > Programs > KYOCERA MITA ...

Operation Guide
Page 178
B-8 Expanding the Printer Memory Adjusting the Memory on the Printer Driver After you install the additional memory to the printer, follow the instructions below to set the printer driver so that the printer can use the memories efficiently. 1 Click the Windows Start button, point to close the window. The Properties dialog box will open. Click the Device Settings tab. 3 Enter the total memory size installed to the printer (up to 144 MB) in the Memory box. 4 Click the OK button to Settings then click Printers. 2 Right click the Kyocera Mita FS-1900 KX icon, and click Properties.
B-8 Expanding the Printer Memory Adjusting the Memory on the Printer Driver After you install the additional memory to the printer, follow the instructions below to set the printer driver so that the printer can use the memories efficiently. 1 Click the Windows Start button, point to close the window. The Properties dialog box will open. Click the Device Settings tab. 3 Enter the total memory size installed to the printer (up to 144 MB) in the Memory box. 4 Click the OK button to Settings then click Printers. 2 Right click the Kyocera Mita FS-1900 KX icon, and click Properties.

Operation Guide
Page 218
...1024 kB, or 1,048,576 bytes. Emulation This refers to the network using SNMP commands. The printer has an expansion socket, into which you can be used with the Kyocera Mita FS series. First mode This is Off. IEEE1284 This is a standard used to a computer, and ... printing on the CD-ROM supplied with the printer. The printer is set to enhance the printer's resolution and produce high-quality printing. The default setting is Kyocera's original smoothing function. The contents of the CD-ROM include guides, printer drivers, and various utilities. dpi (dots per inch...
...1024 kB, or 1,048,576 bytes. Emulation This refers to the network using SNMP commands. The printer has an expansion socket, into which you can be used with the Kyocera Mita FS series. First mode This is Off. IEEE1284 This is a standard used to a computer, and ... printing on the CD-ROM supplied with the printer. The printer is set to enhance the printer's resolution and produce high-quality printing. The default setting is Kyocera's original smoothing function. The contents of the CD-ROM include guides, printer drivers, and various utilities. dpi (dots per inch...
Operation Guide
Page 219
... amount of the cassette when printing on the Kyocera Mita Digital Library CD-ROM supplied with the printer. The printer can receive data, but cannot print. RAM disk This is located on 8-bit chunks. Online The printer can set any memory size arbitrarily, and use...those expressions. Printer driver The printer driver makes it possible for Multi-Purpose tray. Install the printer driver on the computer connected to 999.75 points. The printer goes into sleep mode from the printer's operator panel. Status page This lists printer conditions, such as the printer's memory, the...
... amount of the cassette when printing on the Kyocera Mita Digital Library CD-ROM supplied with the printer. The printer can receive data, but cannot print. RAM disk This is located on 8-bit chunks. Online The printer can set any memory size arbitrarily, and use...those expressions. Printer driver The printer driver makes it possible for Multi-Purpose tray. Install the printer driver on the computer connected to 999.75 points. The printer goes into sleep mode from the printer's operator panel. Status page This lists printer conditions, such as the printer's memory, the...
Operation Guide
Page 226
... Windows NT 4.0, and Windows 2000 • Apple Macintosh OS 7 or greater • IBM OS/2 Version 2.0 or greater • Linux The guide focuses on using the printer driver on how to install, configure, and use the printer drivers for the Kyocera Mita FS-1900 printer. The driver CD-ROM's is included with the printer. Preface This guide contains information on Windows Me.
... Windows NT 4.0, and Windows 2000 • Apple Macintosh OS 7 or greater • IBM OS/2 Version 2.0 or greater • Linux The guide focuses on using the printer driver on how to install, configure, and use the printer drivers for the Kyocera Mita FS-1900 printer. The driver CD-ROM's is included with the printer. Preface This guide contains information on Windows Me.
Operation Guide
Page 228
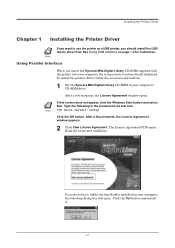
... Command Line text box: Note [CD drive letter]:\setup Click the OK button. If you insert the Kyocera Mita Digital Library CD-ROM supplied with the printer into your computer's CD-ROM drive. Note Using Parallel Interface When you do not have Adobe Acrobat Reader... screen does not appear, click the Windows Start button and select Run. Installing the Printer Driver Chapter 1 Installing the Printer Driver If you want to use the printer as a USB printer, you should install the USB device driver first. Read the terms and conditions. After a few moments, the License Agreement window...
... Command Line text box: Note [CD drive letter]:\setup Click the OK button. If you insert the Kyocera Mita Digital Library CD-ROM supplied with the printer into your computer's CD-ROM drive. Note Using Parallel Interface When you do not have Adobe Acrobat Reader... screen does not appear, click the Windows Start button and select Run. Installing the Printer Driver Chapter 1 Installing the Printer Driver If you want to use the printer as a USB printer, you should install the USB device driver first. Read the terms and conditions. After a few moments, the License Agreement window...
Operation Guide
Page 229
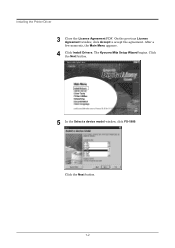
The Kyocera Mita Setup Wizard begins. Installing the Printer Driver 3 Close the License Agreement PDF. After a few moments, the Main Menu appears. 4 Click Install Drivers. Click the Next button. 1-2 On the previous License Agreement window, click Accept to accept the agreement. Click the Next button. 5 In the Select a device model window, click FS-1900.
The Kyocera Mita Setup Wizard begins. Installing the Printer Driver 3 Close the License Agreement PDF. After a few moments, the Main Menu appears. 4 Click Install Drivers. Click the Next button. 1-2 On the previous License Agreement window, click Accept to accept the agreement. Click the Next button. 5 In the Select a device model window, click FS-1900.

Operation Guide
Page 230
Click the appropriate option(s). Click the Next button. 7 Kyocera Mita FS-1900 KX is highlighted in the Available drivers list box. Installing the Printer Driver 6 In the Select a driver language window, click the language you want . Click the Next button. 8 In this window, you can choose whether you want to install TrueType screen fonts and/or Prologue/Epilogue tab. Click the Next button. 1-3
Click the appropriate option(s). Click the Next button. 7 Kyocera Mita FS-1900 KX is highlighted in the Available drivers list box. Installing the Printer Driver 6 In the Select a driver language window, click the language you want . Click the Next button. 8 In this window, you can choose whether you want to install TrueType screen fonts and/or Prologue/Epilogue tab. Click the Next button. 1-3
Operation Guide
Page 233
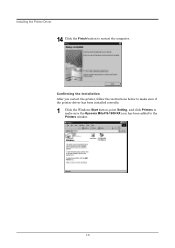
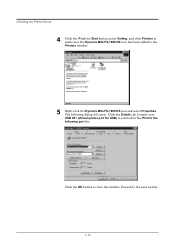
Installing the Printer Driver 14 Click the Finish button to the Printers window. 1-6 Confirming the Installation After you restart the printer, follow the instructions below to make sure if the printer driver has been installed correctly. 1 Click the Windows Start button, point Setting, and click Printers to make sure the Kyocera Mita FS-1900 KX icon has been added to restart the computer.
Installing the Printer Driver 14 Click the Finish button to the Printers window. 1-6 Confirming the Installation After you restart the printer, follow the instructions below to make sure if the printer driver has been installed correctly. 1 Click the Windows Start button, point Setting, and click Printers to make sure the Kyocera Mita FS-1900 KX icon has been added to restart the computer.

Operation Guide
Page 234
Installing the Printer Driver 2 Right click the Kyocera Mita FS-1900 KX icon and select Properties. Click the OK button to the following dialog will open. Click the Details tab to make default settings. 1-7 Proceed to Adding Optional Devices on page 2-1 to make sure the port you have selected in step 11 on page 1-5 is shown in the Print to close the window. The following port list.
Installing the Printer Driver 2 Right click the Kyocera Mita FS-1900 KX icon and select Properties. Click the OK button to the following dialog will open. Click the Details tab to make default settings. 1-7 Proceed to Adding Optional Devices on page 2-1 to make sure the port you have selected in step 11 on page 1-5 is shown in the Print to close the window. The following port list.
Operation Guide
Page 235
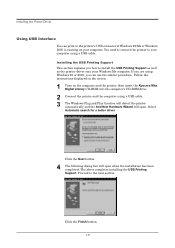
... install the USB Printing Support as well as the printer driver onto your computer using Windows 98 or 2000, you can print to the printer's USB connector if Windows 98/Me or Windows 2000 is running on the computer and the printer, then insert the Kyocera Mita Digital Library CD-ROM into the computer's CD-ROM...
... install the USB Printing Support as well as the printer driver onto your computer using Windows 98 or 2000, you can print to the printer's USB connector if Windows 98/Me or Windows 2000 is running on the computer and the printer, then insert the Kyocera Mita Digital Library CD-ROM into the computer's CD-ROM...
Operation Guide
Page 236
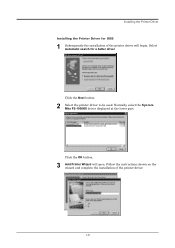
Select Automatic search for USB 1 Subsequently the installation of the printer driver. 1-9 Click the Next button. 2 Select the printer driver to be used. Normally, select the Kyocera Mita FS-1900KX driver displayed at the lower part. Click the OK button. 3 Add Printer Wizard will begin. Follow the instructions shown on the wizard and complete the installation of the printer driver will open. Installing the Printer Driver Installing the Printer Driver for a better driver.
Select Automatic search for USB 1 Subsequently the installation of the printer driver. 1-9 Click the Next button. 2 Select the printer driver to be used. Normally, select the Kyocera Mita FS-1900KX driver displayed at the lower part. Click the OK button. 3 Add Printer Wizard will begin. Follow the instructions shown on the wizard and complete the installation of the printer driver will open. Installing the Printer Driver Installing the Printer Driver for a better driver.
Operation Guide
Page 237
The following port list. Click the Details tab to make sure the Kyocera Mita FS-1900 KX icon has been added to the following dialog will open. Proceed to close the window. Click the OK button to the next section. 1-10 Installing the Printer Driver 4 Click the Windows Start button, point Setting, and click Printers to make sure USB 001 (Virtual printer port for USB) is selected for the Print to the Printers window. 5 Right click the Kyocera Mita FS-1900 KX icon and select Properties.
The following port list. Click the Details tab to make sure the Kyocera Mita FS-1900 KX icon has been added to the following dialog will open. Proceed to close the window. Click the OK button to the next section. 1-10 Installing the Printer Driver 4 Click the Windows Start button, point Setting, and click Printers to make sure USB 001 (Virtual printer port for USB) is selected for the Print to the Printers window. 5 Right click the Kyocera Mita FS-1900 KX icon and select Properties.

Operation Guide
Page 238
...in more printer options, check that option. The printer driver online help will become effective for all application software. The Device Settings tab enables you have attached one or more detail. Paper Feeder 2-1 To temporarily change the settings, make printer settings from... Windows Applications. Setting made in this way will describe the printer settings in the Device Settings window. Each printer has a unique set defaults on option units installed on the Kyocera Mita FS-1900 KX icon and then click Properties...
...in more printer options, check that option. The printer driver online help will become effective for all application software. The Device Settings tab enables you have attached one or more detail. Paper Feeder 2-1 To temporarily change the settings, make printer settings from... Windows Applications. Setting made in this way will describe the printer settings in the Device Settings window. Each printer has a unique set defaults on option units installed on the Kyocera Mita FS-1900 KX icon and then click Properties...

Operation Guide
Page 248
... mm in length as well as Legal size. To set the custom size 1 Display the printer driver's Properties dialog box from Windows Applications Setting Custom Paper Size This printer can feed non-standard size of paper. The paper cassette can accommodate paper whose sizes are... Size dialog box appears. 4 Enter a descriptive name for the custom size in length. Printing from the printer's properties dialog box. Browse through Windows Start > Settings > Printers > right click on the Kyocera Mita FS-1900 KX icon > click Properties > click the Media tab. 2 Click the Custom button on the Media tab...
... mm in length as well as Legal size. To set the custom size 1 Display the printer driver's Properties dialog box from Windows Applications Setting Custom Paper Size This printer can feed non-standard size of paper. The paper cassette can accommodate paper whose sizes are... Size dialog box appears. 4 Enter a descriptive name for the custom size in length. Printing from the printer's properties dialog box. Browse through Windows Start > Settings > Printers > right click on the Kyocera Mita FS-1900 KX icon > click Properties > click the Media tab. 2 Click the Custom button on the Media tab...


