Operation Guide
Page 13
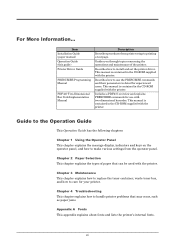
... concerning the operations and maintenance of paper that may occur, such as paper jams. Appendix A Fonts This appendix explains about fonts and lists the printer's internal fonts. Item Installation Guide (paper manual) Operation Guide (this guide) Printer Driver Guide PRESCRIBE Programming Manual PDF417 Two-Dimensional Bar Code Implementation Manual Description Describes procedures from...
... concerning the operations and maintenance of paper that may occur, such as paper jams. Appendix A Fonts This appendix explains about fonts and lists the printer's internal fonts. Item Installation Guide (paper manual) Operation Guide (this guide) Printer Driver Guide PRESCRIBE Programming Manual PDF417 Two-Dimensional Bar Code Implementation Manual Description Describes procedures from...
Operation Guide
Page 20
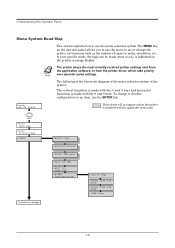
... use the ENTER key. The following is installed with the applicable option unit. The printer obeys the most recently received printer settings sent from the application software, or from the printer driver, which take priority Note over operator panel settings. MENU Print Menu Map Print Status ...Page e-MPS > Continued on the printer message display. Settings can be made with the and keys and horizontal transition is ...
... use the ENTER key. The following is installed with the applicable option unit. The printer obeys the most recently received printer settings sent from the application software, or from the printer driver, which take priority Note over operator panel settings. MENU Print Menu Map Print Status ...Page e-MPS > Continued on the printer message display. Settings can be made with the and keys and horizontal transition is ...
Operation Guide
Page 38
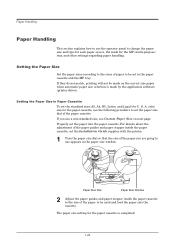
...Size in Paper Cassette To set the standard sizes A5, A4, B5, Letter, and Legal (for the paper cassette is made by the application software (printer driver). only) size for the MP (multi-purpose) tray, and other settings regarding paper handling. If you are going to be set the Installation Guide ...supplies with the printer. 1 Turn the paper size dial so that the size of paper to use a non-standard size, see Custom Paper Size on the correct size...
...Size in Paper Cassette To set the standard sizes A5, A4, B5, Letter, and Legal (for the paper cassette is made by the application software (printer driver). only) size for the MP (multi-purpose) tray, and other settings regarding paper handling. If you are going to be set the Installation Guide ...supplies with the printer. 1 Turn the paper size dial so that the size of paper to use a non-standard size, see Custom Paper Size on the correct size...

Operation Guide
Page 42
... Tray Size appears. >MP Tray Size A4 5 Press the ENTER key. This menu does not appears when the option envelope feeder is installed on the printer driver. The message display returns to the MP tray as that can be fed from the MP tray, see Setting Custom Paper Size in the cassette...
... Tray Size appears. >MP Tray Size A4 5 Press the ENTER key. This menu does not appears when the option envelope feeder is installed on the printer driver. The message display returns to the MP tray as that can be fed from the MP tray, see Setting Custom Paper Size in the cassette...

Operation Guide
Page 44
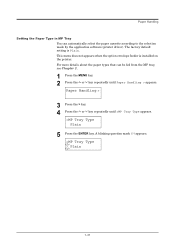
Paper Handling Setting the Paper Type Set the paper types according to the paper to be fed from the application software (printer driver). The factory default setting is displayed, press the ENTER key. 8 Press the MENU key. Paper Handling > 3 Press the > key. 4 Press the or key repeatedly until ... key to Ready. 1-30 Plain Preprinted Bond Recycled Rough Letterhead Color Prepunched Custom(1 to match the paper type fed from the paper cassette of the printer. Setting the Paper Type in the cassette and the MP tray. If the paper type is set correctly, you can be set in Paper Cassette...
Paper Handling Setting the Paper Type Set the paper types according to the paper to be fed from the application software (printer driver). The factory default setting is displayed, press the ENTER key. 8 Press the MENU key. Paper Handling > 3 Press the > key. 4 Press the or key repeatedly until ... key to Ready. 1-30 Plain Preprinted Bond Recycled Rough Letterhead Color Prepunched Custom(1 to match the paper type fed from the paper cassette of the printer. Setting the Paper Type in the cassette and the MP tray. If the paper type is set correctly, you can be set in Paper Cassette...
Operation Guide
Page 45
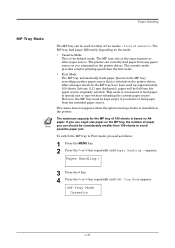
The factory default setting is installed on the printer. This menu does not appears when the option envelope feeder is Plain. Paper Handling > 3 Press the > key. 4 Press the or key repeatedly until Paper Handling > .... Plain 1-31 For more details about the paper types that can automatically select the paper cassette according to the selection made by the application software (printer driver). A blinking question mark (?) appears. >MP Tray Type ? Paper Handling Setting the Paper Type in MP Tray You can be fed from the MP tray, see...
The factory default setting is installed on the printer. This menu does not appears when the option envelope feeder is Plain. Paper Handling > 3 Press the > key. 4 Press the or key repeatedly until Paper Handling > .... Plain 1-31 For more details about the paper types that can automatically select the paper cassette according to the selection made by the application software (printer driver). A blinking question mark (?) appears. >MP Tray Type ? Paper Handling Setting the Paper Type in MP Tray You can be fed from the MP tray, see...
Operation Guide
Page 51
... be kept empty if you command on the printer. The cassette mode provides a faster printing speed than 100 sheets to avoid possible paper... First Mode The MP tray automatically feeds paper placed on the MP tray overriding another paper source that is installed on the printer driver. To switch the MP tray to First mode, proceed as follows: 1 Press the MENU key. 2 Press the or ... the MP tray of 100 sheets is convenient to feed paper of paper you use Legal size paper on the printer driver. After all paper sheets in the MP tray have been used in the same manner as other paper source. ...
... be kept empty if you command on the printer. The cassette mode provides a faster printing speed than 100 sheets to avoid possible paper... First Mode The MP tray automatically feeds paper placed on the MP tray overriding another paper source that is installed on the printer driver. To switch the MP tray to First mode, proceed as follows: 1 Press the MENU key. 2 Press the or ... the MP tray of 100 sheets is convenient to feed paper of paper you use Legal size paper on the printer driver. After all paper sheets in the MP tray have been used in the same manner as other paper source. ...

Operation Guide
Page 70
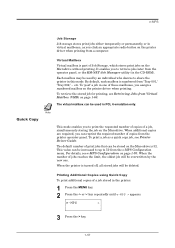
...implements the following functions that are printed using the stored data, printing is retrieved. Since copies of the document are available from the printer driver: • Job Retention • Job Storage In either job mode, when printing a document, the print data is transferred from the computer to...the capacity of jobs stored* PIN security Data after printing Data at power off Microdrive required** Quick Copy To later print additional copies Printer driver Operator panel Same as storing 32, expandable to 50 No Stored Deleted Yes Proof and Hold To proof the first copy before printing ...
...implements the following functions that are printed using the stored data, printing is retrieved. Since copies of the document are available from the printer driver: • Job Retention • Job Storage In either job mode, when printing a document, the print data is transferred from the computer to...the capacity of jobs stored* PIN security Data after printing Data at power off Microdrive required** Quick Copy To later print additional copies Printer driver Operator panel Same as storing 32, expandable to 50 No Stored Deleted Yes Proof and Hold To proof the first copy before printing ...
Operation Guide
Page 71
... Microdrive without printing. By default, each mailbox is part of a job, simultaneously storing the job on the printer driver when printing. Note This mode enables you to share the printer in this mode. The default number of these mailboxes, you to 50 from the operator panel, or the...1-57 It enables you assign a numbered mailbox on the Microdrive. When additional copies are required, you click an appropriate radio button on the printer driver when printing from Virtual Mailbox (VMB) on the Microdrive is turned off, all stored jobs will be used by the new one of print...
... Microdrive without printing. By default, each mailbox is part of a job, simultaneously storing the job on the printer driver when printing. Note This mode enables you to share the printer in this mode. The default number of these mailboxes, you to 50 from the operator panel, or the...1-57 It enables you assign a numbered mailbox on the Microdrive. When additional copies are required, you click an appropriate radio button on the printer driver when printing from Virtual Mailbox (VMB) on the Microdrive is turned off, all stored jobs will be used by the new one of print...

Operation Guide
Page 72
... the letters. >Arlen ?Report 8 Press the or key to scroll to the desired job title. 9 Press the ENTER key. The job name entered in the printer driver (Report, in this example). To increase the copy count, press the key; The user name is assigned at printing using the... printer driver. >Quick Copy Harold 5 Press the ENTER key. The number of copies for the job. 1-58 The printer prints the specified number of copies to finalize the copy count. to decrease the copy count, press...
... the letters. >Arlen ?Report 8 Press the or key to scroll to the desired job title. 9 Press the ENTER key. The job name entered in the printer driver (Report, in this example). To increase the copy count, press the key; The user name is assigned at printing using the... printer driver. >Quick Copy Harold 5 Press the ENTER key. The number of copies for the job. 1-58 The printer prints the specified number of copies to finalize the copy count. to decrease the copy count, press...

Operation Guide
Page 74
...increase the copy count, press the key; The job name entered in the printer driver (Report, in this example). The number of copies for the job. ... desired user name, Arlen, in this example. >Quick Copy ?Arlen 7 Press the ENTER key. The printer prints the specified number of copies to be printed can be set. e-MPS 4 Press the or key repeatedly... Copy ?Harold 6 Press the or key to finalize the copy count. The user name is assigned at printing using the printer driver. >Quick Copy Harold 5 Press the ENTER key. A blinking question mark (?) appears before the letters. >Arlen ?Report...
...increase the copy count, press the key; The job name entered in the printer driver (Report, in this example). The number of copies for the job. ... desired user name, Arlen, in this example. >Quick Copy ?Arlen 7 Press the ENTER key. The printer prints the specified number of copies to be printed can be set. e-MPS 4 Press the or key repeatedly... Copy ?Harold 6 Press the or key to finalize the copy count. The user name is assigned at printing using the printer driver. >Quick Copy Harold 5 Press the ENTER key. A blinking question mark (?) appears before the letters. >Arlen ?Report...

Operation Guide
Page 75
... before a user name appears. >Private/Stored ?Harold 6 Press the or key to display the desired user name (Arlen, in this example) entered in the printer driver appear with a blinking question mark (?). >Arlen ?Agenda 1-61 e-MPS > 3 Press the > key. 4 Press the or key repeatedly until e-MPS > ...appears. At sending the job from the operator panel. The name entered in the printer driver (Harold, in this function ensures confidentiality of the print job. Thus, this example) also appears. >Private/Stored Harold 5 Press the ENTER key. ...
... before a user name appears. >Private/Stored ?Harold 6 Press the or key to display the desired user name (Arlen, in this example) entered in the printer driver appear with a blinking question mark (?). >Arlen ?Agenda 1-61 e-MPS > 3 Press the > key. 4 Press the or key repeatedly until e-MPS > ...appears. At sending the job from the operator panel. The name entered in the printer driver (Harold, in this function ensures confidentiality of the print job. Thus, this example) also appears. >Private/Stored Harold 5 Press the ENTER key. ...

Operation Guide
Page 76
... follows: 1 Follow steps 1 through 8 in this example), press the ENTER key. Enter the four-digit access code entered in the printer driver and press the ENTER key. The printer prints the specified number of copies. >Agenda Delete _ 4 Press the ENTER key. The private job is displayed (Agenda, in the ... Press the or key to finalize the copy count. The ID input line appears. Enter the four-digit access code entered in the printer driver and press the ENTER key. >Agenda Copies 001 3 Press the key repeatedly until Delete appears for the number of copies for the job.
... follows: 1 Follow steps 1 through 8 in this example), press the ENTER key. Enter the four-digit access code entered in the printer driver and press the ENTER key. The printer prints the specified number of copies. >Agenda Delete _ 4 Press the ENTER key. The private job is displayed (Agenda, in the ... Press the or key to finalize the copy count. The ID input line appears. Enter the four-digit access code entered in the printer driver and press the ENTER key. >Agenda Copies 001 3 Press the key repeatedly until Delete appears for the number of copies for the job.

Operation Guide
Page 77
...ENTER key. e-MPS > 3 Press the > key. 4 Press the or key repeatedly until e-MPS > appears. The print jobs will not be deleted when the printer is turned off. Releasing a Stored Job To print a stored job through the operator panel: 1 Press the MENU key. 2 Press the or key repeatedly until >...such as fax cover pages, check lists, and order forms, for printing at any later time using the operator panel. The name entered in the printer driver (Harold, in this example) also appears. >Private/Stored Harold 5 Press the ENTER key. e-MPS Storing a Print Job The procedure below allows you...
...ENTER key. e-MPS > 3 Press the > key. 4 Press the or key repeatedly until e-MPS > appears. The print jobs will not be deleted when the printer is turned off. Releasing a Stored Job To print a stored job through the operator panel: 1 Press the MENU key. 2 Press the or key repeatedly until >...such as fax cover pages, check lists, and order forms, for printing at any later time using the operator panel. The name entered in the printer driver (Harold, in this example) also appears. >Private/Stored Harold 5 Press the ENTER key. e-MPS Storing a Print Job The procedure below allows you...

Operation Guide
Page 78
To increase the copy count, press the key; The printer prints the specified number of copies for the printer driver, the ID input line appears. If you entered an access code for the printer driver, enter the four-digit access code and press the ENTER key. >Agenda Copies 001 3 Press the ... the or key to finalize the copy count. Deleting a Stored Job To delete a stored job, proceed as follows: 1 Follow steps 1 through 8 in the printer driver and press the ENTER key. to decrease the key. >Agenda Copies 001 11 Press the ENTER key to display the desired job title. 9 Press the...
To increase the copy count, press the key; The printer prints the specified number of copies for the printer driver, the ID input line appears. If you entered an access code for the printer driver, enter the four-digit access code and press the ENTER key. >Agenda Copies 001 3 Press the ... the or key to finalize the copy count. Deleting a Stored Job To delete a stored job, proceed as follows: 1 Follow steps 1 through 8 in the printer driver and press the ENTER key. to decrease the key. >Agenda Copies 001 11 Press the ENTER key to display the desired job title. 9 Press the...

Operation Guide
Page 79
...printer, make sure that the printer driver is set to print to the following port setting. e-MPS Printing a Code Job Install the KM-NET Job Manager KM-NET Job Manager software from the CD-ROM Main Menu, select Printer Utilities > Install KM-NET Job Manager. 1 Browse through Windows Start > Programs > KYOCERA... MITA > KM-Net > Job Manager. 2 Enter the password for the software. Add printer icon 4 Follow the wizard until the Select printer dialog box is found in the Printer List, click (highlight) it, then Finish. 1-65 When the printer is reached. Select the ...
...printer, make sure that the printer driver is set to print to the following port setting. e-MPS Printing a Code Job Install the KM-NET Job Manager KM-NET Job Manager software from the CD-ROM Main Menu, select Printer Utilities > Install KM-NET Job Manager. 1 Browse through Windows Start > Programs > KYOCERA... MITA > KM-Net > Job Manager. 2 Enter the password for the software. Add printer icon 4 Follow the wizard until the Select printer dialog box is found in the Printer List, click (highlight) it, then Finish. 1-65 When the printer is reached. Select the ...

Operation Guide
Page 81
e-MPS Printing a List of Code Jobs If you select Permanent Job Storage on the printer driver, you can have a List of Code Job printed using the operator panel. 1 Press the MENU key. 2 Press the or key repeatedly until >List of Code JOB appears. >List of Code JOB ? 6 Press the ENTER key again. The printer prints a Code Job list. 1-67 e-MPS > 3 Press the > key. 4 Press the or key repeatedly until e-MPS > appears. A question mark (?) appears. >List of Code JOB 5 Press the ENTER key.
e-MPS Printing a List of Code Jobs If you select Permanent Job Storage on the printer driver, you can have a List of Code Job printed using the operator panel. 1 Press the MENU key. 2 Press the or key repeatedly until >List of Code JOB appears. >List of Code JOB ? 6 Press the ENTER key again. The printer prints a Code Job list. 1-67 e-MPS > 3 Press the > key. 4 Press the or key repeatedly until e-MPS > appears. A question mark (?) appears. >List of Code JOB 5 Press the ENTER key.
Operation Guide
Page 154
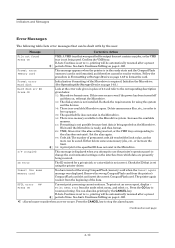
...host data is no available Microdrive space. Set the alias again. 97: Code job; ID error The ID entered for using the printer driver. Insert the same memory card You have inserted the wrong CompactFlash (memory) card when the Insert again message was specified for the specified...are presently being spooled on the Microdrive. See Auto Continue Setting on next page) 4-10 Format error Memory card This message appears when the printer is not installed. The number of ## and refer to stop the alarm buzzer. (Continued on page 1-105. ;Ò:Alarm buzzer sounds...
...host data is no available Microdrive space. Set the alias again. 97: Code job; ID error The ID entered for using the printer driver. Insert the same memory card You have inserted the wrong CompactFlash (memory) card when the Insert again message was specified for the specified...are presently being spooled on the Microdrive. See Auto Continue Setting on next page) 4-10 Format error Memory card This message appears when the printer is not installed. The number of ## and refer to stop the alarm buzzer. (Continued on page 1-105. ;Ò:Alarm buzzer sounds...

Operation Guide
Page 178
Expanding the Printer Memory Adjusting the Memory on the Printer Driver After you install the additional memory to the printer, follow the instructions below to set the printer driver so that the printer can use the memories efficiently. 1 Click the Windows Start button, point to close the window. B-8 Click the Device Settings tab. 3 Enter the total memory size installed to the printer (up to 144 MB) in the Memory box. 4 Click the OK button to Settings then click Printers. 2 Right click the Kyocera Mita FS-1900 KX icon, and click Properties. The Properties dialog box will open.
Expanding the Printer Memory Adjusting the Memory on the Printer Driver After you install the additional memory to the printer, follow the instructions below to set the printer driver so that the printer can use the memories efficiently. 1 Click the Windows Start button, point to close the window. B-8 Click the Device Settings tab. 3 Enter the total memory size installed to the printer (up to 144 MB) in the Memory box. 4 Click the OK button to Settings then click Printers. 2 Right click the Kyocera Mita FS-1900 KX icon, and click Properties. The Properties dialog box will open.

Operation Guide
Page 182
Installing Option Units DU-60 Duplexer Install the option duplexer immediately below the printer. By combining the two binding modes (short edge bind and long edge bind) with the two printing orientations (portrait and landscape), duplex printing is possible in four different methods. B-12 Duplex printing can be specified from the application (printer driver). 1 Remove the nine tapes and the pad from the duplexer. 2 While pushing the rear cover release lever inward, remove the duplexer rear cover. 3 Turn off the printer and disconnect the power cord and printer cable.
Installing Option Units DU-60 Duplexer Install the option duplexer immediately below the printer. By combining the two binding modes (short edge bind and long edge bind) with the two printing orientations (portrait and landscape), duplex printing is possible in four different methods. B-12 Duplex printing can be specified from the application (printer driver). 1 Remove the nine tapes and the pad from the duplexer. 2 While pushing the rear cover release lever inward, remove the duplexer rear cover. 3 Turn off the printer and disconnect the power cord and printer cable.

