PRESCRIBE Commands Command Reference Manual Rev 4.8
Page 172
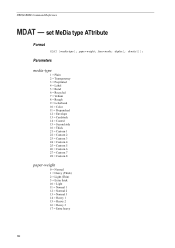
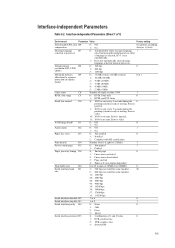
... = Normal 1 12 = Normal 2 13 = Normal 3 14 = Heavy 1 15 = Heavy 2 16 = Heavy 3 17 = Extra heavy 162 set MeDia type ATtribute Format MDAT [media-type[, paper-weight, fuser-mode, duplex[, density]]];
... = Normal 1 12 = Normal 2 13 = Normal 3 14 = Heavy 1 15 = Heavy 2 16 = Heavy 3 17 = Extra heavy 162 set MeDia type ATtribute Format MDAT [media-type[, paper-weight, fuser-mode, duplex[, density]]];
PRESCRIBE Commands Command Reference Manual Rev 4.8
Page 173
MDAT fuser-mode 0 = High 1 = Middle 2 = Low 3 = Vellum duplex 0 = Enable 1 = Disable density 1 = Light 2 = Medium Light 3 = Normal 4 = Medium Heavy 5 = Heavy Function The MDAT command is allowed for optimization. MDAT 2, 1, 0, 1; ... for duplex printing or not. File To set the transparency paper type to the default. The paper-weight attribute affects the printing system's transfer bias, fuser-mode affects the fuser temperature, and duplex determines whether the paper with that paper type is used to their defaults. If the parameters paper-weight and...
MDAT fuser-mode 0 = High 1 = Middle 2 = Low 3 = Vellum duplex 0 = Enable 1 = Disable density 1 = Light 2 = Medium Light 3 = Normal 4 = Medium Heavy 5 = Heavy Function The MDAT command is allowed for optimization. MDAT 2, 1, 0, 1; ... for duplex printing or not. File To set the transparency paper type to the default. The paper-weight attribute affects the printing system's transfer bias, fuser-mode affects the fuser temperature, and duplex determines whether the paper with that paper type is used to their defaults. If the parameters paper-weight and...
PRESCRIBE Commands Command Reference Manual Rev 4.8
Page 358
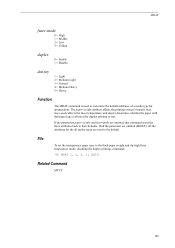
...paper sources to the defaults: !R! TATR 0, 1, 3; EXIT; This command is relevant to optimize the electrical properties (such as the fuser temperature and the transfer bias) so that the best print quality is 3. TATR 2; Function The TATR command applies a paper source (MP...thin print-density print density: lighter (1) to the defaults: !R! To reset all three parameters are omitted. This enables the printing system to the FS-1000 printer only. The attributes are reset for thick paper and normal density: !R! EXIT; apply Tray ATtributes Format TATR [source[, thickness, print...
...paper sources to the defaults: !R! TATR 0, 1, 3; EXIT; This command is relevant to optimize the electrical properties (such as the fuser temperature and the transfer bias) so that the best print quality is 3. TATR 2; Function The TATR command applies a paper source (MP...thin print-density print density: lighter (1) to the defaults: !R! To reset all three parameters are omitted. This enables the printing system to the FS-1000 printer only. The attributes are reset for thick paper and normal density: !R! EXIT; apply Tray ATtributes Format TATR [source[, thickness, print...
PRESCRIBE Commands Command Reference Manual Rev 4.8
Page 407
... priority, 116 font mode, 108, 119 saving current, 270 selection by assigning typeface, 294 Font attributes, 291 Font list, 105 printing a, 105 Font mode, 119 Fuser mode, 162, 163 G Graphics state, 228, 272 Gray pattern, 122 Grouping, 27 H Hard disk, 141, 246, 250, 256, 258 error codes, 136 I Image ...Job separation, 145 choosing first or all pages, 145 separating copies by command, 145 K KCGL pen color, 297 KIR, 304 refinement level, 304 KPDL, 287 Kyocera Image Refinement, 304 L left, 307 Lightness, 155 Line, 73, 80, 82, 87 drawing by angle, 82 drawing to absolute, 73 drawing to relative, 80...
... priority, 116 font mode, 108, 119 saving current, 270 selection by assigning typeface, 294 Font attributes, 291 Font list, 105 printing a, 105 Font mode, 119 Fuser mode, 162, 163 G Graphics state, 228, 272 Gray pattern, 122 Grouping, 27 H Hard disk, 141, 246, 250, 256, 258 error codes, 136 I Image ...Job separation, 145 choosing first or all pages, 145 separating copies by command, 145 K KCGL pen color, 297 KIR, 304 refinement level, 304 KPDL, 287 Kyocera Image Refinement, 304 L left, 307 Lightness, 155 Line, 73, 80, 82, 87 drawing by angle, 82 drawing to absolute, 73 drawing to relative, 80...
PRESCRIBE Commands Technical Reference Manual - Rev. 4.7
Page 105
... MB or more) 1: 10 MB (14 MB) 2: 8 MB (12 MB) 3: 6 MB (10 MB) 0 or 1 4: 4 MB (8 MB) 5: 2 MB (6 MB) Copy count C0 Number of page 0 1: Fuser sensor activated 2: Fuser sensor deactivated 3: Page ejection 4: Same as 0; A4 full page bleeda D1 0: Off 0 1: On Audio alarm D2 0: Off 1 1: On Paper size error D3 0: Not notified...
... MB or more) 1: 10 MB (14 MB) 2: 8 MB (12 MB) 3: 6 MB (10 MB) 0 or 1 4: 4 MB (8 MB) 5: 2 MB (6 MB) Copy count C0 Number of page 0 1: Fuser sensor activated 2: Fuser sensor deactivated 3: Page ejection 4: Same as 0; A4 full page bleeda D1 0: Off 0 1: On Audio alarm D2 0: Off 1 1: On Paper size error D3 0: Not notified...
PRESCRIBE Commands Technical Reference Manual - Rev. 4.7
Page 110
... Paper type for paper cassettes 1 to 6 Paper type for Envelope Feeder/ Universal Feeder PCL paper source Automatic continue for 'Press GO' Automatic continue timer Quick fuser heater Parameter Value 8: Rough 9: Letterhead 10: Color 11: Prepunched 12: Envelope 13: Cardstock 21: Custom1 22: Custom2 23: Custom3 24: Custom4 25: Custom5 26: Custom6...
... Paper type for paper cassettes 1 to 6 Paper type for Envelope Feeder/ Universal Feeder PCL paper source Automatic continue for 'Press GO' Automatic continue timer Quick fuser heater Parameter Value 8: Rough 9: Letterhead 10: Color 11: Prepunched 12: Envelope 13: Cardstock 21: Custom1 22: Custom2 23: Custom3 24: Custom4 25: Custom5 26: Custom6...
FS-1120D/1320D Operation Guide Rev-1
Page 87
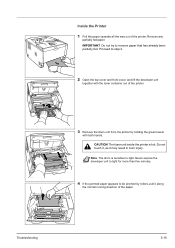
... already been partially fed. Do not touch it, as it along the normal running direction of the paper. Note The drum is hot. CAUTION The fuser unit inside the printer is sensitive to step 2. 2 Open the top cover and front cover, and lift the developer unit together with both hands.
... already been partially fed. Do not touch it, as it along the normal running direction of the paper. Note The drum is hot. CAUTION The fuser unit inside the printer is sensitive to step 2. 2 Open the top cover and front cover, and lift the developer unit together with both hands.

FS-1120D/1320D Operation Guide Rev-1
Page 89
The printer warms up and resumes printing. Do not touch it, as it out. Rear Cover 1 Open the rear cover and remove the jammed paper by pulling it out. 2 Close the rear cover, and open and close the top cover to clear the error. CAUTION The fuser unit inside the fuser unit, open the fuser cover and remove the paper by pulling it may result in burn injury. If the paper is jammed inside the printer is hot. Troubleshooting 5-17
The printer warms up and resumes printing. Do not touch it, as it out. Rear Cover 1 Open the rear cover and remove the jammed paper by pulling it out. 2 Close the rear cover, and open and close the top cover to clear the error. CAUTION The fuser unit inside the fuser unit, open the fuser cover and remove the paper by pulling it may result in burn injury. If the paper is jammed inside the printer is hot. Troubleshooting 5-17
FS-1120D/1320D Operation Guide Rev-1
Page 105
... jams 5-14 E Energy Star program xii Envelope 2-8 Environmental standard requirements 7-4 Error indication indicators 5-10 Expansion memory module option 6-2 Express mode installation method 3-4 F Front cover components 1-2 Fuser unit clearing paper jams 5-17 G General problems troubleshooting 5-2 GO key 1-4 operation panel 1-4 I IB-23 6-2, 6-7 Indicator combinations error 5-10 maintenance 5-8 normal 5-5 Indicators Ready, Data, Jam, Attention...
... jams 5-14 E Energy Star program xii Envelope 2-8 Environmental standard requirements 7-4 Error indication indicators 5-10 Expansion memory module option 6-2 Express mode installation method 3-4 F Front cover components 1-2 Fuser unit clearing paper jams 5-17 G General problems troubleshooting 5-2 GO key 1-4 operation panel 1-4 I IB-23 6-2, 6-7 Indicator combinations error 5-10 maintenance 5-8 normal 5-5 Indicators Ready, Data, Jam, Attention...

Service Manual
Page 12
... feed section ...2-1-2 (3) Paper conveying section ...2-1-3 2-1-2 Drum section...2-1-4 (1) Drum section ...2-1-4 (2) Main charger unit...2-1-5 2-1-3 Expose section...2-1-6 (1) Laser scanner unit...2-1-6 2-1-4 Developing section...2-1-8 2-1-5 Transfer/separation section ...2-1-9 2-1-6 Cleaning section ...2-1-10 2-1-7 Fuser section ...2-1-11 2-1-8 Paper exit section ...2-1-13 2-1-9 Duplex/conveying section ...2-1-15 2-2 Electrical Parts Layout 2-2-1 Electrical parts layout...2-2-1 (1) PWBs ...2-2-1 (2) Switches and sensors ...2-2-2 (3) Other electrical components...2-2-3 2-3 Operation of...
... feed section ...2-1-2 (3) Paper conveying section ...2-1-3 2-1-2 Drum section...2-1-4 (1) Drum section ...2-1-4 (2) Main charger unit...2-1-5 2-1-3 Expose section...2-1-6 (1) Laser scanner unit...2-1-6 2-1-4 Developing section...2-1-8 2-1-5 Transfer/separation section ...2-1-9 2-1-6 Cleaning section ...2-1-10 2-1-7 Fuser section ...2-1-11 2-1-8 Paper exit section ...2-1-13 2-1-9 Duplex/conveying section ...2-1-15 2-2 Electrical Parts Layout 2-2-1 Electrical parts layout...2-2-1 (1) PWBs ...2-2-1 (2) Switches and sensors ...2-2-2 (3) Other electrical components...2-2-3 2-3 Operation of...

Service Manual
Page 17
Paper feed/conveying section 4. Laser scanner unit 9. Duplex/conveying section 1-1-5 Developing unit 6. Drum unit 8. Exit section 12. Top tray 13. Toner container 5. 1-1-3 Machine cross section l 11 12 8 76 5 4 2LY/2LZ 2 10 13 9 1 3 Figure 1-1-3 Light path Paper path Paper path (option) 1. Fuser section 11. Transfer/separation section 10. Main charger unit 7. MP tray 3. Cassette 2.
Paper feed/conveying section 4. Laser scanner unit 9. Duplex/conveying section 1-1-5 Developing unit 6. Drum unit 8. Exit section 12. Top tray 13. Toner container 5. 1-1-3 Machine cross section l 11 12 8 76 5 4 2LY/2LZ 2 10 13 9 1 3 Figure 1-1-3 Light path Paper path Paper path (option) 1. Fuser section 11. Transfer/separation section 10. Main charger unit 7. MP tray 3. Cassette 2.

Service Manual
Page 29
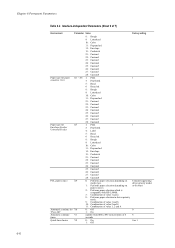
.../2LZ 1-3-5 Service items Description No. Items Description (20) Fixed asset number (Maximum 16 characters) (21) Paper type attributes Paper type setting value from 1 to 28 (fuser, weight, duplex) (unused paper type are always 0x00.) (22) Paper type attributes Paper type setting value from 1 to 28 (density) (unused paper type are always...
.../2LZ 1-3-5 Service items Description No. Items Description (20) Fixed asset number (Maximum 16 characters) (21) Paper type attributes Paper type setting value from 1 to 28 (fuser, weight, duplex) (unused paper type are always 0x00.) (22) Paper type attributes Paper type setting value from 1 to 28 (density) (unused paper type are always...

Service Manual
Page 33
... location Printer [47] (d) Paper feeder 1 Paper feeder 2 (c) [42] [48] [49] (a) (b) (f) (e) [31] [32] Paper jam location [31] Cassette 1 [32] Cassette 2 [33] Cassette 3 [42] MP tray [47] Fuser/Exit section [48] Printer inside [49] Duplex section (e) (f) [33] Sensors (a) Registration sensor (b) Paper sensor (c) MP paper sensor (d) Paper exit sensor (e) PF paper sensor (f) PF paper...
... location Printer [47] (d) Paper feeder 1 Paper feeder 2 (c) [42] [48] [49] (a) (b) (f) (e) [31] [32] Paper jam location [31] Cassette 1 [32] Cassette 2 [33] Cassette 3 [42] MP tray [47] Fuser/Exit section [48] Printer inside [49] Duplex section (e) (f) [33] Sensors (a) Registration sensor (b) Paper sensor (c) MP paper sensor (d) Paper exit sensor (e) PF paper sensor (f) PF paper...

Service Manual
Page 43
... source PWB. Replace the power source PWB (See page 1-5-22). Replace the control PWB (See page 1-519). 1-4-7 Poor contact in the fuser thermistor connector terminals. Fuser thermal cutout Replace the fuser unit (See page 1-5-16). Defective control PWB. 2LY/2LZ Code 6000 6020 6030 6400 Contents Causes Remarks Check procedures/corrective measures Broken...
... source PWB. Replace the power source PWB (See page 1-5-22). Replace the control PWB (See page 1-519). 1-4-7 Poor contact in the fuser thermistor connector terminals. Fuser thermal cutout Replace the fuser unit (See page 1-5-16). Defective control PWB. 2LY/2LZ Code 6000 6020 6030 6400 Contents Causes Remarks Check procedures/corrective measures Broken...

Service Manual
Page 47
... 73.162 mm/2 7/8", or 78.5 mm/3 1/16" (See page 2-4-2), the problem may be the damaged drum (in the drum unit). Replace fuser unit (See page 1-5-16). Clean the bush to cause dropouts. Print example Causes ABC 123 Defective drum unit or developing unit. Defective drum unit. ... If the defects occur at random intervals, the toner may be supported by the bushes at regular intervals of electroconductive grease as required. Defective fuser unit (heat roller or press roller). The transfer roller must be the damaged drum (in the drum unit). Replace the developing unit (See...
... 73.162 mm/2 7/8", or 78.5 mm/3 1/16" (See page 2-4-2), the problem may be the damaged drum (in the drum unit). Replace fuser unit (See page 1-5-16). Clean the bush to cause dropouts. Print example Causes ABC 123 Defective drum unit or developing unit. Defective drum unit. ... If the defects occur at random intervals, the toner may be supported by the bushes at regular intervals of electroconductive grease as required. Defective fuser unit (heat roller or press roller). The transfer roller must be the damaged drum (in the drum unit). Replace the developing unit (See...

Service Manual
Page 49
... PWB. 2LY/2LZ (9) Dirt on such parts as the paper chute guide, paper conveying paths, the bottom of the drum and developing unit, and the fuser unit inlet. Replace the control PWB (See page 1-5-19). 1-4-13 Check procedures/corrective measures Replace the laser scanner unit (See page 1-5-30). Print example Causes...
... PWB. 2LY/2LZ (9) Dirt on such parts as the paper chute guide, paper conveying paths, the bottom of the drum and developing unit, and the fuser unit inlet. Replace the control PWB (See page 1-5-19). 1-4-13 Check procedures/corrective measures Replace the laser scanner unit (See page 1-5-30). Print example Causes...

Service Manual
Page 51
... (See page 1-5-19). (8) Duplex solenoid does not operate. If none, remedy or replace the harness. (11) A paper jam in the paper feed/conveying section or fuser section is indicated when the power switch is present in the cassette. Defective exit sensor. Broken duplex solenoid coil. Check for continuity across the coil...
... (See page 1-5-19). (8) Duplex solenoid does not operate. If none, remedy or replace the harness. (11) A paper jam in the paper feed/conveying section or fuser section is indicated when the power switch is present in the cassette. Defective exit sensor. Broken duplex solenoid coil. Check for continuity across the coil...

Service Manual
Page 52
... registration rollers is correct. Check visually and remedy if necessary. (3) Skewed paper feed. Check if the contact between the ejection roller and fuser ejection pulley is correct. Replace the fuser unit (See page 1-5-16). 2LY/2LZ 1-4-5 Mechanical problems Problem Causes/check procedures Corrective measures (1) Check if the surfaces of the paper feed...
... registration rollers is correct. Check visually and remedy if necessary. (3) Skewed paper feed. Check if the contact between the ejection roller and fuser ejection pulley is correct. Replace the fuser unit (See page 1-5-16). 2LY/2LZ 1-4-5 Mechanical problems Problem Causes/check procedures Corrective measures (1) Check if the surfaces of the paper feed...

Service Manual
Page 68
2LY/2LZ 1-5-7 Fuser section (1) Detaching and refitting the fuser unit Procedure 1. Remove the connector. Wires Wire clamps Connector (Fuser heater lamp) Connector (Fuser thermistor) Figure 1-5-22 1-5-16 Connector Figure 1-5-23 Remove the outer covers (See page 1-5-3). 2. Release the wires form wire clamps. 4. Remove two connectors. 3.
2LY/2LZ 1-5-7 Fuser section (1) Detaching and refitting the fuser unit Procedure 1. Remove the connector. Wires Wire clamps Connector (Fuser heater lamp) Connector (Fuser thermistor) Figure 1-5-22 1-5-16 Connector Figure 1-5-23 Remove the outer covers (See page 1-5-3). 2. Release the wires form wire clamps. 4. Remove two connectors. 3.

Service Manual
Page 69
Rear cover Figure 1-5-24 Fuser unit Screw Screw Figure 1-5-25 1-5-17 Check or replace the fuser unit and refit all the removed parts. Remove two screws and then remove the fuser unit. 7. Remove the rear cover. 2LY/2LZ 6. 5.
Rear cover Figure 1-5-24 Fuser unit Screw Screw Figure 1-5-25 1-5-17 Check or replace the fuser unit and refit all the removed parts. Remove two screws and then remove the fuser unit. 7. Remove the rear cover. 2LY/2LZ 6. 5.


