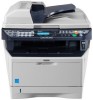
FS 1128 Toner - Kyocera MFP
FS 1128 Toner
Related Manual Pages

Similar Questions


Unknown Toner Installed Pc Kyocera Solution
unknown toner installed pc kyocera solution
unknown toner installed pc kyocera solution
(Posted by printcareservices 7 years ago)


How Do You Change The Toner In A Kycera 3050ci
How do you change the toner in a Kyocera 3050ci
How do you change the toner in a Kyocera 3050ci
(Posted by obrienmarie 10 years ago)
Related Terms
The following terms were also used when searching for FS 1128 Toner - Kyocera MFP:- fs-1128mfp
- fs 1128mfp
- kyocera fs-1128mfp
- kyocera fs 1128mfp
- kyocera fs 1128
- fs-1128 mfp
- kyocera fs1128
- kyocera fs1128mfp
- fs1128 mfp
- fs 1128 mfp
- kyocera fs 1128 mfp
- copystar fs1128
- fs 1128mfp toner
- fs 1128 toner
- copystar fs 1128 mfp
- fs 1128 kyocera
- fs1128 toner
- kyocera fs 1128mfp toner
- ecosys fs 1128mfp
- fs 1128 brochure
- kyocera fs1128 mfp
- kyocera fs1128 toner
- fs 1128 copier
- fs 1128 for sale
- fs 1128 meter reading
- fs 1128 price
- fs-1128 default password
- fs-1128mfp toner
- kyocera fs 1128 brochure
- kyocera fs 1128 password
- kyocera fs 1128 toner
- copystar fs 1128
- copystar fs-1128
- copystar fs-1128 toner
- copystar fs1128 copier
- ecosys fs1128
- f's 1128 brochure
- f's 1128 default password
- f's 1128 problems
- fs 1128
- fs 1128 address book
- fs 1128 admin password
- fs 1128 black copies
- fs 1128 c4200 error
- fs 1128 c6000
- fs 1128 c6000 error
- fs 1128 c7990
- fs 1128 cartridge
- fs 1128 color
- fs 1128 default login
- fs 1128 default password
- fs 1128 default username and password
- fs 1128 default web password
- fs 1128 driver
- fs 1128 driver download
- fs 1128 drivers
- fs 1128 drum
- fs 1128 drum unit
- fs 1128 error c7990
- fs 1128 factory reset
- fs 1128 fax
- fs 1128 fax logs
- fs 1128 fax reports
- fs 1128 firmware download
- fs 1128 fuser
- fs 1128 instructions
- fs 1128 kyocera brochure
- fs 1128 kyocera driver
- fs 1128 light copies
- fs 1128 maintenance kit
- fs 1128 manual
- fs 1128 memory full error
- fs 1128 memory is full
- fs 1128 mfp copier
- fs 1128 mfp kyocera
- fs 1128 mfp manual
- fs 1128 mfp toner
- fs 1128 mfp won't print
- fs 1128 mp tray
- fs 1128 oem toner
- fs 1128 paper tray
- fs 1128 parts
- fs 1128 password
- fs 1128 pdf
- fs 1128 print driver us
- fs 1128 printer
- fs 1128 problems
- fs 1128 process unit
- fs 1128 replace process unit
- fs 1128 scanner problem
- fs 1128 service manual
- fs 1128 smb setup how scan
- fs 1128 specifications
- fs 1128 unknown toner installed.pc
- fs 1128 user manual
- fs 1128 waste toner
- fs 1128 waste toner box
- fs 1128 waste toner box full
- fs 1128 will not print
- fs 1128 windows 7 drivers
- fs 1128mfp address book
- fs 1128mfp kyocera
- fs 1128mfp replace process unit
- fs 1128mfp scan to folder
- fs 1128mfp scanner
- fs 1128mfp won't print
- fs- 1128 mfp kyocera
- fs-1128
- fs-1128 admin password
- fs-1128 brochure
- fs-1128 cf248 code
- fs-1128 copier
- fs-1128 developer unit
- fs-1128 dirty prints
- fs-1128 driver
- fs-1128 driver download
- fs-1128 drum
- fs-1128 drum unit
- fs-1128 error 1102
- fs-1128 fax driver
- fs-1128 fax turned off
- fs-1128 fuser
- fs-1128 kyocera manual
- fs-1128 maintenance kit
- fs-1128 manual
- fs-1128 meter reading
- fs-1128 mfp copier
- fs-1128 password
- fs-1128 price
- fs-1128 printer
- fs-1128 process unit
- fs-1128 replace process unit
- fs-1128 service manual
- fs-1128 toner
- fs-1128 user manual
- fs-1128 waste toner
- fs-1128mfp printer
- fs-1128mfp process unit
- fs-1128mfp scan to pc
- fs-1128mfp scanner setup
- fs1128
- fs1128 admin
- fs1128 brochure
- fs1128 default web password
- fs1128 driver
- fs1128 fuser
- fs1128 kyocera
- fs1128 mfp toner
- fs1128 password
- fs1128 printer
- fs1128 smb setup how scan
- fs1128 supplies
- fs1128mfp
- fs1128mfp kyocera
- fs1128mfp scanner
- fs1128mfp*kyocera
- kyocera f's 1128 problems
- kyocera fs 1128 address book
- kyocera fs 1128 admin password
- kyocera fs 1128 black copies
- kyocera fs 1128 c4200 error
- kyocera fs 1128 c6000 error
- kyocera fs 1128 copier
- kyocera fs 1128 default password
- kyocera fs 1128 default username and password
- kyocera fs 1128 driver
- kyocera fs 1128 driver download
- kyocera fs 1128 drivers
- kyocera fs 1128 drum
- kyocera fs 1128 drum unit
- kyocera fs 1128 error c7990
- kyocera fs 1128 factory reset
- kyocera fs 1128 fax logs
- kyocera fs 1128 fax reports
- kyocera fs 1128 for sale
- kyocera fs 1128 fuser
- kyocera fs 1128 maintenance kit
- kyocera fs 1128 manual
- kyocera fs 1128 memory is full
- kyocera fs 1128 meter reading
- kyocera fs 1128 mfp copier
- kyocera fs 1128 mfp manual
- kyocera fs 1128 mfp toner
- kyocera fs 1128 mp tray
- kyocera fs 1128 paper tray
- kyocera fs 1128 parts
- kyocera fs 1128 price
- kyocera fs 1128 print driver us
- kyocera fs 1128 printer driver
- kyocera fs 1128 problems
- kyocera fs 1128 process unit
- kyocera fs 1128 replace process unit
- kyocera fs 1128 scanner problem
- kyocera fs 1128 service manual
- kyocera fs 1128 specifications
- kyocera fs 1128 unknown toner installed.pc
- kyocera fs 1128 user manual
- kyocera fs 1128 waste toner box
- kyocera fs 1128 waste toner box full
- kyocera fs 1128 will not print
- kyocera fs 1128 windows 7 drivers
- kyocera fs 1128mfp address book
- kyocera fs 1128mfp replace process unit
- kyocera fs 1128mfp scan to folder
- kyocera fs-1128
- kyocera fs-1128 copier
- kyocera fs-1128 default password
- kyocera fs-1128 driver
- kyocera fs-1128 drum unit
- kyocera fs-1128 error 1102
- kyocera fs-1128 fax turned off
- kyocera fs-1128 meter reading
- kyocera fs-1128 mfp
- kyocera fs-1128 password
- kyocera fs-1128 toner
- kyocera fs-1128mfp printer
- kyocera fs-1128mfp scanner setup
- kyocera fs-1128mfp toner
- kyocera fs1128 brochure
- kyocera fs1128 default password
- kyocera fs1128 driver
- kyocera fs1128 drum
- kyocera fs1128 manual
- kyocera fs1128 printer
- kyocera fs1128 service manual
- kyocera mita fs 1128
- kyocera mita fs-1128