
Service Manual
Page 5
...cause fire...• Allow sufficient space around the printer to allow the ventilation grills to injury • Avoid inhaling toner or developer excessively. Avoid multiple connections to a suitable grounding point. 1. Not grounding the printer may cause fire or electric shock • ...Do not install the printer near a radiator, heater, other than that it...
...cause fire...• Allow sufficient space around the printer to allow the ventilation grills to injury • Avoid inhaling toner or developer excessively. Avoid multiple connections to a suitable grounding point. 1. Not grounding the printer may cause fire or electric shock • ...Do not install the printer near a radiator, heater, other than that it...

Service Manual
Page 7
... the ends of solvent at a time, being careful not to fire in fire. If necessary, protect it may be seen coming from the printer, remove the power plug from electronic components • Run wire harnesses carefully so that wires will not be trapped or damaged • After ...to evaporate completely before refitting the covers or turning the main switch on. · Always wash hands afterwards. • Never dispose of toner or toner bottles in a furnace, etc...• Should smoke be stood on high-voltage components when removing them; it with care by following the ...
... the ends of solvent at a time, being careful not to fire in fire. If necessary, protect it may be seen coming from the printer, remove the power plug from electronic components • Run wire harnesses carefully so that wires will not be trapped or damaged • After ...to evaporate completely before refitting the covers or turning the main switch on. · Always wash hands afterwards. • Never dispose of toner or toner bottles in a furnace, etc...• Should smoke be stood on high-voltage components when removing them; it with care by following the ...

Service Manual
Page 8
... specifications ...1-3 1-2 Names of parts ...1-6 1-3 Safety information ...1-7 1-4 Environmental requirements ...1-10 1-5 About the toner container ...1-14 Chapter 2 2-1 Unpacking ...2-3 2-2 Installing the printer ...2-4 2-3 Using the operator panel ...2-15 Chapter 3 3-1 Maintenance/Adjustments ...3-3 Chapter 4 4-1 Electrophotographic system ...4-3 4-2 Paper feeding system ...4-15 4-3 Electrical control system ...4-18 Chapter 5 5-1 General instructions ...5-3 5-2 Disassembly ...5-4 Chapter 6 6-1 Troubleshooting ...6-3 ...
... specifications ...1-3 1-2 Names of parts ...1-6 1-3 Safety information ...1-7 1-4 Environmental requirements ...1-10 1-5 About the toner container ...1-14 Chapter 2 2-1 Unpacking ...2-3 2-2 Installing the printer ...2-4 2-3 Using the operator panel ...2-15 Chapter 3 3-1 Maintenance/Adjustments ...3-3 Chapter 4 4-1 Electrophotographic system ...4-3 4-2 Paper feeding system ...4-15 4-3 Electrical control system ...4-18 Chapter 5 5-1 General instructions ...5-3 5-2 Disassembly ...5-4 Chapter 6 6-1 Troubleshooting ...6-3 ...

Service Manual
Page 10
... information ...1-7 (1) Laser safety ...1-7 (2) Laser notice ...1-7 (3) Laser caution label on the scanner unit 1-7 (4) CDRH regulations (U.S.A 1-9 (5) Ozone concentration ...1-9 (6) Optional equipment ...1-9 (7) Important note on the interface connectors 1-9 1-4 Environmental requirements ...1-10 1-4-1 Environmental conditions ...1-10 (1) Clearance ...1-11 (2) Places to avoid ...1-12 (3) Note on power ...1-12 (4) Removing the printer ...1-13 1-5 About the toner container ...1-14 1-5-1 Toner container ...1-14 (1) Toner container handling 1-14 (2) Toner container...
... information ...1-7 (1) Laser safety ...1-7 (2) Laser notice ...1-7 (3) Laser caution label on the scanner unit 1-7 (4) CDRH regulations (U.S.A 1-9 (5) Ozone concentration ...1-9 (6) Optional equipment ...1-9 (7) Important note on the interface connectors 1-9 1-4 Environmental requirements ...1-10 1-4-1 Environmental conditions ...1-10 (1) Clearance ...1-11 (2) Places to avoid ...1-12 (3) Note on power ...1-12 (4) Removing the printer ...1-13 1-5 About the toner container ...1-14 1-5-1 Toner container ...1-14 (1) Toner container handling 1-14 (2) Toner container...

Service Manual
Page 21
...Should the printer be left in a vehicle, it . (4) Removing the printer Observe the following precautions in removal and transportation of the printer. • Be sure to repack the printer in its original carton. • Do not leave the printer, toner container, process unit and other printer modules inside ...air circulation or the adequate air conditioning should be parked in moisture condensation which will affect the performance of the printer. 1-13 FS-1050 The vehicle during transportation should be removed from the vehicle. Failure to three hours after having moved after uncrated...
...Should the printer be left in a vehicle, it . (4) Removing the printer Observe the following precautions in removal and transportation of the printer. • Be sure to repack the printer in its original carton. • Do not leave the printer, toner container, process unit and other printer modules inside ...air circulation or the adequate air conditioning should be parked in moisture condensation which will affect the performance of the printer. 1-13 FS-1050 The vehicle during transportation should be removed from the vehicle. Failure to three hours after having moved after uncrated...

Service Manual
Page 22
... not attempt to disassemble or refill the toner container. FS-1050 1-14 This is because Kyocera have no means of control over how such refilled toner could affect the print quality and the reliability of the printer. (1) Toner container handling To loosen and mix the toner inside before use any refilled toner containers that may be available commercially. 1-5 About...
... not attempt to disassemble or refill the toner container. FS-1050 1-14 This is because Kyocera have no means of control over how such refilled toner could affect the print quality and the reliability of the printer. (1) Toner container handling To loosen and mix the toner inside before use any refilled toner containers that may be available commercially. 1-5 About...

Service Manual
Page 23
... toner container installed. (2) Toner container storage The toner contained in a dark place. To ensure the high print quality, store the toner container in a place that satisfies the following environmental conditions: Temperature: -20 to 40 °C (-4 to 104 °F) Humidity: 15 to temperature and humidity. Otherwise, toner may leak and contamination may result in the printer. 1-15 FS-1050...
... toner container installed. (2) Toner container storage The toner contained in a dark place. To ensure the high print quality, store the toner container in a place that satisfies the following environmental conditions: Temperature: -20 to 40 °C (-4 to 104 °F) Humidity: 15 to temperature and humidity. Otherwise, toner may leak and contamination may result in the printer. 1-15 FS-1050...

Service Manual
Page 25
Chapter 2 Contents 2-1 Unpacking ...2-3 2-1-1 Unpacking and inspection ...2-3 2-2 Installing the printer ...2-4 2-2-1 Installing the toner container ...2-4 2-2-2 Expanding memory ...2-8 (1) Minimum memory requirements 2-8 (2) DIMM specifications ...2-8 (3) Notes on handling DIMM ...2-9 (4) Installing the DIMM ...2-10 (5) Testing the expansion memory 2-11 (5) Installing the memory card (...
Chapter 2 Contents 2-1 Unpacking ...2-3 2-1-1 Unpacking and inspection ...2-3 2-2 Installing the printer ...2-4 2-2-1 Installing the toner container ...2-4 2-2-2 Expanding memory ...2-8 (1) Minimum memory requirements 2-8 (2) DIMM specifications ...2-8 (3) Notes on handling DIMM ...2-9 (4) Installing the DIMM ...2-10 (5) Testing the expansion memory 2-11 (5) Installing the memory card (...

Service Manual
Page 26
... Printed notice Figure 2-1-2 Unpacking (2) 2-3 Spacer FS-1050 2-1 Unpacking 2-1-1 Unpacking and inspection The package should contain the printer and the accessories as shown in the figure below. Carefully remove the printer. Remove the manuals, toner kit, and other items located on a flat, stable surface. Toner container (TK-17) Cleaning cloth Printer Installation guide Kyocera Mita digital library CD-ROM...
... Printed notice Figure 2-1-2 Unpacking (2) 2-3 Spacer FS-1050 2-1 Unpacking 2-1-1 Unpacking and inspection The package should contain the printer and the accessories as shown in the figure below. Carefully remove the printer. Remove the manuals, toner kit, and other items located on a flat, stable surface. Toner container (TK-17) Cleaning cloth Printer Installation guide Kyocera Mita digital library CD-ROM...

Service Manual
Page 27
Open the top cover all the way. 2. Confirm that the lock lever #1 1 is used with the printer, begin installation with connecting the printer and the paper feeder. 2-2 Installing the printer Installing the printer requires several steps. If the option paper feeder is in the release (forward) position. If not, pull it forward until it is in sequence. For details, refer to the optional Paper feeder's Service Manual. 2-2-1 Installing the toner container 1. Proceed as follows in the release position. 1 Figure 2-2-1 Confirming the lock lever #1 FS-1050 2-4
Open the top cover all the way. 2. Confirm that the lock lever #1 1 is used with the printer, begin installation with connecting the printer and the paper feeder. 2-2 Installing the printer Installing the printer requires several steps. If the option paper feeder is in the release (forward) position. If not, pull it forward until it is in sequence. For details, refer to the optional Paper feeder's Service Manual. 2-2-1 Installing the toner container 1. Proceed as follows in the release position. 1 Figure 2-2-1 Confirming the lock lever #1 FS-1050 2-4
Service Manual
Page 28
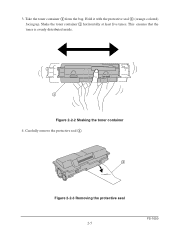
Shake the toner container 2 horizontally at least five times. Take the toner container 2 from the bag. Hold it with the protective seal 3 (orange-colored) facing up. Carefully remove the protective seal 3. 3 Figure 2-2-3 Removing the protective seal 2-5 FS-1050 3. This ensures that the toner is evenly distributed inside. 2 Figure 2-2-2 Shaking the toner container 4.
Shake the toner container 2 horizontally at least five times. Take the toner container 2 from the bag. Hold it with the protective seal 3 (orange-colored) facing up. Carefully remove the protective seal 3. 3 Figure 2-2-3 Removing the protective seal 2-5 FS-1050 3. This ensures that the toner is evenly distributed inside. 2 Figure 2-2-2 Shaking the toner container 4.
Service Manual
Page 29
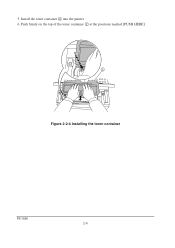
Push firmly on the top of the toner container 2 at the positions marked [PUSH HERE]. 2 Figure 2-2-4 Installing the toner container FS-1050 2-6 5. Install the toner container 2 into the printer. 6.
Push firmly on the top of the toner container 2 at the positions marked [PUSH HERE]. 2 Figure 2-2-4 Installing the toner container FS-1050 2-6 5. Install the toner container 2 into the printer. 6.

Service Manual
Page 30
... LOCK UNLOCK NOTE Figure- 2-2-5 Locking the toner container The printer is necessary for the printer to continuously support a print job. This delay is shipped from the factory with a sufficient amount of toner to fill the developer reservoir with no toner supplied in the manner above, there will ...be a delay of time is approximately 15 minutes. The period of several minutes before the printer gets ready to the lock position. 8. Push the lock lever #1 1 to print a job. 7. FS-1050...
... LOCK UNLOCK NOTE Figure- 2-2-5 Locking the toner container The printer is necessary for the printer to continuously support a print job. This delay is shipped from the factory with a sufficient amount of toner to fill the developer reservoir with no toner supplied in the manner above, there will ...be a delay of time is approximately 15 minutes. The period of several minutes before the printer gets ready to the lock position. 8. Push the lock lever #1 1 to print a job. 7. FS-1050...
Service Manual
Page 39
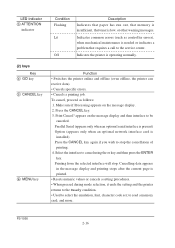
... service center. Print Cancel? Select the interface to cancel using the or key and then press the ENTER key. FS-1050 2-16 Indicates the printer is low, or other warning messages. Printing from the selected interface will stop the cancellation of printing. 4. and ... errors), when mechanical maintenance is needed or indicates a problem that toner is operating normally. (2) keys Key 4 GO key 5 CANCEL key 6 MENU key Function • Switches the printer online and offline (even offline, the printer can receive data). • Cancels specific errors. • Cancels...
... service center. Print Cancel? Select the interface to cancel using the or key and then press the ENTER key. FS-1050 2-16 Indicates the printer is low, or other warning messages. Printing from the selected interface will stop the cancellation of printing. 4. and ... errors), when mechanical maintenance is needed or indicates a problem that toner is operating normally. (2) keys Key 4 GO key 5 CANCEL key 6 MENU key Function • Switches the printer online and offline (even offline, the printer can receive data). • Cancels specific errors. • Cancels...

Service Manual
Page 44
... Adjust > Custom 1 >Reset Type Adjust >>Paper Weight Normal >>Paper Weight Heavy (Thick) >>Paper Weight Light (Thin) LIFE Counters > >>Print Density 03 >Total Print 0123456 >New Toner Installed Continued on next page. 2-21 FS-1050 Print Quality > Opt.
... Adjust > Custom 1 >Reset Type Adjust >>Paper Weight Normal >>Paper Weight Heavy (Thick) >>Paper Weight Light (Thin) LIFE Counters > >>Print Density 03 >Total Print 0123456 >New Toner Installed Continued on next page. 2-21 FS-1050 Print Quality > Opt.

Service Manual
Page 47
Chapter 3 Contents 3-1 Maintenance/Adjustments ...3-3 3-1-1 Life expectancy of modules ...3-3 3-1-2 Toner container ...3-4 (1) When to replace the toner container 3-4 (2) Notes on changing toner container 3-4 (3) Toner container replacement 3-5 (4) Toner saver mode (EcoPrint 3-6 3-1-3 Cleaning the printer ...3-7 (1) Cleaning the registration roller 3-8 (2) Cleaning the main charger wire 3-8 3-1-4 Updating the firmware ...3-9 (1) Firmware program data format 3-9 (2) Downloading the firmware from the parallel interface 3-10 (3) Downloading ...
Chapter 3 Contents 3-1 Maintenance/Adjustments ...3-3 3-1-1 Life expectancy of modules ...3-3 3-1-2 Toner container ...3-4 (1) When to replace the toner container 3-4 (2) Notes on changing toner container 3-4 (3) Toner container replacement 3-5 (4) Toner saver mode (EcoPrint 3-6 3-1-3 Cleaning the printer ...3-7 (1) Cleaning the registration roller 3-8 (2) Cleaning the main charger wire 3-8 3-1-4 Updating the firmware ...3-9 (1) Firmware program data format 3-9 (2) Downloading the firmware from the parallel interface 3-10 (3) Downloading ...

Service Manual
Page 48
Kit TK-17 PU-42 Table 3-1-1 Life expectancy of modules The table below shows the nominal life expectancy for each module (except toner container) can be found in Parts Catalog. Detailed part information for modules. 3-1 Maintenance/Adjustments 3-1-1 Life expectancy of modules Module Toner container Process unit Nominal life (pages) 6,000 100,000 Remarks User-replaceable User-replaceable FS-1050 3-3
Kit TK-17 PU-42 Table 3-1-1 Life expectancy of modules The table below shows the nominal life expectancy for each module (except toner container) can be found in Parts Catalog. Detailed part information for modules. 3-1 Maintenance/Adjustments 3-1-1 Life expectancy of modules Module Toner container Process unit Nominal life (pages) 6,000 100,000 Remarks User-replaceable User-replaceable FS-1050 3-3

Service Manual
Page 49
... to clean the parts as instructed in pages TK-17 6,000 Based on letter or A4 size paper; Table 3-1-2 Toner container NOTE Kit Life in this message appears. FS-1050 3-4 If the printer stops printing while the Toner indicator is highly recommended for the first time, the number of 5 % with EcoPrint mode turned off, the...
... to clean the parts as instructed in pages TK-17 6,000 Based on letter or A4 size paper; Table 3-1-2 Toner container NOTE Kit Life in this message appears. FS-1050 3-4 If the printer stops printing while the Toner indicator is highly recommended for the first time, the number of 5 % with EcoPrint mode turned off, the...

Service Manual
Page 50
Pull lock lever #1 1 to the release [UNLOCK] position, then pull lock lever #2 2 to the release (right) position. 1 2 Figure 3-1-1 Releasing Lock levers #1 and #2 Gently remove the old toner container 3. 3 Figure 3-1-2 Removing the old toner container 3-5 FS-1050 (3) Toner container replacement To replace the toner container, open the top cover.
Pull lock lever #1 1 to the release [UNLOCK] position, then pull lock lever #2 2 to the release (right) position. 1 2 Figure 3-1-1 Releasing Lock levers #1 and #2 Gently remove the old toner container 3. 3 Figure 3-1-2 Removing the old toner container 3-5 FS-1050 (3) Toner container replacement To replace the toner container, open the top cover.

Service Manual
Page 51
... supplied plastic bag 4 and dispose of it. 4 Figure 3-1-3 Disposal of toner consumed on by using the operator panel (MENU) For details refer to save printing costs by drastically extending the toner container life. FS-1050 3-6 EcoPrint mode is made from non-harmful, flammable material, be sure to...to complete installation of the new toner container. (4) Toner saver mode (EcoPrint) The EcoPrint enables to reduce the amount of the old toner container NOTE Although the toner container is factory-set to off and turned on the page so as to the printer's User's Manual. Put it according...
... supplied plastic bag 4 and dispose of it. 4 Figure 3-1-3 Disposal of toner consumed on by using the operator panel (MENU) For details refer to save printing costs by drastically extending the toner container life. FS-1050 3-6 EcoPrint mode is made from non-harmful, flammable material, be sure to...to complete installation of the new toner container. (4) Toner saver mode (EcoPrint) The EcoPrint enables to reduce the amount of the old toner container NOTE Although the toner container is factory-set to off and turned on the page so as to the printer's User's Manual. Put it according...


