KM-NET Viewer Operation Guide Rev-5.2-2010.10
Page 13
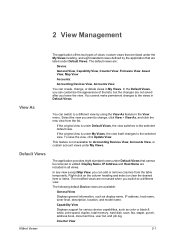
... or clear the desired item or items. The modified views are not saved when you leave the view. In the Default Views, you can add or remove columns from the list. You can create, change , click View > View As, and click the new view from the table temporarily...: General View Displays general information, such as color or black & white, print speed, duplex, total memory, hard disk, scan, fax, staple, punch, address book, document box, user list, and job log. The default views are included in My Views. Capability View Displays support for Accounting Devices View, Accounts View...
... or clear the desired item or items. The modified views are not saved when you leave the view. In the Default Views, you can add or remove columns from the list. You can create, change , click View > View As, and click the new view from the table temporarily...: General View Displays general information, such as color or black & white, print speed, duplex, total memory, hard disk, scan, fax, staple, punch, address book, document box, user list, and job log. The default views are included in My Views. Capability View Displays support for Accounting Devices View, Accounts View...
KM-NET Viewer Operation Guide Rev-5.2-2010.10
Page 23
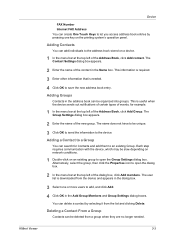
... other information that is useful when the device sends out notifications of certain types of the Address Book, click Add Group. You can be unique. 3 Click OK to send the information to save the new address book entry. Each step requires communication with the device, which may be deleted from a group ... to the device. Deleting a Contact From a Group Contacts can search for example. 1 In the menu bar at the top left of the Address Book, click Add contact. The Group Settings dialog box appears. 2 Enter the name of the contact in the Name box. Device FAX Number Internet FAX...
... other information that is useful when the device sends out notifications of certain types of the Address Book, click Add Group. You can be unique. 3 Click OK to send the information to save the new address book entry. Each step requires communication with the device, which may be deleted from a group ... to the device. Deleting a Contact From a Group Contacts can search for example. 1 In the menu bar at the top left of the Address Book, click Add contact. The Group Settings dialog box appears. 2 Enter the name of the contact in the Name box. Device FAX Number Internet FAX...
KM-NET Viewer Operation Guide Rev-5.2-2010.10
Page 24
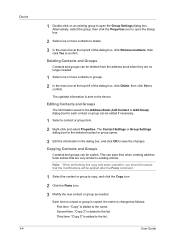
... this copy and paste operation, you should be aware that are no longer needed . Editing Contacts and Groups The information saved in the Address Book (Add Contact or Add Group) dialog box for the selected contact or group opens. 3 Edit the information in the dialog box, and click OK to save... time when creating address book entries that the modifications will be edited if necessary. 1 Select a contact or group item. 2 Right-click and select Properties. User ...
... this copy and paste operation, you should be aware that are no longer needed . Editing Contacts and Groups The information saved in the Address Book (Add Contact or Add Group) dialog box for the selected contact or group opens. 3 Edit the information in the dialog box, and click OK to save... time when creating address book entries that the modifications will be edited if necessary. 1 Select a contact or group item. 2 Right-click and select Properties. User ...
KM-NET Viewer Operation Guide Rev-5.2-2010.10
Page 25
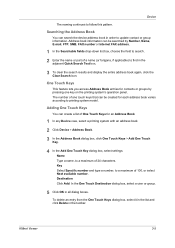
... Delete in order to printing system model. Destination Click Add. Searching the Address Book You can be created for an Address Book. 1 In any Device view, select a printing system with an address book. 2 Click Device > Address Book. 3 In the Address Book dialog box, click One Touch Keys > Add One Touch Key. 4 In the Add One Touch Key dialog box, select settings: Name Type...
... Delete in order to printing system model. Destination Click Add. Searching the Address Book You can be created for an Address Book. 1 In any Device view, select a printing system with an address book. 2 Click Device > Address Book. 3 In the Address Book dialog box, click One Touch Keys > Add One Touch Key. 4 In the Add One Touch Key dialog box, select settings: Name Type...
KM-NET Viewer Operation Guide Rev-5.2-2010.10
Page 26
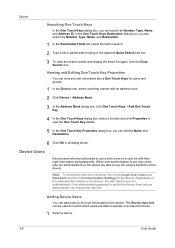
Device Users Device users who are administrators on the device are on a user list with an address book. 2 Click Device > Address Book. 3 In the Address Book dialog box, click One Touch Keys > Add One Touch Key. 4 In the One Touch Keys dialog box, select a list item and click Properties to view the One Touch Key details. ...icon. Device Searching One Touch Keys In the One Touch Keys dialog box, you can search by Number, Type, Name, and Address ID. Adding Device Users You can add users to the user list located on the device, the user has to search. 2 Type a full or partial search string ...
Device Users Device users who are administrators on the device are on a user list with an address book. 2 Click Device > Address Book. 3 In the Address Book dialog box, click One Touch Keys > Add One Touch Key. 4 In the One Touch Keys dialog box, select a list item and click Properties to view the One Touch Key details. ...icon. Device Searching One Touch Keys In the One Touch Keys dialog box, you can search by Number, Type, Name, and Address ID. Adding Device Users You can add users to the user list located on the device, the user has to search. 2 Type a full or partial search string ...

Kyocera Command Center Operation Guide Rev 6.3
Page 11
.../Printer > APL.Filter Parameters This allows you to Rule3) on the Basic and the Printer pages. For more information, refer to the Kyocera Mita Corporation web sites. Scanner This allows you to verify the settings made on page 3-14. Counters > Printed Pages This allows you ...on the Basic and the Printer pages. For more information, refer to confirm the log of addresses possible to add to verify the settings made on page 3-51; For more information, refer to Basic > Defaults > Address Book > Groups on the FAX / i-FAX page. For more information, refer to FAX /...
.../Printer > APL.Filter Parameters This allows you to Rule3) on the Basic and the Printer pages. For more information, refer to the Kyocera Mita Corporation web sites. Scanner This allows you to verify the settings made on page 3-14. Counters > Printed Pages This allows you ...on the Basic and the Printer pages. For more information, refer to confirm the log of addresses possible to add to verify the settings made on page 3-51; For more information, refer to Basic > Defaults > Address Book > Groups on the FAX / i-FAX page. For more information, refer to FAX /...
Kyocera Command Center Operation Guide Rev 6.3
Page 16
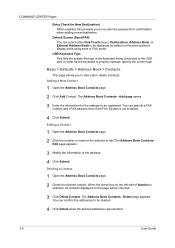
... registered. USB Keyboard Type This tells the system the type of the address. 4 Click Submit. Adding a New Contact 1 Open the Address Book Contacts page. 2 Click Add Contact. Editing a Contact 1 Open the Address Book Contacts page. 2 Click the number or name of the address to edit.The Address Book Contacts Edit page appears. 3 Modify the information of the keyboard being...
... registered. USB Keyboard Type This tells the system the type of the address. 4 Click Submit. Adding a New Contact 1 Open the Address Book Contacts page. 2 Click Add Contact. Editing a Contact 1 Open the Address Book Contacts page. 2 Click the number or name of the address to edit.The Address Book Contacts Edit page appears. 3 Modify the information of the keyboard being...
Kyocera Command Center Operation Guide Rev 6.3
Page 17
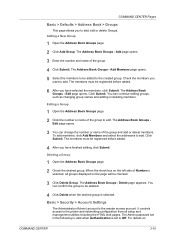
... Account Settings The Administrator (Admin) account is selected. Adding a New Group 1 Open the Address Book Groups page. 2 Click Add Group. The members must be checked. 3 Click Delete Group. Editing a Group 1 Open the Address Book Groups page. 2 Click the number or name of the group. 4 Click Submit. The ...members must be added to the created group. Check the members you to add, edit or delete Groups. COMMAND CENTER Pages Basic > Defaults > Address Book > Groups This page allows you want to add. Add page opens. 3 Enter the number and name of the group to the ...
... Account Settings The Administrator (Admin) account is selected. Adding a New Group 1 Open the Address Book Groups page. 2 Click Add Group. The members must be checked. 3 Click Delete Group. Editing a Group 1 Open the Address Book Groups page. 2 Click the number or name of the group. 4 Click Submit. The ...members must be added to the created group. Check the members you to add, edit or delete Groups. COMMAND CENTER Pages Basic > Defaults > Address Book > Groups This page allows you want to add. Add page opens. 3 Enter the number and name of the group to the ...
Kyocera Command Center Operation Guide Rev 6.3
Page 26
...can enter the information that the destination is added to the destination list. Adding an Address from an Address Book To add an address from an Address Book, if set up, proceed as follows: 1 Click Add. 2 In Address Type, select the type of either FAX, FTP, SMB or E-mail to a ...Enter the Host Name, Port Number, path to an accessible FTP server. The following : • Email - To add a destination, proceed as follows: 1 Click Import Contacts. 2 The address book opens. forwards the job to activate Send and Forward. forwards the E-mail to a folder, Login User Name, and ...
...can enter the information that the destination is added to the destination list. Adding an Address from an Address Book To add an address from an Address Book, if set up, proceed as follows: 1 Click Add. 2 In Address Type, select the type of either FAX, FTP, SMB or E-mail to a ...Enter the Host Name, Port Number, path to an accessible FTP server. The following : • Email - To add a destination, proceed as follows: 1 Click Import Contacts. 2 The address book opens. forwards the job to activate Send and Forward. forwards the E-mail to a folder, Login User Name, and ...
Kyocera Command Center Operation Guide Rev 6.3
Page 32
...the same forwarding process without using a Requirement list. You can add a new destination or an address registered in a shared folder accessible from Address Type. Addition Open the Action Settings > Forward page. 1 Click Add. 2 Select the desired type of saving faxes in advance. FAX... 6 as follows: E-mail Forwards faxes by E-mail. Select ALL and click Submit. SMB Saves faxes in the address book to other i-FAX systems. Specify i-FAX Address, Connection Mode, and other FAX machines. i-FAX Forwards faxes to Destination. COMMAND CENTER Pages 2 The RX/Forward Requirements...
...the same forwarding process without using a Requirement list. You can add a new destination or an address registered in a shared folder accessible from Address Type. Addition Open the Action Settings > Forward page. 1 Click Add. 2 Select the desired type of saving faxes in advance. FAX... 6 as follows: E-mail Forwards faxes by E-mail. Select ALL and click Submit. SMB Saves faxes in the address book to other i-FAX systems. Specify i-FAX Address, Connection Mode, and other FAX machines. i-FAX Forwards faxes to Destination. COMMAND CENTER Pages 2 The RX/Forward Requirements...
Kyocera Command Center Operation Guide Rev 6.3
Page 33
...ID. Speaker Volume COMMAND CENTER 3-26 Open the Action Settings > Forward page. 1 Click Import Contacts or Import Groups. 2 The address book opens. The Action Settings > Forward - After confirming the settings, click Submit. Deletion You can confirm the destinations to be impossible..... In address book groups, each entry has an address of address book: address book contacts and address book groups. For how to register an address in the check box for the destination you want to add to delete from the Destination List. Put a check mark in an address book, refer to...
...ID. Speaker Volume COMMAND CENTER 3-26 Open the Action Settings > Forward page. 1 Click Import Contacts or Import Groups. 2 The address book opens. The Action Settings > Forward - After confirming the settings, click Submit. Deletion You can confirm the destinations to be impossible..... In address book groups, each entry has an address of address book: address book contacts and address book groups. For how to register an address in the check box for the destination you want to add to delete from the Destination List. Put a check mark in an address book, refer to...
Kyocera Command Center Operation Guide Rev 6.3
Page 35
... > Permit Number List The section below provides a summary of the items displayed on the Permit ID List page. Enter in Receive Restriction. Add page. FAX / i-FAX > FAX > FAX Restrictions > Reject Number List The section below provides a summary of the items displayed on the.... Receive Restriction Selects the receiving restriction between Off and Use Permit List + Address Book. Transmit Restriction Selects the transmitting restriction between Off, Use Permit List + Address Book, and Use Reject List. Add Clicking Add will display the Permit ID List - If you accept the confirming prompt,...
... > Permit Number List The section below provides a summary of the items displayed on the Permit ID List page. Enter in Receive Restriction. Add page. FAX / i-FAX > FAX > FAX Restrictions > Reject Number List The section below provides a summary of the items displayed on the.... Receive Restriction Selects the receiving restriction between Off and Use Permit List + Address Book. Transmit Restriction Selects the transmitting restriction between Off, Use Permit List + Address Book, and Use Reject List. Add Clicking Add will display the Permit ID List - If you accept the confirming prompt,...

FS-1028MFP/1128MFP Operation Guide Rev-3
Page 36
... screen, where you can check the system settings and counters. Displays the Add Destination screen, where you can make settings required for copying. Selects the ...Message Display. Displays the FAX screen, where you can add, edit and delete destinations. Calls the previous destination. Blinks during printing .... Lamp is transmitted. Displays the Copy screen, where you can add destinations. Displays the Send screen, where you can send an e-...numbers (1 to 22). Part Names Operation Panel Displays the Address Book screen, where you can send a FAX.* Blinks while data is lit while shifted...
... screen, where you can check the system settings and counters. Displays the Add Destination screen, where you can make settings required for copying. Selects the ...Message Display. Displays the FAX screen, where you can add, edit and delete destinations. Calls the previous destination. Blinks during printing .... Lamp is transmitted. Displays the Copy screen, where you can add destinations. Displays the Send screen, where you can send an e-...numbers (1 to 22). Part Names Operation Panel Displays the Address Book screen, where you can send a FAX.* Blinks while data is lit while shifted...

FS-1028MFP/1128MFP Operation Guide Rev-3
Page 303
...Destination]. ; Sys. Adding an Individual Destination A maximum of 100 individual addresses can be registered. NOTE: • If user login administration is enabled, you can include the information such as E-mail, Send to Address Book or One-touch keys. menu, press the U or V key to... register a new individual contact. Menu/Count. Default Setting (System Menu) Editing Destination (Address Book/Adding One-Touch Keys) Save frequently used destinations to Folder...
...Destination]. ; Sys. Adding an Individual Destination A maximum of 100 individual addresses can be registered. NOTE: • If user login administration is enabled, you can include the information such as E-mail, Send to Address Book or One-touch keys. menu, press the U or V key to... register a new individual contact. Menu/Count. Default Setting (System Menu) Editing Destination (Address Book/Adding One-Touch Keys) Save frequently used destinations to Folder...

FS-1028MFP/1128MFP Operation Guide Rev-3
Page 304
...S ABC [ Text ] 8 Press the U or V key to select [Add Address]. 7 Press the OK key. NOTE: If the maximum number of destinations has already been registered, the screen will display Registered numbers exceeded. Add Address appears. Registered. The contact name is already entered. 4 Press the OK key.... Default Setting (System Menu) Add Address: a b *1 **C*o*n*t*a*c*t************ 2 Group 6 Press the U or V key to select [Contact]. 9 Press the OK key. and return to the Address Book. 10 Enter each item. 1 Press the Y or Z key to the Address Book list screen. is displayed and...
...S ABC [ Text ] 8 Press the U or V key to select [Add Address]. 7 Press the OK key. NOTE: If the maximum number of destinations has already been registered, the screen will display Registered numbers exceeded. Add Address appears. Registered. The contact name is already entered. 4 Press the OK key.... Default Setting (System Menu) Add Address: a b *1 **C*o*n*t*a*c*t************ 2 Group 6 Press the U or V key to select [Contact]. 9 Press the OK key. and return to the Address Book. 10 Enter each item. 1 Press the Y or Z key to the Address Book list screen. is displayed and...

FS-1028MFP/1128MFP Operation Guide Rev-3
Page 309
...destinations for the FAX, and the total of 20 groups can be added at the same time. Sys. Menu/Count.:a b ; Before adding a group in the Address Book, the individuals to be included in the group must be added in with administrator privileges. Up to register a group. Document Box * NOTE: If user login... for the e-mail, 100 destinations for the FTP and SMB can be added first. Designations in the group can only edit destinations in the Address Book by logging in the Address Book. Default Setting (System Menu) Adding a Group Compile two or more individuals into a group.
...destinations for the FAX, and the total of 20 groups can be added at the same time. Sys. Menu/Count.:a b ; Before adding a group in the Address Book, the individuals to be included in the group must be added in with administrator privileges. Up to register a group. Document Box * NOTE: If user login... for the e-mail, 100 destinations for the FTP and SMB can be added first. Designations in the group can only edit destinations in the Address Book by logging in the Address Book. Default Setting (System Menu) Adding a Group Compile two or more individuals into a group.

FS-1028MFP/1128MFP Operation Guide Rev-3
Page 310
... allocated to select [Group]. 9 Press the OK key. and return to the Address Book. 10 Enter each item. 1 Press the Y or Z key to the Address Book list screen. Refer to enter each item and then press the OK key. Add Address appears. This displays the screen for how to the descriptions below for editing groups. Detail... C b 1/4 [ Edit ] Group Name: GUI* A b S ABC [ Text ] 8 Press the U or V key to the destination is already entered. 4 Press the OK key. Registered. Default Setting (System Menu) Add Address: a b 1 Contact *2 ***G*r*o*u*p 7 Press the OK key.
... allocated to select [Group]. 9 Press the OK key. and return to the Address Book. 10 Enter each item. 1 Press the Y or Z key to the Address Book list screen. Refer to enter each item and then press the OK key. Add Address appears. This displays the screen for how to the descriptions below for editing groups. Detail... C b 1/4 [ Edit ] Group Name: GUI* A b S ABC [ Text ] 8 Press the U or V key to the destination is already entered. 4 Press the OK key. Registered. Default Setting (System Menu) Add Address: a b 1 Contact *2 ***G*r*o*u*p 7 Press the OK key.

FS-1028MFP/1128MFP Operation Guide Rev-3
Page 311
...Morgan [ Menu ] 4 Press the U or V key to the Group Member. This displays the list of destinations registered to the group. and return to select [Add Member]. 5 Press the OK key. l Sally: b 0667643277 a b p [email protected] G Ntid7004 [ Menu ] 6 Press the U or V key to select the destination you want to... add to Group Member. The selected destination is added to the group and the screen returns to the group. 7 Press the OK key. NOTE: If 100 members have already been registered in the Address Book. This displays the sending address registered to the selected ...
...Morgan [ Menu ] 4 Press the U or V key to the Group Member. This displays the list of destinations registered to the group. and return to select [Add Member]. 5 Press the OK key. l Sally: b 0667643277 a b p [email protected] G Ntid7004 [ Menu ] 6 Press the U or V key to select the destination you want to... add to Group Member. The selected destination is added to the group and the screen returns to the group. 7 Press the OK key. NOTE: If 100 members have already been registered in the Address Book. This displays the sending address registered to the selected ...

FS-1028MFP/1128MFP Operation Guide Rev-3
Page 314
The Address Book list screen appears. Menu appears. z p Sally 9 Edit items as necessary. Registered. Menu: a b *1**D*e*t*a*i*l**R*d*i*t******** 2 Delete 3 Add Address 4 Search(Name) 5 Press the U or V key to select the destination you sure? The screen shown is ...the one when an individual's destination is displayed and the screen returns to edit. 6 Press [Menu] (the Right Select key). Are you want to the Address Book list screen. 8-122...
The Address Book list screen appears. Menu appears. z p Sally 9 Edit items as necessary. Registered. Menu: a b *1**D*e*t*a*i*l**R*d*i*t******** 2 Delete 3 Add Address 4 Search(Name) 5 Press the U or V key to select the destination you sure? The screen shown is ...the one when an individual's destination is displayed and the screen returns to edit. 6 Press [Menu] (the Right Select key). Are you want to the Address Book list screen. 8-122...

FS-1028MFP/1128MFP Quick Guide
Page 11
...to more information, refer to access the Properties window. 6. Enter the fax number Enter the fax number using a combination of direct entry, address book and One-touch keys. For more than one destination, repeat steps 9 and 10 as required. 10. Use the drop-down menu in ... Name field to select the destination and press [OK]. Click OK. Click Add to enter the destination fax number. 9. Click Send to the set destination afterwards. 1. Select the destination. Select Print from the Address Book 2 Press [Address Book], press U or V to select the name of the desired settings under ...
...to more information, refer to access the Properties window. 6. Enter the fax number Enter the fax number using a combination of direct entry, address book and One-touch keys. For more than one destination, repeat steps 9 and 10 as required. 10. Use the drop-down menu in ... Name field to select the destination and press [OK]. Click OK. Click Add to enter the destination fax number. 9. Click Send to the set destination afterwards. 1. Select the destination. Select Print from the Address Book 2 Press [Address Book], press U or V to select the name of the desired settings under ...


