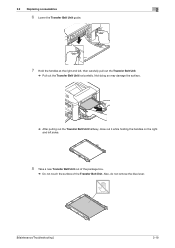
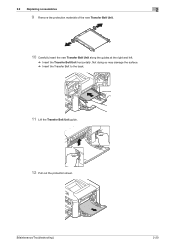
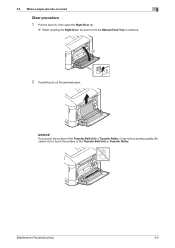
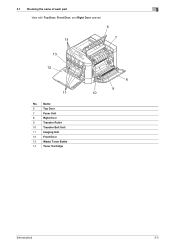
bizhub C3100P Maintenance/Troubleshooting User Guide
Page 2
... consumables ...2-3 Replacing a Toner Cartridge ...2-3 Handling a Toner Cartridge...2-3 Storing Toner Cartridges...2-3 Replacement procedure ...2-4 Replacing an Imaging Unit...2-8 Replacing a Waste Toner Bottle ...2-13 Replacing the Transfer Roller...2-15 Replacing the Transfer Belt Unit ...2-17 Replacing a Fuser Unit...2-22 3 Clearing a Paper Jam 3.1 3.2 3.2.1 3.2.2 3.2.3 3.2.4 3.2.5 3.2.6 3.3 To prevent a paper jam ...3-2 When a paper jam has occurred 3-3 Paper jam message screen...3-3 Clearing...
bizhub C3100P Maintenance/Troubleshooting User Guide
Page 15
...UNIT END OF LIFE] [WASTE TONER NEAR FULL] [WASTE TONER FULL] [TRANS. The operating life of the Imaging Unit has expired. Replace the Transfer Belt Unit. For information on this machine, it can be informed of the time to run out. Replace the Toner Cartridge. The operating life of ...the Transfer Belt Unit has expired. Printing is possible, but the printing quality is depleted. Toner is not assured. Prepare the specified Imaging Unit. Printing is...
bizhub C3100P Maintenance/Troubleshooting User Guide
Page 30
ROLLER], then reset the counter. 2.2.5 Replacing the Transfer Belt Unit After the Transfer Belt Unit replacement message has appeared, printing is possible, but the printing quality reduces. Immediately replace the Transfer Belt. 1 Turn the power of this machine off, then disconnect the power cable and interface cable. 2 Open the Front Door. [Maintenance/Troubleshooting] 2-17 2.2 Replacing consumables 2 6 While holding down the roller, press it inward until it clicks. 7 Close the Right Door. 8 Select [UTILITY] - [ADMIN SETTINGS] - [LIFE] - [REPLACE] - [TRANS.
bizhub C3100P Maintenance/Troubleshooting User Guide
Page 31
... open the Right Door (2). % When opening the Right Door, be sure to fold the Manual Feed Tray in advance. 5 Insert the protection sheet under the Transfer Belt Unit. % Insert the protection sheet until it stops. [Maintenance/Troubleshooting] 2-18 2.2 Replacing consumables 2 3 Remove all of Toner Cartridge, Waste Toner Bottle, and Imaging Unit. % For...
bizhub C3100P Maintenance/Troubleshooting User Guide
Page 32
2.2 Replacing consumables 2 6 Lower the Transfer Belt Unit guide. 7 Hold the handles at the right and left sides. 8 Take a new Transfer Belt Unit out of the package box. % Do not touch the surface of the Transfer Belt Unit. Not doing so may damage the surface. % After pulling out the Transfer Belt Unit halfway, draw out it while holding the handles on the right and left , then carefully pull out the Transfer Belt Unit. % Pull out the Transfer Belt Unit horizontally. Also, do not remove the blue lever. [Maintenance/Troubleshooting] 2-19
bizhub C3100P Maintenance/Troubleshooting User Guide
Page 33
Not doing so may damage the surface. % Insert the Transfer Belt to the back. 11 Lift the Transfer Belt Unit guide. 12 Pull out the protection sheet. [Maintenance/Troubleshooting] 2-20 2.2 Replacing consumables 2 9 Remove the protection materials of the new Transfer Belt Unit. 10 Carefully insert the new Transfer Belt Unit along the guides at the right and left. % Insert the Transfer Belt Unit horizontally.
bizhub C3100P Maintenance/Troubleshooting User Guide
Page 43
NOTICE If you touch the surface of the Transfer Belt Unit or Transfer Roller. [Maintenance/Troubleshooting] 3-4 Be careful not to fold the Manual Feed Tray in advance. 2 Carefully pull out the jammed paper. 3.2 When a paper jam has occurred 3 Clear procedure 1 Pull the lever (1), then open the Right Door (2). % When opening the Right Door, be sure to touch the surface of the Transfer Belt Unit or Transfer Roller, it may reduce printing quality.
bizhub C3100P Maintenance/Troubleshooting User Guide
Page 45
NOTICE If you touch the surface of the Transfer Belt Unit or Transfer Roller. 3 Close the Right Door. 4 Pull out Tray 1, then remove any paper left in the tray. 5 Flip through the removed paper, then align the edges. 6 Load paper into Tray 1, then close the tray. [Maintenance/Troubleshooting] 3-6 Be careful not to touch the surface of the Transfer Belt Unit or Transfer Roller, it may reduce printing quality. 3.2 When a paper jam has occurred 3 2 Carefully pull out the jammed paper.
bizhub C3100P Maintenance/Troubleshooting User Guide
Page 50
Be careful not to touch the surface of the Fuser Unit. NOTICE If you cannot remove the paper downward, remove it may reduce printing quality. 3.2 When a paper jam has occurred 3 5 Carefully pull out the jammed paper. % If you touch the surface of the Transfer Belt Unit or Transfer Roller, it from the upper side of the Transfer Belt Unit or Transfer Roller. 6 Close the Fuser Cover. [Maintenance/Troubleshooting] 3-11
bizhub C3100P Maintenance/Troubleshooting User Guide
Page 61
...operating life of the Fuser Unit has expired. The operating life of the Transfer Roller has expired. Printing is possible, but the printing quality is insufficient. The operating life of the Transfer Belt Unit has expired. The operating life of the Imaging Unit will become ...Remedy Only one copy is automatically canceled. Replace the Imaging Unit. For details, refer to page 2-3. For details, refer to page 2-8. Replace the Transfer Belt Unit. For details, refer to page 2-15. For details, refer to page 2-17. Replace the Fuser Unit. Prepare a new Waste Toner Bottle...
bizhub C3100P Maintenance/Troubleshooting User Guide
Page 66
... Unit Replace 2-8 M Messages 4-8 Consumables replacement 2-2 Error 4-9 Warning 4-8 P Paper Jam Duplex Option 3-8 Fuser Unit 3-9 Lower Feeder Unit 3-7 Manual Feed Tray 3-3 Transfer Roller 3-3 Tray 1 3-5 S Service call 4-9 T Toner Cartridge 2-3 Handle 2-3 Replace 2-4 Store 2-3 Transfer Belt Replace 2-17 Transfer Roller Replace 2-15 Troubleshooting Message Window 4-2 Paper jam 3-13 Power supply 4-2 Print 4-3 Print quality 4-5 W Waste Toner Bottle Replace 2-13 [Maintenance...
bizhub C3100P Introduction User Guide
Page 19
3.1 Checking the name of each part 3 View with Top Door, Front Door, and Right Door opened 6 14 7 13 12 11 No. Name 6 Top Door 7 Fuser Unit 8 Right Door 9 Transfer Roller 10 Transfer Belt Unit 11 Imaging Unit 12 Front Door 13 Waste Toner Bottle 14 Toner Cartridge 8 9 10 [Introduction] 3-3
bizhub C3100P Description of Utility Keys
Page 31
BELT] [TRANS. Resets the transfer belt counter. Resets the transfer roller counter. [Description of Utility Keys] 5-18 ROLLER] Description Resets the fuser unit counter. Settings [FUSER UNIT] [TRANS. 5.5 [LIFE] 5 5.5 [LIFE] 5.5.1 [REPLACE] To display: [ADMIN SETTINGS] - [LIFE] - [REPLACE] Configure a setting to replace consumables.