
bizhub 3300P User Guide
Page 5
... ...105 Checking the status of parts and supplies 105 Checking the status of parts and supplies 105 Estimated number of remaining pages 106 Using genuine KONICA MINOLTA parts and supplies 106 Ordering toner cartridges ...106 Ordering an imaging unit ...107 Storing supplies ...107 Replacing supplies...108 Replacing the toner cartridge ...108 Replacing the...
... ...105 Checking the status of parts and supplies 105 Checking the status of parts and supplies 105 Estimated number of remaining pages 106 Using genuine KONICA MINOLTA parts and supplies 106 Ordering toner cartridges ...106 Ordering an imaging unit ...107 Storing supplies ...107 Replacing supplies...108 Replacing the toner cartridge ...108 Replacing the...
bizhub 3300P User Guide
Page 6
..., remove tray [x]. [24y.xx 131 [x]-page jam, clear manual feeder. [250.xx 134 13-Troubleshooting...136 Understanding the printer messages...136 Toner cartridge messages...136 Imaging unit messages ...145 Paper loading messages ...151 Printer communication error messages 165 Insufficient memory error messages 171 Miscellaneous messages ...175 Solving printer problems ...181 Basic printer...
..., remove tray [x]. [24y.xx 131 [x]-page jam, clear manual feeder. [250.xx 134 13-Troubleshooting...136 Understanding the printer messages...136 Toner cartridge messages...136 Imaging unit messages ...145 Paper loading messages ...151 Printer communication error messages 165 Insufficient memory error messages 171 Miscellaneous messages ...175 Solving printer problems ...181 Basic printer...
bizhub 3300P User Guide
Page 16
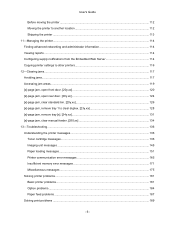
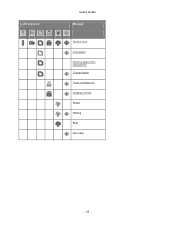
...things, depending on , off, blinking, or blinking slowly, indicating a printer status, a warning, or an error. Light or button 4 Toner low or replace imaging unit light 5 Ready or data light 6 Sleep button and light 7 Start button and light 8 Stop or cancel button User's Guide Color Yellow Green Amber Green ...Red Description The toner cartridge is in Ready state. The printer is low on toner, or the imaging unit needs to be on the light sequence. Understanding the printer control panel light sequences The printer control panel lights can be replaced.
...things, depending on , off, blinking, or blinking slowly, indicating a printer status, a warning, or an error. Light or button 4 Toner low or replace imaging unit light 5 Ready or data light 6 Sleep button and light 7 Start button and light 8 Stop or cancel button User's Guide Color Yellow Green Amber Green ...Red Description The toner cartridge is in Ready state. The printer is low on toner, or the imaging unit needs to be on the light sequence. Understanding the printer control panel light sequences The printer control panel lights can be replaced.
bizhub 3300P User Guide
Page 17
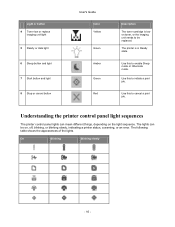
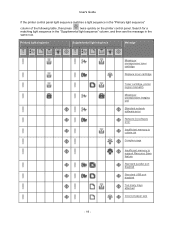
Light sequence Message Close front door Replace imaging unit Replace unsupported toner cartridge Replace unsupported imaging unit Toner cartridge, imaging unit mismatch Canceling print job Flushing buffer Resolution reduced Non-Printer Manufacturer toner cartridge Non-Printer Manufacturer imaging unit Printer had to restart Toner cartridge very low Imaging unit very low Toner cartridge nearly low Imaging unit nearly low - 17 - User's Guide If the printer control panel light sequence matches a light sequence in the following table, then see the message in the same row.
Light sequence Message Close front door Replace imaging unit Replace unsupported toner cartridge Replace unsupported imaging unit Toner cartridge, imaging unit mismatch Canceling print job Flushing buffer Resolution reduced Non-Printer Manufacturer toner cartridge Non-Printer Manufacturer imaging unit Printer had to restart Toner cartridge very low Imaging unit very low Toner cartridge nearly low Imaging unit nearly low - 17 - User's Guide If the printer control panel light sequence matches a light sequence in the following table, then see the message in the same row.
bizhub 3300P User Guide
Page 18
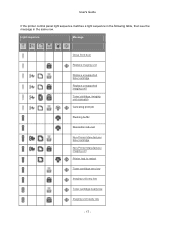
Light sequence User's Guide Message Service error Load paper Remove paper from standard bin Change paper Toner cartridge low Imaging unit low Ready Waiting Busy Not ready - 18 -
Light sequence User's Guide Message Service error Load paper Remove paper from standard bin Change paper Toner cartridge low Imaging unit low Ready Waiting Busy Not ready - 18 -
bizhub 3300P User Guide
Page 19
..., then press twice quickly on the printer control panel. Missing or unresponsive toner cartridge Replace toner cartridge Toner cartridge, printer region mismatch Missing or unresponsive imaging unit Standard network software error Network [x] software error Insufficient memory to collate job Complex page Insufficient memory to support Resource Save feature Standard parallel port disabled...
..., then press twice quickly on the printer control panel. Missing or unresponsive toner cartridge Replace toner cartridge Toner cartridge, printer region mismatch Missing or unresponsive imaging unit Standard network software error Network [x] software error Insufficient memory to collate job Complex page Insufficient memory to support Resource Save feature Standard parallel port disabled...
bizhub 3300P User Guide
Page 107
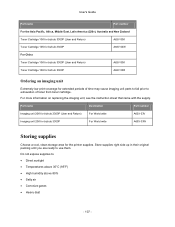
... exhaustion of toner from toner cartridge. For more information on replacing the imaging unit, see the instruction sheet that came with the supply. Part name Destination Part number Imaging unit 20K for bizhub 3300P (User and Return) For World wide A63X 03V Imaging unit 20K for bizhub 3300P For World wide A63X 03W Storing supplies Choose a cool, clean storage area...
... exhaustion of toner from toner cartridge. For more information on replacing the imaging unit, see the instruction sheet that came with the supply. Part name Destination Part number Imaging unit 20K for bizhub 3300P (User and Return) For World wide A63X 03V Imaging unit 20K for bizhub 3300P For World wide A63X 03W Storing supplies Choose a cool, clean storage area...
bizhub 3300P User Guide
Page 109
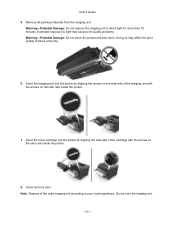
... front door. Do not burn the toner cartridge. CAUTION: If you get toner in your local regulations. User's Guide 5. Replacing the imaging unit 1. Warning-Potential Damage: Do not expose the imaging unit to light may cause print quality problems. 6. Note: Dispose of the empty toner cartridge according to your eyes, wash it out immediately...
... front door. Do not burn the toner cartridge. CAUTION: If you get toner in your local regulations. User's Guide 5. Replacing the imaging unit 1. Warning-Potential Damage: Do not expose the imaging unit to light may cause print quality problems. 6. Note: Dispose of the empty toner cartridge according to your eyes, wash it out immediately...
bizhub 3300P User Guide
Page 110
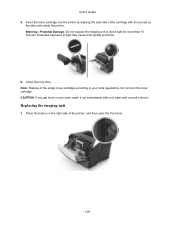
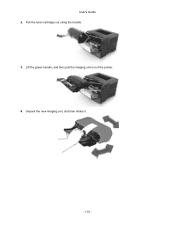
Unpack the new imaging unit, and then shake it. - 110 - User's Guide 2. Lift the green handle, and then pull the imaging unit out of the printer. 4. Pull the toner cartridge out using the handle. 3.
Unpack the new imaging unit, and then shake it. - 110 - User's Guide 2. Lift the green handle, and then pull the imaging unit out of the printer. 4. Pull the toner cartridge out using the handle. 3.
bizhub 3300P User Guide
Page 111
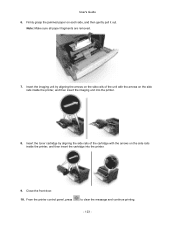
... into the printer by aligning the side rails of the used imaging unit according to direct light for more than 10 minutes. Close the front door. Remove all packing materials from the imaging unit. Insert the imaging unit into the printer by aligning the arrows on the side rails ...of future print jobs. 6. Warning-Potential Damage: Do not expose the imaging unit to your local regulations. Do not burn the imaging unit. - 111 - Doing so may cause print quality problems. Warning-Potential Damage: Do not touch the photoconductor drum. ...
... into the printer by aligning the side rails of the used imaging unit according to direct light for more than 10 minutes. Close the front door. Remove all packing materials from the imaging unit. Insert the imaging unit into the printer by aligning the arrows on the side rails ...of future print jobs. 6. Warning-Potential Damage: Do not expose the imaging unit to your local regulations. Do not burn the imaging unit. - 111 - Doing so may cause print quality problems. Warning-Potential Damage: Do not touch the photoconductor drum. ...
bizhub 3300P User Guide
Page 114
... as four sets of -life by setting the selectable alerts. For more advanced system support tasks, see the Networking Guide on the toner cartridge and imaging unit. • All selectable alerts can be set for assessing the status of -life supply condition. Notes: - These reports are using a proxy server, then temporarily disable...
... as four sets of -life by setting the selectable alerts. For more advanced system support tasks, see the Networking Guide on the toner cartridge and imaging unit. • All selectable alerts can be set for assessing the status of -life supply condition. Notes: - These reports are using a proxy server, then temporarily disable...
bizhub 3300P User Guide
Page 122
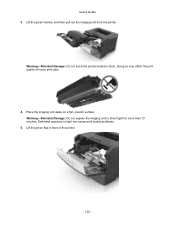
Doing so may affect the print quality of the printer. - 122 - Lift the green flap in front of future print jobs. 4. Place the imaging unit aside on a flat, smooth surface. Warning-Potential Damage: Do not expose the imaging unit to light can cause print quality problems. 5. Lift the green handle, and then pull out the imaging unit from the printer. Warning-Potential Damage: Do not touch the photoconductor drum. Extended exposure to direct light for more than 10 minutes. User's Guide 3.
Doing so may affect the print quality of the printer. - 122 - Lift the green flap in front of future print jobs. 4. Place the imaging unit aside on a flat, smooth surface. Warning-Potential Damage: Do not expose the imaging unit to light can cause print quality problems. 5. Lift the green handle, and then pull out the imaging unit from the printer. Warning-Potential Damage: Do not touch the photoconductor drum. Extended exposure to direct light for more than 10 minutes. User's Guide 3.
bizhub 3300P User Guide
Page 123
... each side, and then gently pull it out. Close the front door. 10. Insert the imaging unit by aligning the side rails of the unit with the arrows on the side rails inside the printer, and then insert the imaging unit into the printer. 9. User's Guide 6. Firmly grasp the jammed paper on the side rails...
... each side, and then gently pull it out. Close the front door. 10. Insert the imaging unit by aligning the side rails of the unit with the arrows on the side rails inside the printer, and then insert the imaging unit into the printer. 9. User's Guide 6. Firmly grasp the jammed paper on the side rails...
bizhub 3300P User Guide
Page 136
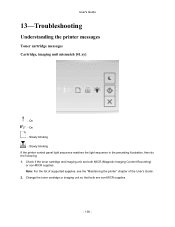
... Recording) or non-MICR supplies. Slowly blinking - Check if the toner cartridge and imaging unit are both are non-MICR supplies. - 136 - Slowly blinking If the printer control panel light sequence matches the light sequence in the preceding illustration, then ... of supported supplies, see the "Maintaining the printer" chapter of the User's Guide. 2. User's Guide 13-Troubleshooting Understanding the printer messages Toner cartridge messages Cartridge, imaging unit mismatch [41.xy] -
... Recording) or non-MICR supplies. Slowly blinking - Check if the toner cartridge and imaging unit are both are non-MICR supplies. - 136 - Slowly blinking If the printer control panel light sequence matches the light sequence in the preceding illustration, then ... of supported supplies, see the "Maintaining the printer" chapter of the User's Guide. 2. User's Guide 13-Troubleshooting Understanding the printer messages Toner cartridge messages Cartridge, imaging unit mismatch [41.xy] -
bizhub 3300P User Guide
Page 145
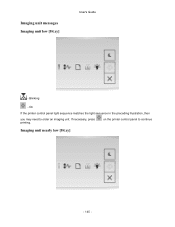
on the printer control panel to order an imaging unit. On If the printer control panel light sequence matches the light sequence in the preceding illustration, then you may need to continue Imaging unit nearly low [84.xy] - 145 - Imaging unit messages Imaging unit low [84.xy] User's Guide - If necessary, press printing. Blinking -
on the printer control panel to order an imaging unit. On If the printer control panel light sequence matches the light sequence in the preceding illustration, then you may need to continue Imaging unit nearly low [84.xy] - 145 - Imaging unit messages Imaging unit low [84.xy] User's Guide - If necessary, press printing. Blinking -

bizhub 3300P User Guide
Page 146
... illustration, then press on the printer control panel to continue printing. - 146 - If necessary, press on the printer control panel, if necessary, to replace the imaging unit very soon. User's Guide - Imaging unit very low [84.xy] - Blinking - For more information, see the "Replacing supplies" section of the User's Guide. Blinking - Slowly blinking -
... illustration, then press on the printer control panel to continue printing. - 146 - If necessary, press on the printer control panel, if necessary, to replace the imaging unit very soon. User's Guide - Imaging unit very low [84.xy] - Blinking - For more information, see the "Replacing supplies" section of the User's Guide. Blinking - Slowly blinking -

bizhub 3300P User Guide
Page 147
...light sequence in the preceding illustration, then the printer has detected a non-Printer Manufacturer supply or part installed in your KONICA MINOLTA printer or associated components. Use of third-party supplies or parts may deliver unpredictable results if third-party supplies or ...supplies or parts in the printer. Blinking - Blinking - User's Guide Non-Printer Manufacturer imaging unit, see the "Ordering supplies" section of the User's Guide. - 147 - Blinking - Imaging component usage beyond the intended life may damage your printer, press and simultaneously for at least...
...light sequence in the preceding illustration, then the printer has detected a non-Printer Manufacturer supply or part installed in your KONICA MINOLTA printer or associated components. Use of third-party supplies or parts may deliver unpredictable results if third-party supplies or ...supplies or parts in the printer. Blinking - Blinking - User's Guide Non-Printer Manufacturer imaging unit, see the "Ordering supplies" section of the User's Guide. - 147 - Blinking - Imaging component usage beyond the intended life may damage your printer, press and simultaneously for at least...

bizhub 3300P User Guide
Page 148
On If the printer control panel light sequence matches the light sequence in the preceding illustration, then replace the imaging unit. Blinking - Reinstall missing or unresponsive imaging unit [31.xy] - 148 - Note: If you do not have a replacement imaging unit, then see the instruction sheet that came with the supply. For more information, see the "Ordering supplies" section of the User's Guide. On - User's Guide Replace imaging unit, 0 estimated pages remain [84.xy] -
On If the printer control panel light sequence matches the light sequence in the preceding illustration, then replace the imaging unit. Blinking - Reinstall missing or unresponsive imaging unit [31.xy] - 148 - Note: If you do not have a replacement imaging unit, then see the instruction sheet that came with the supply. For more information, see the "Ordering supplies" section of the User's Guide. On - User's Guide Replace imaging unit, 0 estimated pages remain [84.xy] -

bizhub 3300P User Guide
Page 149
On - Blinking If the supplemental light sequence matches the light sequence in the preceding illustration, then press twice quickly to see the instruction sheet that came with the supply. - 149 - On - Blinking If the printer control panel light sequence matches the light sequence in the preceding illustration, then try one . User's Guide - On - For more of the following: • Remove the imaging unit, and then reinstall it. • Remove the imaging unit, and then install a new one or more information, see the supplemental light sequence. -
On - Blinking If the supplemental light sequence matches the light sequence in the preceding illustration, then press twice quickly to see the instruction sheet that came with the supply. - 149 - On - Blinking If the printer control panel light sequence matches the light sequence in the preceding illustration, then try one . User's Guide - On - For more of the following: • Remove the imaging unit, and then reinstall it. • Remove the imaging unit, and then install a new one or more information, see the supplemental light sequence. -
bizhub 3300P User Guide
Page 150
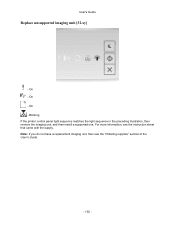
Blinking If the printer control panel light sequence matches the light sequence in the preceding illustration, then remove the imaging unit, and then install a supported one. Note: If you do not have a replacement imaging unit, then see the instruction sheet that came with the supply. On - For more information, see the "Ordering supplies" section of the User's Guide. - 150 - User's Guide Replace unsupported imaging unit [32.xy] - On - On -
Blinking If the printer control panel light sequence matches the light sequence in the preceding illustration, then remove the imaging unit, and then install a supported one. Note: If you do not have a replacement imaging unit, then see the instruction sheet that came with the supply. On - For more information, see the "Ordering supplies" section of the User's Guide. - 150 - User's Guide Replace unsupported imaging unit [32.xy] - On - On -


