KIP 7900 User Guide
Page 2
... Company No. & UPN No. : 7391A-K120 Operation is installed in Part 15 of the device. 3. Please keep this USER'S MANUAL for purchasing the KIP 7900. Operation is subject to the following two conditions: (1) this device may not cause interference, and (2) this device must accept any interference, including interference that may be co-located or operating in accordance with any interference received...
... Company No. & UPN No. : 7391A-K120 Operation is installed in Part 15 of the device. 3. Please keep this USER'S MANUAL for purchasing the KIP 7900. Operation is subject to the following two conditions: (1) this device may not cause interference, and (2) this device must accept any interference, including interference that may be co-located or operating in accordance with any interference received...

KIP 7900 User Guide
Page 5
Use a circuit with the printer. Do not remove the screw and do not open the cover if not instructed to do so in this warning, you may be as possible. 4. REPLACE THE CORD IF DAMAGED! 1. WARNING Ground the product with a correct ground source or you may be burnt or receive an ...throw the toner into . It may receive an electric shock. If the Power Cord is plugged into a fire or other sources of the printer. 2. If you ignore this User's Manual. Do not put a flower vase, a flowerpot or any water-filled item on it from the wall electrical outlet immediately. Install the ...
Use a circuit with the printer. Do not remove the screw and do not open the cover if not instructed to do so in this warning, you may be as possible. 4. REPLACE THE CORD IF DAMAGED! 1. WARNING Ground the product with a correct ground source or you may be burnt or receive an ...throw the toner into . It may receive an electric shock. If the Power Cord is plugged into a fire or other sources of the printer. 2. If you ignore this User's Manual. Do not put a flower vase, a flowerpot or any water-filled item on it from the wall electrical outlet immediately. Install the ...
KIP 7900 User Guide
Page 8
Correction Chapter 2 Basic Operations 2. 1 Turning on KIP 7900 2. 2 Turning off KIP 7900 2. 3 Replacing Roll Media 2. 4 Replacing Toner Cartridge 2. 5 Placing Cut Sheet Media 2. 6 Canceling Sleep Mode 2. 7 Dehumidifying Roll Media 2. 8 Stacking Prints on High Capacity Print Tray (option) Chapter 3 Error Corrections 3. 1 Paper Jam 3. 1. 1 Roll Deck Section (J-01, J-02, J-03, J-04) 3. 1. 2 Manual Feeder Section (J-05) 3. 1. 3 Paper Feeder Section (J-10, J-11, J-12) 3. 1. 4 Fuser Section (J-13, J-14) 3. 1. 5 Outer Device (J-21, J-22) 3. 2 Open Cover Errors 3. 2. 1 Roll Deck Open (7) Page 1- 2 1-...
Correction Chapter 2 Basic Operations 2. 1 Turning on KIP 7900 2. 2 Turning off KIP 7900 2. 3 Replacing Roll Media 2. 4 Replacing Toner Cartridge 2. 5 Placing Cut Sheet Media 2. 6 Canceling Sleep Mode 2. 7 Dehumidifying Roll Media 2. 8 Stacking Prints on High Capacity Print Tray (option) Chapter 3 Error Corrections 3. 1 Paper Jam 3. 1. 1 Roll Deck Section (J-01, J-02, J-03, J-04) 3. 1. 2 Manual Feeder Section (J-05) 3. 1. 3 Paper Feeder Section (J-10, J-11, J-12) 3. 1. 4 Fuser Section (J-13, J-14) 3. 1. 5 Outer Device (J-21, J-22) 3. 2 Open Cover Errors 3. 2. 1 Roll Deck Open (7) Page 1- 2 1-...

KIP 7900 User Guide
Page 9
3. 2. 2 Upper Frame Unit / Top Cover Open 3. 2. 3 Exit Cover Open 3. 3 Other Errors 3. 3. 1 Roll Replacement 3. 3. 2 Toner Empty 3. 4 Call Service Errors 3-18 3-19 3-20 3-20 3-20 3-21 (8)
3. 2. 2 Upper Frame Unit / Top Cover Open 3. 2. 3 Exit Cover Open 3. 3 Other Errors 3. 3. 1 Roll Replacement 3. 3. 2 Toner Empty 3. 4 Call Service Errors 3-18 3-19 3-20 3-20 3-20 3-21 (8)
KIP 7900 User Guide
Page 11
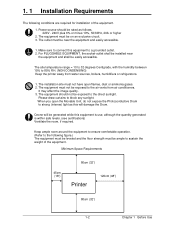
... or refrigerators. 1. Minimum Space Requirements 45cm (18") 80cm (32") Printer 120cm (48") 80cm (32") 1-2 Chapter 1 Before Use The installation site must be near the equipment and shall be easily accessible. The outlet must not have open the Movable Unit, do not expose the Photoconductive Drum to strong (intense) light as follows. 220V - 240V plus 6% or minus 10%, 50...
... or refrigerators. 1. Minimum Space Requirements 45cm (18") 80cm (32") Printer 120cm (48") 80cm (32") 1-2 Chapter 1 Before Use The installation site must be near the equipment and shall be easily accessible. The outlet must not have open the Movable Unit, do not expose the Photoconductive Drum to strong (intense) light as follows. 220V - 240V plus 6% or minus 10%, 50...
KIP 7900 User Guide
Page 13
1. 3 Features • KIP 7900 Digital Printer can make a print in a speed of KIP Contact Development System and mono-component minute toner can be made on the Touch Screen Panel (User Interface). 1-4 Chapter 1 Before Use The KIP HDP process generates no Waste Toner. • Many user operations can produce a high definition line, distinctive grayscale and consistent solid black. The maximum print size is 36 inches (914mm) wide, and the minimum...
1. 3 Features • KIP 7900 Digital Printer can make a print in a speed of KIP Contact Development System and mono-component minute toner can be made on the Touch Screen Panel (User Interface). 1-4 Chapter 1 Before Use The KIP HDP process generates no Waste Toner. • Many user operations can produce a high definition line, distinctive grayscale and consistent solid black. The maximum print size is 36 inches (914mm) wide, and the minimum...
KIP 7900 User Guide
Page 14
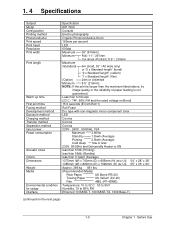
... Base-T) (continued on the next page) 1-5 Chapter 1 Before Use 1. 4 Specifications Subject Model Configuration Printing method Photoconductor Print speed Print head Resolution Print width Print length Warm up time First print time Fusing method Development method Exposure method Charging method Transfer method Separation method Input power Power consumption Acoustic noise Ozone Dimensions Weight Media Environmental condition for usage Interface Specification KIP 7900 Console Electro photography Organic Photoconductive Drum 160mm per second LED 600dpi...
... Base-T) (continued on the next page) 1-5 Chapter 1 Before Use 1. 4 Specifications Subject Model Configuration Printing method Photoconductor Print speed Print head Resolution Print width Print length Warm up time First print time Fusing method Development method Exposure method Charging method Transfer method Separation method Input power Power consumption Acoustic noise Ozone Dimensions Weight Media Environmental condition for usage Interface Specification KIP 7900 Console Electro photography Organic Photoconductive Drum 160mm per second LED 600dpi...
KIP 7900 User Guide
Page 16
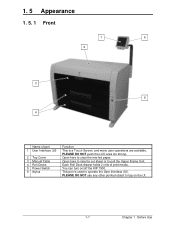
... of part 1 User Interface (UI) 2 Top Cover 3 Manual Table 4 Roll Decks 5 Power Switch 6 Stylus Function This is used to tap on /off the KIP 7900. 1. 5 Appearance 1. 5. 1 Front 1 6 2 3 5 4 Name of print media. Open here to pull the Upper Frame Unit. Open here to insert a cut sheet or to clear the mis-fed paper. PLEASE DO NOT use any other pointed object to operate the User Interface (UI). You can turn on the...
... of part 1 User Interface (UI) 2 Top Cover 3 Manual Table 4 Roll Decks 5 Power Switch 6 Stylus Function This is used to tap on /off the KIP 7900. 1. 5 Appearance 1. 5. 1 Front 1 6 2 3 5 4 Name of print media. Open here to pull the Upper Frame Unit. Open here to insert a cut sheet or to clear the mis-fed paper. PLEASE DO NOT use any other pointed object to operate the User Interface (UI). You can turn on the...

KIP 7900 User Guide
Page 17
Connect the power cord here. NOTE: Specification for the power cord used in North America Use the following type of part 1 Exit Cover 2 Dehumidify Heater Switch 3 Inlet Socket 4 Breaker 5 USB connector (USB2.0) 6 COM Port 7 LAN Port Function Open the Exit Cover when you remove the mis-fed media. 1. 5. 2 Rear 1 2 4 5 3 6 7 Name of power cord (UL-Listed). (1) Rating 250VAC, 20A (2) Plug type NEMA6-20 (3) Socket type IEC60320 : C19 (4) Cord SJT 3xAWG12 L Press "H" to turn on the Dehumidify Heater, and press "L" to turn it off.
Connect the power cord here. NOTE: Specification for the power cord used in North America Use the following type of part 1 Exit Cover 2 Dehumidify Heater Switch 3 Inlet Socket 4 Breaker 5 USB connector (USB2.0) 6 COM Port 7 LAN Port Function Open the Exit Cover when you remove the mis-fed media. 1. 5. 2 Rear 1 2 4 5 3 6 7 Name of power cord (UL-Listed). (1) Rating 250VAC, 20A (2) Plug type NEMA6-20 (3) Socket type IEC60320 : C19 (4) Cord SJT 3xAWG12 L Press "H" to turn on the Dehumidify Heater, and press "L" to turn it off.
KIP 7900 User Guide
Page 18
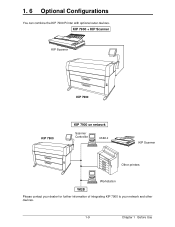
KIP 7900 + KIP Scanner KIP Scanner KIP 7900 KIP 7900 KIP 7900 on network Scanner Controller USB2.0 KIP Scanner Other printers Workstation WEB Please contact your dealer for further information of integrating KIP 7900 to your network and other devices. 1-9 Chapter 1 Before Use 1. 6 Optional Configurations You can combine the KIP 7900 Printer with optional outer devices.
KIP 7900 + KIP Scanner KIP Scanner KIP 7900 KIP 7900 KIP 7900 on network Scanner Controller USB2.0 KIP Scanner Other printers Workstation WEB Please contact your dealer for further information of integrating KIP 7900 to your network and other devices. 1-9 Chapter 1 Before Use 1. 6 Optional Configurations You can combine the KIP 7900 Printer with optional outer devices.
KIP 7900 User Guide
Page 19
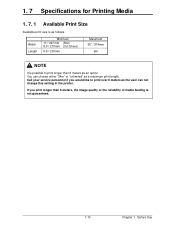
... Minimum 11"/ 297mm (Roll) 8.5"/ 210mm (Cut Sheet) 8.5"/ 210mm Maximum 36" / 914mm 6m NOTE It is not guaranteed. 1-10 Chapter 1 Before Use You can choose either "24m" or "unlimited" as the user can not change this setting in the printer. If you would like to print longer than 6 meters as follows. 1. 7 Specifications for Printing Media 1. 7. 1 Available Print Size Available print size is as an option.
... Minimum 11"/ 297mm (Roll) 8.5"/ 210mm (Cut Sheet) 8.5"/ 210mm Maximum 36" / 914mm 6m NOTE It is not guaranteed. 1-10 Chapter 1 Before Use You can choose either "24m" or "unlimited" as the user can not change this setting in the printer. If you would like to print longer than 6 meters as follows. 1. 7 Specifications for Printing Media 1. 7. 1 Available Print Size Available print size is as an option.

KIP 7900 User Guide
Page 22
.... "Void of paper If the media is equipped with vellum. Install the humidifier in case of paper" will occur in the room, and humidify the room air. 2. If you will not make print soon, remove the vellum from the machine right after everyday use, and keep it in a plastic bag. 1. NOTE (1) KIP 7900 is humidified; Remove the paper from the machine and keep it in a plastic...
.... "Void of paper If the media is equipped with vellum. Install the humidifier in case of paper" will occur in the room, and humidify the room air. 2. If you will not make print soon, remove the vellum from the machine right after everyday use, and keep it in a plastic bag. 1. NOTE (1) KIP 7900 is humidified; Remove the paper from the machine and keep it in a plastic...

KIP 7900 User Guide
Page 24
Chapter 2 Basic Operations 2. 1 Turning on KIP 7900 2. 2 Turning off KIP 7900 2. 3 Replacing Roll Media 2. 4 Replacing Toner Cartridge 2. 5 Placing Cut Sheet Media 2. 6 Canceling Sleep Mode 2. 7 Dehumidifying Roll Media 2. 8 Stacking Prints on High Capacity Print Tray (option) 2-1 page 2- 2 2- 4 2- 5 2-13 2-17 2-18 2-19 2-21 Chapter 2 Basic Operations
Chapter 2 Basic Operations 2. 1 Turning on KIP 7900 2. 2 Turning off KIP 7900 2. 3 Replacing Roll Media 2. 4 Replacing Toner Cartridge 2. 5 Placing Cut Sheet Media 2. 6 Canceling Sleep Mode 2. 7 Dehumidifying Roll Media 2. 8 Stacking Prints on High Capacity Print Tray (option) 2-1 page 2- 2 2- 4 2- 5 2-13 2-17 2-18 2-19 2-21 Chapter 2 Basic Operations
KIP 7900 User Guide
Page 36
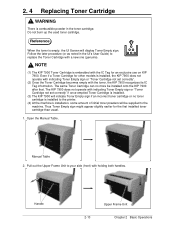
... models is installed, the KIP 7900 does not operate with indicating Toner Empty sign or "Toner Cartridge not set correctly" if once emptied Toner Cartridge is installed. (3) The KIP 7900 will display Toner Empty sign. Do not burn up the used toner cartridge. Manual Table 2. Pull out the Upper Frame Unit to your side (front) with a new one (genuine). Handle 2-13 Upper Frame Unit Chapter 2 Basic Operations 2. 4 Replacing Toner Cartridge WARNING There is combustible powder in the UI's User Guide...
... models is installed, the KIP 7900 does not operate with indicating Toner Empty sign or "Toner Cartridge not set correctly" if once emptied Toner Cartridge is installed. (3) The KIP 7900 will display Toner Empty sign. Do not burn up the used toner cartridge. Manual Table 2. Pull out the Upper Frame Unit to your side (front) with a new one (genuine). Handle 2-13 Upper Frame Unit Chapter 2 Basic Operations 2. 4 Replacing Toner Cartridge WARNING There is combustible powder in the UI's User Guide...
KIP 7900 User Guide
Page 41
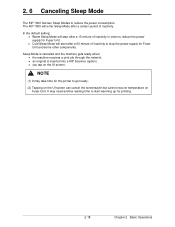
... on the UI screen. The KIP 7900 will start warming up for printing. 2-18 Chapter 2 Basic Operations It may take time for Fuser Unit. • Cold Sleep Mode will enter Sleep Mode after a 60 minute of inactivity. In the default setting; • Warm Sleep Mode will start after a 15 minute of inactivity in order to reduce the power supply for the printer to start after a certain period...
... on the UI screen. The KIP 7900 will start warming up for printing. 2-18 Chapter 2 Basic Operations It may take time for Fuser Unit. • Cold Sleep Mode will enter Sleep Mode after a 60 minute of inactivity. In the default setting; • Warm Sleep Mode will start after a 15 minute of inactivity in order to reduce the power supply for the printer to start after a certain period...

KIP 7900 User Guide
Page 43
... installing it into the printer. "Dehumidify Heater Switch" is located on the Dehumidify Heater. When these settings are several dehumidifying settings which can not change the switch setting. If media is unpacked from the manufacture right before installation, poor image quality may occur. Press "H" side. Note that the user can be in the "H" position. Dehumidify Heater Switch 2-20 Chapter 2 Basic Operations Call your service personnel if you use media...
... installing it into the printer. "Dehumidify Heater Switch" is located on the Dehumidify Heater. When these settings are several dehumidifying settings which can not change the switch setting. If media is unpacked from the manufacture right before installation, poor image quality may occur. Press "H" side. Note that the user can be in the "H" position. Dehumidify Heater Switch 2-20 Chapter 2 Basic Operations Call your service personnel if you use media...
KIP 7900 User Guide
Page 44
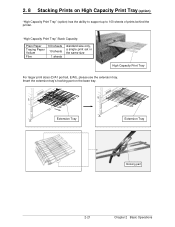
"High Capacity Print Tray" Stack Capacity: Plain Paper Tracing Paper Vellum Film 100 sheets 10 sheets 1 sheets standard size only, a single print set in the same size High Capacity Print Tray For larger print sizes (D/A1 portrait, E/A0), please use the extension tray. Insert the extension tray's hooking part on High Capacity Print Tray (option) "High Capacity Print Tray" (option) has the ability to support up to 100 sheets of prints behind the printer. 2. 8 Stacking Prints on the base tray. Extension Tray Extension Tray Hooking part 2-21 Chapter 2 Basic Operations
"High Capacity Print Tray" Stack Capacity: Plain Paper Tracing Paper Vellum Film 100 sheets 10 sheets 1 sheets standard size only, a single print set in the same size High Capacity Print Tray For larger print sizes (D/A1 portrait, E/A0), please use the extension tray. Insert the extension tray's hooking part on High Capacity Print Tray (option) "High Capacity Print Tray" (option) has the ability to support up to 100 sheets of prints behind the printer. 2. 8 Stacking Prints on the base tray. Extension Tray Extension Tray Hooking part 2-21 Chapter 2 Basic Operations
KIP 7900 User Guide
Page 46
Chapter 3 Error Correction 3. 1 Paper Jam 3. 1. 1 Roll Deck Section (J-01, J-02, J-03, J-04) 3. 1. 2 Manual Feeder Section (J-05) 3. 1. 3 Paper Feeder Section (J-10, J-11, J-12) 3. 1. 4 Fuser Section (J-13, J-14) 3. 1. 5 Outer Device (J-21, J-22) 3. 2 Open Cover Errors 3. 2. 1 Roll Deck Open 3. 2. 2 Upper Frame Unit / Top Cover Open 3. 2. 3 Exit Cover Open 3. 3 Other Errors 3. 3. 1 Roll Replacement 3. 3. 2 Toner Empty 3. 4 Call Service Errors 3-1 page 3- 2 3- 3 3- 5 3- 6 3- 9 3-16 3-17 3-17 3-18 3-19 3-20 3-20 3-20 3-21 Chapter 3 Error Correction
Chapter 3 Error Correction 3. 1 Paper Jam 3. 1. 1 Roll Deck Section (J-01, J-02, J-03, J-04) 3. 1. 2 Manual Feeder Section (J-05) 3. 1. 3 Paper Feeder Section (J-10, J-11, J-12) 3. 1. 4 Fuser Section (J-13, J-14) 3. 1. 5 Outer Device (J-21, J-22) 3. 2 Open Cover Errors 3. 2. 1 Roll Deck Open 3. 2. 2 Upper Frame Unit / Top Cover Open 3. 2. 3 Exit Cover Open 3. 3 Other Errors 3. 3. 1 Roll Replacement 3. 3. 2 Toner Empty 3. 4 Call Service Errors 3-1 page 3- 2 3- 3 3- 5 3- 6 3- 9 3-16 3-17 3-17 3-18 3-19 3-20 3-20 3-20 3-21 Chapter 3 Error Correction
KIP 7900 User Guide
Page 47
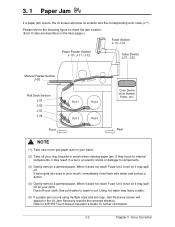
... following figure to check the jam location. (Error Codes are described on the later pages.) Fuser Section J-13, J-14 Paper Feeder Section J-10 / J-11 / J-12 Outer Device J-21, J-22 Manual Feeder Section J-05 Roll Deck Section J-01 J-02 J-03 J-04 Front Roll 1 Roll 2 Roll 3 Roll 4 Outer Device (Auto Stacker, Folder, etc.) Rear NOTE (1) Take care not to components. (3) Gently remove a jammed paper. Use cold water...
... following figure to check the jam location. (Error Codes are described on the later pages.) Fuser Section J-13, J-14 Paper Feeder Section J-10 / J-11 / J-12 Outer Device J-21, J-22 Manual Feeder Section J-05 Roll Deck Section J-01 J-02 J-03 J-04 Front Roll 1 Roll 2 Roll 3 Roll 4 Outer Device (Auto Stacker, Folder, etc.) Rear NOTE (1) Take care not to components. (3) Gently remove a jammed paper. Use cold water...
KIP 7900 User Guide
Page 66
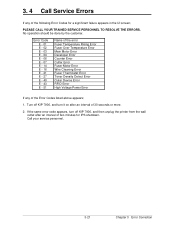
... Name of the error Fuser Temperature Rising Error Fuser Over Temperature Error Main Motor Error Developer Error Counter Error Cutter Error Fuser Motor Error Wire Cleaning Error Fuser Thermostat Error Toner Density Detect Error Outer Device Error RFID Error High Voltage Power Error If any of 30 seconds or more. 2. If the same error code appears, turn off KIP 7900, and turn it on after an interval of the Error Codes listed above appears; 1. PLEASE CALL YOUR TRAINED SERVICE PERSONNEL TO RESOLVE...
... Name of the error Fuser Temperature Rising Error Fuser Over Temperature Error Main Motor Error Developer Error Counter Error Cutter Error Fuser Motor Error Wire Cleaning Error Fuser Thermostat Error Toner Density Detect Error Outer Device Error RFID Error High Voltage Power Error If any of 30 seconds or more. 2. If the same error code appears, turn off KIP 7900, and turn it on after an interval of the Error Codes listed above appears; 1. PLEASE CALL YOUR TRAINED SERVICE PERSONNEL TO RESOLVE...


