
User Guide
Page 3
... the product. • Be sure the power cord is securely plugged into the wall outlet. Environmental information • The Kodak s1220 Scanner is easily accessible. • Use only the power cord that was provided with any other product. • Leave sufficient ... the last user wishes to meet worldwide environmental requirements. • Guidelines are designed for reuse and recycling. • The Kodak s1220 Scanner is supplied with the default time set to the cord/cable. Acoustic emission Maschinenlärminformationsverordnung - 3, GSGV Der arbeitsplatzbezogene Emissionswert...
... the product. • Be sure the power cord is securely plugged into the wall outlet. Environmental information • The Kodak s1220 Scanner is easily accessible. • Use only the power cord that was provided with any other product. • Leave sufficient ... the last user wishes to meet worldwide environmental requirements. • Guidelines are designed for reuse and recycling. • The Kodak s1220 Scanner is supplied with the default time set to the cord/cable. Acoustic emission Maschinenlärminformationsverordnung - 3, GSGV Der arbeitsplatzbezogene Emissionswert...
User Guide
Page 6
1 Introduction Contents Supporting documentation Supporting documentation 1-1 Accessories 1-2 What's in the box 1-2 Scanner components 1-3 The Kodak s1220 Photo Scanning System allows you to easily digitize and enhance photos and can also be used as an easy reference. Smart Touch software, included with the Kodak s1220 Photo Scanner allows you can be used in PDF format. • Smart Touch User's Guide - provides easy visual...
1 Introduction Contents Supporting documentation Supporting documentation 1-1 Accessories 1-2 What's in the box 1-2 Scanner components 1-3 The Kodak s1220 Photo Scanning System allows you to easily digitize and enhance photos and can also be used as an easy reference. Smart Touch software, included with the Kodak s1220 Photo Scanner allows you can be used in PDF format. • Smart Touch User's Guide - provides easy visual...

User Guide
Page 7
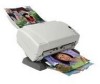
... the box and check the contents: • Kodak s1220 Photo Scanner • Output tray • Pre-separation pad, for exception photos (e.g., badly torn or very fragile photos, severely curled photos, etc.), bound albums, scrapbooks and documents up to 219 x 300 mm (8.62 x 11.81 inches). Installation CD including: • Kodak s1220 Photo Scanning Software • Smart Touch software for A4 Flatbed...
... the box and check the contents: • Kodak s1220 Photo Scanner • Output tray • Pre-separation pad, for exception photos (e.g., badly torn or very fragile photos, severely curled photos, etc.), bound albums, scrapbooks and documents up to 219 x 300 mm (8.62 x 11.81 inches). Installation CD including: • Kodak s1220 Photo Scanning Software • Smart Touch software for A4 Flatbed...
User Guide
Page 8
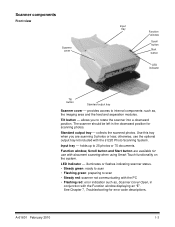
... Scroll button Start button LED indicator Tilt button Standard output tray Scanner cover - The scanner should be left in conjunction with the s1220 Photo Scanning System. LED Indicator - collects the scanned photos. illuminates or flashes indicating scanner status. • Steady green: ready to scan • Flashing green: preparing to 25 photos or 75 documents. allows you are available for use the...
... Scroll button Start button LED indicator Tilt button Standard output tray Scanner cover - The scanner should be left in conjunction with the s1220 Photo Scanning System. LED Indicator - collects the scanned photos. illuminates or flashes indicating scanner status. • Steady green: ready to scan • Flashing green: preparing to 25 photos or 75 documents. allows you are available for use the...

User Guide
Page 9
...torn. provides smooth feeding and separation of various sizes, thicknesses and textures of photos in the input tray. Paper path sensor - Scanner cover release lever - detects the presence of photos. push the release lever down to manually adjust the space between the feed...rollers and separation module - tracks the movement of photos you to remove the separation module for photos that require special handling, e.g., photos that are scanning. Imaging area - this cover needs to accommodate the size of paper and photos through the scanner. for cleaning or clearing a jam. 1-4 A-...
...torn. provides smooth feeding and separation of various sizes, thicknesses and textures of photos in the input tray. Paper path sensor - Scanner cover release lever - detects the presence of photos. push the release lever down to manually adjust the space between the feed...rollers and separation module - tracks the movement of photos you to remove the separation module for photos that require special handling, e.g., photos that are scanning. Imaging area - this cover needs to accommodate the size of paper and photos through the scanner. for cleaning or clearing a jam. 1-4 A-...

User Guide
Page 10
... port used for installation procedures. USB port - You can purchase a standard security lock at an office supply store. connects a security lock to the scanner (similar to the scanner. A-61601 February 2010 1-5 connects the optional flatbed accessory to the instructions provided with the security lock for a laptop). Rear view Power switch Power port...
... port used for installation procedures. USB port - You can purchase a standard security lock at an office supply store. connects a security lock to the scanner (similar to the scanner. A-61601 February 2010 1-5 connects the optional flatbed accessory to the instructions provided with the security lock for a laptop). Rear view Power switch Power port...
User Guide
Page 11
... February 2010 2-1 The s1220 Photo Scanning System application must be installed under Administrator and run under Administrator or Standard groups. • Close any currently running applications. • Close any currently running applications that is provided with your scanner. 2 Installation Contents Installing the scanner 2-1 Installation notes regarding Windows 7 and Windows XP.......... 2-2 Installing the Kodak Driver Software 2-3 Attaching the...
... February 2010 2-1 The s1220 Photo Scanning System application must be installed under Administrator and run under Administrator or Standard groups. • Close any currently running applications. • Close any currently running applications that is provided with your scanner. 2 Installation Contents Installing the scanner 2-1 Installation notes regarding Windows 7 and Windows XP.......... 2-2 Installing the Kodak Driver Software 2-3 Attaching the...

User Guide
Page 12
... on the Internet at a Microsoft website even though the drivers are installing on Windows 7, the following message will be displayed as part of the Kodak Driver Software installation. This software needs to be installed for CD/DVD burners for the Burn CD/DVD feature to work on the... scanner. Installation notes regarding Windows 7 and Windows XP Windows 7 If you are part of the new Microsoft Feature Pack for Storage 1.0 software. This process can click...
... on the Internet at a Microsoft website even though the drivers are installing on Windows 7, the following message will be displayed as part of the Kodak Driver Software installation. This software needs to be installed for CD/DVD burners for the Burn CD/DVD feature to work on the... scanner. Installation notes regarding Windows 7 and Windows XP Windows 7 If you are part of the new Microsoft Feature Pack for Storage 1.0 software. This process can click...
User Guide
Page 13
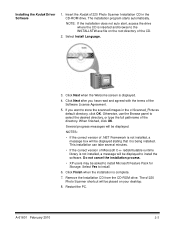
...version of the Software License Agreement. 5. A-61601 February 2010 2-3 Select Install Language. 3. Several progress messages will be displayed to store the scanned images in the CD-ROM drive. NOTES: • If the correct version of .NET Framework is not installed, a message box will ... process. • XP users may be displayed stating that it is displayed. 4. Restart the PC. Installing the Kodak Driver Software 1. Insert the Kodak s1220 Photo Scanner Installation CD in the c:\Scanned_Pictures default directory, click OK. Remove the Installation CD from the CD-ROM drive.
...version of the Software License Agreement. 5. A-61601 February 2010 2-3 Select Install Language. 3. Several progress messages will be displayed to store the scanned images in the CD-ROM drive. NOTES: • If the correct version of .NET Framework is not installed, a message box will ... process. • XP users may be displayed stating that it is displayed. 4. Restart the PC. Installing the Kodak Driver Software 1. Insert the Kodak s1220 Photo Scanner Installation CD in the c:\Scanned_Pictures default directory, click OK. Remove the Installation CD from the CD-ROM drive.

User Guide
Page 14
Slide the standard output tray underneath the scanner platform along the center guide. 2. Attaching the standard output tray 1. Push it all the way back until it snaps into place. 2-4 A-61601 February 2010
Slide the standard output tray underneath the scanner platform along the center guide. 2. Attaching the standard output tray 1. Push it all the way back until it snaps into place. 2-4 A-61601 February 2010
User Guide
Page 15
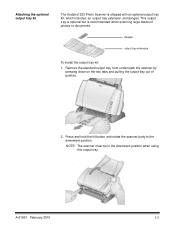
... tray. A-61601 February 2010 2-5 Remove the standard output tray from underneath the scanner by pressing down on the two tabs and pulling the output tray out of photos or documents. Press and hold the tilt button and rotate the scanner body to the downward position. dangler output tray extension To install the output... optional but is shipped with an optional output tray kit, which includes: an output tray extension and dangler. Attaching the optional output tray kit The Kodak s1220 Photo Scanner is recommended when scanning large stacks of position. 2.
... tray. A-61601 February 2010 2-5 Remove the standard output tray from underneath the scanner by pressing down on the two tabs and pulling the output tray out of photos or documents. Press and hold the tilt button and rotate the scanner body to the downward position. dangler output tray extension To install the output... optional but is shipped with an optional output tray kit, which includes: an output tray extension and dangler. Attaching the optional output tray kit The Kodak s1220 Photo Scanner is recommended when scanning large stacks of position. 2.

User Guide
Page 16
Once the clip is installed, there is no need to remove it is not installed you can install it by sliding it up into the scanner between the slots at the center of the scanner and snap it in place. 3. Slide the output tray extension underneath the scanner platform along the center guide and push it back until it . 2-6 A-61601 February 2010 NOTE: If the clip is securely in place.
Once the clip is installed, there is no need to remove it is not installed you can install it by sliding it up into the scanner between the slots at the center of the scanner and snap it in place. 3. Slide the output tray extension underneath the scanner platform along the center guide and push it back until it . 2-6 A-61601 February 2010 NOTE: If the clip is securely in place.

User Guide
Page 18
... is easily accessible. 1. NOTE: Be sure that the power cord is located within 1.52 metres (5 feet) of the scanner. 6. Attach the power cord you selected to the power supply. 3. Plug the output power cord from the supply of the power cord into the power...power outlet is securely attached to the power supply. Attach the USB cable to the proper USB 2.0 port on the scanner. 4. Connecting the power cord and USB cable When the s1220 Photo Scanning Software application has been installed, connect the power supply, power cord and USB cable to the illustration below for your region...
... is easily accessible. 1. NOTE: Be sure that the power cord is located within 1.52 metres (5 feet) of the scanner. 6. Attach the power cord you selected to the power supply. 3. Plug the output power cord from the supply of the power cord into the power...power outlet is securely attached to the power supply. Attach the USB cable to the proper USB 2.0 port on the scanner. 4. Connecting the power cord and USB cable When the s1220 Photo Scanning Software application has been installed, connect the power supply, power cord and USB cable to the illustration below for your region...

User Guide
Page 19
... the application shortcut on your PC. When the installation process is complete and you turn on the scanner, the LED indicator on your desktop or select Start>Programs>Kodak>Document Imaging>s1220 Photo System>s1220 Photo Scanner. THERE IS A FEE TO REPLACE THE DONGLE. When you are ready to be displayed. IT ...hand corner on most screens or click the Close box in a USB port on the front of the scanner will flash as the scanner goes through a series of the scanner to scan, the LED indicator will be recognized by your PC. A-61601 February 2010 2-9 Wait for the USB ...
... the application shortcut on your PC. When the installation process is complete and you turn on the scanner, the LED indicator on your desktop or select Start>Programs>Kodak>Document Imaging>s1220 Photo System>s1220 Photo Scanner. THERE IS A FEE TO REPLACE THE DONGLE. When you are ready to be displayed. IT ...hand corner on most screens or click the Close box in a USB port on the front of the scanner will flash as the scanner goes through a series of the scanner to scan, the LED indicator will be recognized by your PC. A-61601 February 2010 2-9 Wait for the USB ...
User Guide
Page 22
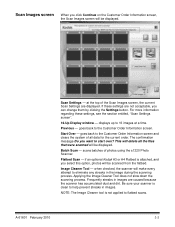
... displayed. if an optional Kodak A3 or A4 Flatbed is not applied to the Customer Order Information screen and clears the system of all the files that were scanned will be displayed. Image Cleaner Tool - Be sure your scanner is clean to 16 images at the top of photos using the s1220 Photo Scanner. NOTE: The Image Cleaner...
... displayed. if an optional Kodak A3 or A4 Flatbed is not applied to the Customer Order Information screen and clears the system of all the files that were scanned will be displayed. Image Cleaner Tool - Be sure your scanner is clean to 16 images at the top of photos using the s1220 Photo Scanner. NOTE: The Image Cleaner...
User Guide
Page 24
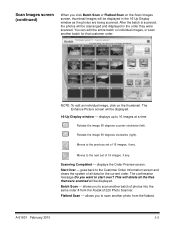
...scan another photo from the Kodak s1220 Photo Scanner. A-61601 February 2010 3-5 You can edit the entire batch or individual images, or scan another batch of 16 images, if any . displays up to scan another batch for the current order. Scanning Completed - Scan Images screen (continued) When you click Batch Scan or Flatbed Scan...rearranged and displayed in the 16-Up Display window as the photos are being scanned. Flatbed Scan - Start Over - allows you want to the Customer Order Information screen and clears the system of 16 images, if any . allows you to 16 ...
...scan another photo from the Kodak s1220 Photo Scanner. A-61601 February 2010 3-5 You can edit the entire batch or individual images, or scan another batch of 16 images, if any . displays up to scan another batch for the current order. Scanning Completed - Scan Images screen (continued) When you click Batch Scan or Flatbed Scan...rearranged and displayed in the 16-Up Display window as the photos are being scanned. Flatbed Scan - Start Over - allows you want to the Customer Order Information screen and clears the system of 16 images, if any . allows you to 16 ...
User Guide
Page 25
... automatically rotate images to the correct orientation. Be sure your scanner is clean to eliminate any streaks in images. For more information regarding these values will make every attempt to help prevent streaks in the image during the scanning process. when selected, the s1220 Photo Scanning Software will be rotated manually. Applying the Image Cleaner...
... automatically rotate images to the correct orientation. Be sure your scanner is clean to eliminate any streaks in images. For more information regarding these values will make every attempt to help prevent streaks in the image during the scanning process. when selected, the s1220 Photo Scanning Software will be rotated manually. Applying the Image Cleaner...

User Guide
Page 27
..., which will be asked to insert the next photo or document into the current batch. If this option is changed again. Best is not recommended for Media: if selected, you want to set the amount of scanned image files. optimum compression, best image quality. NOTE... Medium are : • None: no sharpening will impact performance. Select Best if you will wait after scanning is desired. Select Superior if you to reprint enlargements of time the scanner will be done. allows you want standard size reprints of sharpening applied. Sharpen Images - Transport timeout -...
..., which will be asked to insert the next photo or document into the current batch. If this option is changed again. Best is not recommended for Media: if selected, you want to set the amount of scanned image files. optimum compression, best image quality. NOTE... Medium are : • None: no sharpening will impact performance. Select Best if you will wait after scanning is desired. Select Superior if you to reprint enlargements of time the scanner will be done. allows you want standard size reprints of sharpening applied. Sharpen Images - Transport timeout -...

User Guide
Page 36
... that you to place your scanner in the downward position. Be sure the scanner is on and ready to scan (green indicator light is on and constant). 2. A-61601 February 2010 4-1 4 Scanning Photos Contents Getting your scanner ready to scan 4-1 Getting your photos ready to scan 4-3 Handling guidelines 4-5 Scanning your photos 4-6 Getting your scanner ready to scan Even though your scanner can be sure the...
... that you to place your scanner in the downward position. Be sure the scanner is on and ready to scan (green indicator light is on and constant). 2. A-61601 February 2010 4-1 4 Scanning Photos Contents Getting your scanner ready to scan 4-1 Getting your photos ready to scan 4-3 Handling guidelines 4-5 Scanning your photos 4-6 Getting your scanner ready to scan Even though your scanner can be sure the...

User Guide
Page 38
... to increase the transport timeout using this stack and place them face up in the scanner. Place the photos you want to scan is face up . Be sure the side of the photo(s) you want to scan in the desired order. NOTE: If you would place them face down on the table.... Take your photos in a specific order, do not stop the scanner during scanning, otherwise the photos will be image 9, etc. For example, if your stack has 9 photos, you want to introduce photos into the scanner one at a time. 2. Any inks and correction fluids on ...
... to increase the transport timeout using this stack and place them face up in the scanner. Place the photos you want to scan is face up . Be sure the side of the photo(s) you want to scan in the desired order. NOTE: If you would place them face down on the table.... Take your photos in a specific order, do not stop the scanner during scanning, otherwise the photos will be image 9, etc. For example, if your stack has 9 photos, you want to introduce photos into the scanner one at a time. 2. Any inks and correction fluids on ...


