
User Manual
Page 1
After installing the software, return to this User guide. ᕢ Loading the KLIC-7001 battery Kodak Li-Ion rechargeable digital camera battery KLIC-7001 www.kodak.com/go/m893support 1 ENGLISH ᕡ Installing the software Before connecting any cables, install the software that was included with your camera. Follow the on-screen instructions.
After installing the software, return to this User guide. ᕢ Loading the KLIC-7001 battery Kodak Li-Ion rechargeable digital camera battery KLIC-7001 www.kodak.com/go/m893support 1 ENGLISH ᕡ Installing the software Before connecting any cables, install the software that was included with your camera. Follow the on-screen instructions.

User Manual
Page 2
...USB cable to 3 Purchase hours). Make sure the computer is turned on and not in sleep mode. Kodak EasyShare camera or printer docks (may be sold separately) Kodak 5V AC adapter, Kodak Li-Ion universal battery chargers (sold separately) USB AC adapter USB cable Battery Charging light First, turn... OFF the camera. Charge until the Battery Charging light turns off (up to the computer's USB port, not a...
...USB cable to 3 Purchase hours). Make sure the computer is turned on and not in sleep mode. Kodak EasyShare camera or printer docks (may be sold separately) Kodak 5V AC adapter, Kodak Li-Ion universal battery chargers (sold separately) USB AC adapter USB cable Battery Charging light First, turn... OFF the camera. Charge until the Battery Charging light turns off (up to the computer's USB port, not a...
User Manual
Page 3
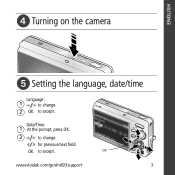
OK www.kodak.com/go/m893support 3 Date/Time: 1 At the prompt, press OK. 2 to accept. OK to change . 2 OK to accept. ENGLISH ᕤ Turning on the camera ᕥ Setting the language, date/time Language: 1 to change . for previous/next field.
OK www.kodak.com/go/m893support 3 Date/Time: 1 At the prompt, press OK. 2 to accept. OK to change . 2 OK to accept. ENGLISH ᕤ Turning on the camera ᕥ Setting the language, date/time Language: 1 to change . for previous/next field.

User Manual
Page 4
Press it completely down and release. ENGLISH ᕦ Taking a picture/video Pictures 1 2 Videos 1 2 3 3 Ready/Battery charging light T - Turn on /off: • Status icons • Framing grid Press the Shutter button completely down when the Ready light turns green. Press to turn on Help button Press the Shutter button halfway to focus and set exposure. To stop recording, press the Shutter button again. 4 www.kodak.com/go/easysharecenter
Press it completely down and release. ENGLISH ᕦ Taking a picture/video Pictures 1 2 Videos 1 2 3 3 Ready/Battery charging light T - Turn on /off: • Status icons • Framing grid Press the Shutter button completely down when the Ready light turns green. Press to turn on Help button Press the Shutter button halfway to focus and set exposure. To stop recording, press the Shutter button again. 4 www.kodak.com/go/easysharecenter

User Manual
Page 5
play at 2X speed; press again for 4X. Videos Play. press again for 4X. 1 Turn off the camera. 2 Connect the A/V cable. 3 Turn on the camera. 4 Review pictures/videos/slide shows on a television. During playback: OK pause/unpause. Other display devices: •Your computer monitor •Devices equipped with a video input www.kodak.com/go/m893support 5 adjust the volume. ENGLISH ᕧ Reviewing pictures/videos Camera Your television A/V cable (may be sold separately) 1 Press Review. 2 for previous/next picture/video. reverse at 2X speed;
play at 2X speed; press again for 4X. Videos Play. press again for 4X. 1 Turn off the camera. 2 Connect the A/V cable. 3 Turn on the camera. 4 Review pictures/videos/slide shows on a television. During playback: OK pause/unpause. Other display devices: •Your computer monitor •Devices equipped with a video input www.kodak.com/go/m893support 5 adjust the volume. ENGLISH ᕧ Reviewing pictures/videos Camera Your television A/V cable (may be sold separately) 1 Press Review. 2 for previous/next picture/video. reverse at 2X speed;
User Manual
Page 6
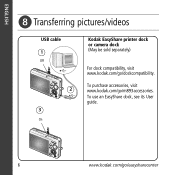
To use an EasyShare dock, see its User guide. 6 www.kodak.com/go /m893accessories. To purchase accessories, visit www.kodak.com/go /easysharecenter ENGLISH ᕨ Transferring pictures/videos USB cable 1 Off 2 3 On Kodak EasyShare printer dock or camera dock (May be sold separately) For dock compatibility, visit www.kodak.com/go/dockcompatibility.
To use an EasyShare dock, see its User guide. 6 www.kodak.com/go /m893accessories. To purchase accessories, visit www.kodak.com/go /easysharecenter ENGLISH ᕨ Transferring pictures/videos USB cable 1 Off 2 3 On Kodak EasyShare printer dock or camera dock (May be sold separately) For dock compatibility, visit www.kodak.com/go/dockcompatibility.

User Manual
Page 7
Visit www.kodak.com/go/m893support and www.kodak.com/go/easysharecenter for: • the Extended user guide • interactive troubleshooting and repairs • interactive tutorials • FAQs • downloads • accessories • printing information • product registration www.kodak.com/go/m893support 7 Finish reading this book, so you can take and share your computer Keep learning! You have: • set up your camera • taken pictures • transferred pictures to your best pictures! Congratulations! ENGLISH ᕩ Keep learning about your camera!
Visit www.kodak.com/go/m893support and www.kodak.com/go/easysharecenter for: • the Extended user guide • interactive troubleshooting and repairs • interactive tutorials • FAQs • downloads • accessories • printing information • product registration www.kodak.com/go/m893support 7 Finish reading this book, so you can take and share your computer Keep learning! You have: • set up your camera • taken pictures • transferred pictures to your best pictures! Congratulations! ENGLISH ᕩ Keep learning about your camera!

User Manual
Page 9
ENGLISH Back view 1 2 3 45 6 7 16 15 14 optional memory card (sold separately) 8 9 10 11 12 13 1 LCD 2 Review button 3 Ready/Battery charging light 4 Menu button 5 Delete button 6 Zoom button (Wide/Telephoto) 7 Mode dial 9 OK/ 10 Strap post 11 USB port 12 Share button 13 Battery compartment 14 SD/SDHC memory card slot 15 Dock connector 8 DC-In (5V) , for optional AC adapter 16 Tripod socket www.kodak.com/go/m893support 9
ENGLISH Back view 1 2 3 45 6 7 16 15 14 optional memory card (sold separately) 8 9 10 11 12 13 1 LCD 2 Review button 3 Ready/Battery charging light 4 Menu button 5 Delete button 6 Zoom button (Wide/Telephoto) 7 Mode dial 9 OK/ 10 Strap post 11 USB port 12 Share button 13 Battery compartment 14 SD/SDHC memory card slot 15 Dock connector 8 DC-In (5V) , for optional AC adapter 16 Tripod socket www.kodak.com/go/m893support 9
User Manual
Page 10
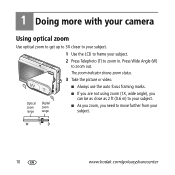
Press Wide Angle (W) to zoom out. I As you zoom, you can be as close as 2 ft (0.6 m) to your subject. I If you are not using zoom (1X, wide angle), you need to move further from your subject. 2 Press Telephoto (T) to zoom in. Optical zoom range Digital zoom range I Always use the auto focus framing marks. W TD 10 www.kodak.com/go/easysharecenter The zoom indicator shows zoom status. 3 Take the picture or video. 1 Doing more with your camera Using optical zoom Use optical zoom to get up to 3X closer to your subject. 1 Use the LCD to frame your subject.
Press Wide Angle (W) to zoom out. I As you zoom, you can be as close as 2 ft (0.6 m) to your subject. I If you are not using zoom (1X, wide angle), you need to move further from your subject. 2 Press Telephoto (T) to zoom in. Optical zoom range Digital zoom range I Always use the auto focus framing marks. W TD 10 www.kodak.com/go/easysharecenter The zoom indicator shows zoom status. 3 Take the picture or video. 1 Doing more with your camera Using optical zoom Use optical zoom to get up to 3X closer to your subject. 1 Use the LCD to frame your subject.
User Manual
Page 11
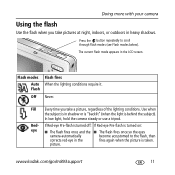
...The flash fires once and the I The flash fires once so the eyes camera automatically become accustomed to scroll through flash modes (see Flash modes below). www.kodak.com/go/m893support 11 picture. Doing more with your camera Using the flash Use the flash when you take pictures at night, indoors,... then corrects red-eye in heavy shadows. Flash modes Auto Flash Flash fires When the lighting conditions require it. In low light, hold the camera steady or use a tripod. Use when the subject is in the LCD screen. Off Never. The current flash mode appears in shadow or...
...The flash fires once and the I The flash fires once so the eyes camera automatically become accustomed to scroll through flash modes (see Flash modes below). www.kodak.com/go/m893support 11 picture. Doing more with your camera Using the flash Use the flash when you take pictures at night, indoors,... then corrects red-eye in heavy shadows. Flash modes Auto Flash Flash fires When the lighting conditions require it. In low light, hold the camera steady or use a tripod. Use when the subject is in the LCD screen. Off Never. The current flash mode appears in shadow or...

User Manual
Page 12
Doing more with sound. (See page 4.) Reviewing favorite pictures. 12 www.kodak.com/go/easysharecenter Close range. Point-and-shoot simplicity when taking modes Choose the mode that best suits your camera Using different picture-taking pictures under special conditions. (See page 13.) People in low-light scenes indoors using a higher ISO. Use...
Doing more with sound. (See page 4.) Reviewing favorite pictures. 12 www.kodak.com/go/easysharecenter Close range. Point-and-shoot simplicity when taking modes Choose the mode that best suits your camera Using different picture-taking pictures under special conditions. (See page 13.) People in low-light scenes indoors using a higher ISO. Use...
User Manual
Page 13
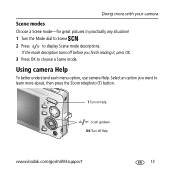
Doing more about, then press the Zoom telephoto (T) button. Using camera Help To better understand each menu option, use camera Help. T Turn on Help Scroll up/down OK Turn off before you want to learn more with your camera Scene modes Choose a Scene mode-for great pictures in practically any situation! 1 Turn the Mode dial to Scene . 2 Press to choose a Scene mode. Select an option you finish reading it, press OK. 3 Press OK to display Scene mode descriptions. If the mode description turns off Help www.kodak.com/go/m893support 13
Doing more about, then press the Zoom telephoto (T) button. Using camera Help To better understand each menu option, use camera Help. T Turn on Help Scroll up/down OK Turn off before you want to learn more with your camera Scene modes Choose a Scene mode-for great pictures in practically any situation! 1 Turn the Mode dial to Scene . 2 Press to choose a Scene mode. Select an option you finish reading it, press OK. 3 Press OK to display Scene mode descriptions. If the mode description turns off Help www.kodak.com/go/m893support 13
User Manual
Page 14
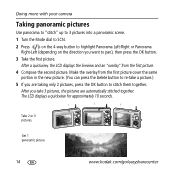
...button to stitch them together. The LCD displays a quickview for approximately 10 seconds. 1 2 3 Take 2 or 3 pictures. Get 1 panoramic picture. 14 www.kodak.com/go/easysharecenter After you take a picture.) 5 If you want to pan), then press the OK button. 3 Take the first picture. Doing more with your... camera Taking panoramic pictures Use panorama to "stitch" up to 3 pictures into a panoramic scene. 1 Turn the Mode dial to SCN. 2 Press on ...
...button to stitch them together. The LCD displays a quickview for approximately 10 seconds. 1 2 3 Take 2 or 3 pictures. Get 1 panoramic picture. 14 www.kodak.com/go/easysharecenter After you take a picture.) 5 If you want to pan), then press the OK button. 3 Take the first picture. Doing more with your... camera Taking panoramic pictures Use panorama to "stitch" up to 3 pictures into a panoramic scene. 1 Turn the Mode dial to SCN. 2 Press on ...
User Manual
Page 15
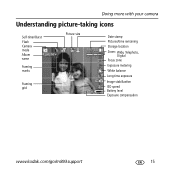
Doing more with your camera Understanding picture-taking icons Self-timer/Burst Flash Camera mode Album name Framing marks Framing grid Picture size Date stamp Pictures/time remaining Storage location Zoom: Wide, Telephoto, Digital Focus zone Exposure metering White balance Long time exposure Image stabilization ISO speed Battery level Exposure compensation www.kodak.com/go/m893support 15
Doing more with your camera Understanding picture-taking icons Self-timer/Burst Flash Camera mode Album name Framing marks Framing grid Picture size Date stamp Pictures/time remaining Storage location Zoom: Wide, Telephoto, Digital Focus zone Exposure metering White balance Long time exposure Image stabilization ISO speed Battery level Exposure compensation www.kodak.com/go/m893support 15

User Manual
Page 16
to view other parts of the picture remains. 1 Press the Review button, then picture. Press OK. 16 www.kodak.com/go/easysharecenter to find a Picture 2 Press the Menu button. Press to find Edit. Cropped picture 3 Press to highlight Crop, then press OK. 4 Press Telephoto (T) ...
to view other parts of the picture remains. 1 Press the Review button, then picture. Press OK. 16 www.kodak.com/go/easysharecenter to find a Picture 2 Press the Menu button. Press to find Edit. Cropped picture 3 Press to highlight Crop, then press OK. 4 Press Telephoto (T) ...
User Manual
Page 17
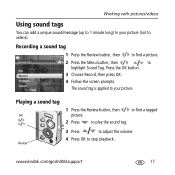
www.kodak.com/go/m893support 17 to find a picture. 2 Press the Menu button, then to videos). Review 3 Press to adjust the volume. 4 Press OK to play the ...
www.kodak.com/go/m893support 17 to find a picture. 2 Press the Menu button, then to videos). Review 3 Press to adjust the volume. 4 Press OK to play the ...

User Manual
Page 18
to save the enhanced picture as a new one. NOTE: You cannot enhance previously enhanced pictures. 18 www.kodak.com/go/easysharecenter Press picture. Using Kodak Perfect Touch technology Kodak Perfect Touch technology helps ensure better, brighter pictures. 1 Press the Review button, then for previous/next picture. 2 Press the Menu button. Follow the screen prompts...
to save the enhanced picture as a new one. NOTE: You cannot enhance previously enhanced pictures. 18 www.kodak.com/go/easysharecenter Press picture. Using Kodak Perfect Touch technology Kodak Perfect Touch technology helps ensure better, brighter pictures. 1 Press the Review button, then for previous/next picture. 2 Press the Menu button. Follow the screen prompts...
User Manual
Page 19
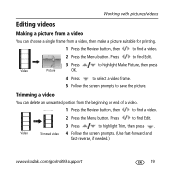
... frame. 5 Follow the screen prompts to save the picture. Video Trimmed video 4 Follow the screen prompts. (Use fast-forward and fast-reverse, if needed.) www.kodak.com/go/m893support 19 Working with pictures/videos Editing videos Making a picture from a video You can delete an unwanted portion from a video, then make a picture...
... frame. 5 Follow the screen prompts to save the picture. Video Trimmed video 4 Follow the screen prompts. (Use fast-forward and fast-reverse, if needed.) www.kodak.com/go/m893support 19 Working with pictures/videos Editing videos Making a picture from a video You can delete an unwanted portion from a video, then make a picture...

User Manual
Page 20
... the first and last frames, then 2, 7, or 14 equally spaced frames. To interrupt the Slide Show, press the OK button. 20 www.kodak.com/go/easysharecenter Press Edit Video, then press OK. to highlight Video 4-, 9-, or 3 Press to highlight Video Action Print, then 16-up picture, ...suitable for a 4 x 6-inch (10 x 15 cm) print. 1 Press the Review button, then to display your pictures/videos on the camera, a television, or any device equipped with pictures/videos Making a video action print From a video, you can make a 4-, 9-, or 16-up picture press OK. ...
... the first and last frames, then 2, 7, or 14 equally spaced frames. To interrupt the Slide Show, press the OK button. 20 www.kodak.com/go/easysharecenter Press Edit Video, then press OK. to highlight Video 4-, 9-, or 3 Press to highlight Video Action Print, then 16-up picture, ...suitable for a 4 x 6-inch (10 x 15 cm) print. 1 Press the Review button, then to display your pictures/videos on the camera, a television, or any device equipped with pictures/videos Making a video action print From a video, you can make a 4-, 9-, or 16-up picture press OK. ...

User Manual
Page 21
... Running a multimedia slide show Multimedia Slide Show is used most effectively in Multi-Up mode, page 18.) 1 Press the Review button, then picture/video. www.kodak.com/go/m893support 21 First, select 2-20 pictures (see page 21). Then: 1 Press the Review button. 2 Press to highlight Multimedia Slide Show, then press the...
... Running a multimedia slide show Multimedia Slide Show is used most effectively in Multi-Up mode, page 18.) 1 Press the Review button, then picture/video. www.kodak.com/go/m893support 21 First, select 2-20 pictures (see page 21). Then: 1 Press the Review button. 2 Press to highlight Multimedia Slide Show, then press the...
