

User Guide
Page 1
Image Processing for Scanner 1500 and Scanner 2500 User's Guide A-63055
Image Processing for Scanner 1500 and Scanner 2500 User's Guide A-63055

User Guide
Page 7
Many popular scanning applications are also compatible with the scanner) or Kodak Digital Science Low Volume Capture Software to enable image processing. Kodak Digital Science™ Scanner 1500 Kodak Digital Science™ Scanner 2500 You can improve image quality and sometimes make the reproduction better than the original. Not all of the images. NOTE: The scanned images used...
Many popular scanning applications are also compatible with the scanner) or Kodak Digital Science Low Volume Capture Software to enable image processing. Kodak Digital Science™ Scanner 1500 Kodak Digital Science™ Scanner 2500 You can improve image quality and sometimes make the reproduction better than the original. Not all of the images. NOTE: The scanned images used...

User Guide
Page 8
...Codes Dither / Halftone Dots per inch / Resolution (DPI) Fit to Page Gamma Halftone Mode / Automatic Separation Image Emphasis Imprinter (Document Printer) Lamp (dropout lamp color) Length Control Long Paper Manual Feed Method Mirror Image Mode / Image Type Noise Reduction Page ...Page Size / Paper Size Read Deskew Data Region / Side Settings Remove Shadow Reverse Image Scanner Information / Scanner Status Side Slow Feeding Stop at Skew Sub Area White Level From Paper / White Level Scanner 1500 ISIS TWAIN ¥ ¥ ¥ ¥ ¥ ¥ ¥ ¥ &#...
...Codes Dither / Halftone Dots per inch / Resolution (DPI) Fit to Page Gamma Halftone Mode / Automatic Separation Image Emphasis Imprinter (Document Printer) Lamp (dropout lamp color) Length Control Long Paper Manual Feed Method Mirror Image Mode / Image Type Noise Reduction Page ...Page Size / Paper Size Read Deskew Data Region / Side Settings Remove Shadow Reverse Image Scanner Information / Scanner Status Side Slow Feeding Stop at Skew Sub Area White Level From Paper / White Level Scanner 1500 ISIS TWAIN ¥ ¥ ¥ ¥ ¥ ¥ ¥ ¥ &#...

User Guide
Page 9
Additional memory may be required, depending on SIMM modules for the required extended memory. Refer to the scanner's User's Guide for your scanning needs. This may add up to two SIMM modules can be sufficient for information about installing memory. Obtain memory at a .... The tables below and on the following page show how much memory (in 8, 16, or 32 MB modules. Memory Requirements Simplex Scanning (8-bit) The Scanner 1500 and the Scanner 2500 both have 8 MB of 72 MB. (Memory is required.) Resolution A3 A4 A5 A6 B4 B5 B6 100 dpi 200 dpi 300 dpi...
Additional memory may be required, depending on SIMM modules for the required extended memory. Refer to the scanner's User's Guide for your scanning needs. This may add up to two SIMM modules can be sufficient for information about installing memory. Obtain memory at a .... The tables below and on the following page show how much memory (in 8, 16, or 32 MB modules. Memory Requirements Simplex Scanning (8-bit) The Scanner 1500 and the Scanner 2500 both have 8 MB of 72 MB. (Memory is required.) Resolution A3 A4 A5 A6 B4 B5 B6 100 dpi 200 dpi 300 dpi...
User Guide
Page 12
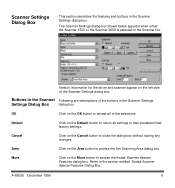
... settings. OK Click on the Cancel button to access the Kodak Scanner Special Features dialog box. Refer to access the Set Scanning Area dialog box. Buttons in the Scanner Following are descriptions of the Scanner Settings dialog box. Cancel Click on the OK button to ... saving any changes. The Scanner Settings dialog box shown below appears when either the Scanner 1500 or the Scanner 2500 is selected in the Scanner Settings Settings Dialog Box dialog box. Scanner Settings Dialog Box This section describes the features and buttons in the Scanner Settings dialog box. A-63055...
... settings. OK Click on the Cancel button to access the Kodak Scanner Special Features dialog box. Refer to access the Set Scanning Area dialog box. Buttons in the Scanner Following are descriptions of the Scanner Settings dialog box. Cancel Click on the OK button to ... saving any changes. The Scanner Settings dialog box shown below appears when either the Scanner 1500 or the Scanner 2500 is selected in the Scanner Settings Settings Dialog Box dialog box. Scanner Settings Dialog Box This section describes the features and buttons in the Scanner Settings dialog box. A-63055...

User Guide
Page 15
... image. The industry standard is first selected. Specify the resolution before you select these functions. The default page size is set when a scanner is 200 dpi (about 8 pixels/mm). Choose a paper size in the Dots per inch (dpi) indicates the scanning resolution, which ...the page size before you select these functions. The default value is 300 dpi. Following are the available resolutions: • Scanner 1500-100-600 dpi (1 dpi/step) • Scanner 2500-100-600 dpi (1 dpi/step) NOTE: Changing the resolution affects the Area, Region, Dither, and Barcode settings. You...
... image. The industry standard is first selected. Specify the resolution before you select these functions. The default page size is set when a scanner is 200 dpi (about 8 pixels/mm). Choose a paper size in the Dots per inch (dpi) indicates the scanning resolution, which ...the page size before you select these functions. The default value is 300 dpi. Following are the available resolutions: • Scanner 1500-100-600 dpi (1 dpi/step) • Scanner 2500-100-600 dpi (1 dpi/step) NOTE: Changing the resolution affects the Area, Region, Dither, and Barcode settings. You...

User Guide
Page 20
A-63055 December 1999 14 This dialog box is selected in the Scanner list. Kodak Scanner Special Features Dialog Box This section describes the features and buttons in the Scanner Settings dialog box. The Kodak Scanner Special Features dialog box shown below appears when the Scanner 1500 is accessed by clicking on the More button in the Kodak Scanner Special Features dialog box.
A-63055 December 1999 14 This dialog box is selected in the Scanner list. Kodak Scanner Special Features Dialog Box This section describes the features and buttons in the Scanner Settings dialog box. The Kodak Scanner Special Features dialog box shown below appears when the Scanner 1500 is accessed by clicking on the More button in the Kodak Scanner Special Features dialog box.

User Guide
Page 38
....) The chart below shows the characters that the document printer can print character strings on a document. • Pre-Imprinter-prints on the back of the document before scanning. The printing does not become part of the scanned image. (Available only for the Scanner 1500 and the Scanner 2500.) • Post-Imprinter-prints on the front of...
....) The chart below shows the characters that the document printer can print character strings on a document. • Pre-Imprinter-prints on the back of the document before scanning. The printing does not become part of the scanned image. (Available only for the Scanner 1500 and the Scanner 2500.) • Post-Imprinter-prints on the front of...
User Guide
Page 45
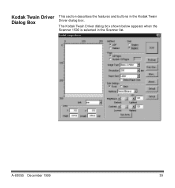
Kodak Twain Driver Dialog Box This section describes the features and buttons in the Scanner list. The Kodak Twain Driver dialog box shown below appears when the Scanner 1500 is selected in the Kodak Twain Driver dialog box. A-63055 December 1999 39
Kodak Twain Driver Dialog Box This section describes the features and buttons in the Scanner list. The Kodak Twain Driver dialog box shown below appears when the Scanner 1500 is selected in the Kodak Twain Driver dialog box. A-63055 December 1999 39

User Guide
Page 48
... duplex mode, enter "2" for the Scanner 1500. Side Method Page You can specify single-sided or double-sided scanning in the Method group box. NOTES: Both sides of pages when scanning one sheet (front side and back side). Side is available only for the number of the document are scanning in the text... box to indicate the amount of pages to be scanned. NOTE: This option is always available for the Scanner 1500 unless ADF is output first, then the back side of the image/page is...
... duplex mode, enter "2" for the Scanner 1500. Side Method Page You can specify single-sided or double-sided scanning in the Method group box. NOTES: Both sides of pages when scanning one sheet (front side and back side). Side is available only for the number of the document are scanning in the text... box to indicate the amount of pages to be scanned. NOTE: This option is always available for the Scanner 1500 unless ADF is output first, then the back side of the image/page is...

User Guide
Page 49
... function sets the resolution of the scanned image. The default value is 200 dpi (about memory. Following are the available resolutions: • Scanner 1500-100-600 dpi (1 dpi/step) • Scanner 2500-100-600 dpi (1 dpi/step) NOTE: Changing the resolution affects the Area, Region, Halftone (Dither), and Barcode settings. Resolution or dots...
... function sets the resolution of the scanned image. The default value is 200 dpi (about memory. Following are the available resolutions: • Scanner 1500-100-600 dpi (1 dpi/step) • Scanner 2500-100-600 dpi (1 dpi/step) NOTE: Changing the resolution affects the Area, Region, Halftone (Dither), and Barcode settings. Resolution or dots...

User Guide
Page 51
...Add button. The scanner detects the document size by paper width, not length. A-63055 December 1999 45 Deleting a Paper Size 1. Click on the left side of different sizes on the paper size you want to reconfigure the Paper Size function. The paper size is determined by the document guide positions. ...the paper name, width, and length into the appropriate text boxes in the Free Paper Name/Size group box in the Kodak Twain Driver dialog box for the Scanner 1500, different sized paper can be scanned without having to delete in the Added Paper Size list in the Added Paper Size ...
...Add button. The scanner detects the document size by paper width, not length. A-63055 December 1999 45 Deleting a Paper Size 1. Click on the left side of different sizes on the paper size you want to reconfigure the Paper Size function. The paper size is determined by the document guide positions. ...the paper name, width, and length into the appropriate text boxes in the Free Paper Name/Size group box in the Kodak Twain Driver dialog box for the Scanner 1500, different sized paper can be scanned without having to delete in the Added Paper Size list in the Added Paper Size ...

User Guide
Page 54
Select a contrast value from the top end of the document to check the contrast. The Area group box shows the area settings for the Scanner 1500. A-63055 December 1999 48 In a high-contrast setting, the difference between black and white is large, so the image is available only for a region. ...• Units-select mm or inches. • X-the position from the left end of the document to the left end ...
Select a contrast value from the top end of the document to check the contrast. The Area group box shows the area settings for the Scanner 1500. A-63055 December 1999 48 In a high-contrast setting, the difference between black and white is large, so the image is available only for a region. ...• Units-select mm or inches. • X-the position from the left end of the document to the left end ...

User Guide
Page 56
... box. You can also use the mouse to access the Sub Area dialog box. NOTE: The Sub Area dialog box shown above appears for the Scanner 2500. The Sub Area dialog box shown below appears for the Scanner 1500. Specifying an Area To capture a portion of the size specified in the window.
... box. You can also use the mouse to access the Sub Area dialog box. NOTE: The Sub Area dialog box shown above appears for the Scanner 2500. The Sub Area dialog box shown below appears for the Scanner 1500. Specifying an Area To capture a portion of the size specified in the window.
User Guide
Page 57
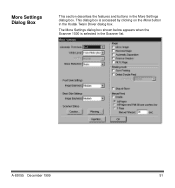
This dialog box is selected in the Kodak Twain Driver dialog box. A-63055 December 1999 51 The More Settings dialog box shown below appears when the Scanner 1500 is accessed by clicking on the More button in the Scanner list. More Settings Dialog Box This section describes the features and buttons in the More Settings dialog box.
This dialog box is selected in the Kodak Twain Driver dialog box. A-63055 December 1999 51 The More Settings dialog box shown below appears when the Scanner 1500 is accessed by clicking on the More button in the Scanner list. More Settings Dialog Box This section describes the features and buttons in the More Settings dialog box.

User Guide
Page 68
... is 300 seconds (5 minutes). The default is available only on the Scanner 1500. When scanning is finished, the scanner waits for more documents. Manual Timeout-when you only have to place paper in the feed tray and press the scanner's Stop/Start button to configure the feeder in different ways, from ...1-300 seconds. Check the Enable box and choose a Manual Feed mode: • All Pages-when documents are placed in the feed tray and press the scanner's Stop/Start button. • 1 Page-you can scan pages one by one , to a mode where you enable Manual...
... is 300 seconds (5 minutes). The default is available only on the Scanner 1500. When scanning is finished, the scanner waits for more documents. Manual Timeout-when you only have to place paper in the feed tray and press the scanner's Stop/Start button to configure the feeder in different ways, from ...1-300 seconds. Check the Enable box and choose a Manual Feed mode: • All Pages-when documents are placed in the feed tray and press the scanner's Stop/Start button. • 1 Page-you can scan pages one by one , to a mode where you enable Manual...

User Guide
Page 69
... y z { | } ¯ A-63055 December 1999 63 The printing becomes part of the scanned image. (Available for the Scanner 1500 and the Scanner 2500.) • Post-prints on the front of the document before scanning. There are two printing methods: • Pre-prints on the back of the scanned image. (Available only for... the optional document printer. The printing does not become part of the document after scanning. Document Printer (Imprinter) Printable Characters The Imprinter button in the Scanner Special Features dialog box allows you to access ...
... y z { | } ¯ A-63055 December 1999 63 The printing becomes part of the scanned image. (Available for the Scanner 1500 and the Scanner 2500.) • Post-prints on the front of the document before scanning. There are two printing methods: • Pre-prints on the back of the scanned image. (Available only for... the optional document printer. The printing does not become part of the document after scanning. Document Printer (Imprinter) Printable Characters The Imprinter button in the Scanner Special Features dialog box allows you to access ...


