User Guide
Page 2
... finalizing Kodak Driver Software installation 12 Installing application software 13 Scanner components 14 Locking the scanner 16 3 Using the Scanner 17 Turning the scanner on and off 17 Scanner positions 17 Tilting the scanner body 18 Adjusting the output tray 19 Adjusting the input tray 21 Adjusting the side guides 22 Start and stop scanning 22 Document preparation 23...
... finalizing Kodak Driver Software installation 12 Installing application software 13 Scanner components 14 Locking the scanner 16 3 Using the Scanner 17 Turning the scanner on and off 17 Scanner positions 17 Tilting the scanner body 18 Adjusting the output tray 19 Adjusting the input tray 21 Adjusting the side guides 22 Start and stop scanning 22 Document preparation 23...

User Guide
Page 3
... 40 Using the TWAIN datasource 41 Terminology and features 41 How do I begin 42 Selecting Image settings 43 Selecting Device settings 45 The main Kodak Scanner window 46 The Image Settings window 49 Preview area 50 General tab 51 Size tab 53 Adjustments tab: black and white 56 Adjustments tab:...Driver window 84 Main tab 85 Layout tab 88 Image Processing tab 89 Scanner tab 91 Auto Color Detect tab 93 Adjustments tab 95 Dropout tab 97 Log tab 98 About tab 98 Scan Area dialog box 99 ii A-61560 January 2007 Example 1 67 Creating multiple images for each side of a document...
... 40 Using the TWAIN datasource 41 Terminology and features 41 How do I begin 42 Selecting Image settings 43 Selecting Device settings 45 The main Kodak Scanner window 46 The Image Settings window 49 Preview area 50 General tab 51 Size tab 53 Adjustments tab: black and white 56 Adjustments tab:...Driver window 84 Main tab 85 Layout tab 88 Image Processing tab 89 Scanner tab 91 Auto Color Detect tab 93 Adjustments tab 95 Dropout tab 97 Log tab 98 About tab 98 Scan Area dialog box 99 ii A-61560 January 2007 Example 1 67 Creating multiple images for each side of a document...
User Guide
Page 5
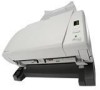
... to 30 pages per minute at 200 dpi. Kodak i1320 Scanner - a duplex scanner which provides scanning at up to 30 pages per minute at 200 dpi. These drivers provide all scanner models unless otherwise noted. 1 Kodak i1220 Scanner - A-61560 January 2007 This User's Guide provides... to 60 pages per minute in a variety of most document scanning software applications, a TWAIN datasource and ISIS Driver are available: Kodak i1210 Scanner - The i1200/i1300 Scanners also can expect from Kodak. Kodak i1310 Scanner - The information in this guide is limited and stores easily...
... to 30 pages per minute at 200 dpi. Kodak i1320 Scanner - a duplex scanner which provides scanning at up to 30 pages per minute at 200 dpi. These drivers provide all scanner models unless otherwise noted. 1 Kodak i1220 Scanner - A-61560 January 2007 This User's Guide provides... to 60 pages per minute in a variety of most document scanning software applications, a TWAIN datasource and ISIS Driver are available: Kodak i1210 Scanner - The i1200/i1300 Scanners also can expect from Kodak. Kodak i1310 Scanner - The information in this guide is limited and stores easily...
User Guide
Page 11
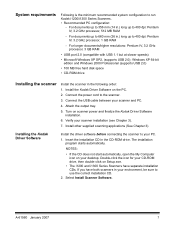
... (see Chapter 3). 7. NOTES: • If the CD does not start automatically, open the My Computer icon on scanner power and finalize the Kodak Driver Software installation. 6. For longer documents/higher resolutions: Pentium IV, 3.2 GHz processor, 3 GB RAM • USB port 2.0 (compatible with USB 1.1 but at slower speeds) • Microsoft Windows XP SP2, (supports USB...
... (see Chapter 3). 7. NOTES: • If the CD does not start automatically, open the My Computer icon on scanner power and finalize the Kodak Driver Software installation. 6. For longer documents/higher resolutions: Pentium IV, 3.2 GHz processor, 3 GB RAM • USB port 2.0 (compatible with USB 1.1 but at slower speeds) • Microsoft Windows XP SP2, (supports USB...

User Guide
Page 14
Make sure that was provided with your scanner. 2. After the drivers have been installed, connect the power supply and power cord to the scanner. Select the appropriate AC power cord for your region from the power supply into the wall outlet. 10 A-61560 January 2007 Attach the power... cord for your power type to the power supply. 3. Plug the output power cord from the supply of power cords packed with the Kodak i1200/ i1300 Series Scanner. Connecting the power cord to the scanner Use only the power supply that the power outlet is located within 1.52 metres (5 feet) of the...
Make sure that was provided with your scanner. 2. After the drivers have been installed, connect the power supply and power cord to the scanner. Select the appropriate AC power cord for your region from the power supply into the wall outlet. 10 A-61560 January 2007 Attach the power... cord for your power type to the power supply. 3. Plug the output power cord from the supply of power cords packed with the Kodak i1200/ i1300 Series Scanner. Connecting the power cord to the scanner Use only the power supply that the power outlet is located within 1.52 metres (5 feet) of the...

User Guide
Page 15
...needs. Attaching the output tray • Slide the output tray underneath the scanner platform along the center guide. A-61560 January 2007 11 Connecting the USB cable IMPORTANT: If you have not installed the Kodak Driver Software, do that now before proceeding. See the section entitled, "Adjusting the... output tray" in a variety of positions to meet your scanner has two different ends. Attach the B end of the USB cable...
...needs. Attaching the output tray • Slide the output tray underneath the scanner platform along the center guide. A-61560 January 2007 11 Connecting the USB cable IMPORTANT: If you have not installed the Kodak Driver Software, do that now before proceeding. See the section entitled, "Adjusting the... output tray" in a variety of positions to meet your scanner has two different ends. Attach the B end of the USB cable...

User Guide
Page 16
... • If a flatbed is attached, the New Hardware window may be complete when the scanner is finished and ready to turn on Windows XP. Click Next. Turning on the scanner and finalizing Kodak Driver Software installation When the USB cable and power connections have been made, and the... Kodak Software Drivers have been properly installed, the installation will be displayed once for the scanner and once for the flatbed. Use the ...
... • If a flatbed is attached, the New Hardware window may be complete when the scanner is finished and ready to turn on Windows XP. Click Next. Turning on the scanner and finalizing Kodak Driver Software installation When the USB cable and power connections have been made, and the... Kodak Software Drivers have been properly installed, the installation will be displayed once for the scanner and once for the flatbed. Use the ...

User Guide
Page 28
.... 24 A-61560 January 2007 The Scan Validation Tool dialog box will be ready to scan. 1. Select Start>Programs>Kodak>Document Imaging>Scan Validation Tool. The following steps help you begin, be displayed. 2. Select TWAIN for the Driver Types and Kodak Scanner i12XX/ i13XX as the Driver. This section describes how to use your PC. Verifying your...
.... 24 A-61560 January 2007 The Scan Validation Tool dialog box will be ready to scan. 1. Select Start>Programs>Kodak>Document Imaging>Scan Validation Tool. The following steps help you begin, be displayed. 2. Select TWAIN for the Driver Types and Kodak Scanner i12XX/ i13XX as the Driver. This section describes how to use your PC. Verifying your...
User Guide
Page 29
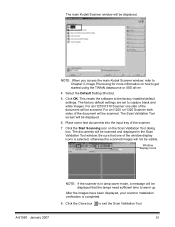
... window. This resets the software to exit the Scan Validation Tool. A-61560 January 2007 25 For an i1210/i1310 Scanner one of the document will be displayed. 6. Click the Close box to the factory-installed default settings. Select the Default Setting Shortcut. 5. The... or ISIS driver. 4. Click the Start Scanning icon on how to warm up. The factory default settings are set to Chapter 4, Image Processing for more information on the Scan Validation Tool dialog box. For an i1220 or i1320 Scanner both sides of the scanner. 7. The main Kodak Scanner window will be...
... window. This resets the software to exit the Scan Validation Tool. A-61560 January 2007 25 For an i1210/i1310 Scanner one of the document will be displayed. 6. Click the Close box to the factory-installed default settings. Select the Default Setting Shortcut. 5. The... or ISIS driver. 4. Click the Start Scanning icon on how to warm up. The factory default settings are set to Chapter 4, Image Processing for more information on the Scan Validation Tool dialog box. For an i1220 or i1320 Scanner both sides of the scanner. 7. The main Kodak Scanner window will be...
User Guide
Page 30
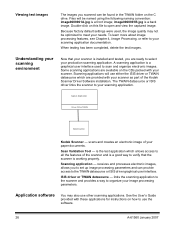
... TWAIN datasource - Double-click on the CDs packed with your paper documents. Because factory default settings were used to select your scanner as part of the Kodak Scanner Driver Software installation. The TWAIN datasource or ISIS driver links the scanner to meet your scanning application. image0000001B.jpg is working properly. Some scanning applications are provided with these...
... TWAIN datasource - Double-click on the CDs packed with your paper documents. Because factory default settings were used to select your scanner as part of the Kodak Scanner Driver Software installation. The TWAIN datasource or ISIS driver links the scanner to meet your scanning application. image0000001B.jpg is working properly. Some scanning applications are provided with these...

User Guide
Page 31
... the smart touch function listing. NOTE: If the Scanner icon indicates that the scanner is not ready, turn the scanner off, and then on again. • Click on the Scanner icon on the system tray to assign commonly performed scanning tasks with the scanner, however, you can configure smart touch to you ...use frequently by pressing the Start button on the system tray. After the scanner, software drivers, and application software are most important to handle the tasks that you . select Configure to change the task assigned to run the assigned ...
... the smart touch function listing. NOTE: If the Scanner icon indicates that the scanner is not ready, turn the scanner off, and then on again. • Click on the Scanner icon on the system tray to assign commonly performed scanning tasks with the scanner, however, you can configure smart touch to you ...use frequently by pressing the Start button on the system tray. After the scanner, software drivers, and application software are most important to handle the tasks that you . select Configure to change the task assigned to run the assigned ...

User Guide
Page 43
... automatically adjust each image in the fed document, cutting the edges of the image off to improve their quality. The information that may improve the resulting images. Select TWAIN (or ISIS) for the Driver Type and the Kodak Scanner i12XX/i13XX Scanner as the Driver. The Kodak i1200/i1300 Series Scanners provide the ability to process scanned images...
... automatically adjust each image in the fed document, cutting the edges of the image off to improve their quality. The information that may improve the resulting images. Select TWAIN (or ISIS) for the Driver Type and the Kodak Scanner i12XX/i13XX Scanner as the Driver. The Kodak i1200/i1300 Series Scanners provide the ability to process scanned images...

User Guide
Page 44
...only available when Save Images to verify scanner functionality using both the TWAIN datasource and the ISIS driver. License Key - displays two images at a time. Eight Image Display mode - allows you to Files is a diagnostic application provided by Kodak. Two Image Display mode - Stop Scanning...scanned images and their file names. The Scan Validation Tool allows you to select a directory to verify that the scanner is working properly. scans the documents in the input tray. scans only one image at a time. 40 A-61560 January 2007 ends the scan session....
...only available when Save Images to verify scanner functionality using both the TWAIN datasource and the ISIS driver. License Key - displays two images at a time. Eight Image Display mode - allows you to Files is a diagnostic application provided by Kodak. Two Image Display mode - Stop Scanning...scanned images and their file names. The Scan Validation Tool allows you to select a directory to verify that the scanner is working properly. scans the documents in the input tray. scans only one image at a time. 40 A-61560 January 2007 ends the scan session....

User Guide
Page 45
...driver, see every 10th image, enter a value of specific image and device settings. If you have a Kodak i1210 or i1310 Scanner (simplex scanner) all displayed windows assume the features available on the Scan Validation Tool dialog box to Files - A-61560 January 2007 41 If none of input documents... during the current Scan Validation Tool session. • To access the TWAIN datasource (or ISIS driver), double-click the Setup icon on the Kodak i1220 or i1320 Scanner (duplex scanner). Total displays the total number of 1. This can provide a wide variety of those...
...driver, see every 10th image, enter a value of specific image and device settings. If you have a Kodak i1210 or i1310 Scanner (simplex scanner) all displayed windows assume the features available on the Scan Validation Tool dialog box to Files - A-61560 January 2007 41 If none of input documents... during the current Scan Validation Tool session. • To access the TWAIN datasource (or ISIS driver), double-click the Setup icon on the Kodak i1220 or i1320 Scanner (duplex scanner). Total displays the total number of 1. This can provide a wide variety of those...

User Guide
Page 88
... scanning applications support ISIS drivers and this function is provided with the scanner by EMC Captiva and is only available when scanning two-sided documents. Default when you highlight and set of the window apply to all tabs. Copy this driver can be reset to ... provides a set up the color, grayscale or black and white image settings on the Kodak i1220/i1320 Scanners. The buttons on the bottom of 9 tabs. This driver is created and maintained by Kodak. See the section entitled, "Starting the Scan Validation Tool" earlier in this manual, all ...
... scanning applications support ISIS drivers and this function is provided with the scanner by EMC Captiva and is only available when scanning two-sided documents. Default when you highlight and set of the window apply to all tabs. Copy this driver can be reset to ... provides a set up the color, grayscale or black and white image settings on the Kodak i1220/i1320 Scanners. The buttons on the bottom of 9 tabs. This driver is created and maintained by Kodak. See the section entitled, "Starting the Scan Validation Tool" earlier in this manual, all ...

User Guide
Page 89
...Image #2, Back Image #1 and Back Image #2. Mode • Black and White: if you want your electronic image to represent all elements of your document in black and white. • Grayscale: if you want your electronic image to be in the Camera box list the available sides (front and back... 100, 150, 200, 240, 300, 400, 600 and 1200 dpi. Main tab The Main tab provides the following options: Image Mode Camera - The Kodak Scanner drivers allow you want your electronic image to have a range of varying shades of the scanned image. Choose a resolution value from black to white. • ...
...Image #2, Back Image #1 and Back Image #2. Mode • Black and White: if you want your electronic image to represent all elements of your document in black and white. • Grayscale: if you want your electronic image to be in the Camera box list the available sides (front and back... 100, 150, 200, 240, 300, 400, 600 and 1200 dpi. Main tab The Main tab provides the following options: Image Mode Camera - The Kodak Scanner drivers allow you want your electronic image to have a range of varying shades of the scanned image. Choose a resolution value from black to white. • ...

User Guide
Page 101
A-61560 January 2007 97 Enable Dropout Color the i1200/i1300 Series Scanners can drop out red, green or blue. The Dropout tab is used to eliminate a form's background so that only the entered data is the default. ... Image Mode and Mode information that electronic image. For black and white images, these settings effect the grayscale version of the document which the scanner analyzes to the section entitled, "The main ISIS Driver tab" earlier in the electronic image (i.e., remove the form's lines and boxes). Refer to produce that was previously described.
A-61560 January 2007 97 Enable Dropout Color the i1200/i1300 Series Scanners can drop out red, green or blue. The Dropout tab is used to eliminate a form's background so that only the entered data is the default. ... Image Mode and Mode information that electronic image. For black and white images, these settings effect the grayscale version of the document which the scanner analyzes to the section entitled, "The main ISIS Driver tab" earlier in the electronic image (i.e., remove the form's lines and boxes). Refer to produce that was previously described.

User Guide
Page 102
Displays information about your scanner and driver. 98 A-61560 January 2007 Log tab The Log tab provides a listing of any errors that have been encountered. About tab You can either save this information to a file by clicking the Save icon, or print the displayed information.
Displays information about your scanner and driver. 98 A-61560 January 2007 Log tab The Log tab provides a listing of any errors that have been encountered. About tab You can either save this information to a file by clicking the Save icon, or print the displayed information.

User Guide
Page 103
based on the Layout tab. The scan areas defined for each of image data which is returned to Document is selected on the Scanner Settings dialog box. The Scan Area dialog box is only available when Fixed to Transport or Relative to the host. Scan Area dialog box The...Pixels, Inches or Centimeters. A-61560 January 2007 Page Size the default paper size is set when a scanner is first selected. NOTE: Select the side and image to be defined in the main ISIS Driver window. You can be defined by highlighting Front Image #1, Front Image #2, etc. To access the Scan Area...
based on the Layout tab. The scan areas defined for each of image data which is returned to Document is selected on the Scanner Settings dialog box. The Scan Area dialog box is only available when Fixed to Transport or Relative to the host. Scan Area dialog box The...Pixels, Inches or Centimeters. A-61560 January 2007 Page Size the default paper size is set when a scanner is first selected. NOTE: Select the side and image to be defined in the main ISIS Driver window. You can be defined by highlighting Front Image #1, Front Image #2, etc. To access the Scan Area...


