User Manual
Page 3
... ...10 Installing your printer on additional computers on the network 10 Connecting to another KODAK All-in-One Printer 10 Adding a network connection to a USB-connected computer 11 For WINDOWS OS-based computers...11 For MACINTOSH Computers ...11 3 Handling Paper Paper types...12 Paper sizes...12 Envelope sizes...13 Loading paper ...13 Loading plain paper...13 Loading photo paper ...14 Loading envelopes...15 4 Printing Pictures Changing Print Photos Options / Defaults ...16 Printing pictures from a memory card ...17 Types of memory cards ...17 Printing a picture using the default settings...
... ...10 Installing your printer on additional computers on the network 10 Connecting to another KODAK All-in-One Printer 10 Adding a network connection to a USB-connected computer 11 For WINDOWS OS-based computers...11 For MACINTOSH Computers ...11 3 Handling Paper Paper types...12 Paper sizes...12 Envelope sizes...13 Loading paper ...13 Loading plain paper...13 Loading photo paper ...14 Loading envelopes...15 4 Printing Pictures Changing Print Photos Options / Defaults ...16 Printing pictures from a memory card ...17 Types of memory cards ...17 Printing a picture using the default settings...
User Manual
Page 4
...31 Replacing ink cartridges...32 Replacing the printhead ...35 Upgrading the printer software and firmware ...39 Upgrading software and firmware on a WINDOWS OS-based computer 39 Upgrading software and firmware on a MACINTOSH Computer 39 Monitoring and adjusting printer performance ...40 Checking ink levels...40 Resetting factory defaults ...40 8 Troubleshooting Basic troubleshooting ...41 Status lights...43 Power status light...43 Wi-Fi status light ...43 9 Product and Safety Specifications Specifications and features ...44 Print performance ...44 Photo printing features ...44 Copy document...
...31 Replacing ink cartridges...32 Replacing the printhead ...35 Upgrading the printer software and firmware ...39 Upgrading software and firmware on a WINDOWS OS-based computer 39 Upgrading software and firmware on a MACINTOSH Computer 39 Monitoring and adjusting printer performance ...40 Checking ink levels...40 Resetting factory defaults ...40 8 Troubleshooting Basic troubleshooting ...41 Status lights...43 Power status light...43 Wi-Fi status light ...43 9 Product and Safety Specifications Specifications and features ...44 Print performance ...44 Photo printing features ...44 Copy document...
User Manual
Page 8
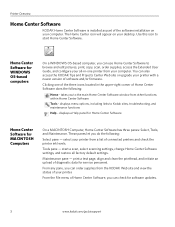
... of Home Center Software, you can use Home Center Software to start a scan, select scanning settings, change Home Center Software settings, and restore all -in-one of the three icons located in the upper-right corner of connected printers and check the printer ink levels. From the File menu of diagnostic data for software updates. 3 www.kodak.com/go/aiosupport Use this icon to browse and edit pictures, print, copy, scan, order supplies, access the Extended User Guide, and configure your all factory default settings. takes you...
... of Home Center Software, you can use Home Center Software to start a scan, select scanning settings, change Home Center Software settings, and restore all -in-one of the three icons located in the upper-right corner of connected printers and check the printer ink levels. From the File menu of diagnostic data for software updates. 3 www.kodak.com/go/aiosupport Use this icon to browse and edit pictures, print, copy, scan, order supplies, access the Extended User Guide, and configure your all factory default settings. takes you...
User Manual
Page 9
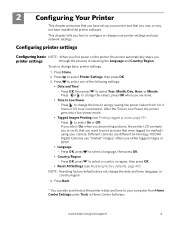
... Low Power, the printer goes into a low-power mode. • Tagged Images Printing (see Resetting factory defaults, page 40) NOTE: Resetting factory defaults does not change the date and time, language, or country/region. 4. Press to 4 hours in Home Center Software. Press to select Year, Month, Day, Hour, or Minute. KODAK Digital Cameras use different terminology; Press Home. 2. Press to select a language, then press OK. • Country/Region - Press or to change your printer settings...
... Low Power, the printer goes into a low-power mode. • Tagged Images Printing (see Resetting factory defaults, page 40) NOTE: Resetting factory defaults does not change the date and time, language, or country/region. 4. Press to 4 hours in Home Center Software. Press to select Year, Month, Day, Hour, or Minute. KODAK Digital Cameras use different terminology; Press Home. 2. Press to select a language, then press OK. • Country/Region - Press or to change your printer settings...
User Manual
Page 10
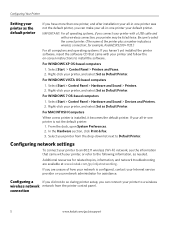
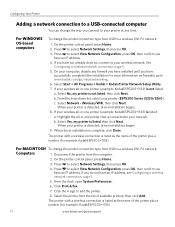
... service provider or your network administrator for example, KodakESP5200+1133.) For all computers and operating systems: If you can make your all-in -one printer your printer, and select Set as Default Printer. If you connect your printer with a USB cable and with your all operating systems, if you are available at www.kodak.com/go /aiosupport For WINDOWS XP OS-based computers 1. Be sure to install the software. Select Start > Control Panel...
... service provider or your network administrator for example, KodakESP5200+1133.) For all computers and operating systems: If you can make your all-in -one printer your printer, and select Set as Default Printer. If you connect your printer with a USB cable and with your all operating systems, if you are available at www.kodak.com/go /aiosupport For WINDOWS XP OS-based computers 1. Be sure to install the software. Select Start > Control Panel...
User Manual
Page 13
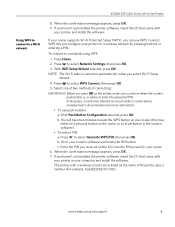
... PIN screen for your Internet service provider or router device manufacturer's documentation for a wireless network by pressing buttons or entering a PIN. Press to a network using WPS: 1. The printer with your computer and install the software. Press Home. 2. If necessary, consult your router. 6. If you haven't yet installed the printer software, insert the CD that came with a wireless connection is turned on the printer, make sure you configure your router supports Wi-Fi Protected Setup...
... PIN screen for your Internet service provider or router device manufacturer's documentation for a wireless network by pressing buttons or entering a PIN. Press to a network using WPS: 1. The printer with your computer and install the software. Press Home. 2. If necessary, consult your router. 6. If you haven't yet installed the printer software, insert the CD that came with a wireless connection is turned on the printer, make sure you configure your router supports Wi-Fi Protected Setup...
User Manual
Page 14
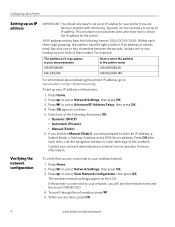
... Address Setup, then press OK. 4. If you selected Manual (Static), you are connected to your wireless network: 1. Consult your network, you will see the network name and the word CONNECTED. 4. Within each digit of the following format: 000.000.000.000. Press Home. 2. Use the navigation buttons to enter each three-digit grouping, the number must be right-justified. The wireless network settings appear on the printer...
... Address Setup, then press OK. 4. If you selected Manual (Static), you are connected to your wireless network: 1. Consult your network, you will see the network name and the word CONNECTED. 4. Within each digit of the following format: 000.000.000.000. Press Home. 2. Use the navigation buttons to enter each three-digit grouping, the number must be right-justified. The wireless network settings appear on the printer...
User Manual
Page 16
... the name of available printers, then click Add. Press to add the printer. 8. Click Print & Fax. 7. On the printer control panel, press Home. 2. b. The printer with a wireless connection is detected, driver installation begins. 8. The printer with a wireless connection is not listed: a. When your printer is complete, click Done. Click the + sign to select View Network Configuration, press OK, then confirm you have an IP address. Select Start > All Programs > Kodak > Kodak Printer Network Setup Utility. 7. If your printer (ESP5200 Series (5250/5260).
... the name of available printers, then click Add. Press to add the printer. 8. Click Print & Fax. 7. On the printer control panel, press Home. 2. b. The printer with a wireless connection is detected, driver installation begins. 8. The printer with a wireless connection is not listed: a. When your printer is complete, click Done. Click the + sign to select View Network Configuration, press OK, then confirm you have an IP address. Select Start > All Programs > Kodak > Kodak Printer Network Setup Utility. 7. If your printer (ESP5200 Series (5250/5260).
User Manual
Page 17
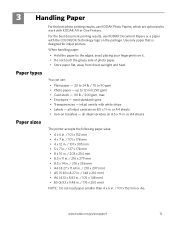
... x 250 mm) NOTE: Do not load paper smaller than 4 x 6 in -One Printers. 3 Handling Paper Paper types Paper sizes For the best photo printing results, use KODAK Photo Papers, which are optimized to work with KODAK All-in . / 101 x 152 mm or A6. Use only paper that is designed for inkjet printers. or A4 sheets • Iron-on it. • Do not touch the glossy side of photo paper. • Store paper flat, away from direct sunlight...
... x 250 mm) NOTE: Do not load paper smaller than 4 x 6 in -One Printers. 3 Handling Paper Paper types Paper sizes For the best photo printing results, use KODAK Photo Papers, which are optimized to work with KODAK All-in . / 101 x 152 mm or A6. Use only paper that is designed for inkjet printers. or A4 sheets • Iron-on it. • Do not touch the glossy side of photo paper. • Store paper flat, away from direct sunlight...

User Manual
Page 21
... paper in the paper tray, the printer automatically arranges the pictures to change print photos options: 1. Quantity Print Size Plain Paper Quality 1 (default) to your computer, press OK then Start. (Your printer and computer must be connected with a USB cable.) The number of pictures, or you have a MACINTOSH Computer, print your pictures using KODAK EASYSHARE Software, iPhoto, or another picture-editing program. 4 Printing Pictures The quickest way to use Home Center Software on your computer running the WINDOWS Operating...
... paper in the paper tray, the printer automatically arranges the pictures to change print photos options: 1. Quantity Print Size Plain Paper Quality 1 (default) to your computer, press OK then Start. (Your printer and computer must be connected with a USB cable.) The number of pictures, or you have a MACINTOSH Computer, print your pictures using KODAK EASYSHARE Software, iPhoto, or another picture-editing program. 4 Printing Pictures The quickest way to use Home Center Software on your computer running the WINDOWS Operating...
User Manual
Page 22
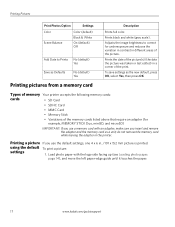
... is printed. Printing a picture If you use a memory card with the logo side facing up (see Loading photo paper, page 14), and move the left paper-edge guide until it touches the paper. 17 www.kodak.com/go/aiosupport Prints the date of the picture(s) (the date the picture was taken or last edited) in different areas of the print. using the default To print a picture: settings 1. Printing Pictures Print Photos Option Settings Color Scene Balance Color (default) Black & White On (default) Off Add Date...
... is printed. Printing a picture If you use a memory card with the logo side facing up (see Loading photo paper, page 14), and move the left paper-edge guide until it touches the paper. 17 www.kodak.com/go/aiosupport Prints the date of the picture(s) (the date the picture was taken or last edited) in different areas of the print. using the default To print a picture: settings 1. Printing Pictures Print Photos Option Settings Color Scene Balance Color (default) Black & White On (default) Off Add Date...

User Manual
Page 24
... changing options, press to change the selection. 7. Load photo paper with the logo side facing up (see Loading photo paper, page 14), and move the left paper-edge guide until the picture is selected. NOTE: Refer to your camera user guide to the default settings on your camera supports tagged (also "marked" or "DPOF") functionality. To print tagged pictures: 1. This creates a tag that is recognized by the tag from the printer...
... changing options, press to change the selection. 7. Load photo paper with the logo side facing up (see Loading photo paper, page 14), and move the left paper-edge guide until the picture is selected. NOTE: Refer to your camera user guide to the default settings on your camera supports tagged (also "marked" or "DPOF") functionality. To print tagged pictures: 1. This creates a tag that is recognized by the tag from the printer...

User Manual
Page 27
... select Copy Document or Copy Photo. 5. Close the lid. Press Home. 4. NOTE: Single-button document copy is turned on the scanner and immediately press Start, without following the remaining steps below. If needed, press or to select Copy Document. 3. Changing copy options You can change the copy options for copying documents or copying photos, and save them as the defaults. The printer produces high-quality color or black-and-white copies on the glass. Press Start to Copy Document mode. 3. Changing copy To change the settings for...
... select Copy Document or Copy Photo. 5. Close the lid. Press Home. 4. NOTE: Single-button document copy is turned on the scanner and immediately press Start, without following the remaining steps below. If needed, press or to select Copy Document. 3. Changing copy options You can change the copy options for copying documents or copying photos, and save them as the defaults. The printer produces high-quality color or black-and-white copies on the glass. Press Start to Copy Document mode. 3. Changing copy To change the settings for...
User Manual
Page 28
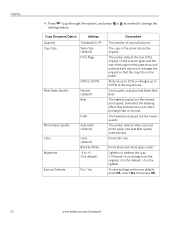
... no change the settings below: Copy Document Option Settings Quantity 1 (default) to 99 Copy Size Same Size (default) Fit to Page Plain Paper Quality 20% to 500% Normal (default) Best Photo Paper Quality Color Brightness Draft Automatic (default) Color (default) Black & White -3 to 500% of the paper in the paper tray, and automatically reduces or enlarges the original so that sometimes occurs when printing Draft or Normal. The printer detects when you load photo paper and sets Best quality automatically. Prints full color. Copying...
... no change the settings below: Copy Document Option Settings Quantity 1 (default) to 99 Copy Size Same Size (default) Fit to Page Plain Paper Quality 20% to 500% Normal (default) Best Photo Paper Quality Color Brightness Draft Automatic (default) Color (default) Black & White -3 to 500% of the paper in the paper tray, and automatically reduces or enlarges the original so that sometimes occurs when printing Draft or Normal. The printer detects when you load photo paper and sets Best quality automatically. Prints full color. Copying...
User Manual
Page 29
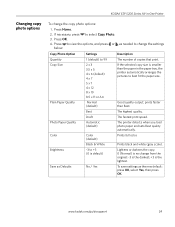
... below: as needed to change the settings Copy Photo Option Settings Description Quantity Copy Size Plain Paper Quality 1 (default) to +3 (0 is default) No / Yes Prints black and white (gray scale). Press Home. 2. Lightens or darkens the copy. 0 (Normal) is no change the copy photo options: 1. KODAK ESP 5200 Series All-in the paper tray, the printer automatically arranges the pictures to select Copy Photo. 4. If the selected copy size is the lightest. Brightness Save as the new default: press OK, select Yes...
... below: as needed to change the settings Copy Photo Option Settings Description Quantity Copy Size Plain Paper Quality 1 (default) to +3 (0 is default) No / Yes Prints black and white (gray scale). Press Home. 2. Lightens or darkens the copy. 0 (Normal) is no change the copy photo options: 1. KODAK ESP 5200 Series All-in the paper tray, the printer automatically arranges the pictures to select Copy Photo. 4. If the selected copy size is the lightest. Brightness Save as the new default: press OK, select Yes...
User Manual
Page 44
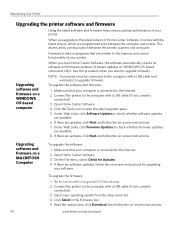
.... 8. Make sure that your computer is data or programs that your software. On the File menu, select Check for upgrading your computer is connected to open Home Center Software, the software automatically checks for software and firmware updates (firmware updates on a WINDOWS OS-based computer NOTE: Your printer must be connected to the computer with a USB cable (not wirelessly) to check whether firmware updates are updates, click Next and follow the on -screen instructions. Connect the printer to the latest version of your operating...
.... 8. Make sure that your computer is data or programs that your software. On the File menu, select Check for upgrading your computer is connected to open Home Center Software, the software automatically checks for software and firmware updates (firmware updates on a WINDOWS OS-based computer NOTE: Your printer must be connected to the computer with a USB cable (not wirelessly) to check whether firmware updates are updates, click Next and follow the on -screen instructions. Connect the printer to the latest version of your operating...
User Manual
Page 46
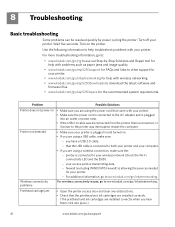
... jam • Open the printer access door and clear any obstructions. • Check that the printhead and ink cartridges are installed correctly. (The printhead and ink cartridges are using a USB cable, make sure the: - 8 Troubleshooting Basic troubleshooting Some problems can be resolved quickly by -Step Solutions and Repair tool for help with problems such as paper jams and image quality. • www.kodak.com/go/esp5250support for FAQs and links to other support for your printer. • www.kodak...
... jam • Open the printer access door and clear any obstructions. • Check that the printhead and ink cartridges are installed correctly. (The printhead and ink cartridges are using a USB cable, make sure the: - 8 Troubleshooting Basic troubleshooting Some problems can be resolved quickly by -Step Solutions and Repair tool for help with problems such as paper jams and image quality. • www.kodak.com/go/esp5250support for FAQs and links to other support for your printer. • www.kodak...
User Manual
Page 47
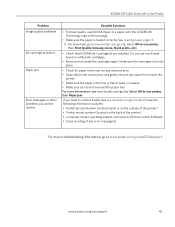
...; Check for paper in the rear-access cleanout area. • Open the printer access door and gently remove any error message(s) For more troubleshooting information, go to www.kodak.com/go/esp5250support. www.kodak.com/go /itg. KODAK ESP 5200 Series All-in-One Printer Problem Image quality problems Ink cartridge problems Paper jam Error messages or other problems you cannot resolve Possible Solutions • For best results, use non-Kodak brand or refilled ink cartridges. • Remove, then install the cartridges again. See Loading paper, page 13...
...; Check for paper in the rear-access cleanout area. • Open the printer access door and gently remove any error message(s) For more troubleshooting information, go to www.kodak.com/go/esp5250support. www.kodak.com/go /itg. KODAK ESP 5200 Series All-in-One Printer Problem Image quality problems Ink cartridge problems Paper jam Error messages or other problems you cannot resolve Possible Solutions • For best results, use non-Kodak brand or refilled ink cartridges. • Remove, then install the cartridges again. See Loading paper, page 13...
User Manual
Page 60
... button, 2 Black print speed, 44 C Cancel button, 2 Changing ink cartridges. See Zooming and cropping pictures D Darkening copies, 26 Date and time setting, 4 synchronizing to your printer, 4 basic printer settings, 4 setting printer as the default printer, 5 wireless network settings, 5 Connecting to a USB-connected computer, 11 Additional computers on network, installing printer on LCD, using, 7 KODAK Home Center Software. See Replacing ink cartridges Cleaning the printer, 29 Components, printer, 1 Configuring your computer, 4 Default printer settings, resetting, 4 Document paper sizes...
... button, 2 Black print speed, 44 C Cancel button, 2 Changing ink cartridges. See Zooming and cropping pictures D Darkening copies, 26 Date and time setting, 4 synchronizing to your printer, 4 basic printer settings, 4 setting printer as the default printer, 5 wireless network settings, 5 Connecting to a USB-connected computer, 11 Additional computers on network, installing printer on LCD, using, 7 KODAK Home Center Software. See Replacing ink cartridges Cleaning the printer, 29 Components, printer, 1 Configuring your computer, 4 Default printer settings, resetting, 4 Document paper sizes...
User Manual
Page 61
... a copy document, 25 photo, 25 Removing the printhead, 36 Replacing ink cartridges, 32 Right paper-edge guide, 1 Rotate button, 2, 21 S Scanner glass, 1 lid, 1 Scanning, 27 changing settings in -One printer LCD, 1, 2 LED, Wi-Fi connectivity, 1 Left paper-edge guide, 1 Lid, scanner, 1 Lightening copies, 26 Lights power status, 43 Wi-Fi status, 43 Loading paper envelopes, 15 photo, 14 plain, 13 M Maintenance, 29 Marked images, printing. KODAK ESP 5200 Series All-in Home Center Software, 27 multiple pictures simultaneously, 28 Service agreements, 29 Settings basic printer, 4 wireless network...
... a copy document, 25 photo, 25 Removing the printhead, 36 Replacing ink cartridges, 32 Right paper-edge guide, 1 Rotate button, 2, 21 S Scanner glass, 1 lid, 1 Scanning, 27 changing settings in -One printer LCD, 1, 2 LED, Wi-Fi connectivity, 1 Left paper-edge guide, 1 Lid, scanner, 1 Lightening copies, 26 Lights power status, 43 Wi-Fi status, 43 Loading paper envelopes, 15 photo, 14 plain, 13 M Maintenance, 29 Marked images, printing. KODAK ESP 5200 Series All-in Home Center Software, 27 multiple pictures simultaneously, 28 Service agreements, 29 Settings basic printer, 4 wireless network...


