User guide
Page 4
... Scanner Lid 36 Printing a Test Page 36 Ink Cartridges ...37 Checking Ink Levels 37 Replacing Ink Cartridges 37 Printhead...38 Printhead Alignment 39 Clean Printhead 39 Replace the Printhead 40 Support ...43 Contact Kodak...43 Troubleshooting 44 Printer Fails to Power On 44 Device not Recognized 44 Ink Cartridge Not Recognized 45 Multiple Paper Feed 45... 50 Print Spotted 51 Print Too Dark 51 Print Too Light 51 Printing Slow 51 Printing Stops 52 White Edges on Borderless Prints 52 iv Kodak ESP·3 All-in-One
... Scanner Lid 36 Printing a Test Page 36 Ink Cartridges ...37 Checking Ink Levels 37 Replacing Ink Cartridges 37 Printhead...38 Printhead Alignment 39 Clean Printhead 39 Replace the Printhead 40 Support ...43 Contact Kodak...43 Troubleshooting 44 Printer Fails to Power On 44 Device not Recognized 44 Ink Cartridge Not Recognized 45 Multiple Paper Feed 45... 50 Print Spotted 51 Print Too Dark 51 Print Too Light 51 Printing Slow 51 Printing Stops 52 White Edges on Borderless Prints 52 iv Kodak ESP·3 All-in-One
User guide
Page 10
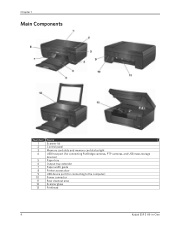
Chapter 1 Main Components Number 1 2 3 4 5 6 7 8 9 10 11 12 13 Name Scanner lid Control panel Memory card slots and memory card status light USB host port (for connecting PictBridge cameras, PTP cameras, and USB mass storage devices) Paper tray Output tray extender Paper width guide Printer access door USB device port (for connecting to the computer) Power connector Rear cleanout area Scanner glass Printhead 4 Kodak ESP 3 All-in-One
Chapter 1 Main Components Number 1 2 3 4 5 6 7 8 9 10 11 12 13 Name Scanner lid Control panel Memory card slots and memory card status light USB host port (for connecting PictBridge cameras, PTP cameras, and USB mass storage devices) Paper tray Output tray extender Paper width guide Printer access door USB device port (for connecting to the computer) Power connector Rear cleanout area Scanner glass Printhead 4 Kodak ESP 3 All-in-One
User guide
Page 14
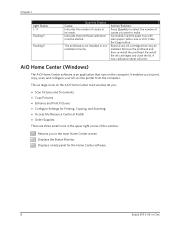
... Resource Center at Kodak • Order Supplies There are three small icons in the upper right corner of the window: Returns you to the main Home Center screen Displays the Status Monitor Displays a Help panel for the Home Center software 8 Kodak ESP 3 All-in -One printer from the computer. Remove the printhead and then re...
... Resource Center at Kodak • Order Supplies There are three small icons in the upper right corner of the window: Returns you to the main Home Center screen Displays the Status Monitor Displays a Help panel for the Home Center software 8 Kodak ESP 3 All-in -One printer from the computer. Remove the printhead and then re...

User guide
Page 15
...; Configure Settings • Print a Test Page • Align the Printhead • Run a Nozzle Health Check • Clean the Printhead Select: Provides a list of your Kodak All-in-One printer in -One printer. After installation, you can select another printer. Order Supplies: Connects you to configure your All-in-One printer from the System Preference's Print & Fax pane by selecting your...
...; Configure Settings • Print a Test Page • Align the Printhead • Run a Nozzle Health Check • Clean the Printhead Select: Provides a list of your Kodak All-in-One printer in -One printer. After installation, you can select another printer. Order Supplies: Connects you to configure your All-in-One printer from the System Preference's Print & Fax pane by selecting your...
User guide
Page 43
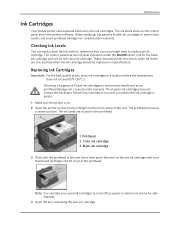
Maintenance Ink Cartridges Your Kodak printer uses separate black and color ink cartridges. The control panel has two ink level indicators under the On/Off button, one for the black ink cartridge and one for safe disposal. 4 Open the box containing the new ink cartridge. The ink ... Ink Cartridges Important For the best quality prints, store ink cartridges in the printer software. The printhead moves to ensure best results and avoid printhead damage not covered under warranty. Warning Use genuine Kodak ink cartridges to a center position. Checking Ink Levels You can take your ...
Maintenance Ink Cartridges Your Kodak printer uses separate black and color ink cartridges. The control panel has two ink level indicators under the On/Off button, one for the black ink cartridge and one for safe disposal. 4 Open the box containing the new ink cartridge. The ink ... Ink Cartridges Important For the best quality prints, store ink cartridges in the printer software. The printhead moves to ensure best results and avoid printhead damage not covered under warranty. Warning Use genuine Kodak ink cartridges to a center position. Checking Ink Levels You can take your ...
User guide
Page 44
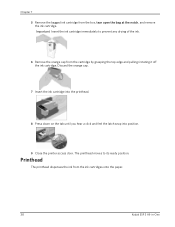
...Remove the bagged ink cartridge from the ink cartridges onto the paper. 38 Kodak ESP 3 All-in-One Printhead The printhead dispenses the ink from the box, tear open the bag at the notch, and remove the ink cartridge. The printhead moves to prevent any drying of the ink. 6 Remove the orange cap ... it off the ink cartridge. Discard the orange cap. 7 Insert the ink cartridge into the printhead. 8 Press down on the tab until you hear a click and feel the latch snap into position. 9 Close the printer access door. Important Insert the ink cartridge immediately to its ready position.
...Remove the bagged ink cartridge from the ink cartridges onto the paper. 38 Kodak ESP 3 All-in-One Printhead The printhead dispenses the ink from the box, tear open the bag at the notch, and remove the ink cartridge. The printhead moves to prevent any drying of the ink. 6 Remove the orange cap ... it off the ink cartridge. Discard the orange cap. 7 Insert the ink cartridge into the printhead. 8 Press down on the tab until you hear a click and feel the latch snap into position. 9 Close the printer access door. Important Insert the ink cartridge immediately to its ready position.
User guide
Page 45
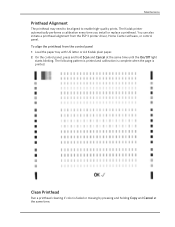
... Load the paper tray with US letter or A4 Kodak plain paper. 2 On the control panel, press and hold Scan and Cancel at the same time. Clean Printhead Run a printhead cleaning if color is printed. To align the printhead from the ESP 3 printer driver, Home Center software, or control panel. The ...or missing by pressing and holding Copy and Cancel at the same time until the On/Off light starts blinking. Maintenance Printhead Alignment The printhead may need to be aligned to enable high-quality prints. The Kodak printer automatically performs a calibration every time you install or replace...
... Load the paper tray with US letter or A4 Kodak plain paper. 2 On the control panel, press and hold Scan and Cancel at the same time. Clean Printhead Run a printhead cleaning if color is printed. To align the printhead from the ESP 3 printer driver, Home Center software, or control panel. The ...or missing by pressing and holding Copy and Cancel at the same time until the On/Off light starts blinking. Maintenance Printhead Alignment The printhead may need to be aligned to enable high-quality prints. The Kodak printer automatically performs a calibration every time you install or replace...
User guide
Page 46
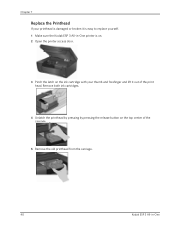
Remove both ink cartridges. 4 Unlatch the printhead by pressing by pressing the release button on the ink cartridge with your thumb and forefinger and lift it is easy to replace yourself. 1 Make sure the Kodak ESP 3 All-in -One Chapter 7 Replace the Printhead If your printhead is damaged or broken it out of the carriage. 5 Remove the old printhead from the carriage. 40 Kodak ESP 3 All-in -One printer is on. 2 Open the printer access door. 3 Pinch the latch on the top center of the print head.
Remove both ink cartridges. 4 Unlatch the printhead by pressing by pressing the release button on the ink cartridge with your thumb and forefinger and lift it is easy to replace yourself. 1 Make sure the Kodak ESP 3 All-in -One Chapter 7 Replace the Printhead If your printhead is damaged or broken it out of the carriage. 5 Remove the old printhead from the carriage. 40 Kodak ESP 3 All-in -One printer is on. 2 Open the printer access door. 3 Pinch the latch on the top center of the print head.
User guide
Page 47
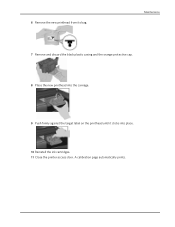
6 Remove the new printhead from its bag. A calibration page automatically prints. Maintenance 7 Remove and discard the black plastic casing and the orange protective cap. 8 Place the new printhead into the carriage. 9 Push firmly against the target label on the printhead until it clicks into place. 10 Reinstall the ink cartridges. 11 Close the printer access door.
6 Remove the new printhead from its bag. A calibration page automatically prints. Maintenance 7 Remove and discard the black plastic casing and the orange protective cap. 8 Place the new printhead into the carriage. 9 Push firmly against the target label on the printhead until it clicks into place. 10 Reinstall the ink cartridges. 11 Close the printer access door.
User guide
Page 56
...Remove paper and check for your Kodak All-in-One printer. Corrective Action Handle paper by the edges. Review the picture on the camera or computer and delete, if necessary. • The image file may be cropped to replace the printhead. Important KODAK Inkjet paper is not properly loaded ... Cleaning the Printhead). The Kodak printer can print only JPEG files in standalone mode. Chapter 8 Note Cropping may vary depending on the selected picture size and size of the paper. 50 Kodak ESP 3 All-in-One If the printhead is clogged, the printouts should begin to print other ...
...Remove paper and check for your Kodak All-in-One printer. Corrective Action Handle paper by the edges. Review the picture on the camera or computer and delete, if necessary. • The image file may be cropped to replace the printhead. Important KODAK Inkjet paper is not properly loaded ... Cleaning the Printhead). The Kodak printer can print only JPEG files in standalone mode. Chapter 8 Note Cropping may vary depending on the selected picture size and size of the paper. 50 Kodak ESP 3 All-in-One If the printhead is clogged, the printouts should begin to print other ...
User guide
Page 57
.... • Adjust the exposure compensation on the paper or inside the printer. Print Spotted Probable Cause Paper may slow down to your printer. • Make sure the paper is loaded. Refer to prevent the printhead from collecting on your camera, and try taking the picture again with the...Refer to keep dust and debris from overheating. • Make sure the printer is not placed in direct sunlight or is not operating in a high-temperature environment (higher than one type of paper is loaded with the Kodak logo facing up. Support Probable Cause 2 More than 95° F, or...
.... • Adjust the exposure compensation on the paper or inside the printer. Print Spotted Probable Cause Paper may slow down to your printer. • Make sure the paper is loaded. Refer to prevent the printhead from collecting on your camera, and try taking the picture again with the...Refer to keep dust and debris from overheating. • Make sure the printer is not placed in direct sunlight or is not operating in a high-temperature environment (higher than one type of paper is loaded with the Kodak logo facing up. Support Probable Cause 2 More than 95° F, or...
User guide
Page 63
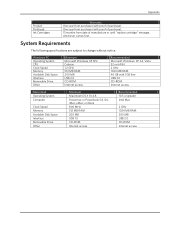
...1024 MB RAM 40 GB with proof of purchase). System Requirements The following specifications are subject to change without notice. Appendix Product Printhead Ink Cartridges Warranty One year from date of manufacture or until "replace cartridge" message, whichever comes first. or iBook 800 MHz 512 MB RAM 200...1.0 CD-ROM Internet access Recommended 10.5 or greater Intel Mac 2 GHz 1024 MB RAM 200 MB USB 2.0 CD-ROM Internet access iMac; One year from purchase (with proof of purchase). 13 months from purchase (with 1 GB free USB 2.0 CD-ROM Internet access Macintosh Operating System ...
...1024 MB RAM 40 GB with proof of purchase). System Requirements The following specifications are subject to change without notice. Appendix Product Printhead Ink Cartridges Warranty One year from date of manufacture or until "replace cartridge" message, whichever comes first. or iBook 800 MHz 512 MB RAM 200...1.0 CD-ROM Internet access Recommended 10.5 or greater Intel Mac 2 GHz 1024 MB RAM 200 MB USB 2.0 CD-ROM Internet access iMac; One year from purchase (with proof of purchase). 13 months from purchase (with 1 GB free USB 2.0 CD-ROM Internet access Macintosh Operating System ...


