
User Manual
Page 6
...Printing 19 Creating a Print Order 19 Resolution and Print Sizes 19 Running a Slide Show 20 Starting the Slide Show 20 Other Review Settings 20 4 Customizing Your Camera Settings 21 Setup Options 21 Capture Options 22 Setting Image Quality 22 Setting Macro 22 Turning QuickView On or Off 22... Review Options 23 Setting Video Out 23 Print Order 24 Copying Pictures 25 Viewing Camera Information 25 Formatting Camera Memory or MMC/SD Card 26 Selecting a Language 27 Date/Time Settings 27 iv
...Printing 19 Creating a Print Order 19 Resolution and Print Sizes 19 Running a Slide Show 20 Starting the Slide Show 20 Other Review Settings 20 4 Customizing Your Camera Settings 21 Setup Options 21 Capture Options 22 Setting Image Quality 22 Setting Macro 22 Turning QuickView On or Off 22... Review Options 23 Setting Video Out 23 Print Order 24 Copying Pictures 25 Viewing Camera Information 25 Formatting Camera Memory or MMC/SD Card 26 Selecting a Language 27 Date/Time Settings 27 iv

User Manual
Page 11
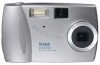
...shoot operation. What Can I Do With My Camera? Review Display your pictures on your purchase of the KODAK EASYSHARE DX3700 Digital Camera. After you install the included software: Transfer pictures to friends and family. What Can I Do With My Digital Pictures? E-mail pictures to your photo retailer ... 1 1 Getting Started Congratulations on the LCD screen and delete unwanted pictures. Store pictures in the camera's 8 MB internal memory or on an optional, removable MultiMedia (MMC) or Secure Digital (SD) card. Print to your home printer, make a slide show; Set Up Select...
...shoot operation. What Can I Do With My Camera? Review Display your pictures on your purchase of the KODAK EASYSHARE DX3700 Digital Camera. After you install the included software: Transfer pictures to friends and family. What Can I Do With My Digital Pictures? E-mail pictures to your photo retailer ... 1 1 Getting Started Congratulations on the LCD screen and delete unwanted pictures. Store pictures in the camera's 8 MB internal memory or on an optional, removable MultiMedia (MMC) or Secure Digital (SD) card. Print to your home printer, make a slide show; Set Up Select...
User Manual
Page 15
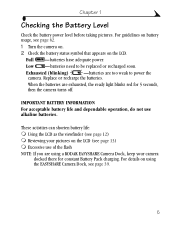
...12) m Reviewing your pictures on using a KODAK EASYSHARE Camera Dock, keep your camera docked there for 5 seconds, then the camera turns off. For details on the LCD (see page 13) m Excessive use alkaline batteries. Exhausted (blinking) -batteries are using the EASYSHARE Camera Dock, see page 62. 1 Turn the camera on. ... are too weak to be replaced or recharged soon. Full -batteries have adequate power. Low -batteries need to power the camera. When the batteries are exhausted, the ready light blinks red for constant Battery Pack charging. For guidelines on the LCD. ...
...12) m Reviewing your pictures on using a KODAK EASYSHARE Camera Dock, keep your camera docked there for 5 seconds, then the camera turns off. For details on the LCD (see page 13) m Excessive use alkaline batteries. Exhausted (blinking) -batteries are using the EASYSHARE Camera Dock, see page 62. 1 Turn the camera on. ... are too weak to be replaced or recharged soon. Full -batteries have adequate power. Low -batteries need to power the camera. When the batteries are exhausted, the ready light blinks red for constant Battery Pack charging. For guidelines on the LCD. ...
User Manual
Page 16
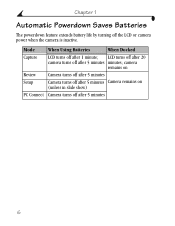
camera remains on Review Camera turns off after 5 minutes Setup Camera turns off after 5 minutes Camera remains on (unless in slide show) PC Connect Camera turns off the LCD or camera power when the camera is inactive. Chapter 1 Automatic Powerdown Saves Batteries The powerdown feature extends battery life by turning off after 5 minutes 6 LCD turns off after 20 camera turns off after 5 minutes minutes; Mode When Using Batteries When Docked Capture LCD turns off after 1 minute;
camera remains on Review Camera turns off after 5 minutes Setup Camera turns off after 5 minutes Camera remains on (unless in slide show) PC Connect Camera turns off the LCD or camera power when the camera is inactive. Chapter 1 Automatic Powerdown Saves Batteries The powerdown feature extends battery life by turning off after 5 minutes 6 LCD turns off after 20 camera turns off after 5 minutes minutes; Mode When Using Batteries When Docked Capture LCD turns off after 1 minute;

User Manual
Page 20
... copy them to an MMC/SD card (see page 25). Chapter 1 Choosing Internal or Removable Memory If an MMC/SD card is inserted in the camera, new pictures are stored in internal memory. You cannot copy pictures from a card to...
... copy them to an MMC/SD card (see page 25). Chapter 1 Choosing Internal or Removable Memory If an MMC/SD card is inserted in the camera, new pictures are stored in internal memory. You cannot copy pictures from a card to...

User Manual
Page 27
... Location Best Better Good/2X Digital Zoom Quality Full battery Low battery Exhausted battery 17 The icons displayed with the pictures stored in the LCD Mode Selector 1 Slide the Mode selector to Review . Chapter 3 3 Reviewing Your Pictures Use Review mode to Capture or Setup . If a card is present, the camera accesses internal memory. Viewing Pictures...
... Location Best Better Good/2X Digital Zoom Quality Full battery Low battery Exhausted battery 17 The icons displayed with the pictures stored in the LCD Mode Selector 1 Slide the Mode selector to Review . Chapter 3 3 Reviewing Your Pictures Use Review mode to Capture or Setup . If a card is present, the camera accesses internal memory. Viewing Pictures...

User Manual
Page 28
...available picture. 5 Press Select and follow the prompts. 18 To delete pictures from a card, insert the card. Chapter 3 Magnifying Pictures 1 Slide the Mode selector to Review . 2 Press the buttons to display the desired picture. 3 Press Select to magnify the picture. 4 Press the or buttons to pan horizontally or vertically. 5 Press ...Select to return to normal magnification. Deleting Pictures To delete pictures from internal memory, remove the card. 1 Slide the Mode selector to Review . 2 Press the buttons to display the picture to the displayed picture.
...available picture. 5 Press Select and follow the prompts. 18 To delete pictures from a card, insert the card. Chapter 3 Magnifying Pictures 1 Slide the Mode selector to Review . 2 Press the buttons to display the desired picture. 3 Press Select to magnify the picture. 4 Press the or buttons to pan horizontally or vertically. 5 Press ...Select to return to normal magnification. Deleting Pictures To delete pictures from internal memory, remove the card. 1 Slide the Mode selector to Review . 2 Press the buttons to display the picture to the displayed picture.

User Manual
Page 29
See your printer or print service guidelines, or visit http://www.kodak.com for pictures stored in internal memory. Creating a Print Order 1 Slide the Mode selector to Review , then scroll until the desired picture is available only for the pictures stored on an MMC/SD card, not for further ...SD card for printing. Resolution and Print Sizes Setting Sensor Resolution (pixels) Best 2160 x 1440 Better 2160 x 1440 Best/Better (with 2X digital zoom) 1088 x 720 Best/Better (with 3X digital zoom) 720 x 480 Good 1088 x 720 Recommended Print Size (inches)* Up to 11 x 14 Up to 11 x 14 Up to...
See your printer or print service guidelines, or visit http://www.kodak.com for pictures stored in internal memory. Creating a Print Order 1 Slide the Mode selector to Review , then scroll until the desired picture is available only for the pictures stored on an MMC/SD card, not for further ...SD card for printing. Resolution and Print Sizes Setting Sensor Resolution (pixels) Best 2160 x 1440 Better 2160 x 1440 Best/Better (with 2X digital zoom) 1088 x 720 Best/Better (with 3X digital zoom) 720 x 480 Good 1088 x 720 Recommended Print Size (inches)* Up to 11 x 14 Up to 11 x 14 Up to...

User Manual
Page 30
... press Select. Press Select. 3 Select how long you turn the camera off and the television screen acts as the camera display. The camera LCD turns off . 4 To cancel the slide show on video-in setup. Other Review Settings Feature Page Copy Pictures from Internal Memory to display each picture, ...to highlight Slide Show. Starting the Slide Show You can display pictures on the camera LCD, a television screen, or any external video device equipped with the camera) from the video-out port on the camera to the video-in port on your television. 2 Refer to your television User's...
... press Select. Press Select. 3 Select how long you turn the camera off and the television screen acts as the camera display. The camera LCD turns off . 4 To cancel the slide show on video-in setup. Other Review Settings Feature Page Copy Pictures from Internal Memory to display each picture, ...to highlight Slide Show. Starting the Slide Show You can display pictures on the camera LCD, a television screen, or any external video device equipped with the camera) from the video-out port on the camera to the video-in port on your television. 2 Refer to your television User's...

User Manual
Page 31
Setup Options Capture Options (page 22) Format (page 26) Review Options (page 23) Language (page 27) Copy (page 25) Date/Time (page 27) About Camera (page 25) 21 Chapter 4 4 Customizing Your Camera Settings Slide the Mode selector to Setup to customize the camera settings.
Setup Options Capture Options (page 22) Format (page 26) Review Options (page 23) Language (page 27) Copy (page 25) Date/Time (page 27) About Camera (page 25) 21 Chapter 4 4 Customizing Your Camera Settings Slide the Mode selector to Setup to customize the camera settings.

User Manual
Page 33
... slide show on a television or other external device. 1 Slide the Mode selector to Setup . 2 Press the buttons to highlight the Review Options icon. 3 Press the buttons to the standard that applies in European countries. m NTSC: Standard used in your geographical location. The ...setting remains until you change it. 23 Chapter 4 Review Options Setting Video Out Use the Video Out feature to match the camera's video signal to highlight Video Out, then press Select. 4 Highlight the desired setting, then press ...
... slide show on a television or other external device. 1 Slide the Mode selector to Setup . 2 Press the buttons to highlight the Review Options icon. 3 Press the buttons to the standard that applies in European countries. m NTSC: Standard used in your geographical location. The ...setting remains until you change it. 23 Chapter 4 Review Options Setting Video Out Use the Video Out feature to match the camera's video signal to highlight Video Out, then press Select. 4 Highlight the desired setting, then press ...

User Manual
Page 34
Press 24 Press Select. 3 Select All Pictures (applies to all pictures on MMC/SD card), Cancel Order, or Future Pictures (applies to highlight Print Order. Press Select. 4 Press the Select. Chapter 4 Print Order Before using this feature, ensure that an MMC/SD card is inserted in the camera. 1 Slide the Mode selector to Setup . 2 Press the buttons to highlight the Review Options icon, then the buttons to future pictures and leaves current pictures unchanged). buttons to select the desired number of prints.
Press 24 Press Select. 3 Select All Pictures (applies to all pictures on MMC/SD card), Cancel Order, or Future Pictures (applies to highlight Print Order. Press Select. 4 Press the Select. Chapter 4 Print Order Before using this feature, ensure that an MMC/SD card is inserted in the camera. 1 Slide the Mode selector to Setup . 2 Press the buttons to highlight the Review Options icon, then the buttons to future pictures and leaves current pictures unchanged). buttons to select the desired number of prints.

User Manual
Page 45
..., refer to your computer. m Or, select the Guided Transfer radio button, then click Transfer. m Guided Transfer lets you review each picture, name it in the application window. Working With Your Pictures When your pictures are transferred, Picture Transfer Software closes and... KODAK Picture Software opens. For this application. Turning Off KODAK Picture Software Autostart If you can turn the auto start feature off. On a MACINTOSH computer-click the Help...
..., refer to your computer. m Or, select the Guided Transfer radio button, then click Transfer. m Guided Transfer lets you review each picture, name it in the application window. Working With Your Pictures When your pictures are transferred, Picture Transfer Software closes and... KODAK Picture Software opens. For this application. Turning Off KODAK Picture Software Autostart If you can turn the auto start feature off. On a MACINTOSH computer-click the Help...

User Manual
Page 82
... symbol 5 error messages 51 picture location icon 7 previewing pictures 12 status bar 7 viewing pictures on 17 lens, cleaning 63 light EASYSHARE Camera Dock 53 ready, camera 4, 50 loading batteries 3 Battery Pack 41 MMC/SD Card 8 software 30 M MACINTOSH installing software 30 OS X Notice 29 system...menus review 23 reviewing pictures 23 still 21 taking pictures 21 MISC folder, MMC/SD Card 65 MMC 8 MMC/SD Card file structure 65 inserting 8 problems 45 mode selector review 23 still 21 modes review 23 still 21 monitor, requirements 32 MultiMedia Card 8 P package contents camera 2 EASYSHARE Camera ...
... symbol 5 error messages 51 picture location icon 7 previewing pictures 12 status bar 7 viewing pictures on 17 lens, cleaning 63 light EASYSHARE Camera Dock 53 ready, camera 4, 50 loading batteries 3 Battery Pack 41 MMC/SD Card 8 software 30 M MACINTOSH installing software 30 OS X Notice 29 system...menus review 23 reviewing pictures 23 still 21 taking pictures 21 MISC folder, MMC/SD Card 65 MMC 8 MMC/SD Card file structure 65 inserting 8 problems 45 mode selector review 23 still 21 modes review 23 still 21 monitor, requirements 32 MultiMedia Card 8 P package contents camera 2 EASYSHARE Camera ...

User Manual
Page 83
... on Memory Card 66 magnifying 18 printing 37 reviewing 17 selecting for printing 19 storage capacity 65 storage location 10 taking 11 transferring manually 36 transferring to computer 34, 43 using on computer 33, 35 viewing 17 power checking batteries 5 EASYSHARE Camera Dock 42 turning camera on 4 powerdown, automatic 6 preview pictures 12 print orders...
... on Memory Card 66 magnifying 18 printing 37 reviewing 17 selecting for printing 19 storage capacity 65 storage location 10 taking 11 transferring manually 36 transferring to computer 34, 43 using on computer 33, 35 viewing 17 power checking batteries 5 EASYSHARE Camera Dock 42 turning camera on 4 powerdown, automatic 6 preview pictures 12 print orders...

User Manual
Page 84
...32 WINDOWS-based system 32 review mode selector 23 mode, using 17 reviewing pictures deleting 18 for printing 19 menus 23 on LCD 17 slide show 20 running slide show 20 S safety 63 SD 8 Secure Digital 8 service and support fax numbers 55 Kodak web site 55 telephone ... shutoff, auto 6 shutter problems 47 sleep mode 6 slide show problems 49 running 20 software getting help 55 included with camera 31 installing 30 KODAK Camera Connection 31 KODAK Picture 31 KODAK Picture Transfer 31 QUICKTIME 31 specifications camera 59 EASYSHARE Camera Dock 61 MACINTOSH system 32 WINDOWS-based system 32 status...
...32 WINDOWS-based system 32 review mode selector 23 mode, using 17 reviewing pictures deleting 18 for printing 19 menus 23 on LCD 17 slide show 20 running slide show 20 S safety 63 SD 8 Secure Digital 8 service and support fax numbers 55 Kodak web site 55 telephone ... shutoff, auto 6 shutter problems 47 sleep mode 6 slide show problems 49 running 20 software getting help 55 included with camera 31 installing 30 KODAK Camera Connection 31 KODAK Picture 31 KODAK Picture Transfer 31 QUICKTIME 31 specifications camera 59 EASYSHARE Camera Dock 61 MACINTOSH system 32 WINDOWS-based system 32 status...


