User Manual
Page 4
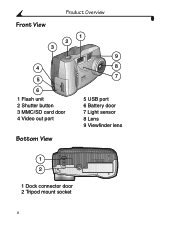
Product Overview Front View 1 2 3 9 4 8 7 5 6 1 Flash unit 2 Shutter button 3 MMC/SD card door 4 Video out port 5 USB port 6 Battery door 7 Light sensor 8 Lens 9 Viewfinder lens Bottom View 1 2 1 Dock connector door 2 Tripod mount socket ii
Product Overview Front View 1 2 3 9 4 8 7 5 6 1 Flash unit 2 Shutter button 3 MMC/SD card door 4 Video out port 5 USB port 6 Battery door 7 Light sensor 8 Lens 9 Viewfinder lens Bottom View 1 2 1 Dock connector door 2 Tripod mount socket ii

User Manual
Page 5
... Can I Do With My Camera 1 What Can I Do With My Digital Pictures 1 Camera Package Contents 2 Attaching the Wrist Strap and Lens Cap 3 Loading the Battery 3 Turning the Camera On and Off 4 Checking the Battery Level 5 Automatic Powerdown Saves Batteries 6 Checking Camera Status 7 Status Bar Icons 7 Inserting an Optional MMC/SD Card 8 Choosing Internal or Removable Memory...
... Can I Do With My Camera 1 What Can I Do With My Digital Pictures 1 Camera Package Contents 2 Attaching the Wrist Strap and Lens Cap 3 Loading the Battery 3 Turning the Camera On and Off 4 Checking the Battery Level 5 Automatic Powerdown Saves Batteries 6 Checking Camera Status 7 Status Bar Icons 7 Inserting an Optional MMC/SD Card 8 Choosing Internal or Removable Memory...

User Manual
Page 6
... 19 Creating a Print Order 19 Resolution and Print Sizes 19 Running a Slide Show 20 Starting the Slide Show 20 Other Review Settings 20 4 Customizing Your Camera Settings 21 Setup Options 21 Capture Options 22 Setting Image Quality 22 Setting Macro 22 Turning QuickView On or Off 22 Review Options 23 Setting... Video Out 23 Print Order 24 Copying Pictures 25 Viewing Camera Information 25 Formatting Camera Memory or MMC/SD Card 26 Selecting a Language 27 Date/Time Settings 27 iv
... 19 Creating a Print Order 19 Resolution and Print Sizes 19 Running a Slide Show 20 Starting the Slide Show 20 Other Review Settings 20 4 Customizing Your Camera Settings 21 Setup Options 21 Capture Options 22 Setting Image Quality 22 Setting Macro 22 Turning QuickView On or Off 22 Review Options 23 Setting... Video Out 23 Print Order 24 Copying Pictures 25 Viewing Camera Information 25 Formatting Camera Memory or MMC/SD Card 26 Selecting a Language 27 Date/Time Settings 27 iv

User Manual
Page 8
... On a WINDOWS-based Computer 36 On a MACINTOSH Computer 36 KODAK Camera Connection Software Online Help. 36 Printing Your Pictures 37 From KODAK Picture Software 37 From an MMC/SD Card 37 7 Using the EASYSHARE Camera Dock 39 EASYSHARE Camera Dock Package Contents 39 Installing the Dock Insert 40 Connecting the EASYSHARE Camera Dock 40 Installing the Battery Pack in the...
... On a WINDOWS-based Computer 36 On a MACINTOSH Computer 36 KODAK Camera Connection Software Online Help. 36 Printing Your Pictures 37 From KODAK Picture Software 37 From an MMC/SD Card 37 7 Using the EASYSHARE Camera Dock 39 EASYSHARE Camera Dock Package Contents 39 Installing the Dock Insert 40 Connecting the EASYSHARE Camera Dock 40 Installing the Battery Pack in the...
User Manual
Page 9
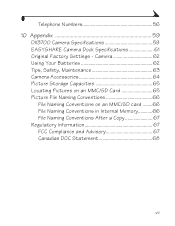
Camera 62 Using Your Batteries 62 Tips, Safety, Maintenance 63 Camera Accessories 64 Picture Storage Capacities 65 Locating Pictures on an MMC/SD Card 65 Picture File Naming Conventions 66 File Naming Conventions on an MMC/SD card ........66 File Naming Conventions in Internal Memory............66 File Naming Conventions After a Copy 67 Regulatory Information 67 FCC Compliance and Advisory 67 Canadian DOC Statement 68 vii Telephone Numbers 56 10 Appendix 59 DX3700 Camera Specifications 59 EASYSHARE Camera Dock Specifications 61 Original Factory Settings -
Camera 62 Using Your Batteries 62 Tips, Safety, Maintenance 63 Camera Accessories 64 Picture Storage Capacities 65 Locating Pictures on an MMC/SD Card 65 Picture File Naming Conventions 66 File Naming Conventions on an MMC/SD card ........66 File Naming Conventions in Internal Memory............66 File Naming Conventions After a Copy 67 Regulatory Information 67 FCC Compliance and Advisory 67 Canadian DOC Statement 68 vii Telephone Numbers 56 10 Appendix 59 DX3700 Camera Specifications 59 EASYSHARE Camera Dock Specifications 61 Original Factory Settings -

User Manual
Page 11
... or on your purchase of the KODAK EASYSHARE DX3700 Digital Camera. E-mail pictures to your pictures on the LCD screen and delete unwanted pictures. fix red-eye; What Can I Do With My Camera? Have fun! and much more. 1 Chapter 1 1 Getting Started Congratulations on an optional, removable MultiMedia (MMC) or Secure Digital (SD) card. Review Display your computer. crop...
... or on your purchase of the KODAK EASYSHARE DX3700 Digital Camera. E-mail pictures to your pictures on the LCD screen and delete unwanted pictures. fix red-eye; What Can I Do With My Camera? Have fun! and much more. 1 Chapter 1 1 Getting Started Congratulations on an optional, removable MultiMedia (MMC) or Secure Digital (SD) card. Review Display your computer. crop...

User Manual
Page 18
Forcing the card may damage your camera. Chapter 1 Inserting an Optional MMC/SD Card To insert a card: 1 Turn the camera off. 2 Open the card door. CAUTION: The card can only be inserted one way. See page 65 for storage capacities. 8 Close the door. Use only certified cards that carry the MultiMedia (MMC) or Secure Digital (SD) logo. Notched corner of card 3 Orient the card as shown. 4 Push the card into the slot to seat the connector.
Forcing the card may damage your camera. Chapter 1 Inserting an Optional MMC/SD Card To insert a card: 1 Turn the camera off. 2 Open the card door. CAUTION: The card can only be inserted one way. See page 65 for storage capacities. 8 Close the door. Use only certified cards that carry the MultiMedia (MMC) or Secure Digital (SD) logo. Notched corner of card 3 Orient the card as shown. 4 Push the card into the slot to seat the connector.

User Manual
Page 19
CAUTION: Do not insert or remove a card when the ready light is partially ejected, remove the card. Doing so may damage your pictures, card, or camera. 9 Chapter 1 To remove a card: 1 Turn the camera off. 2 Open the card door. 3 Push the end of the card in, then release it is blinking. When it .
CAUTION: Do not insert or remove a card when the ready light is partially ejected, remove the card. Doing so may damage your pictures, card, or camera. 9 Chapter 1 To remove a card: 1 Turn the camera off. 2 Open the card door. 3 Push the end of the card in, then release it is blinking. When it .

User Manual
Page 20
... 10 picture is stored on the card. You cannot copy pictures from a card to Review . The storage location icon indicates the location of the picture. - If no card is inserted, new pictures are stored in the camera, new pictures are stored on an MMC/SD card -picture is stored in internal memory..., then copy them to an MMC/SD card (see page 25). Chapter 1 Choosing Internal or Removable Memory...
... 10 picture is stored on the card. You cannot copy pictures from a card to Review . The storage location icon indicates the location of the picture. - If no card is inserted, new pictures are stored in the camera, new pictures are stored on an MMC/SD card -picture is stored in internal memory..., then copy them to an MMC/SD card (see page 25). Chapter 1 Choosing Internal or Removable Memory...

User Manual
Page 21
... take the picture. The ready light blinks green while the picture is blinking. Doing so may damage your subject using the viewfinder, or turn the camera on (see page 12) and use the LCD. 3 Press the Shutter button halfway down to set the exposure and focus. 4 Press the Shutter ...button completely down to charge before taking the next picture. CAUTION: Do not insert or remove an MMC/SD card when the ready light is being saved. The ready light blinks orange when the flash is recharging. Chapter 2 2 Taking Pictures Taking a Picture Mode ...
... take the picture. The ready light blinks green while the picture is blinking. Doing so may damage your subject using the viewfinder, or turn the camera on (see page 12) and use the LCD. 3 Press the Shutter button halfway down to set the exposure and focus. 4 Press the Shutter ...button completely down to charge before taking the next picture. CAUTION: Do not insert or remove an MMC/SD card when the ready light is being saved. The ready light blinks orange when the flash is recharging. Chapter 2 2 Taking Pictures Taking a Picture Mode ...

User Manual
Page 27
... Picture Location Best Better Good/2X Digital Zoom Quality Full battery Low battery Exhausted battery 17 The icons displayed with the pictures stored in the LCD Mode Selector 1 Slide the Mode selector to Review . If no card is present, the camera accesses the card. Viewing Pictures in your camera's internal memory or on an MMC...
... Picture Location Best Better Good/2X Digital Zoom Quality Full battery Low battery Exhausted battery 17 The icons displayed with the pictures stored in the LCD Mode Selector 1 Slide the Mode selector to Review . If no card is present, the camera accesses the card. Viewing Pictures in your camera's internal memory or on an MMC...

User Manual
Page 28
To delete pictures from a card, insert the card. m NONE: returns to normal magnification. Chapter 3 Magnifying Pictures 1 Slide the Mode selector to Review . 2 Press the buttons to display the desired picture. 3 Press Select to ... displayed picture, then displays the next available picture. 5 Press Select and follow the prompts. 18 Deleting Pictures To delete pictures from internal memory, remove the card. 1 Slide the Mode selector to Review . 2 Press the buttons to display the picture to be deleted. 3 Press the Delete button. 4 Highlight the Delete option: m ALL...
To delete pictures from a card, insert the card. m NONE: returns to normal magnification. Chapter 3 Magnifying Pictures 1 Slide the Mode selector to Review . 2 Press the buttons to display the desired picture. 3 Press Select to ... displayed picture, then displays the next available picture. 5 Press Select and follow the prompts. 18 Deleting Pictures To delete pictures from internal memory, remove the card. 1 Slide the Mode selector to Review . 2 Press the buttons to display the picture to be deleted. 3 Press the Delete button. 4 Highlight the Delete option: m ALL...

User Manual
Page 29
...Pictures for Printing Use the Print Order feature to select pictures on an MMC/SD card for pictures stored in internal memory. Resolution and Print Sizes Setting Sensor Resolution (pixels) Best... 2160 x 1440 Better 2160 x 1440 Best/Better (with 2X digital zoom) 1088 x 720 Best/Better (with 3X digital zoom) 720 x 480 Good 1088 x 720 Recommended Print Size (inches)* Up to 11...stored on subject. See your printer or print service guidelines, or visit http://www.kodak.com for further information. 19 Creating a Print Order 1 Slide the Mode selector to 4 x ...
...Pictures for Printing Use the Print Order feature to select pictures on an MMC/SD card for pictures stored in internal memory. Resolution and Print Sizes Setting Sensor Resolution (pixels) Best... 2160 x 1440 Better 2160 x 1440 Best/Better (with 2X digital zoom) 1088 x 720 Best/Better (with 3X digital zoom) 720 x 480 Good 1088 x 720 Recommended Print Size (inches)* Up to 11...stored on subject. See your printer or print service guidelines, or visit http://www.kodak.com for further information. 19 Creating a Print Order 1 Slide the Mode selector to 4 x ...

User Manual
Page 30
...press Select. Each picture from Internal Memory to Card see page 25 20 Press Select. 3 Select how long you turn the camera off and the television screen acts as the camera display. Video Out To run the slide show , press Select. The camera LCD turns off . 4 To cancel the ... 2 Refer to your television User's Guide for details on the camera LCD, a television screen, or any external video device equipped with a video input. Other Review Settings Feature Page Copy Pictures from internal memory or MMC/SD card is displayed once at the desired interval. Chapter 3 Running a Slide...
...press Select. Each picture from Internal Memory to Card see page 25 20 Press Select. 3 Select how long you turn the camera off and the television screen acts as the camera display. Video Out To run the slide show , press Select. The camera LCD turns off . 4 To cancel the ... 2 Refer to your television User's Guide for details on the camera LCD, a television screen, or any external video device equipped with a video input. Other Review Settings Feature Page Copy Pictures from internal memory or MMC/SD card is displayed once at the desired interval. Chapter 3 Running a Slide...

User Manual
Page 34
Press 24 Press Select. 4 Press the Select. Press Select. 3 Select All Pictures (applies to all pictures on MMC/SD card), Cancel Order, or Future Pictures (applies to highlight Print Order. Chapter 4 Print Order Before using this feature, ensure that an MMC/SD card is inserted in the camera. 1 Slide the Mode selector to Setup . 2 Press the buttons to highlight the Review Options icon, then the buttons to future pictures and leaves current pictures unchanged). buttons to select the desired number of prints.
Press 24 Press Select. 4 Press the Select. Press Select. 3 Select All Pictures (applies to all pictures on MMC/SD card), Cancel Order, or Future Pictures (applies to highlight Print Order. Chapter 4 Print Order Before using this feature, ensure that an MMC/SD card is inserted in the camera. 1 Slide the Mode selector to Setup . 2 Press the buttons to highlight the Review Options icon, then the buttons to future pictures and leaves current pictures unchanged). buttons to select the desired number of prints.

User Manual
Page 35
... then disappears when the pictures are copied. The information includes camera model and current firmware version. 25 Viewing Camera Information The About this feature, ensure that an MMC/SD card is inserted in the camera. 1 Slide the Mode selector to highlight About . buttons to... remove the pictures from a card to internal memory.) NOTE: Before using this Camera feature displays information about the camera. 1 Slide the Mode selector to Setup...
... then disappears when the pictures are copied. The information includes camera model and current firmware version. 25 Viewing Camera Information The About this feature, ensure that an MMC/SD card is inserted in the camera. 1 Slide the Mode selector to highlight About . buttons to... remove the pictures from a card to internal memory.) NOTE: Before using this Camera feature displays information about the camera. 1 Slide the Mode selector to Setup...

User Manual
Page 36
...the buttons to highlight the Format menu. 3 Highlight the Format option you want to use: m FORMAT CARD: erases all of the information on the LCD. You may need to format the camera's internal memory if it was used in a different device. When formatting is no way to undo ...the function. 26 m FORMAT INTERNAL: erases all of the information in the camera. CAUTION: Formatting erases everything from the internal memory or MMC/SD card. When the formatting is complete, the Setup menu is displayed. m CANCEL FORMAT: exits without erasing anything. 4 ...
...the buttons to highlight the Format menu. 3 Highlight the Format option you want to use: m FORMAT CARD: erases all of the information on the LCD. You may need to format the camera's internal memory if it was used in a different device. When formatting is no way to undo ...the function. 26 m FORMAT INTERNAL: erases all of the information in the camera. CAUTION: Formatting erases everything from the internal memory or MMC/SD card. When the formatting is complete, the Setup menu is displayed. m CANCEL FORMAT: exits without erasing anything. 4 ...

User Manual
Page 42
... MB of available hard disk space MACINTOSH System Requirements m PowerPC-based MACINTOSH computer with CD-ROM drive m Operating system 8.6, 9.x, X m Available USB port or MMC/SD card reader m Color display monitor with a minimum resolution of available hard disk space 32 thousands or millions of colors recommended) m 64 MB of available RAM; 100...
... MB of available hard disk space MACINTOSH System Requirements m PowerPC-based MACINTOSH computer with CD-ROM drive m Operating system 8.6, 9.x, X m Available USB port or MMC/SD card reader m Color display monitor with a minimum resolution of available hard disk space 32 thousands or millions of colors recommended) m 64 MB of available RAM; 100...

User Manual
Page 46
... acts as subfolders. m Double-click the camera icon in the My Computer window. m The Camera window opens and displays the camera internal memory and MMC/SD card as a removable drive. KODAK Camera Connection Software Online Help For information on the Finder menu bar, choose Camera → Camera Help. 36 Connect your camera to the computer (see page 65. m If...
... acts as subfolders. m Double-click the camera icon in the My Computer window. m The Camera window opens and displays the camera internal memory and MMC/SD card as a removable drive. KODAK Camera Connection Software Online Help For information on the Finder menu bar, choose Camera → Camera Help. 36 Connect your camera to the computer (see page 65. m If...

User Manual
Page 47
Chapter 6 Printing Your Pictures From KODAK Picture Software Print to your own prints at any KODAK Picture Maker kiosk. m Order prints online from the Kodak web site. 37 From an MMC/SD Card m Make your home printer with KODAK Premium Picture Paper. For recommended print sizes, see "Resolution and Print Sizes" on page 19.
Chapter 6 Printing Your Pictures From KODAK Picture Software Print to your own prints at any KODAK Picture Maker kiosk. m Order prints online from the Kodak web site. 37 From an MMC/SD Card m Make your home printer with KODAK Premium Picture Paper. For recommended print sizes, see "Resolution and Print Sizes" on page 19.


