
User Manual
Page 3
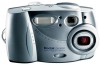
Product Overview Camera Front 1 2 3 4 5 1 Shutter button 2 Flash unit 3 Microphone 4 Light sensor 5 On / Off switch 6 7 8 9 10 6 Speaker 7 Viewfinder lens 8 Self Timer light 9 Lens with built-in cover 10 Audio/Video out / USB connector Camera Bottom 4 1 5 2 1 Camera Dock connector 2 Connector door (open) 3 Tripod mount socket 3 4 Eject button, for Picture Card 5 Battery door iii
Product Overview Camera Front 1 2 3 4 5 1 Shutter button 2 Flash unit 3 Microphone 4 Light sensor 5 On / Off switch 6 7 8 9 10 6 Speaker 7 Viewfinder lens 8 Self Timer light 9 Lens with built-in cover 10 Audio/Video out / USB connector Camera Bottom 4 1 5 2 1 Camera Dock connector 2 Connector door (open) 3 Tripod mount socket 3 4 Eject button, for Picture Card 5 Battery door iii

User Manual
Page 5
Table of Contents 1 Getting Started 1 What Can I Do With My KODAK DX3600 Zoom Digital Camera 1 What Can I Do With My Digital Pictures 1 Camera Package Contents 2 Attaching the Wrist Strap 3 Loading the Batteries 3 Inserting a Picture Card 4 Turning the Camera On and Off 5 Automatic Powerdown Saves Batteries 6 Setting the Clock 6 Checking the Battery Level 7 Mode Dial-Settings and Menus 8 Navigating Through the Menus...
Table of Contents 1 Getting Started 1 What Can I Do With My KODAK DX3600 Zoom Digital Camera 1 What Can I Do With My Digital Pictures 1 Camera Package Contents 2 Attaching the Wrist Strap 3 Loading the Batteries 3 Inserting a Picture Card 4 Turning the Camera On and Off 5 Automatic Powerdown Saves Batteries 6 Setting the Clock 6 Checking the Battery Level 7 Mode Dial-Settings and Menus 8 Navigating Through the Menus...
User Manual
Page 7
... 43 Formatting Memory or Picture Card 44 6 Installing the Software 45 Install the Software 45 Software Included With Your Camera 46 Computer System Requirements 47 7 Transferring Pictures and Videos 49 Before You Transfer Files to the Computer 49 Connecting ...and Videos 52 Transferring Your Pictures and Videos Manually ......... 53 Printing Your Pictures 54 8 Using the KODAK Camera Dock 55 Camera Dock Package Contents 55 Installing the Dock Insert 56 Connecting the Camera Dock 56 Installing the Battery Pack in the Camera 57 Docking the Camera 57 Charging the Battery Pack 58 vii
... 43 Formatting Memory or Picture Card 44 6 Installing the Software 45 Install the Software 45 Software Included With Your Camera 46 Computer System Requirements 47 7 Transferring Pictures and Videos 49 Before You Transfer Files to the Computer 49 Connecting ...and Videos 52 Transferring Your Pictures and Videos Manually ......... 53 Printing Your Pictures 54 8 Using the KODAK Camera Dock 55 Camera Dock Package Contents 55 Installing the Dock Insert 56 Connecting the Camera Dock 56 Installing the Battery Pack in the Camera 57 Docking the Camera 57 Charging the Battery Pack 58 vii

User Manual
Page 10
.... For details on a CD instead of in printed form. Chapter 1 Camera Package Contents The KODAK DX3600 Zoom Digital Camera is packaged with the following items. 3* 21 1 Camera 6** 2 Wrist strap 3 AA lithium batteries, or equivalent* 4 USB cable 5 Audio/Video cable (for viewing pictures and videos on a 4 5 television) 6 Dock insert** 7 User's Guide***, Quick Start Guide, and Software CD (not...
.... For details on a CD instead of in printed form. Chapter 1 Camera Package Contents The KODAK DX3600 Zoom Digital Camera is packaged with the following items. 3* 21 1 Camera 6** 2 Wrist strap 3 AA lithium batteries, or equivalent* 4 USB cable 5 Audio/Video cable (for viewing pictures and videos on a 4 5 television) 6 Dock insert** 7 User's Guide***, Quick Start Guide, and Software CD (not...

User Manual
Page 11
... can use in the direction of the arrow, then lift to make sure your camera. Loading the Batteries AA lithium batteries, or equivalent, are replaced with the KODAK Ni-MH Rechargeable Battery Pack. In that case, the AA batteries are included with a KODAK Camera Dock. Chapter 1 Attaching the Wrist Strap 1 Thread the short loop of the wrist strap...
... can use in the direction of the arrow, then lift to make sure your camera. Loading the Batteries AA lithium batteries, or equivalent, are replaced with the KODAK Ni-MH Rechargeable Battery Pack. In that case, the AA batteries are included with a KODAK Camera Dock. Chapter 1 Attaching the Wrist Strap 1 Thread the short loop of the wrist strap...

User Manual
Page 14
Chapter 1 Automatic Powerdown Saves Batteries The automatic powerdown features help extend battery life by turning off the camera when it . Press the arrow buttons to adjust the date and time settings. 4 Press Select to move through the fields. The time is displayed in ...imprint the date on your pictures (see page 24) or videos (see page 29). 1 Turn on the camera. 6 Sleep, QuickView on 5 seconds Deep Sleep 8 minutes Most camera circuits off Auto Off 3 hours All camera circuits off Turn the power switch off Press any button. This setting remains until you turn on the...
Chapter 1 Automatic Powerdown Saves Batteries The automatic powerdown features help extend battery life by turning off the camera when it . Press the arrow buttons to adjust the date and time settings. 4 Press Select to move through the fields. The time is displayed in ...imprint the date on your pictures (see page 24) or videos (see page 29). 1 Turn on the camera. 6 Sleep, QuickView on 5 seconds Deep Sleep 8 minutes Most camera circuits off Auto Off 3 hours All camera circuits off Turn the power switch off Press any button. This setting remains until you turn on the...

User Manual
Page 15
...) - Replace or recharge the batteries. Low -batteries soon need to make sure your camera operates dependably, do not use in your camera. 1 Turn on the camera. 2 If a battery symbol appears in the LCD, the batteries are low or exhausted. Don't miss an important picture because the camera batteries are too weak to power the camera. See page 81 for five...
...) - Replace or recharge the batteries. Low -batteries soon need to make sure your camera operates dependably, do not use in your camera. 1 Turn on the camera. 2 If a battery symbol appears in the LCD, the batteries are low or exhausted. Don't miss an important picture because the camera batteries are too weak to power the camera. See page 81 for five...

User Manual
Page 21
... Card Pictures Storage location remaining/ setting Video recording time available Magnification Date stamp Low battery Exhausted battery (blinking) 13 The icons displayed on the camera. Status bar 1 Turn the Mode dial to turn on the status screen represent the camera features that are active. Screen icons Status Bar Icons Best / Good Close up Self...
... Card Pictures Storage location remaining/ setting Video recording time available Magnification Date stamp Low battery Exhausted battery (blinking) 13 The icons displayed on the camera. Status bar 1 Turn the Mode dial to turn on the status screen represent the camera features that are active. Screen icons Status Bar Icons Best / Good Close up Self...

User Manual
Page 34
... image 3 To display the last picture or video taken in the LCD and begin Press Select recording. NOTE: In Video mode, the camera default is deleted from the camera. Previewing Your Video When the Preview feature is on, a live image and the status bar. 2 Frame your subject. 1 To turn..., turn off Preview at any time 26 Use the LCD instead of a video on . screen appears. 3 Highlight Yes, then press Select. To lengthen battery life, press Select to Video , then press Select. The video is Preview on the LCD immediately after you take a video. The LCD displays a live...
... image 3 To display the last picture or video taken in the LCD and begin Press Select recording. NOTE: In Video mode, the camera default is deleted from the camera. Previewing Your Video When the Preview feature is on, a live image and the status bar. 2 Frame your subject. 1 To turn..., turn off Preview at any time 26 Use the LCD instead of a video on . screen appears. 3 Highlight Yes, then press Select. To lengthen battery life, press Select to Video , then press Select. The video is Preview on the LCD immediately after you take a video. The LCD displays a live...
User Manual
Page 39
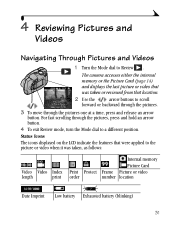
The camera accesses either the internal memory or the Picture Card (page 14) and displays the last picture or video that was taken or reviewed from that ... was taken, as follows: Video Video Index length print Internal memory Picture Card Print Protect Frame Picture or video order number location Date Imprint Low battery Exhausted battery (blinking) 31 For fast scrolling through the pictures one at a time, press and release an arrow button. 4 Reviewing Pictures and Videos Navigating Through Pictures...
The camera accesses either the internal memory or the Picture Card (page 14) and displays the last picture or video that was taken or reviewed from that ... was taken, as follows: Video Video Index length print Internal memory Picture Card Print Protect Frame Picture or video order number location Date Imprint Low battery Exhausted battery (blinking) 31 For fast scrolling through the pictures one at a time, press and release an arrow button. 4 Reviewing Pictures and Videos Navigating Through Pictures...

User Manual
Page 63
... your pictures to the camera. NOTE: A Dock insert, packaged with your camera. If a Camera Dock was not included with all KODAK DX-series cameras, is a rapid battery charger for the included Rechargeable Battery Pack, and supplies power to the computer. To keep the Battery Pack charged and the camera always ready to custom-fit your KODAK retail dealer or visit...
... your pictures to the camera. NOTE: A Dock insert, packaged with your camera. If a Camera Dock was not included with all KODAK DX-series cameras, is a rapid battery charger for the included Rechargeable Battery Pack, and supplies power to the computer. To keep the Battery Pack charged and the camera always ready to custom-fit your KODAK retail dealer or visit...

User Manual
Page 64
... pictures, charging the Battery Pack, and providing power to power and the computer. 1 2 3 1 Plug the labeled ( ) end of the USB cable into place. Make sure your camera, and the AC adapter that is included with a Dock insert, which is not in the Camera Dock cavity. 2...with your camera is used to custom-fit the camera to an external power source. Chapter 8 Installing the Dock Insert KODAK DX-series cameras are connecting to the camera. 56 Connecting the Camera Dock Connect the Camera Dock to your camera, contact Kodak Customer Support, see your type of the Camera Dock ...
... pictures, charging the Battery Pack, and providing power to power and the computer. 1 2 3 1 Plug the labeled ( ) end of the USB cable into place. Make sure your camera, and the AC adapter that is included with a Dock insert, which is not in the Camera Dock cavity. 2...with your camera is used to custom-fit the camera to an external power source. Chapter 8 Installing the Dock Insert KODAK DX-series cameras are connecting to the camera. 56 Connecting the Camera Dock Connect the Camera Dock to your camera, contact Kodak Customer Support, see your type of the Camera Dock ...

User Manual
Page 65
... when you receive it. IMPORTANT: The batteries in the Camera Dock. Chapter 8 Installing the Battery Pack in the Camera 1 Open the battery door on the bottom of the arrows, as illustrated. Kodak CAUTION: The Battery Pack can damage your pictures from the camera to transfer your camera. 3 Close the battery door. If the Battery Pack does not easily install, reposition it...
... when you receive it. IMPORTANT: The batteries in the Camera Dock. Chapter 8 Installing the Battery Pack in the Camera 1 Open the battery door on the bottom of the arrows, as illustrated. Kodak CAUTION: The Battery Pack can damage your pictures from the camera to transfer your camera. 3 Close the battery door. If the Battery Pack does not easily install, reposition it...

User Manual
Page 66
... with any other type of the camera batteries. m Charging stops if you receive it. 1 Turn off the camera. 2 Make sure the Battery Pack is left in the Camera Dock and push down to seat the connectors; If the camera is installed in the camera. 3 Place the camera in the camera requires charging, the Camera Dock light turns red after a few...
... with any other type of the camera batteries. m Charging stops if you receive it. 1 Turn off the camera. 2 Make sure the Battery Pack is left in the Camera Dock and push down to seat the connectors; If the camera is installed in the camera. 3 Place the camera in the camera requires charging, the Camera Dock light turns red after a few...

User Manual
Page 67
... transfer is complete, the Camera Dock begins to monitor battery power and then begins charging whenever necessary. When Using a Tripod For stability when using a tripod, remove the camera from your camera to your pictures are transferred. You can work with your pictures on the bottom of the camera. 59 m Then, KODAK Picture Software opens so you...
... transfer is complete, the Camera Dock begins to monitor battery power and then begins charging whenever necessary. When Using a Tripod For stability when using a tripod, remove the camera from your camera to your pictures are transferred. You can work with your pictures on the bottom of the camera. 59 m Then, KODAK Picture Software opens so you...
User Manual
Page 70
... or Close that software before similar software runs starting the KODAK Software. Camera power is a problem with the camera. ports to www.kodak.com and click Service and Support. Install the software (page 45). There is off guide to camera and securely connected. Battery is not charged. There are too many Disconnect your laptop user's laptops...
... or Close that software before similar software runs starting the KODAK Software. Camera power is a problem with the camera. ports to www.kodak.com and click Service and Support. Install the software (page 45). There is off guide to camera and securely connected. Battery is not charged. There are too many Disconnect your laptop user's laptops...

User Manual
Page 72
... be turned off.) camera is the first time you Reset the clock (page 6). five seconds. 64 appears automatically turned on . Delete pictures from the location you are copying to (internal memory or the Picture Card). or the batteries have been removed for it back on. Chapter 9 LCD ...Messages Message Cause Solution No memory card, Files There is still displayed, call for service (page 74). Camera needs service A camera error has #xxx occurred. If the error message is...
... be turned off.) camera is the first time you Reset the clock (page 6). five seconds. 64 appears automatically turned on . Delete pictures from the location you are copying to (internal memory or the Picture Card). or the batteries have been removed for it back on. Chapter 9 LCD ...Messages Message Cause Solution No memory card, Files There is still displayed, call for service (page 74). Camera needs service A camera error has #xxx occurred. If the error message is...

User Manual
Page 74
... Turn the power switch off ; installed. Replace or recharge the batteries (page 3). 66 Alkaline batteries were installed in the camera. lens does not retract. In that case, turn off , remove the alkaline batteries, and replace with available memory. blinking. If the power switch ... reinstall the turn back on . Camera does not Battery is on when you replace the batteries, the camera may not turn on . Chapter 9 Camera Problem Cause Solution Shutter button does Camera is to your internal memory is not charged. The camera is Wait until the light stops ...
... Turn the power switch off ; installed. Replace or recharge the batteries (page 3). 66 Alkaline batteries were installed in the camera. lens does not retract. In that case, turn off , remove the alkaline batteries, and replace with available memory. blinking. If the power switch ... reinstall the turn back on . Camera does not Battery is on when you replace the batteries, the camera may not turn on . Chapter 9 Camera Problem Cause Solution Shutter button does Camera is to your internal memory is not charged. The camera is Wait until the light stops ...
User Manual
Page 77
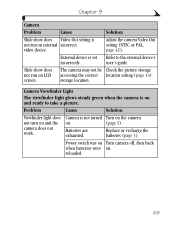
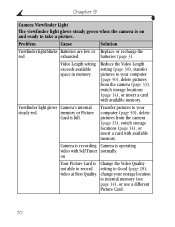
... 42). screen. user's guide. storage location. Replace or recharge the batteries (page 3). Power switch was on Turn camera off, then back when batteries were on and ready to the external device's incorrectly. Batteries are exhausted. Camera Viewfinder Light The viewfinder light glows steady green when the camera is set Refer to take a picture. video device. Chapter...
... 42). screen. user's guide. storage location. Replace or recharge the batteries (page 3). Power switch was on Turn camera off, then back when batteries were on and ready to the external device's incorrectly. Batteries are exhausted. Camera Viewfinder Light The viewfinder light glows steady green when the camera is set Refer to take a picture. video device. Chapter...
User Manual
Page 78
... insert a card with available memory. Problem Cause Solution Viewfinder light blinks Batteries are low or Replace or recharge the red. batteries (page 3). Camera is recording Camera is on Your Picture Card is full. exhausted. change your computer (page 50), delete pictures from the camera (page 33), switch storage locations (page 14), or insert a card with...
... insert a card with available memory. Problem Cause Solution Viewfinder light blinks Batteries are low or Replace or recharge the red. batteries (page 3). Camera is recording Camera is on Your Picture Card is full. exhausted. change your computer (page 50), delete pictures from the camera (page 33), switch storage locations (page 14), or insert a card with...


