
User Manual
Page 6
...Reviewing Your Pictures 23 Viewing Pictures on the LCD 23 Navigating Through the Pictures 24 Magnifying Pictures 24 Deleting Pictures 25 Selecting Pictures for Automatic Printing 25 Protecting Pictures From Deletion 27 Running a Slide Show 27 Copying Pictures 29 Viewing Picture Information 30 4 Customizing Your Camera... Settings 31 Adjusting LCD Screen Brightness 31 Setting Video Out 32 Selecting a Language 33 Viewing Camera Information 33 Formatting Memory or Picture Card 34 5 Installing the ...
...Reviewing Your Pictures 23 Viewing Pictures on the LCD 23 Navigating Through the Pictures 24 Magnifying Pictures 24 Deleting Pictures 25 Selecting Pictures for Automatic Printing 25 Protecting Pictures From Deletion 27 Running a Slide Show 27 Copying Pictures 29 Viewing Picture Information 30 4 Customizing Your Camera... Settings 31 Adjusting LCD Screen Brightness 31 Setting Video Out 32 Selecting a Language 33 Viewing Camera Information 33 Formatting Memory or Picture Card 34 5 Installing the ...
User Manual
Page 9
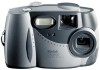
... special effects to your own home printer; The internal memory is included on the LCD screen, keep special pictures. What Can I Do With My Camera? Capture -in Review mode, display your pictures on the KODAK Picture Software CD, then: Transfer-automatically transfer your pictures to your pictures, make prints yourself at... you want, magnify, protect, run a slide show , fix red-eye, crop and rotate, and much more. 1 make a custom slide show of all of the KODAK DX3500 Digital Camera-the camera that is ideal as a safe place to your local photo retailer for professional printing.
... special effects to your own home printer; The internal memory is included on the LCD screen, keep special pictures. What Can I Do With My Camera? Capture -in Review mode, display your pictures on the KODAK Picture Software CD, then: Transfer-automatically transfer your pictures to your pictures, make prints yourself at... you want, magnify, protect, run a slide show , fix red-eye, crop and rotate, and much more. 1 make a custom slide show of all of the KODAK DX3500 Digital Camera-the camera that is ideal as a safe place to your local photo retailer for professional printing.
User Manual
Page 15
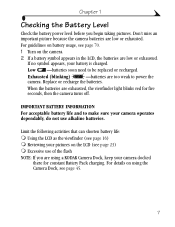
Replace or recharge the batteries. For details on using a KODAK Camera Dock, keep your battery is charged. Low -batteries soon need to power the camera. Limit the following activities that can shorten battery life: m Using the LCD as the viewfinder (see page 16) m Reviewing your pictures on the camera. 2 If a battery symbol appears in the LCD...
Replace or recharge the batteries. For details on using a KODAK Camera Dock, keep your battery is charged. Low -batteries soon need to power the camera. Limit the following activities that can shorten battery life: m Using the LCD as the viewfinder (see page 16) m Reviewing your pictures on the camera. 2 If a battery symbol appears in the LCD...
User Manual
Page 16
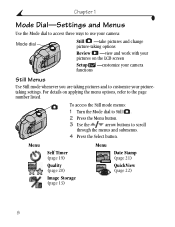
... to scroll through the menus and submenus. 4 Press the Select button. For details on the LCD screen Setup -customize your camera functions Still Menus Use Still mode whenever you are taking options Review -view and work with your picturetaking settings. Menu Self Timer (page 19) Quality (page 20) Image Storage (page 13...
... to scroll through the menus and submenus. 4 Press the Select button. For details on the LCD screen Setup -customize your camera functions Still Menus Use Still mode whenever you are taking options Review -view and work with your picturetaking settings. Menu Self Timer (page 19) Quality (page 20) Image Storage (page 13...
User Manual
Page 17
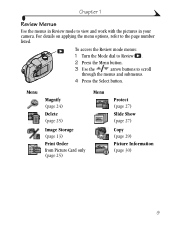
Menu Magnify (page 24) Delete (page 25) Image Storage (page 13) Print Order from Picture Card only (page 25) Menu Protect (page 27) Slide Show (page 27) Copy (page 29) Picture Information (page 30) 9 For details on applying the menu options, refer to view and work with the pictures in Review mode to the page number listed. Chapter 1 Review Menus Use the menus in your camera. To access the Review mode menus: 1 Turn the Mode dial to Review . 2 Press the Menu button. 3 Use the arrow buttons to scroll through the menus and submenus. 4 Press the Select button.
Menu Magnify (page 24) Delete (page 25) Image Storage (page 13) Print Order from Picture Card only (page 25) Menu Protect (page 27) Slide Show (page 27) Copy (page 29) Picture Information (page 30) 9 For details on applying the menu options, refer to view and work with the pictures in Review mode to the page number listed. Chapter 1 Review Menus Use the menus in your camera. To access the Review mode menus: 1 Turn the Mode dial to Review . 2 Press the Menu button. 3 Use the arrow buttons to scroll through the menus and submenus. 4 Press the Select button.

User Manual
Page 19
... button to Setup. Select button 3 In Still and Review modes, press the Menu button to turn the Mode dial to display the menus. The name of the selected menu is the same in the top right corner of the camera modes. Chapter 1 Navigating Through The Menus The method ...of moving through the menus and submenu options. MENU SELECT Additional selections In Review mode, the menus are automatically displayed when you turn off the menus. 11...
... button to Setup. Select button 3 In Still and Review modes, press the Menu button to turn the Mode dial to display the menus. The name of the selected menu is the same in the top right corner of the camera modes. Chapter 1 Navigating Through The Menus The method ...of moving through the menus and submenu options. MENU SELECT Additional selections In Review mode, the menus are automatically displayed when you turn off the menus. 11...
User Manual
Page 21
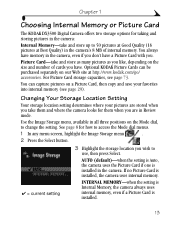
... Card storage capacities, see page 29). You can be purchased separately on a Picture Card, then copy and save your pictures are in Review mode. Use the Image Storage menu, available in all three positions on the size and number of internal memory. AUTO (default)-when the...you like, depending on the Mode dial, to change the setting. Chapter 1 Choosing Internal Memory or Picture Card The KODAK DX3500 Digital Camera offers two storage options for taking and storing pictures in the camera: Internal Memory-take and store up to 50 pictures at Good Quality (16 pictures at http://www...
... Card storage capacities, see page 29). You can be purchased separately on a Picture Card, then copy and save your pictures are in Review mode. Use the Image Storage menu, available in all three positions on the size and number of internal memory. AUTO (default)-when the...you like, depending on the Mode dial, to change the setting. Chapter 1 Choosing Internal Memory or Picture Card The KODAK DX3500 Digital Camera offers two storage options for taking and storing pictures in the camera: Internal Memory-take and store up to 50 pictures at Good Quality (16 pictures at http://www...
User Manual
Page 22
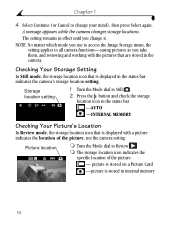
...storage location icon that are stored in effect until you take them, and reviewing and working with a picture indicates the location of the picture. - Storage location setting 1 Turn the Mode dial to all camera functions-saving pictures as you change your mind), then press Select again. Chapter... 1 4 Select Continue (or Cancel to Review . NOTE: No matter which mode you use to access the Image Storage menu,...
...storage location icon that are stored in effect until you take them, and reviewing and working with a picture indicates the location of the picture. - Storage location setting 1 Turn the Mode dial to all camera functions-saving pictures as you change your mind), then press Select again. Chapter... 1 4 Select Continue (or Cancel to Review . NOTE: No matter which mode you use to access the Image Storage menu,...

User Manual
Page 31
... the LCD m Turn the Mode dial to Still or Setup . The camera accesses either the internal memory or the Picture Card (page 13) and displays the last picture that was taken or reviewed from that location. 3 Reviewing Your Pictures Use the Review setting on the Mode dial to display and work with the picture...
... the LCD m Turn the Mode dial to Still or Setup . The camera accesses either the internal memory or the Picture Card (page 13) and displays the last picture that was taken or reviewed from that location. 3 Reviewing Your Pictures Use the Review setting on the Mode dial to display and work with the picture...

User Manual
Page 32
Magnifying Pictures Use the Magnify feature to zoom in to two times magnification and navigate to Review the Menu button. 2 Highlight the Magnify menu press the Select button. This feature is ideal for checking detail on the LCD. Chapter 3 Navigating Through the ...
Magnifying Pictures Use the Magnify feature to zoom in to two times magnification and navigate to Review the Menu button. 2 Highlight the Magnify menu press the Select button. This feature is ideal for checking detail on the LCD. Chapter 3 Navigating Through the ...
User Manual
Page 33
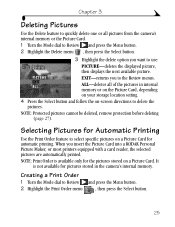
ALL-deletes all pictures from the camera's internal memory or the Picture Card. 1 Turn the Mode dial to Review and press the Menu button. 2 Highlight the Delete menu , then press the Select button. 3 Highlight the delete option you to the Review menus. NOTE: Protected pictures cannot be deleted, remove ...the pictures. Chapter 3 Deleting Pictures Use the Delete feature to quickly delete one or all of the pictures in the camera's internal memory. EXIT-returns you want to Review and press the Menu button. 2 Highlight the Print Order menu , then press the Select button. 25 When you ...
ALL-deletes all pictures from the camera's internal memory or the Picture Card. 1 Turn the Mode dial to Review and press the Menu button. 2 Highlight the Delete menu , then press the Select button. 3 Highlight the delete option you to the Review menus. NOTE: Protected pictures cannot be deleted, remove ...the pictures. Chapter 3 Deleting Pictures Use the Delete feature to quickly delete one or all of the pictures in the camera's internal memory. EXIT-returns you want to Review and press the Menu button. 2 Highlight the Print Order menu , then press the Select button. 25 When you ...
User Manual
Page 35
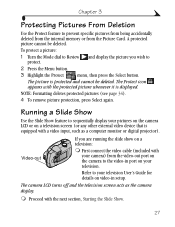
...protected pictures (see page 34). 4 To remove picture protection, press Select again. To protect a picture: 1 Turn the Mode dial to Review and display the picture you are running the slide show on a television: m First connect the video cable (included with the protected picture ...whenever it is protected and cannot be deleted. The camera LCD turns off and the television screen acts as a computer monitor or digital projector). A protected picture cannot be deleted. Video-out If you wish to the video-in setup. m...
...protected pictures (see page 34). 4 To remove picture protection, press Select again. To protect a picture: 1 Turn the Mode dial to Review and display the picture you are running the slide show on a television: m First connect the video cable (included with the protected picture ...whenever it is protected and cannot be deleted. The camera LCD turns off and the television screen acts as a computer monitor or digital projector). A protected picture cannot be deleted. Video-out If you wish to the video-in setup. m...

User Manual
Page 36
... is running, the slide show stops. To scroll through the seconds menu faster, hold an arrow button down. 3 Press the Select button. Then the camera returns to Review and press the Menu button. 2 Highlight the Slide Show menu , then press the Select button. 3 Highlight Begin Show, then press Select. NOTE: If you... remains until you change it begins again with the first picture in your picture storage location) are each displayed once, in the order in the camera (from internal memory or Picture Card, depending on your...
... is running, the slide show stops. To scroll through the seconds menu faster, hold an arrow button down. 3 Press the Select button. Then the camera returns to Review and press the Menu button. 2 Highlight the Slide Show menu , then press the Select button. 3 Highlight Begin Show, then press Select. NOTE: If you... remains until you change it begins again with the first picture in your picture storage location) are each displayed once, in the order in the camera (from internal memory or Picture Card, depending on your...
User Manual
Page 37
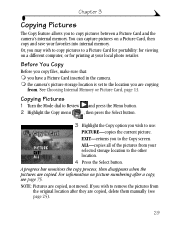
... for portability: for printing at your local photo retailer. m the camera's picture storage location is set to remove the pictures from the original location after a copy, see page 25). 29 Copying Pictures 1 Turn the Mode dial to Review and press the Menu button. 2 Highlight the Copy menu , then...delete them manually (see page 75. Before You Copy Before you copy files, make sure that: m you have a Picture Card inserted in the camera. A progress bar monitors the copy process, then disappears when the pictures are copied, not moved. ALL-copies all of the pictures from . See...
... for portability: for printing at your local photo retailer. m the camera's picture storage location is set to remove the pictures from the original location after a copy, see page 25). 29 Copying Pictures 1 Turn the Mode dial to Review and press the Menu button. 2 Highlight the Copy menu , then...delete them manually (see page 75. Before You Copy Before you copy files, make sure that: m you have a Picture Card inserted in the camera. A progress bar monitors the copy process, then disappears when the pictures are copied, not moved. ALL-copies all of the pictures from . See...

User Manual
Page 38
The information about each picture stored in your camera. 1 Turn the Mode dial to display the previous/next picture, with that picture's information. 4 To exit Picture Info, press the Select button. 30 Chapter 3 Viewing ... includes: file name, location of the file (Directory), date and time the picture was taken, and the picture's quality setting. 3 Press the arrow buttons to Review and press the Menu button. 2 Highlight the Picture Info menu , then press the Select button.
The information about each picture stored in your camera. 1 Turn the Mode dial to display the previous/next picture, with that picture's information. 4 To exit Picture Info, press the Select button. 30 Chapter 3 Viewing ... includes: file name, location of the file (Directory), date and time the picture was taken, and the picture's quality setting. 3 Press the arrow buttons to Review and press the Menu button. 2 Highlight the Picture Info menu , then press the Select button.

User Manual
Page 49
.... Guided Transfer lets you can bypass the auto start automatically, you review each picture, give it a name, and select a destination folder on your pictures are transferred, Picture Transfer Software closes and KODAK Picture Software opens. For this and other detailed information on how to... a WINDOWS-based computer-right-click the Picture Transfer icon on a MACINTOSH Computer m Select the Automatic Transfer radio button, then click Transfer. KODAK Picture Transfer Software Online Help If you 'd like to work with your pictures: Edit m add special effects, make a custom slide show,...
.... Guided Transfer lets you can bypass the auto start automatically, you review each picture, give it a name, and select a destination folder on your pictures are transferred, Picture Transfer Software closes and KODAK Picture Software opens. For this and other detailed information on how to... a WINDOWS-based computer-right-click the Picture Transfer icon on a MACINTOSH Computer m Select the Automatic Transfer radio button, then click Transfer. KODAK Picture Transfer Software Online Help If you 'd like to work with your pictures: Edit m add special effects, make a custom slide show,...
User Manual
Page 62
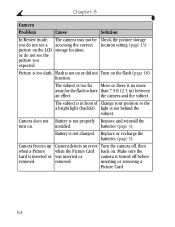
...is not on or did not Turn on the LCD storage location. installed. Camera freezes up Camera detects an error Turn the camera off before removed. Chapter 8 Camera Problem Cause Solution In Review mode, The camera may not be Check the picture storage you do not see a accessing the ...correct location setting (page 13). picture on the flash (page 18). the camera and the subject. The subject ...
...is not on or did not Turn on the LCD storage location. installed. Camera freezes up Camera detects an error Turn the camera off before removed. Chapter 8 Camera Problem Cause Solution In Review mode, The camera may not be Check the picture storage you do not see a accessing the ...correct location setting (page 13). picture on the flash (page 18). the camera and the subject. The subject ...
User Manual
Page 88
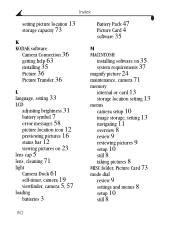
Index setting picture location 13 storage capacity 73 K KODAK software Camera Connection 36 getting help 63 installing 35 Picture 36 Picture Transfer 36 L language, setting 33 LCD adjusting brightness 31 battery symbol 7 error messages 58...Picture Card 4 software 35 M MACINTOSH installing software on 35 system requirements 37 magnify picture 24 maintenance, camera 71 memory internal or card 13 storage location setting 13 menus camera setup 10 image storage, setting 13 navigating 11 overview 8 review 9 reviewing pictures 9 setup 10 still 8 taking pictures 8 MISC folder, Picture Card 73 mode dial...
Index setting picture location 13 storage capacity 73 K KODAK software Camera Connection 36 getting help 63 installing 35 Picture 36 Picture Transfer 36 L language, setting 33 LCD adjusting brightness 31 battery symbol 7 error messages 58...Picture Card 4 software 35 M MACINTOSH installing software on 35 system requirements 37 magnify picture 24 maintenance, camera 71 memory internal or card 13 storage location setting 13 menus camera setup 10 image storage, setting 13 navigating 11 overview 8 review 9 reviewing pictures 9 setup 10 still 8 taking pictures 8 MISC folder, Picture Card 73 mode dial...

User Manual
Page 89
Index modes review 9 setup 10 still 8 monitor, requirements 37 N navigating menus 11 pictures 24 NTSC, video out setting 32 O overview, camera menus 8 P package contents camera 2 Camera Dock 45 PAL, video out setting 32 photo paper, purchasing 72 Picture Card file name conventions 74 file structure 73 formatting 34 inserting 4 picture location ... 30 locating in memory 74 locating on computer 40 locating on Picture Card 74 magnifying 24 navigating 24 printing 43 protecting 27 quality, setting 20 reviewing 23 selecting for printing 25 81
Index modes review 9 setup 10 still 8 monitor, requirements 37 N navigating menus 11 pictures 24 NTSC, video out setting 32 O overview, camera menus 8 P package contents camera 2 Camera Dock 45 PAL, video out setting 32 photo paper, purchasing 72 Picture Card file name conventions 74 file structure 73 formatting 34 inserting 4 picture location ... 30 locating in memory 74 locating on computer 40 locating on Picture Card 74 magnifying 24 navigating 24 printing 43 protecting 27 quality, setting 20 reviewing 23 selecting for printing 25 81

User Manual
Page 90
...camera on 5 powerdown, automatic 6 preview pictures 16 print orders 25 printing from a Picture Card 43 from Picture Software 43 with print orders 25 protecting pictures 27 red-eye, flash 18 regulatory information 75, 76 replacing batteries 70 requirements MACINTOSH system 37 WINDOWS-based system 37 resolution, setting 20 review... mode dial 9 mode, using 23 reviewing pictures deleting 25 for printing 25 magnify 24 menus 9 on LCD 23...service and support fax numbers 63 Kodak web site 63 telephone numbers 64 82
...camera on 5 powerdown, automatic 6 preview pictures 16 print orders 25 printing from a Picture Card 43 from Picture Software 43 with print orders 25 protecting pictures 27 red-eye, flash 18 regulatory information 75, 76 replacing batteries 70 requirements MACINTOSH system 37 WINDOWS-based system 37 resolution, setting 20 review... mode dial 9 mode, using 23 reviewing pictures deleting 25 for printing 25 magnify 24 menus 9 on LCD 23...service and support fax numbers 63 Kodak web site 63 telephone numbers 64 82


