
Extended User Guide
Page 6
Table of contents 1 1 Setting up your camera 1 Charging the battery (approximately 1 hour 1 Inserting a MICROSD or MICROSDHC Card 2 Connecting the strap 3 Turning on the camera 4 Setting the language, date/time 4 2 Using your camera 5 Taking videos and pictures 5 Reviewing, deleting pictures and videos 6 Changing settings 7 Transferring, editing, sharing online 8 3 Getting help 9 Troubleshooting 9 Getting help on the Web 11 4 Appendix 12 Specifications 12 Safety ...13 Care and maintenance 14 Limited warranty 14 Regulatory compliance 16 iv www.kodak.com/go/support
Table of contents 1 1 Setting up your camera 1 Charging the battery (approximately 1 hour 1 Inserting a MICROSD or MICROSDHC Card 2 Connecting the strap 3 Turning on the camera 4 Setting the language, date/time 4 2 Using your camera 5 Taking videos and pictures 5 Reviewing, deleting pictures and videos 6 Changing settings 7 Transferring, editing, sharing online 8 3 Getting help 9 Troubleshooting 9 Getting help on the Web 11 4 Appendix 12 Specifications 12 Safety ...13 Care and maintenance 14 Limited warranty 14 Regulatory compliance 16 iv www.kodak.com/go/support
Extended User Guide
Page 8
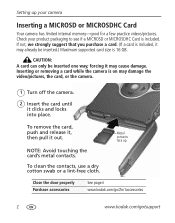
...2 www.kodak.com/go/support CAUTION: A card can only be inserted.) Maximum supported card size is included, it may already be inserted one way; Metal contacts face up your product packaging to see if a MICROSD or MICROSDHC Card is on may damage the video/pictures, the card, or the camera. 1 ...Turn off the camera. 2 Insert the card until it out. forcing it may cause damage. To clean the contacts, use a dry cotton swab...
...2 www.kodak.com/go/support CAUTION: A card can only be inserted.) Maximum supported card size is included, it may already be inserted one way; Metal contacts face up your product packaging to see if a MICROSD or MICROSDHC Card is on may damage the video/pictures, the card, or the camera. 1 ...Turn off the camera. 2 Insert the card until it out. forcing it may cause damage. To clean the contacts, use a dry cotton swab...
Extended User Guide
Page 11
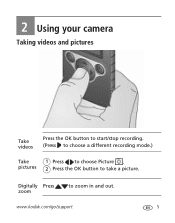
pictures 2 Press the OK button to zoom in and out. Digitally Press zoom to take a picture. www.kodak.com/go/support 5 2 Using your camera Taking videos and pictures Take videos Press the OK button to start/stop recording. (Press to choose a different recording mode.) Take 1 Press to choose Picture .
pictures 2 Press the OK button to zoom in and out. Digitally Press zoom to take a picture. www.kodak.com/go/support 5 2 Using your camera Taking videos and pictures Take videos Press the OK button to start/stop recording. (Press to choose a different recording mode.) Take 1 Press to choose Picture .
Extended User Guide
Page 12
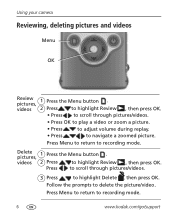
.... Press to scroll through pictures/videos. • Press OK to play a video or zoom a picture. • Press to adjust volume during replay. • Press to recording mode. Using your camera Reviewing, deleting pictures and videos Menu OK Review pictures, 1 ...Press the Menu button . Press Menu to return to highlight Review , then press OK. videos 2 Press to recording mode. 6 www.kodak...
.... Press to scroll through pictures/videos. • Press OK to play a video or zoom a picture. • Press to adjust volume during replay. • Press to recording mode. Using your camera Reviewing, deleting pictures and videos Menu OK Review pictures, 1 ...Press the Menu button . Press Menu to return to highlight Review , then press OK. videos 2 Press to recording mode. 6 www.kodak...
Extended User Guide
Page 14
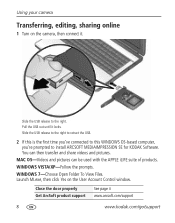
... pictures can then transfer and share videos and pictures. Launch MI.exe, then click Yes on the camera, then connect it locks. Slide the USB release to the right to retract the USB. 2 If this is the first time you've connected to .../XP-Follow the prompts. Close the door properly Get ArcSoft product support See page ii www.arcsoft.com/support 8 www.kodak.com/go/support Pull the USB out until it . Using your camera Transferring, editing, sharing online 1 Turn on the User Account Control window. Slide the USB release to install ARCSOFT MEDIAIMPRESSION...
... pictures can then transfer and share videos and pictures. Launch MI.exe, then click Yes on the camera, then connect it locks. Slide the USB release to the right to retract the USB. 2 If this is the first time you've connected to .../XP-Follow the prompts. Close the door properly Get ArcSoft product support See page ii www.arcsoft.com/support 8 www.kodak.com/go/support Pull the USB out until it . Using your camera Transferring, editing, sharing online 1 Turn on the User Account Control window. Slide the USB release to install ARCSOFT MEDIAIMPRESSION...
Extended User Guide
Page 16
... help Problem Solution Camera will not turn on a computer. ■ Use ARCSOFT MEDIAIMPRESSION SE for KODAK Software for to their support sites.) KODAK Software. Go to www.kodak.com/go/support and click Step-by-Step Solutions & Repair. 10 www.kodak.com/go/support Videos are blurry. ■... Ensure that the computer system requirements are met. NOTE: If problems persist, go MEDIAIMPRESSION SE for video playback (see page 8). ■ Ensure that the battery is charged. ■ Ensure the camera is at least 1 m (3.3 ft) from the lens. Problems with ARCSOFT ■ Go to ...
... help Problem Solution Camera will not turn on a computer. ■ Use ARCSOFT MEDIAIMPRESSION SE for KODAK Software for to their support sites.) KODAK Software. Go to www.kodak.com/go/support and click Step-by-Step Solutions & Repair. 10 www.kodak.com/go/support Videos are blurry. ■... Ensure that the computer system requirements are met. NOTE: If problems persist, go MEDIAIMPRESSION SE for video playback (see page 8). ■ Ensure that the battery is charged. ■ Ensure the camera is at least 1 m (3.3 ft) from the lens. Problems with ARCSOFT ■ Go to ...
Extended User Guide
Page 19
...substances included on the candidate list according to higher temperatures. If the LCD breaks, do not expose camera to article 59(1) of Regulation (EC) No. 1907/2006 (REACH). Contact Kodak customer support. ■ The use of an accessory that battery fluid leaks onto your skin, ....kodak.com/go to qualified service personnel. The use of controls, adjustments, or procedures other than those specified herein may cause fire, electric shock, or injury. For approved accessories, go /support 13 in-camera charging via USB connector Battery life-Approximately 85 minutes in VGA video ...
...substances included on the candidate list according to higher temperatures. If the LCD breaks, do not expose camera to article 59(1) of Regulation (EC) No. 1907/2006 (REACH). Contact Kodak customer support. ■ The use of an accessory that battery fluid leaks onto your skin, ....kodak.com/go to qualified service personnel. The use of controls, adjustments, or procedures other than those specified herein may cause fire, electric shock, or injury. For approved accessories, go /support 13 in-camera charging via USB connector Battery life-Approximately 85 minutes in VGA video ...
Extended User Guide
Page 25
..., setting, 4 connecting the strap, 3 connecting to a computer, 8 D date setting, 4 deleting pictures, videos, 6 digital zoom, 5 disposal, recycling, 14 E erase pictures, videos, 6 H help, Web links, troubleshooting, 9 www.kodak.com/go/support 1 I icons, iii installing software, 8 K Kodak Web sites, 9 L lens, cleaning, 14 loading, card, 2 M maintenance, camera, 14 MICROD/SDHC card loading, 2 microphone, i O on/off, 4 P pictures deleting, 6 reviewing, 6 taking...
..., setting, 4 connecting the strap, 3 connecting to a computer, 8 D date setting, 4 deleting pictures, videos, 6 digital zoom, 5 disposal, recycling, 14 E erase pictures, videos, 6 H help, Web links, troubleshooting, 9 www.kodak.com/go/support 1 I icons, iii installing software, 8 K Kodak Web sites, 9 L lens, cleaning, 14 loading, card, 2 M maintenance, camera, 14 MICROD/SDHC card loading, 2 microphone, i O on/off, 4 P pictures deleting, 6 reviewing, 6 taking...
Extended User Guide
Page 26
Index S setting date and time, 4 setting up the camera, 1 settings, camera, 7 sharing online, 8 software, installing, 8 specifications, 12 status icons, iii strap, 3 T taking pictures, videos, 5 time and date, setting, 4 tips, care, & maintenance, 14 transferring videos, 8 troubleshooting, 9 turning on/off camera, 4 U URLs, Kodak Web sites, 9 USB connection, 8 release, i V videos deleting, 6 reviewing, 6 taking, 5 W warranty, 14 Z zoom, using, 5 20 www.kodak.com/go/support
Index S setting date and time, 4 setting up the camera, 1 settings, camera, 7 sharing online, 8 software, installing, 8 specifications, 12 status icons, iii strap, 3 T taking pictures, videos, 5 time and date, setting, 4 tips, care, & maintenance, 14 transferring videos, 8 troubleshooting, 9 turning on/off camera, 4 U URLs, Kodak Web sites, 9 USB connection, 8 release, i V videos deleting, 6 reviewing, 6 taking, 5 W warranty, 14 Z zoom, using, 5 20 www.kodak.com/go/support


