
Extended user guide
Page 1
KODAK PLAYSPORT Video Camera Extended user guide Model Zx3 www.kodak.com For interactive tutorials: www.kodak.com/go/howto For help with your camera: www.kodak.com/go/support
KODAK PLAYSPORT Video Camera Extended user guide Model Zx3 www.kodak.com For interactive tutorials: www.kodak.com/go/howto For help with your camera: www.kodak.com/go/support
Extended user guide
Page 4
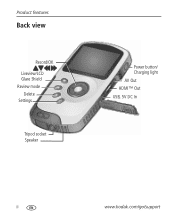
Product features Back view Record/OK Liveview/LCD Glare Shield Review mode Delete Settings Tripod socket Speaker Power button/ Charging light AV Out HDMI™ Out USB, 5V DC In ii www.kodak.com/go/support
Product features Back view Record/OK Liveview/LCD Glare Shield Review mode Delete Settings Tripod socket Speaker Power button/ Charging light AV Out HDMI™ Out USB, 5V DC In ii www.kodak.com/go/support

Extended user guide
Page 5
Understanding the status icons Video length Recording Recording Product features Capture mode Underwater mode Elapsed time Playback Zoom Battery level (or DC-In connected) No card inserted Video length Volume Video/picture number (or direction/speed) Battery level (or DC-In connected) Card inserted See important Alert icons see page 14 www.kodak.com/go/support iii
Understanding the status icons Video length Recording Recording Product features Capture mode Underwater mode Elapsed time Playback Zoom Battery level (or DC-In connected) No card inserted Video length Volume Video/picture number (or direction/speed) Battery level (or DC-In connected) Card inserted See important Alert icons see page 14 www.kodak.com/go/support iii

Extended user guide
Page 6
... 1 1 Setting up your camera 1 Charging the battery (approximately 2 hours 1 Charging using external charger or USB 2 Inserting an SD or SDHC Card 3 Connecting a strap 4 2 Using your camera 5 Turning on the camera 5 Setting the date/time 5 Recording videos, taking pictures 6 Playing videos 7 Transferring, editing, sharing online 8 Deleting videos/pictures 9 Viewing on a TV 10 Accessing the settings menu 11 Using the camera under water 12 Using the optional remote control 13 3 Getting help 14 Troubleshooting 14 Getting help on the Web 16 4 Appendix 17 Specifications 17...
... 1 1 Setting up your camera 1 Charging the battery (approximately 2 hours 1 Charging using external charger or USB 2 Inserting an SD or SDHC Card 3 Connecting a strap 4 2 Using your camera 5 Turning on the camera 5 Setting the date/time 5 Recording videos, taking pictures 6 Playing videos 7 Transferring, editing, sharing online 8 Deleting videos/pictures 9 Viewing on a TV 10 Accessing the settings menu 11 Using the camera under water 12 Using the optional remote control 13 3 Getting help 14 Troubleshooting 14 Getting help on the Web 16 4 Appendix 17 Specifications 17...

Extended user guide
Page 7
.... 2 Turn off the camera, then connect it. Charging light: • On = charging • Off = charged (approx. 2 hours) Your adapter may differ. KODAK Camera USB Cable, Micro B / 5-Pin (Use only the cable included with AC power. 1 Setting up your camera Charging the battery (approximately 2 hours) Use this procedure to charge the battery or power the camera with this camera!) Keep the camera watertight Tightly close all doors See other charging solutions see page 2 www.kodak.com/go/support 1 Notched corner Charge...
.... 2 Turn off the camera, then connect it. Charging light: • On = charging • Off = charged (approx. 2 hours) Your adapter may differ. KODAK Camera USB Cable, Micro B / 5-Pin (Use only the cable included with AC power. 1 Setting up your camera Charging the battery (approximately 2 hours) Use this procedure to charge the battery or power the camera with this camera!) Keep the camera watertight Tightly close all doors See other charging solutions see page 2 www.kodak.com/go/support 1 Notched corner Charge...

Extended user guide
Page 8
Setting up your camera Charging using external charger or USB Do not charge the battery near water. Charger USB 1 Connect the camera, then turn it off to start charging. 2 Charging light: • On = charging • Off = charged (approx. 4 hours) KODAK Camera USB Cable, Micro B / 5-Pin (Use only the cable included with this camera!) Keep the camera watertight Tightly close all doors Purchase extra KLIC-7004 batteries www.kodak.com/go/playsportaccessories 2 www.kodak.com/go/support
Setting up your camera Charging using external charger or USB Do not charge the battery near water. Charger USB 1 Connect the camera, then turn it off to start charging. 2 Charging light: • On = charging • Off = charged (approx. 4 hours) KODAK Camera USB Cable, Micro B / 5-Pin (Use only the cable included with this camera!) Keep the camera watertight Tightly close all doors Purchase extra KLIC-7004 batteries www.kodak.com/go/playsportaccessories 2 www.kodak.com/go/support
Extended user guide
Page 12
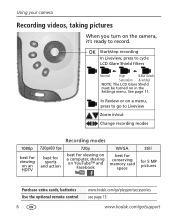
... Liveview Zoom in the Settings menu. OK Start/stop recording In Liveview, press to cycle LCD Glare Shield filters Normal High B&W (black Saturation & white) NOTE: The LCD Glare Shield must be turned on in /out Change recording modes 1080p best for viewing on an HDTV Recording modes 720p/60 fps 720p WVGA best for sports and action best for 5 MP pictures Purchase extra cards, batteries Use the optional remote control 6 www.kodak.com...
... Liveview Zoom in the Settings menu. OK Start/stop recording In Liveview, press to cycle LCD Glare Shield filters Normal High B&W (black Saturation & white) NOTE: The LCD Glare Shield must be turned on in /out Change recording modes 1080p best for viewing on an HDTV Recording modes 720p/60 fps 720p WVGA best for sports and action best for 5 MP pictures Purchase extra cards, batteries Use the optional remote control 6 www.kodak.com...

Extended user guide
Page 13
Use the optional remote control see page 13 www.kodak.com/go forward/reverse one frame. While paused, go /support 7 While paused, press for different views: 1-up Thumbnail Timeline view view While playing, fast-forward/rewind 2X/4X/8X/16X. Playing videos Using your camera 1 Review 2 Previous/next video 3 OK Play/Pause (Press and hold to Stop) Volume Delete video/pictures While playing, play in slow motion.
Use the optional remote control see page 13 www.kodak.com/go forward/reverse one frame. While paused, go /support 7 While paused, press for different views: 1-up Thumbnail Timeline view view While playing, fast-forward/rewind 2X/4X/8X/16X. Playing videos Using your camera 1 Review 2 Previous/next video 3 OK Play/Pause (Press and hold to Stop) Volume Delete video/pictures While playing, play in slow motion.

Extended user guide
Page 14
... 8 www.kodak.com/go/support Using your camera Transferring, editing, sharing online 1 Connect the camera. (It turns on automatically.) 2 If this is the first time you've connected to this camera!) Videos and pictures can then transfer and share videos. You can be used with the APPLE ILIFE suite of products to install ARCSOFT MEDIAIMPRESSION for syncing with ITUNES for KODAK Software. KODAK Camera USB Cable, Micro B / 5-Pin (Use only the cable included with this WINDOWS OS...
... 8 www.kodak.com/go/support Using your camera Transferring, editing, sharing online 1 Connect the camera. (It turns on automatically.) 2 If this is the first time you've connected to this camera!) Videos and pictures can then transfer and share videos. You can be used with the APPLE ILIFE suite of products to install ARCSOFT MEDIAIMPRESSION for syncing with ITUNES for KODAK Software. KODAK Camera USB Cable, Micro B / 5-Pin (Use only the cable included with this WINDOWS OS...
Extended user guide
Page 16
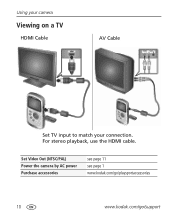
For stereo playback, use the HDMI cable. Set Video Out (NTSC/PAL) Power the camera by AC power Purchase accessories see page 11 see page 1 www.kodak.com/go/playsportaccessories 10 www.kodak.com/go/support Using your camera Viewing on a TV HDMI Cable AV Cable Set TV input to match your connection.
For stereo playback, use the HDMI cable. Set Video Out (NTSC/PAL) Power the camera by AC power Purchase accessories see page 11 see page 1 www.kodak.com/go/playsportaccessories 10 www.kodak.com/go/support Using your camera Viewing on a TV HDMI Cable AV Cable Set TV input to match your connection.
Extended user guide
Page 17
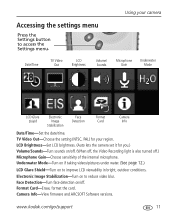
... Video Recording light is also turned off . Date/Time TV Video Out LCD Brightness Volume/ Sounds Microphone Gain Underwater Mode LCD Glare Shield Electronic Image Stabilization Face Detection Format Card Camera Info Date/Time-Set the date/time. LCD Brightness-Set LCD brightness. (Auto lets the camera set it for your camera Accessing the settings menu Press the Settings button to reduce video blur. Underwater Mode-Turn on if taking videos/pictures under water. (See page 12.) LCD Glare Shield-Turn on to access the Settings menu. Format Card-Erase, format the card. Using your...
... Video Recording light is also turned off . Date/Time TV Video Out LCD Brightness Volume/ Sounds Microphone Gain Underwater Mode LCD Glare Shield Electronic Image Stabilization Face Detection Format Card Camera Info Date/Time-Set the date/time. LCD Brightness-Set LCD brightness. (Auto lets the camera set it for your camera Accessing the settings menu Press the Settings button to reduce video blur. Underwater Mode-Turn on if taking videos/pictures under water. (See page 12.) LCD Glare Shield-Turn on to access the Settings menu. Format Card-Erase, format the card. Using your...

Extended user guide
Page 18
... open doors in water ■ Wipe off water or debris. For more information, see page 20. 1 Press the Settings button, then choose Underwater Mode . 2 Press to choose the checkmark, then press OK. 3 Press the Liveview button, then take videos/pictures as you normally do. 4 When finished taking underwater videos/pictures, turn Underwater Mode off. 3 meters (9.8 feet) After using . 12 www.kodak.com/go/support...
... open doors in water ■ Wipe off water or debris. For more information, see page 20. 1 Press the Settings button, then choose Underwater Mode . 2 Press to choose the checkmark, then press OK. 3 Press the Liveview button, then take videos/pictures as you normally do. 4 When finished taking underwater videos/pictures, turn Underwater Mode off. 3 meters (9.8 feet) After using . 12 www.kodak.com/go/support...

Extended user guide
Page 19
Using your camera Using the optional remote control Use the optional remote control just as you would use the on-camera buttons-to www.kodak.com/go /support Delete Previous/Next Reverse/Forward Record/OK/Play Review Mode Volume/Zoom 13 Remove the tab to activate the battery Using the remote control Stop Liveview (Video/Still) www.kodak.com/go /playsportaccessories. Go to start/stop recording, review videos and pictures, and more.
Using your camera Using the optional remote control Use the optional remote control just as you would use the on-camera buttons-to www.kodak.com/go /support Delete Previous/Next Reverse/Forward Record/OK/Play Review Mode Volume/Zoom 13 Remove the tab to activate the battery Using the remote control Stop Liveview (Video/Still) www.kodak.com/go /playsportaccessories. Go to start/stop recording, review videos and pictures, and more.

Extended user guide
Page 20
...; Card is full. 3 Getting help Troubleshooting Icon Solution ■ Low battery. Transfer videos/pictures to your computer, or use an SD/SDHC card to your computer or use another card. ■ Unrecognized file. Transfer videos/pictures to your computer. ■ An error has occurred. Transfer videos/pictures to your computer, then format (erase) the card. 14 www.kodak.com/go/support Transfer videos/pictures to your computer, then format (erase) the card in the camera or card reader. ■ Internal memory is nearly full. Transfer videos/pictures...
...; Card is full. 3 Getting help Troubleshooting Icon Solution ■ Low battery. Transfer videos/pictures to your computer, or use an SD/SDHC card to your computer or use another card. ■ Unrecognized file. Transfer videos/pictures to your computer. ■ An error has occurred. Transfer videos/pictures to your computer, then format (erase) the card. 14 www.kodak.com/go/support Transfer videos/pictures to your computer, then format (erase) the card in the camera or card reader. ■ Internal memory is nearly full. Transfer videos/pictures...

Extended user guide
Page 21
... using a tripod, turn on a computer. ■ Use ARCSOFT MEDIAIMPRESSION for KODAK Software for video playback (see page 11). www.kodak.com/go/support 15 Camera will not turn off Electronic Image Stabilization. Videos are in low ■ If no card is inserted and the camera is in the remote optional remote control. Getting help Problem Solution Camera will not work with ■ Ensure that the camera infrared receiver (above the lens) and the remote control have...
... using a tripod, turn on a computer. ■ Use ARCSOFT MEDIAIMPRESSION for KODAK Software for video playback (see page 11). www.kodak.com/go/support 15 Camera will not turn off Electronic Image Stabilization. Videos are in low ■ If no card is inserted and the camera is in the remote optional remote control. Getting help Problem Solution Camera will not work with ■ Ensure that the camera infrared receiver (above the lens) and the remote control have...
Extended user guide
Page 24
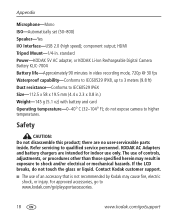
.../go/playsportaccessories. 18 www.kodak.com/go/support KODAK AC Adapters and battery chargers are no user-serviceable parts inside. standard Power-KODAK 5V AC adapter, or KODAK Li-Ion Rechargeable Digital Camera Battery KLIC-7004 Battery life-Approximately 90 minutes in .) Weight-145 g (5.1 oz) with battery and card Operating temperature-0-40° C (32-104° F); Refer servicing to IEC60529 IP6X Size-112.5 x 58 x 19.5 mm (4.4 x 2.3 x 0.8 in video recording mode, 720p @ 30 fps Waterproof capability...
.../go/playsportaccessories. 18 www.kodak.com/go/support KODAK AC Adapters and battery chargers are no user-serviceable parts inside. standard Power-KODAK 5V AC adapter, or KODAK Li-Ion Rechargeable Digital Camera Battery KLIC-7004 Battery life-Approximately 90 minutes in .) Weight-145 g (5.1 oz) with battery and card Operating temperature-0-40° C (32-104° F); Refer servicing to IEC60529 IP6X Size-112.5 x 58 x 19.5 mm (4.4 x 2.3 x 0.8 in video recording mode, 720p @ 30 fps Waterproof capability...

Extended user guide
Page 25
... product, contact Kodak customer support. ■ In the unlikely event that battery fluid leaks onto your skin, wash immediately with a current-limiting motherboard. www.kodak.com/go /reach for this product in an airplane, observe all instructions of children. ■ Do not allow them to touch metal objects, including coins. Appendix ■ Use only a USB-certified computer...
... product, contact Kodak customer support. ■ In the unlikely event that battery fluid leaks onto your skin, wash immediately with a current-limiting motherboard. www.kodak.com/go /reach for this product in an airplane, observe all instructions of children. ■ Do not allow them to touch metal objects, including coins. Appendix ■ Use only a USB-certified computer...

Extended user guide
Page 26
... 40° C (104° F) for an extended time-the integrity of KODAK Products for camera lenses. Wait until camera reaches operating temperatures before using . ■ Blow gently on the lens or LCD to Kodak at www.eiae.org or go /support. Allow all times. ■ If water has entered the camera, remove the battery/card. Wipe gently with a soft, lint-free cloth or an untreated lens-cleaning tissue.
... 40° C (104° F) for an extended time-the integrity of KODAK Products for camera lenses. Wait until camera reaches operating temperatures before using . ■ Blow gently on the lens or LCD to Kodak at www.eiae.org or go /support. Allow all times. ■ If water has entered the camera, remove the battery/card. Wipe gently with a soft, lint-free cloth or an untreated lens-cleaning tissue.

Extended user guide
Page 33
..., troubleshooting, 14 I icons, iii image stabilization, 11 info, 11 K Kodak Web sites, 14 L LCD brightness, 11 LCD glare shield, 6 lens, i lens, cleaning, 20 loading battery, 1 M maintenance, camera, 20 memory card, loading, 3 menus, 11 microphone, i 27 Index A about the camera, 11 accessing settings, 11 accessories, purchase, 16 B battery loading, charging, 1 brightness, LCD, 11 C camera info, 11 card, loading, 3 care and maintenance, 20 cautions, 20 charging battery, 1 clock, setting, 5 connecting strap, 4 to a computer, 8 to a TV, 10 D date setting, 5 delete pictures, videos, 9 disposal...
..., troubleshooting, 14 I icons, iii image stabilization, 11 info, 11 K Kodak Web sites, 14 L LCD brightness, 11 LCD glare shield, 6 lens, i lens, cleaning, 20 loading battery, 1 M maintenance, camera, 20 memory card, loading, 3 menus, 11 microphone, i 27 Index A about the camera, 11 accessing settings, 11 accessories, purchase, 16 B battery loading, charging, 1 brightness, LCD, 11 C camera info, 11 card, loading, 3 care and maintenance, 20 cautions, 20 charging battery, 1 clock, setting, 5 connecting strap, 4 to a computer, 8 to a TV, 10 D date setting, 5 delete pictures, videos, 9 disposal...

Extended user guide
Page 34
..., 7 playing on a TV, 10 R recording, 6 recording light, i recording modes, 6 recycling, disposal, 20 remote control, 13 repair, 16 rewind video, 7 S SD/SDHC card loading, 3 setting date and time, 5 setting up the camera, 1 settings menu, 11 sharing online, 8 slow motion playback, 7 sounds, 11 speaker, ii specifications, 17 start recording, 6 status icons, iii strap, connecting, 4 T taking a video, picture, 6 28 taking videos, pictures, 6 telephoto, 6 time and date, setting, 5 tips, care, & maintenance, 20 transferring videos, 8 troubleshooting, 14 turning on camera, 5 TV playback, 10 TV video...
..., 7 playing on a TV, 10 R recording, 6 recording light, i recording modes, 6 recycling, disposal, 20 remote control, 13 repair, 16 rewind video, 7 S SD/SDHC card loading, 3 setting date and time, 5 setting up the camera, 1 settings menu, 11 sharing online, 8 slow motion playback, 7 sounds, 11 speaker, ii specifications, 17 start recording, 6 status icons, iii strap, connecting, 4 T taking a video, picture, 6 28 taking videos, pictures, 6 telephoto, 6 time and date, setting, 5 tips, care, & maintenance, 20 transferring videos, 8 troubleshooting, 14 turning on camera, 5 TV playback, 10 TV video...


