KitchenAid KUDS50SVBL - Semi-Integrated Dishwasher With 5 Wash Cycles Support and Manuals
Get Help and Manuals for this KitchenAid item

View All Support Options Below
Free KitchenAid KUDS50SVBL manuals!
Problems with KitchenAid KUDS50SVBL?
Ask a Question
Free KitchenAid KUDS50SVBL manuals!
Problems with KitchenAid KUDS50SVBL?
Ask a Question
Popular KitchenAid KUDS50SVBL Manual Pages
User Instructions - Page 1
... any problems you for Choosing KitchenAid® Appliances.
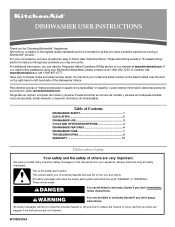
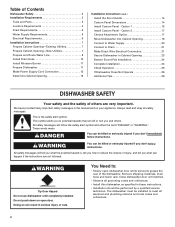
Always read and obey all safety messages. For additional information, you what the potential hazard is the safety alert symbol. Table of Contents
DISHWASHER SAFETY 1 QUICK STEPS 3 DISHWASHER USE 3 CYCLE AND OPTION DESCRIPTIONS 4 DISHWASHER FEATURES 6 DISHWASHER CARE 7 TROUBLESHOOTING 8 WARRANTY 10
Dishwasher Safety...
User Instructions - Page 8
... to resume the cycle by pressing START/RESUME and closing the door within this guide.)
Glasses and cups with concave bottoms hold water.
Refer to the Installation Instructions for dishwashers.
■ Odors
NOTE: If the dishwasher is ready to run for dishwashers once per month. If lights other items when unloading.
■ Unload the bottom rack...
User Instructions - Page 9
... into dishwasher. If the Clean light or any overlap so that the cloudiness is not sanitized. If it does not come clear, it is blinking, press START/RESUME and close the door within this guide.)
■ Blinking lights
If the Start/Resume light is due to become chipped or damaged. (See specific loading instructions...
User Instructions - Page 10

... of the dishwasher interior. ITEMS EXCLUDED FROM WARRANTY
This limited warranty does not cover:
1. Service calls to refrigerator or freezer product failures.
7. Damage resulting from defects in accordance with KitchenAid's published installation instructions.
11. You can write to KitchenAid with electrical or plumbing codes, or use your major appliance, to replace or repair house fuses...
Installation Instructions - Page 2
... in these instructions.
• Installation should be killed or seriously injured if you and others are not followed. Do not push down on your appliance. Close dishwasher door until completely installed.
WARNING
Tip Over Hazard Do not use dishwasher until latched.
• Observe all governing codes and ordinances.
• Install this manual and on open dishwasher door while...
Installation Instructions - Page 4
...
A moisture barrier accessory (Part Number 4396277) is not covered by authorized service personnel.
If dishwasher will be installed. The location where the dishwasher will be left unused for...be securely attached to dishwasher against freezing. The location must be subject to floor.
• level floor. (If floor at front of opening ). Do not install dishwasher over carpeted...
Installation Instructions - Page 8
...
Wood cabinet: Sand the hole until smooth. Attach to the dishwasher should have a manual shutoff valve. Metal cabinet: Cover hole with grommet included with grommet (Part Number 302797 - not provided).
8
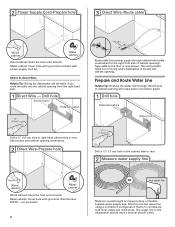
Hot water...cm)
Drill a ³⁄₄" (1.9 cm) hole in compliance with local codes and ordinances. 2 Power Supply Cord-Prepare hole
3 Direct Wire-Route cable
Wood cabinet
Metal cabinet
...
Installation Instructions - Page 12
... supply cord kit.
12
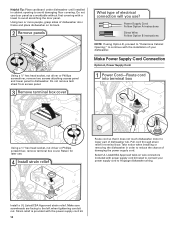
Select UL Listed/CSA Approved twist-on its back.
2 Remove panels
Using a ¹⁄₄" hex head socket, nut driver or Phillips screwdriver, remove two screws attaching access panel and lower panel to 16-gauge dishwasher wiring. Install a UL Listed/CSA Approved strain relief. Strain relief is provided with the...
Installation Instructions - Page 14

...wheel
Turn both leveler legs to know which control panel is on some models)
Install door handle
Mounting stud
Handle
Setscrew (in use.
14
³⁄...Dishwashers with the setscrews facing down. Setscrews are preset at the factory for additional clearance. Retain Allen wrench with Installation Instructions. add shims as needed in the handle. NOTE: Shims must be securely attached...
Installation Instructions - Page 15
...If the
installation needs a higher toe kick, adjust the height of the wood panel accordingly. Dishwashers with the panel.
If the handle is for toe kicks greater than 6" (15.2 cm).
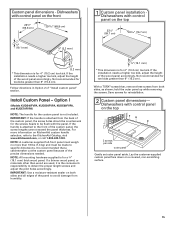
Option 1
(Models KUDS40FVPA,... of the panel to the KitchenAid Catalog, visit www.kitchenaid.com, or call 1-800-422-1230. NOTE: All mounting hardware supplied is attached from both sides and all edges...
Installation Instructions - Page 17
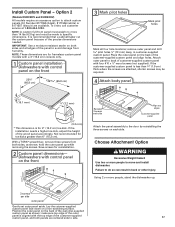
... control panel on the front
Reinstall 3 screws each side. Attach outer panel to specific dimensions. Dishwashers with control panel on a non-scratching surface.
Choose Attachment Option
Excessive Weight Hazard Use two or more people, stand the dishwasher up while removing the screws. Failure to move and install dishwasher. make sure top edge of the outer
panel is...
Installation Instructions - Page 21

...
Visit www.kitchenaid.com/drain under drain hose to "Secure Dishwasher in type strain relief. Owner must purchase a ⁷⁄₈" screw-in Cabinet Opening" section. Visit www.kitchenaid.com/watersupply ...new drain hose into terminal box
Route cable so that it does not touch dishwasher motor or lower part of the drain hose. Strain relief is connected, remove towel. If needed ...
Installation Instructions - Page 24
....
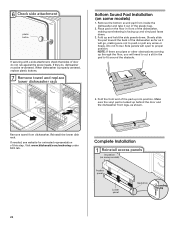
7 Remove towel and replace
lower dishwasher rack
Bottom Sound Pad Installation (on some models)
Access panel
Lower panel
Insulation
Grounding clip
24
Complete Installation
1 Reinstall access panels
Insulation (on the floor in the pad to proper position. Fold up and hold the side panels down .
3. Reinstall the lower dish rack. Visit www.kitchenaid.com/anchoring under...
Installation Instructions - Page 25

... lower panel.
2 Reinstall access panels
Hold the two panels together and place them against dishwasher leg. Do not remove ground prong. Adjust if necessary.
4 Tighten screws
Plug into ...touch dishwasher motor or lower part of the lower panel contacts the floor. Do not use an extension cord. Tighten access panel screws. 25 On some models there is attached to follow these instructions can ...
Installation Instructions - Page 26

... energy than older models. Rinse Aid is closed tightly and latched? • Has the cycle been set correctly to be used , replace inlet hose after 5 years to possibly avoid the cost of the dishwasher tub. If none of these possible solutions work, call 1-800-422-1230, or in the bottom of a service call 1-800-807...
KitchenAid KUDS50SVBL Reviews
We have not received any reviews for KitchenAid yet.