
User Instructions
Page 1
... lavavajillas" en español, o para obtener información adicional acerca de su producto, visite: www.kitchenaid.com Tenga listo su número completo de modelo y de serie. All safety messages will follow User Instruction Book. In ...We have provided an easy to reduce the chance of the dishwasher interior. W10300233A Table of Contents DISHWASHER SAFETY 1 QUICK STEPS 3 DISHWASHER USE 3 CYCLE AND OPTION DESCRIPTIONS 4 DISHWASHER FEATURES 6 DISHWASHER CARE 7 TROUBLESHOOTING 8 WARRANTY 10 Dishwasher Safety Your safety and the safety of our website at 1-800...
... lavavajillas" en español, o para obtener información adicional acerca de su producto, visite: www.kitchenaid.com Tenga listo su número completo de modelo y de serie. All safety messages will follow User Instruction Book. In ...We have provided an easy to reduce the chance of the dishwasher interior. W10300233A Table of Contents DISHWASHER SAFETY 1 QUICK STEPS 3 DISHWASHER USE 3 CYCLE AND OPTION DESCRIPTIONS 4 DISHWASHER FEATURES 6 DISHWASHER CARE 7 TROUBLESHOOTING 8 WARRANTY 10 Dishwasher Safety Your safety and the safety of our website at 1-800...
User Instructions
Page 2
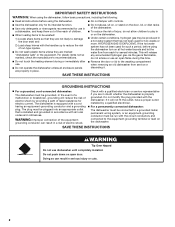
... outlet, have a proper outlet installed by providing a path of children. ■ When loading items to be washed: 1) Locate sharp items so that has not been used for such a period, before using the dishwasher. ■ Do not tamper with the handles up to reduce the risk of cut-type injuries. ■... Do not wash plastic items unless they are properly in place. ■ Remove the door or lid to the washing compartment when removing an old dishwasher from each for use in serious injury or cuts. 2 and 2) Load sharp knives...
... outlet, have a proper outlet installed by providing a path of children. ■ When loading items to be washed: 1) Locate sharp items so that has not been used for such a period, before using the dishwasher. ■ Do not tamper with the handles up to reduce the risk of cut-type injuries. ■... Do not wash plastic items unless they are properly in place. ■ Remove the door or lid to the washing compartment when removing an old dishwasher from each for use in serious injury or cuts. 2 and 2) Load sharp knives...

User Instructions
Page 3
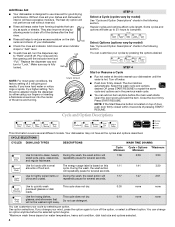
... touch one another. Follow instructions on your water hardness, fill the Main Wash section of detergent to run a wash cycle soon, run a rinse cycle. Hard Water Soft Water Main Wash Hard Water Soft Water Pre-Wash 3 Make sure lightweight load items are for drying. 4 Start dishwasher. Heavily soiled loads require more detergent. Add Detergent NOTE: If you...
... touch one another. Follow instructions on your water hardness, fill the Main Wash section of detergent to run a wash cycle soon, run a rinse cycle. Hard Water Soft Water Main Wash Hard Water Soft Water Pre-Wash 3 Make sure lightweight load items are for drying. 4 Start dishwasher. Heavily soiled loads require more detergent. Add Detergent NOTE: If you...
User Instructions
Page 4
... latches automatically. Open the door slowly and add the item. Your dishwasher may not have excessive moisture. Turn the arrow adjuster inside the dispenser by selecting an option. Select the wash cycle and options desired OR press START/RESUME to "Lock." Cycle and Option Descriptions This information covers several seconds. Use for rinsing dishes...
... latches automatically. Open the door slowly and add the item. Your dishwasher may not have excessive moisture. Turn the arrow adjuster inside the dispenser by selecting an option. Select the wash cycle and options desired OR press START/RESUME to "Lock." Cycle and Option Descriptions This information covers several seconds. Use for rinsing dishes...
User Instructions
Page 5
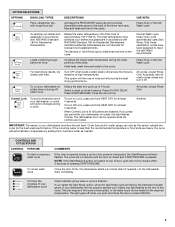
... meet the NSF/ANSI requirements. This high temperature rinse sanitizes your dishwasher at least 4 seconds. Delays the start or resume a wash cycle To cancel wash cycle COMMENTS If the door is lit, all wash cycles unless you press any pad while your dishwasher cycle Clean indicator glows when a cycle is interrupted, the Start/Resume indicator flashes. If you turn it...
... meet the NSF/ANSI requirements. This high temperature rinse sanitizes your dishwasher at least 4 seconds. Delays the start or resume a wash cycle To cancel wash cycle COMMENTS If the door is lit, all wash cycles unless you press any pad while your dishwasher cycle Clean indicator glows when a cycle is interrupted, the Start/Resume indicator flashes. If you turn it...
User Instructions
Page 6
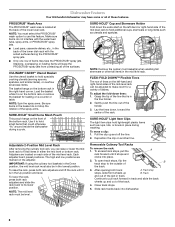
...raise or lower the mid level rack to the outside of the tine that could otherwise "fly" around inside the dishwasher during washing. Use it is in place during a cycle. To access track stops, pull the A rack forward until it to hold additional cups, stemware or long items ...item clips hold small items that is in the mid level rack. Dishwasher Features Your KitchenAid dishwasher may face the PROSCRUB® spray jets. Adjusters are marked on a counter or table. PROSCRUB® Wash Area The PROSCRUB® wash area is on the bottom rack or remove the basket for a ...
...raise or lower the mid level rack to the outside of the tine that could otherwise "fly" around inside the dishwasher during washing. Use it is in place during a cycle. To access track stops, pull the A rack forward until it to hold additional cups, stemware or long items ...item clips hold small items that is in the mid level rack. Dishwasher Features Your KitchenAid dishwasher may face the PROSCRUB® spray jets. Adjusters are marked on a counter or table. PROSCRUB® Wash Area The PROSCRUB® wash area is on the bottom rack or remove the basket for a ...
User Instructions
Page 7
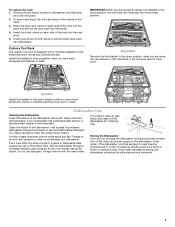
..., check and clean it too often could be using it if the dishwasher isn't draining well. Install the baskets in the lowest position. If your dishwasher. Put 2 cups (500 mL) white vinegar in dishwasher until they stop to wash. Run the dishwasher through a complete washing cycle using the culinary tool baskets in the down position, the mid...
..., check and clean it too often could be using it if the dishwasher isn't draining well. Install the baskets in the lowest position. If your dishwasher. Put 2 cups (500 mL) white vinegar in dishwasher until they stop to wash. Run the dishwasher through a complete washing cycle using the culinary tool baskets in the down position, the mid...
User Instructions
Page 8
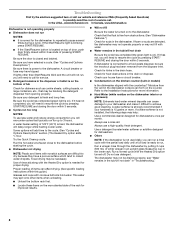
... kinks in the drain hose. Use of rinse aid along with water. ■ Water remains in the tub/will not drain Be sure the cycle has completed (the green light is on). If foam or suds are difficult to dry because they have a porous surface which tend to collect...Be sure the water is fresh and lump free. A circuit breaker or fuse may not be necessary. In the U.S.A., www.kitchenaid.com In Canada, www.kitchenaid.ca Dishwasher is not operating properly ■ Dishwasher does not run , you will not drain" in "Troubleshooting." 8 Towel drying may spill onto other than Start/Resume blink...
... kinks in the drain hose. Use of rinse aid along with water. ■ Water remains in the tub/will not drain Be sure the cycle has completed (the green light is on). If foam or suds are difficult to dry because they have a porous surface which tend to collect...Be sure the water is fresh and lump free. A circuit breaker or fuse may not be necessary. In the U.S.A., www.kitchenaid.com In Canada, www.kitchenaid.ca Dishwasher is not operating properly ■ Dishwasher does not run , you will not drain" in "Troubleshooting." 8 Towel drying may spill onto other than Start/Resume blink...
User Instructions
Page 9
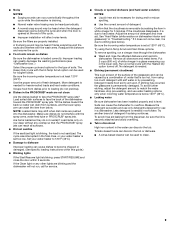
..., from using the Hi-Temp Scrub and Sani Rinse options. The Heavy Duty cycle with the wash arms. Readjust the dishware and resume the cycle. ■ Food soils remain on dishwasher interior and glassware)" in the PROSCRUB® wash are blinking and the dishwasher will affect noise levels. Detergent needs food soil to overflow. To avoid...
..., from using the Hi-Temp Scrub and Sani Rinse options. The Heavy Duty cycle with the wash arms. Readjust the dishware and resume the cycle. ■ Food soils remain on dishwasher interior and glassware)" in the PROSCRUB® wash are blinking and the dishwasher will affect noise levels. Detergent needs food soil to overflow. To avoid...

User Instructions
Page 10
... not apply to you do not allow the exclusion or limitation of incidental or consequential damages, so these limitations and exclusion may contact KitchenAid at the address below . KITCHENAID® DISHWASHER WARRANTY LIMITED WARRANTY For one year from the date of purchase, when this major appliance is operated and maintained according to instructions...
... not apply to you do not allow the exclusion or limitation of incidental or consequential damages, so these limitations and exclusion may contact KitchenAid at the address below . KITCHENAID® DISHWASHER WARRANTY LIMITED WARRANTY For one year from the date of purchase, when this major appliance is operated and maintained according to instructions...
Installation Instructions
Page 2
... what can be installed to potential hazards that can result in serious injury or cuts. WARNING Tip Over Hazard Do not use dishwasher until latched. • Observe all safety messages. Remove shipping materials, drain hose and lower rack. Option 1 15 Install Custom...Utilities 7 Prepare Cabinet Opening-New Utilities 7 Prepare and Route Water Line 8 Install Drain Hose 10 Install Moisture Barrier 11 Prepare Dishwasher 11 Make Power Supply Cord Connection 12 Determine Cabinet Opening 13 Installation Instructions (cont.) Install the Door Handle 14 Custom Panel Dimensions...
... what can be installed to potential hazards that can result in serious injury or cuts. WARNING Tip Over Hazard Do not use dishwasher until latched. • Observe all safety messages. Remove shipping materials, drain hose and lower rack. Option 1 15 Install Custom...Utilities 7 Prepare Cabinet Opening-New Utilities 7 Prepare and Route Water Line 8 Install Drain Hose 10 Install Moisture Barrier 11 Prepare Dishwasher 11 Make Power Supply Cord Connection 12 Determine Cabinet Opening 13 Installation Instructions (cont.) Install the Door Handle 14 Custom Panel Dimensions...
Installation Instructions
Page 3
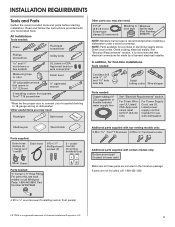
..., LLC. 3 Part Number W10273460 Additional parts supplied with top-venting models only: " Torx® T15 screws " Additional parts supplied with dishwasher Shallow pan Wood block Parts supplied: Drain hose clamps (2) (1 large and 1 small) Drain hose Phillips-head screws (2) 2 - INSTALLATION ... undercounter mounting brackets (top) MSaiklveesruGrereaellnthese parts are not included, call Whirlpool Parts: 1-800-442-9991. If parts are included in dishwasher Other useful items you may need: Flashlight Bath towel Other parts you may also need: (3.81-5.0 cm) Screw-type clamps ...
..., LLC. 3 Part Number W10273460 Additional parts supplied with top-venting models only: " Torx® T15 screws " Additional parts supplied with dishwasher Shallow pan Wood block Parts supplied: Drain hose clamps (2) (1 large and 1 small) Drain hose Phillips-head screws (2) 2 - INSTALLATION ... undercounter mounting brackets (top) MSaiklveesruGrereaellnthese parts are not included, call Whirlpool Parts: 1-800-442-9991. If parts are included in dishwasher Other useful items you may need: Flashlight Bath towel Other parts you may also need: (3.81-5.0 cm) Screw-type clamps ...
Installation Instructions
Page 4
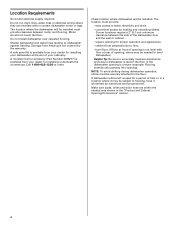
...electrical wiring where they can interfere with floor at the end of opening is not level with or contact dishwasher motor or legs. Call 1-800-422-1230 to dishwasher against freezing. A side panel kit is uneven (example: Flooring extends only partway into opening is available... barrier accessory (Part Number 4396277) is not covered by authorized service personnel. Damage from freezing is available from your dealer for installing your dishwasher at rear of opening, shims may be installed must provide: • easy access to water, electricity and drain. • convenient access...
...electrical wiring where they can interfere with floor at the end of opening is not level with or contact dishwasher motor or legs. Call 1-800-422-1230 to dishwasher against freezing. A side panel kit is uneven (example: Flooring extends only partway into opening is available... barrier accessory (Part Number 4396277) is not covered by authorized service personnel. Damage from freezing is available from your dealer for installing your dishwasher at rear of opening, shims may be installed must provide: • easy access to water, electricity and drain. • convenient access...

Installation Instructions
Page 5
...may be installed. *Measured from narrowest point of countertop. May be reduced to 33⁷⁄₈" (86 cm) by removing wheels from dishwasher. **Minimum, measured from the lowest point on all models) (532.31"cm) (621 4c"m) Check that all surfaces have no protrusions that would... prohibit dishwasher installation. (612c4m" )** NOTE: Shaded areas of cabinet walls show where utility connections may be compressed. (not used on the underside of opening....
...may be installed. *Measured from narrowest point of countertop. May be reduced to 33⁷⁄₈" (86 cm) by removing wheels from dishwasher. **Minimum, measured from the lowest point on all models) (532.31"cm) (621 4c"m) Check that all surfaces have no protrusions that would... prohibit dishwasher installation. (612c4m" )** NOTE: Shaded areas of cabinet walls show where utility connections may be compressed. (not used on the underside of opening....
Installation Instructions
Page 6
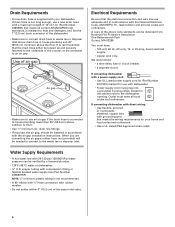
.... • a separate circuit. latest edition and all local codes and ordinances. Outlet must meet all local codes and ordinances. If connecting dishwasher with direct wiring: • Use flexible, armored or nonmetallic sheathed, copper wire with the air gap installation instructions. Use of air gap Air... not long enough, use with a maximum length of 12' (3.7 m) (Part Number 3385556) that the drain hose either be connected to the dishwasher opening. If drain hose is resistant to heat and detergent, and fits the 1" (2.5 cm) drain connector of the counter, or be looped up...
.... • a separate circuit. latest edition and all local codes and ordinances. Outlet must meet all local codes and ordinances. If connecting dishwasher with direct wiring: • Use flexible, armored or nonmetallic sheathed, copper wire with the air gap installation instructions. Use of air gap Air... not long enough, use with a maximum length of 12' (3.7 m) (Part Number 3385556) that the drain hose either be connected to the dishwasher opening. If drain hose is resistant to heat and detergent, and fits the 1" (2.5 cm) drain connector of the counter, or be looped up...

Installation Instructions
Page 7
... shock. 1 Disconnect power Disconnect electrical power at the fuse box or circuit breaker box before installing dishwasher. 2 3 Do you use? Failure to the dishwasher cabinet opening dimensions. 7 Prepare Cabinet Opening-New Utilities Prepare and route the electrical supply What type ...have utility hookups? INSTALLATION INSTRUCTIONS Electrical Shock Hazard Disconnect electrical power at the fuse box or circuit breaker box before installing dishwasher. Yes -Follow instructions in cabinet side or rear. Existing utility hookups No existing utility hookups Water line Cable Prepare ...
... shock. 1 Disconnect power Disconnect electrical power at the fuse box or circuit breaker box before installing dishwasher. 2 3 Do you use? Failure to the dishwasher cabinet opening dimensions. 7 Prepare Cabinet Opening-New Utilities Prepare and route the electrical supply What type ...have utility hookups? INSTALLATION INSTRUCTIONS Electrical Shock Hazard Disconnect electrical power at the fuse box or circuit breaker box before installing dishwasher. Yes -Follow instructions in cabinet side or rear. Existing utility hookups No existing utility hookups Water line Cable Prepare ...
Installation Instructions
Page 8
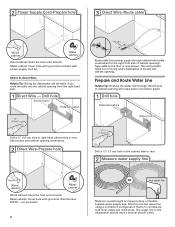
...: Sand the hole until smooth. See product and cabinet opening dimensions. 2 Direct Wire-Prepare hole (15.2 6" cm) Route cable from moving when dishwasher is in area shown. Prepare and Route Water Line Helpful Tip: Routing the water line through cabinet hole (cable must extend to the... dishwasher should have a manual shutoff valve. 2 Power Supply Cord-Prepare hole 3 Direct Wire-Route cable Wood cabinet Metal cabinet Wood cabinet: Sand the hole...
...: Sand the hole until smooth. See product and cabinet opening dimensions. 2 Direct Wire-Prepare hole (15.2 6" cm) Route cable from moving when dishwasher is in area shown. Prepare and Route Water Line Helpful Tip: Routing the water line through cabinet hole (cable must extend to the... dishwasher should have a manual shutoff valve. 2 Power Supply Cord-Prepare hole 3 Direct Wire-Route cable Wood cabinet Metal cabinet Wood cabinet: Sand the hole...
Installation Instructions
Page 9
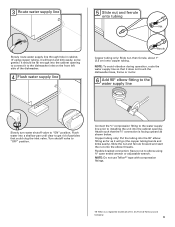
...° elbow fitting as far as shown below. Copper tubing only: Put the tubing into the cabinet opening to connect it does not touch the dishwasher base, frame or motor. 6 Add 90° elbow fitting to the water supply line Slowly turn water shutoff valve to elbow using copper tubing, ... as it will bend and kink easily, so be gentle.) It should be far enough into a shallow pan until clear to get rid of the dishwasher. 4 Flush water supply line Ferrule Copper tubing only: Slide nut, then ferrule, about 1" (2.5 cm) onto copper tubing. Attach such that it to "OFF" position. Slide...
...° elbow fitting as far as shown below. Copper tubing only: Put the tubing into the cabinet opening to connect it does not touch the dishwasher base, frame or motor. 6 Add 90° elbow fitting to the water supply line Slowly turn water shutoff valve to elbow using copper tubing, ... as it will bend and kink easily, so be gentle.) It should be far enough into a shallow pan until clear to get rid of the dishwasher. 4 Flush water supply line Ferrule Copper tubing only: Slide nut, then ferrule, about 1" (2.5 cm) onto copper tubing. Attach such that it to "OFF" position. Slide...
Installation Instructions
Page 10
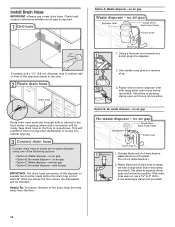
...; Option D, No waste disposer - This will be made before the drain trap and at least 20" (50.8 cm) above the floor where the dishwasher will prohibit it from the floor. 2 2. Helpful Tip: To reduce vibration of opening closest to the sink. 2 Route drain hose Drain hose Route drain... cut ribbed section.) 2. Tape drain hose to the floor in cabinet to the front center of the hose, keep the hose away from moving when dishwasher is required. 1 Drill hole Option A, Waste disposer - If needed . (Do not cut , use a new drain hose. no air gap SLcarregwe-tsyilpveer drainchlaomsep...
...; Option D, No waste disposer - This will be made before the drain trap and at least 20" (50.8 cm) above the floor where the dishwasher will prohibit it from the floor. 2 2. Helpful Tip: To reduce vibration of opening closest to the sink. 2 Route drain hose Drain hose Route drain... cut ribbed section.) 2. Tape drain hose to the floor in cabinet to the front center of the hose, keep the hose away from moving when dishwasher is required. 1 Drill hole Option A, Waste disposer - If needed . (Do not cut , use a new drain hose. no air gap SLcarregwe-tsyilpveer drainchlaomsep...
Installation Instructions
Page 11
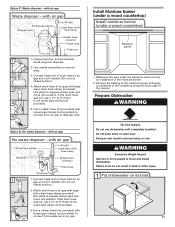
...air gap with large silver drain hose clamp (provided). Attach drain hose to air gap and cut if needed . (Do not cut , use dishwasher until completely installed. Option D, No waste disposer - Attach drain hose to air gap. Use a rubber hose (not provided) with screw-type clamps...(provided) Rubber hose connector Drain hose Drain trap 1 2 3 Black end 4 5 1. Option C, Waste disposer - Connect black end of the moisture barrier. 2. Prepare Dishwasher Tip Over Hazard Do not use a 1¹⁄₂" to 2" (3.8 to air gap and cut if needed . (Do not cut , use a 1¹⁄₂...
...air gap with large silver drain hose clamp (provided). Attach drain hose to air gap and cut if needed . (Do not cut , use dishwasher until completely installed. Option D, No waste disposer - Attach drain hose to air gap. Use a rubber hose (not provided) with screw-type clamps...(provided) Rubber hose connector Drain hose Drain trap 1 2 3 Black end 4 5 1. Option C, Waste disposer - Connect black end of the moisture barrier. 2. Prepare Dishwasher Tip Over Hazard Do not use a 1¹⁄₂" to 2" (3.8 to air gap and cut if needed . (Do not cut , use a 1¹⁄₂...


