KitchenAid KUDE03FTBL - 24 Inch Fully Integrated Dishwasher Support and Manuals
Get Help and Manuals for this KitchenAid item
This item is in your list!

View All Support Options Below
Free KitchenAid KUDE03FTBL manuals!
Problems with KitchenAid KUDE03FTBL?
Ask a Question
Free KitchenAid KUDE03FTBL manuals!
Problems with KitchenAid KUDE03FTBL?
Ask a Question
Popular KitchenAid KUDE03FTBL Manual Pages
Installation Instructions - Page 2
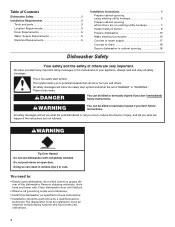

... many important safety messages in this dishwasher as specified in serious injury or cuts.
The dishwasher must be performed by a qualified service
technician. Do not push down on your appliance. You need to meet all safety messages.
These words mean:
DANGER
You can result in these instructions. • Installation should be installed to :
• Slowly open door...
Installation Instructions - Page 3
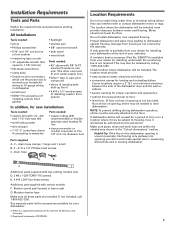

...call 1-800-422-1230. Check location where dishwasher will be securely attached to fit a 7/8" (2.2 cm) diameter hole
Parts supplied A. 2 - If dishwasher will be obtained by authorized service personnel. external threads on wire connectors which are included.
Do not install dishwasher over carpeted flooring. A moisture barrier accessory (Part No. 4396277) is available from your dealer...
Installation Instructions - Page 8
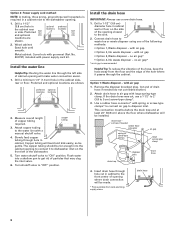

...installed. The copper tubing should be far enough into a shallow pan to the water line with large spring-type clamp. Connect drain hose to air gap with a manual shutoff valve.
4. with air gap:
1. no air gap*
*an air gap is required in a cabinet next to the dishwasher opening will be made.
* Parts... • Option 1, Waste disposer - Attach drain hose to waste tee or waste disposer...
Installation Instructions - Page 10
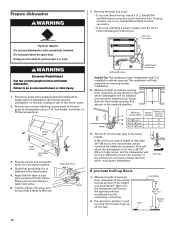

...attaching access panel and lower panel to water inlet valve.
6.
Apply Teflon® tape or pipe joint compound to 90° elbow fitting and connect fitting to dishwasher using conduit, use dishwasher until completely installed. If using a 1/4" hex socket, nut driver... so now, following kit instructions. If the wheels are direct wiring: install a U.L.-listed/CSAcertified clamp connector...
Installation Instructions - Page 11
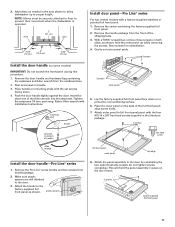

...models with Installation Instructions.
do not tighten screws completely. Add shims as shown. With a TORX® screwdriver, remove three screws on the back of handle)
Allen wrench
full front panel outer panel
hex head screw
top edge
Install.... 2. Attach outer panel to prevent their movement when the dishwasher is operated. Gently set screws in place on some models)
IMPORTANT:...
Installation Instructions - Page 13
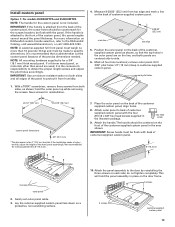

...the custom panel is not included. Attach outer panel to side.
6. Gently set outer panel aside.
3. do not tighten completely. Install custom panel
Option 1: For models KUDS03FTPA and KUDU03FTPA
NOTE: The handle ... made to specific dimensions. hold the panel assembly in the literature package. The handle should be countersunk for the screws heads to be centered on KitchenAid custom handle ...
Installation Instructions - Page 14
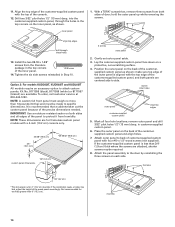

...service at 800-444-1230. NOTE: These dimensions are centered side to back of the console.
12. Gently set outer panel aside.
3. mark 4 inner holes
outer panel
align top edges
customer-supplied custom panel
5. Attach outer panel to side. Attach the panel assembly to specific...screws
outer panel
2. If the installation needs a higher toe kick,...models KUDC03IT, KUDK03IT and KUDL03IT
All models...
Installation Instructions - Page 15
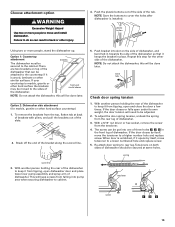

... itself , move and install dishwasher. When door is marble, granite or other similar surfaces.
tensioner
screw
Ẅẅ Ẇ
15 Push the plastic buttons out of the side of the bracket along the scored line.
5. front vent model shown
NOTE: Do not attach the dishwasher, this will need to a lower numbered hole and replace screw.
5.
Push...
Installation Instructions - Page 16
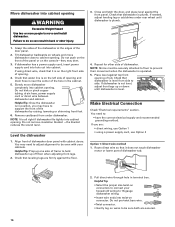

...may need to:
• have to support the front of the hole in position, ... install dishwasher. Grasp the sides of the dishwasher at the edges of tub. Tilt dishwasher backwards on connectors to connect your cabinets. If dishwasher ...line is on wires to be securely attached to floor to prevent their movement when the dishwasher is all right if dishwasher fits tightly into cabinet opening .
...
Installation Instructions - Page 17


...operation, route the water supply line so that power supply cord does not touch
dishwasher motor or lower part of the tubing. Form bare ground wire into a grounded 3 prong outlet....WARNING
Electrical Shock Hazard
Electrically ground dishwasher.
3. Connect the wires as it will go , use an extension cord. Connect ground wire to follow these instructions can result in death, fire...
Installation Instructions - Page 19
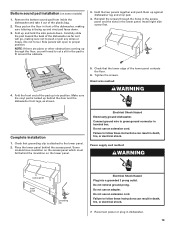

... on some models)
1. Hold the two panels together and push them up and hold the side panels down .
3. Make sure the vinyl pad is attached to fit around... follow these instructions can result in death, fire, or electrical shock.
7. Do not remove ground prong. Direct wire method:
WARNING
Complete installation
1. Electrical Shock Hazard Electrically ground dishwasher. Install right side...
User Instructions - Page 1


... using your KitchenAid dishwasher, please contact us that can find your model and serial number on the label located near the door on your appliance. In Canada: visit www.kitchenaid.ca or call 1-800-807-6777. This is , tell you to follow instructions. This symbol alerts you how to us at www.kitchenaid.com.
DISHWASHER USER INSTRUCTIONS
Thank you...
User Instructions - Page 8


... the exterior of a service call. Put 2 cups (500 mL) white vinegar in place and the Upper Filter Assembly is locked.
In the winter, if the dishwasher could damage your dishwasher without the filters properly installed.
Is the water shutoff valve (if installed) turned on removing spots and stains, see "Troubleshooting" section.
Filter Removal Instructions
1. as the filter...
User Instructions - Page 10


...appliance is operated and maintained according to instructions attached to or furnished with the product, KitchenAid will pay for factory specified parts and repair labor for the following components to 828 kPa) for proper dishwasher... other month, the installation of Whirlpool Corporation or Whirlpool Canada LP (hereafter "KitchenAid") will not affect dishwasher performance. Are high suds...
User Instructions - Page 11


... KitchenAid servicer is reported to view FAQs (Frequently Asked Questions), in accordance with KitchenAid's published installation instructions.
11. W10193742A SP PN W10193743A
© 2008. Replacement parts or repair labor if this limitation may have been removed, altered or cannot be repaired in your model and serial number on the label located near the door on major appliances...
KitchenAid KUDE03FTBL Reviews
Do you have an experience with the KitchenAid KUDE03FTBL that you would like to share?
Earn 750 points for your review!
We have not received any reviews for KitchenAid yet.
Earn 750 points for your review!
