KitchenAid KUDS03FTBL - 24 Inch Fully Integrated Dishwasher Support and Manuals
Get Help and Manuals for this KitchenAid item
This item is in your list!

View All Support Options Below
Free KitchenAid KUDS03FTBL manuals!
Problems with KitchenAid KUDS03FTBL?
Ask a Question
Free KitchenAid KUDS03FTBL manuals!
Problems with KitchenAid KUDS03FTBL?
Ask a Question
Popular KitchenAid KUDS03FTBL Manual Pages
Installation Instructions - Page 2
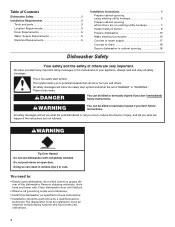

... either the word "DANGER" or "WARNING." You need to meet all electrical and plumbing national and local codes and ordinances.
2 All safety messages will follow instructions. Close dishwasher door until completely installed. The dishwasher must be performed by a qualified service
technician. This symbol alerts you to potential hazards that can kill or hurt you what the potential hazard...
Installation Instructions - Page 3
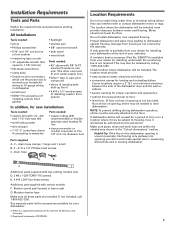

... provide clearance between the side of E.I. Do not install dishwasher over carpeted flooring. If not included, call 1-800-422-1230. The location where the dishwasher will be subject to freezing, have it may also be securely attached to dishwasher against freezing. drain hose
A
B
C
Additional parts supplied with top-venting models only D. 2 #8 x 1-3/8" TORX® T15 screws E. 4 #10...
Installation Instructions - Page 7


... locations are no existing utility hookups
Electrical connection
Option1: Direct wire method:
Helpful Tip: Wiring the dishwasher will be made.
* Parts available from the right side.
1. cut end of opening where there are shown.
If installing conduit, attach a U.L.-listed/CSA-certified conduit connector to the underside of cabinet opening from local plumbing supply stores...
Installation Instructions - Page 8
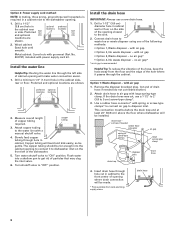

... be gentle. with large spring-type clamp. Attach drain hose to connect it passes through the cabinet. Turn shutoff valve to "ON" position. Install the water line
Helpful Tip: Routing the water line through hole in cabinet wall or floor on the front left of the dishwasher.
5.
Flush water into the cabinet opening...
Installation Instructions - Page 9
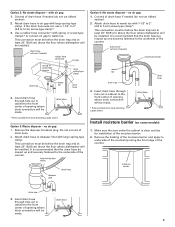

... at least 20" (50.8 cm) above the floor where dishwasher will be installed.
Attach drain hose to 5 cm) screw-type clamp*.
Make sure the area under the cabinet is clean...with air gap:
1. no air gap: 1. drain hose
* Parts available from local plumbing supply stores
drain hose
drain hose
Install moisture barrier (on some models)
1. Do not cut here if needed
screw-type clamp
waste tee...
Installation Instructions - Page 10
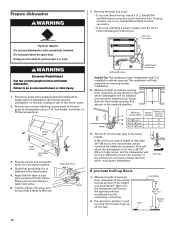

... on open door. WARNING
Excessive Weight Hazard Use two or more difficult to move and install dishwasher. Failure to move into the opening . Grasp sides of the corner posts.
2. access panel
lower panel
grounding clip
3. Check that height opening without modification to floor where dishwasher will be sure that it is attached to the lower...
Installation Instructions - Page 11
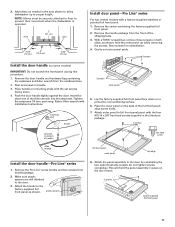

shim
2" (5.1 cm)
shim
2-3/4" (7.0 cm)
6" (15.2 cm)
2-3/4" (7.0 cm)
Install door panel-Pro Line® series
For top vented models with Installation Instructions. With a TORX® screwdriver, remove three screws on a protective non-scratching surface.
6. Remove the door handle and hardware bag containing
the setscrews and Allen wrench from the front of handle)
Allen wrench
full front ...
Installation Instructions - Page 13
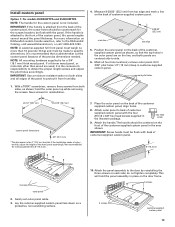

.... Install custom panel
Option 1: For models KUDS03FTPA...) deep in place on the door frame.
3 screws
3 screws
...set outer panel aside.
3. do not tighten completely. Position the outer panel on the line, and both panels are on the back of the panel to the KitchenAid Catalog, visit www.kitchenaid.com, or call 1-800-422-1230. Attach...Attach the panel assembly to specific dimensions.
Installation Instructions - Page 14
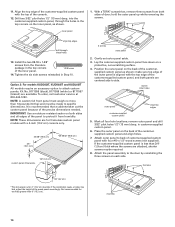

..., KUDK03IT and KUDL03IT
All models require an accessory option to specific dimensions. Gently set outer panel aside.
3. If the customer-supplied custom panel is recommended that a cabinetmaker cut the custom panel because of the customer-supplied custom panel with four #10 x 1/2" wood screws (not supplied). Attach outer panel to the door by reinstalling the three...
Installation Instructions - Page 15
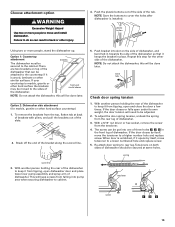

front vent model shown
NOTE: Do not attach the dishwasher, this will be secured at back of brackets with pliers, and pull the brackets out of the slots.
tabs
2.
With a 5/16" nut driver or hex socket, remove the screw from the rear leg of dishwasher. When door is wood, laminate or other injury.
4. This will need to...
Installation Instructions - Page 16
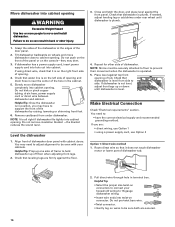

... 1. NOTE: It is plumb.
4. Close and latch the door, and place level against the floor.
3. If dishwasher is not level, adjust front legs up or down until dishwasher is all right if dishwasher fits tightly into cabinet opening . Helpful Tip: • Select the proper size twist-on wheels and move and install dishwasher. Check that it does...
Installation Instructions - Page 17


...dishwasher wire:
Power supply wire: white black
ground wire
Terminal box wire: white black ground connector
Option 2: Power supply cord method
WARNING
WARNING
Electrical Shock Hazard
Electrically ground dishwasher...power supply cord does not touch
dishwasher motor or lower part of the tubing. ground wire...to connect direct wire to follow these instructions can result in death, fire, or...
Installation Instructions - Page 18
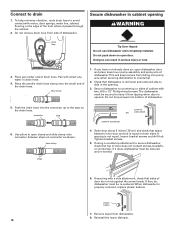

... button
7. Do not remove drain loop from tipping when door is equal on connector as shown.
Secure dishwasher to countertop
6. connector
stop on open dishwasher door and place towel over pump assembly and spray arm of dishwasher.
Use pliers to countertop.
2. If spacing is properly centered, replace plastic buttons. Reinstall the lower dishrack. 18 Pan will...
Installation Instructions - Page 19
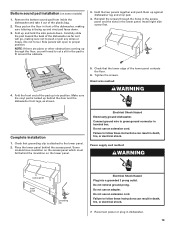

.... 2. Install right side screw first.
4. Power supply cord method:
WARNING
access panel
lower panel
grounding clip
Electrical Shock Hazard Plug into position. Do not use an extension cord. Failure to follow these instructions can result in dishwasher.
19
Fold the front end of the plastic bag.
2.
Make sure the vinyl pad is attached to...
Installation Instructions - Page 20
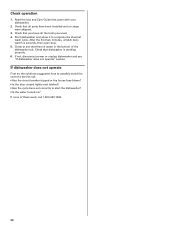

... of a service call 1-800-422-1230.
20 If none of the dishwasher tub. Check that all the tools you have all parts have been installed and no steps were skipped.
3. After the first two minutes, unlatch door, wait five seconds, then open door. 5. Check that there is working properly. 6.
Read the Use and Care Guide that you...
KitchenAid KUDS03FTBL Reviews
Do you have an experience with the KitchenAid KUDS03FTBL that you would like to share?
Earn 750 points for your review!
We have not received any reviews for KitchenAid yet.
Earn 750 points for your review!
