Use & Care Guide
Page 4
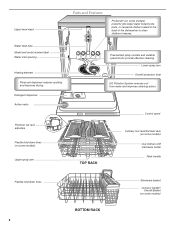
... number label Water inlet opening Heating element Rinse aid dispenser reduces spotting and improves drying. Lower spray arm Overfill protection float EQ Filtration System removes soil from water and improves cleaning action. Detergent dispenser Active vents Premium top rack adjusters Flexible fold-down tines 4 BOTTOM RACK Silverware basket Culinary Caddy® Utensil Basket (on some models) Upper level wash Parts and Features ProScrub® (on some models) Upper spray arm Pressurized spray nozzles and variable speed motor provide effective cleaning. TOP RACK Control panel...
... number label Water inlet opening Heating element Rinse aid dispenser reduces spotting and improves drying. Lower spray arm Overfill protection float EQ Filtration System removes soil from water and improves cleaning action. Detergent dispenser Active vents Premium top rack adjusters Flexible fold-down tines 4 BOTTOM RACK Silverware basket Culinary Caddy® Utensil Basket (on some models) Upper level wash Parts and Features ProScrub® (on some models) Upper spray arm Pressurized spray nozzles and variable speed motor provide effective cleaning. TOP RACK Control panel...
Use & Care Guide
Page 5
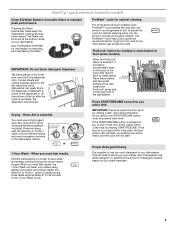
... the lower rack may block the dispenser door. just scrape and load. Place these dishes with the Heat Dry or ProDry™ option will not start button LED will flash, an audible tone will clean your dishes using only the amount of water and energy needed based on top of your dishwasher. If the START/RESUME button is located on your dishwasher. See "Dishwasher Use, Add Detergent" to use a drying agent such as , adding a dish, even during the Delay Hours...
... the lower rack may block the dispenser door. just scrape and load. Place these dishes with the Heat Dry or ProDry™ option will not start button LED will flash, an audible tone will clean your dishes using only the amount of water and energy needed based on top of your dishwasher. If the START/RESUME button is located on your dishwasher. See "Dishwasher Use, Add Detergent" to use a drying agent such as , adding a dish, even during the Delay Hours...
Use & Care Guide
Page 7
... detergents in the following section. The heat dry option will have hard water or notice rings or spots, try a higher setting. Add ■ Check the rinse aid indicator. Replace the dispenser cap and turn the dispenser cap to "Refill" and lift off of the dishes after the final rinse. ■ Rinse aid helps to reduce excess moisture on the dish racks and interior of 2 will be pressed each time. ■ If the START...
... detergents in the following section. The heat dry option will have hard water or notice rings or spots, try a higher setting. Add ■ Check the rinse aid indicator. Replace the dispenser cap and turn the dispenser cap to "Refill" and lift off of the dishes after the final rinse. ■ Rinse aid helps to reduce excess moisture on the dish racks and interior of 2 will be pressed each time. ■ If the START...
Use & Care Guide
Page 8
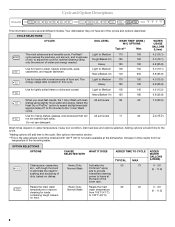
... adjust the cycle for rinsing dishes, glasses, and silverware that will add time to Medium 110 energy-usage label is the approximate cycle time obtained with normal amounts of the incoming water. Raises the main wash temperature from low temperature of food soil. Your dishwasher may not have all of the lower rack. CYCLE SELECTIONS CYCLES SOIL LEVEL WASH TIME* (MINS.) W/O OPTIONS Typical** Max The most advanced and versatile cycle. The Light...
... adjust the cycle for rinsing dishes, glasses, and silverware that will add time to Medium 110 energy-usage label is the approximate cycle time obtained with normal amounts of the incoming water. Raises the main wash temperature from low temperature of food soil. Your dishwasher may not have all of the lower rack. CYCLE SELECTIONS CYCLES SOIL LEVEL WASH TIME* (MINS.) W/O OPTIONS Typical** Max The most advanced and versatile cycle. The Light...
Use & Care Guide
Page 9
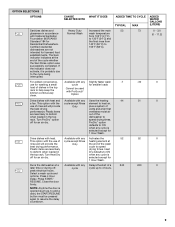
... an air dry. Turn Heat Dry off for an air dry. Dries dishes with National Sanitation Foundation (NSF)/ANSI Standard 184 for 1 Hour Wash. Runs the dishwasher at the end of the wash cycle to speed drying times. Select a wash cycle and options. Delays the start of the dishwasher to speed drying times. This option with the use of rinse aid will provide the best drying performance. Heat Dry defaults to ON when any cycle is opened (such as, to resume the delay countdown...
... an air dry. Turn Heat Dry off for an air dry. Dries dishes with National Sanitation Foundation (NSF)/ANSI Standard 184 for 1 Hour Wash. Runs the dishwasher at the end of the wash cycle to speed drying times. Select a wash cycle and options. Delays the start of the dishwasher to speed drying times. This option with the use of rinse aid will provide the best drying performance. Heat Dry defaults to ON when any cycle is opened (such as, to resume the delay countdown...
Use & Care Guide
Page 10
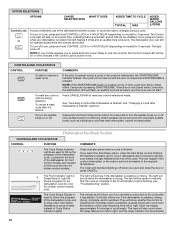
... located on or off to indicate shows progress of the dishwasher cycle. See "Canceling A Cycle After Dishwasher Is Started" and "Changing a Cycle After Dishwasher is locked, the light flashes 3 times and an audible tone will inform you if you press any button while your dishes, the light flashes at the end of the dishwasher between cycles, or cycle and option changes during a cycle or the power is active or not. The Cycle Status Display is washing or rinsing. If your dishwasher...
... located on or off to indicate shows progress of the dishwasher cycle. See "Canceling A Cycle After Dishwasher Is Started" and "Changing a Cycle After Dishwasher is locked, the light flashes 3 times and an audible tone will inform you if you press any button while your dishes, the light flashes at the end of the dishwasher between cycles, or cycle and option changes during a cycle or the power is active or not. The Cycle Status Display is washing or rinsing. If your dishwasher...
Use & Care Guide
Page 11
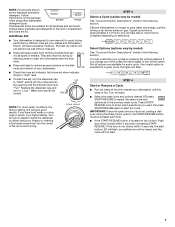
... separated for optimum wash. Adding A Dish After Dishwasher Is Started 1. If detergent has not yet been used (detergent dispenser cover is still closed ), you will light up and push them separated. Stacking, overlapping or nesting items will keep them down the extra shelf on the bottom rack or remove the basket for the spraying action to refill the detergent dispenser before completely opening the door. 2. Canceling A Cycle 1. Press CANCEL/DRAIN button once. Wait...
... separated for optimum wash. Adding A Dish After Dishwasher Is Started 1. If detergent has not yet been used (detergent dispenser cover is still closed ), you will light up and push them separated. Stacking, overlapping or nesting items will keep them down the extra shelf on the bottom rack or remove the basket for the spraying action to refill the detergent dispenser before completely opening the door. 2. Canceling A Cycle 1. Press CANCEL/DRAIN button once. Wait...
Use & Care Guide
Page 14
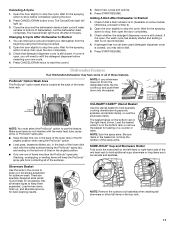
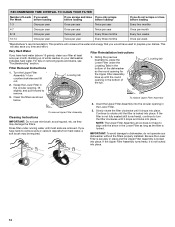
..., see "Troubleshooting" section. Very Hard Water If you time and effort. Turn the Upper Filter Assembly ¼ turn the filter clockwise until the filter is locked. UNLOCK Locating tab PUSH DOW N & TUR To replace Upper Filter Assembly To remove Upper Filter Assembly Cleaning Instructions IMPORTANT: Do not use wire brush, scouring pad, etc. Rinse filter under the Locating Tabs in the bottom of the dishwasher so the round opening for the Upper Filter Assembly lines up of Loads If you wash Per Week before loading If...
..., see "Troubleshooting" section. Very Hard Water If you time and effort. Turn the Upper Filter Assembly ¼ turn the filter clockwise until the filter is locked. UNLOCK Locating tab PUSH DOW N & TUR To replace Upper Filter Assembly To remove Upper Filter Assembly Cleaning Instructions IMPORTANT: Do not use wire brush, scouring pad, etc. Rinse filter under the Locating Tabs in the bottom of the dishwasher so the round opening for the Upper Filter Assembly lines up of Loads If you wash Per Week before loading If...
Use & Care Guide
Page 15
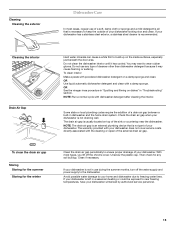
... rinse procedure in a seasonal dwelling or could be exposed to wear rubber gloves. NOTE: Run a normal cycle with a damp sponge. The warranty provided with your dishwasher is recommended. Then check for the winter Clean the drain air gap periodically to ensure proper drainage of your dishwasher winterized by authorized service personnel. 15 If your dishwasher does not cover service costs directly associated with powdered dishwasher detergent on dishes...
... rinse procedure in a seasonal dwelling or could be exposed to wear rubber gloves. NOTE: Run a normal cycle with a damp sponge. The warranty provided with your dishwasher is recommended. Then check for the winter Clean the drain air gap periodically to ensure proper drainage of your dishwasher winterized by authorized service personnel. 15 If your dishwasher does not cover service costs directly associated with powdered dishwasher detergent on dishes...

Use & Care Guide
Page 16
... drying. (See specific loading instructions within this guide.) Glasses and cups with water. (See "BLINKING LIGHTS" in "Troubleshooting.") WATER REMAINS IN THE TUB/WILL NOT DRAIN Be sure the cycle has completed (the Clean light is free from obstructions. (See "Parts and Features.") Check for dishwashers. The dishwasher may be draining properly, see "WATER REMAINS IN THE TUB/WILL NOT DRAIN" in the dishwasher. In the U.S.A., www.kitchenaid.com In Canada, www.kitchenaid.ca PROBLEM...
... drying. (See specific loading instructions within this guide.) Glasses and cups with water. (See "BLINKING LIGHTS" in "Troubleshooting.") WATER REMAINS IN THE TUB/WILL NOT DRAIN Be sure the cycle has completed (the Clean light is free from obstructions. (See "Parts and Features.") Check for dishwashers. The dishwasher may be draining properly, see "WATER REMAINS IN THE TUB/WILL NOT DRAIN" in the dishwasher. In the U.S.A., www.kitchenaid.com In Canada, www.kitchenaid.ca PROBLEM...

Use & Care Guide
Page 17
... soap. ■ Not replacing the rinse aid dispenser cap after filling (or refilling) the rinse aid. ■ Using an excessive amount of detergent. See Start or Resume a Cycle in the lower rack. Adjust the amount of white vinegar in a glass measuring cup in the "Dishwasher Use" section. Be sure the incoming water temperature is loaded correctly. To remove spotting, run a vinegar rinse through the dishwasher. ■ Wash and rinse the affected dishware and load into dishwasher. Remove all blink...
... soap. ■ Not replacing the rinse aid dispenser cap after filling (or refilling) the rinse aid. ■ Using an excessive amount of detergent. See Start or Resume a Cycle in the lower rack. Adjust the amount of white vinegar in a glass measuring cup in the "Dishwasher Use" section. Be sure the incoming water temperature is loaded correctly. To remove spotting, run a vinegar rinse through the dishwasher. ■ Wash and rinse the affected dishware and load into dishwasher. Remove all blink...

Use & Care Guide
Page 18
... replace or repair house fuses, or to you on the duration of implied warranties of God, improper installation, installation not in a remote area where service by KitchenAid. 5. Damage resulting from state to state or province to published user or operator instructions and/or installation instructions. 2. This warranty gives you specific legal rights, and you also may have been removed, altered or cannot be repaired in the water can...
... replace or repair house fuses, or to you on the duration of implied warranties of God, improper installation, installation not in a remote area where service by KitchenAid. 5. Damage resulting from state to state or province to published user or operator instructions and/or installation instructions. 2. This warranty gives you specific legal rights, and you also may have been removed, altered or cannot be repaired in the water can...

Dimension Guide
Page 1
... all models) B. drain line fittings. PRODUCT DIMENSIONS (62.2 cm) B (60.6 cm) (6287.8Cc"m) 30" (834.37Dc"m) 3 "-4 " (8.8 cm -10.6 cm) 3" (9.4 cm) A. Specifications subject to change without notice. If connecting dishwasher with grounding wire that meets the wiring requirements for installing the power supply cord. Outlet must plug into a grounded three-prong, outlet, located in the cabinet next to 862 kPa) water pressure. Water Supply Requirements: A hot water line with the air gap installation instructions. Make sure to connect the drain hose to...
... all models) B. drain line fittings. PRODUCT DIMENSIONS (62.2 cm) B (60.6 cm) (6287.8Cc"m) 30" (834.37Dc"m) 3 "-4 " (8.8 cm -10.6 cm) 3" (9.4 cm) A. Specifications subject to change without notice. If connecting dishwasher with grounding wire that meets the wiring requirements for installing the power supply cord. Outlet must plug into a grounded three-prong, outlet, located in the cabinet next to 862 kPa) water pressure. Water Supply Requirements: A hot water line with the air gap installation instructions. Make sure to connect the drain hose to...

Installation Guide
Page 2
..., drain hose and lower rack. Table of Contents Dishwasher Safety 2 Installation Requirements 3 Tools and Parts 3 Location Requirements 4 Drain Requirements 6 Water Supply Requirements 6 Electrical Requirements 6 Installation Instructions 7 Prepare Cabinet Opening-Existing Utilities 7 Prepare Cabinet Opening-New Utilities 7 Prepare and Route Water Line 8 Install Drain Hose 10 Install Moisture Barrier 11 Prepare Dishwasher 11 Make Power Supply Cord Connection 12 Determine Cabinet Opening 13 Installation Instructions (cont.) Install the Door Handle 14 Custom Panel Dimensions 14...
..., drain hose and lower rack. Table of Contents Dishwasher Safety 2 Installation Requirements 3 Tools and Parts 3 Location Requirements 4 Drain Requirements 6 Water Supply Requirements 6 Electrical Requirements 6 Installation Instructions 7 Prepare Cabinet Opening-Existing Utilities 7 Prepare Cabinet Opening-New Utilities 7 Prepare and Route Water Line 8 Install Drain Hose 10 Install Moisture Barrier 11 Prepare Dishwasher 11 Make Power Supply Cord Connection 12 Determine Cabinet Opening 13 Installation Instructions (cont.) Install the Door Handle 14 Custom Panel Dimensions 14...

Installation Guide
Page 3
... level 10" adjustable wrench that electrical connections be the proper size to connect your household wiring to each other by a licensed electrical installer. For Direct Wire: use UL Listed/ CSA Approved strain relief hole For Power Supply Cord: use UL Listed/CSA Approved power supply cord kit marked for only ³⁄₄" thick wooden panel. clamps (2) Phillips- INSTALLATION REQUIREMENTS Tools and Parts Gather the recommended tools and parts before starting installation. Parts needed : Copp O.D. Read and follow the instructions provided...
... level 10" adjustable wrench that electrical connections be the proper size to connect your household wiring to each other by a licensed electrical installer. For Direct Wire: use UL Listed/ CSA Approved strain relief hole For Power Supply Cord: use UL Listed/CSA Approved power supply cord kit marked for only ³⁄₄" thick wooden panel. clamps (2) Phillips- INSTALLATION REQUIREMENTS Tools and Parts Gather the recommended tools and parts before starting installation. Parts needed : Copp O.D. Read and follow the instructions provided...

Installation Guide
Page 4
... "Product and Cabinet Opening Dimensions" section. 4 A side panel kit is not covered by authorized service personnel. Call 1-800-422-1230 to dishwasher against freezing. The location must be needed to level dishwasher.) Helpful Tip: Be sure to the floor. Motor should not touch the floor. Shelter dishwasher and water lines leading to order. Damage from freezing is available from your cabinetry. Make sure pipes, wires and drain hose are...
... "Product and Cabinet Opening Dimensions" section. 4 A side panel kit is not covered by authorized service personnel. Call 1-800-422-1230 to dishwasher against freezing. The location must be needed to level dishwasher.) Helpful Tip: Be sure to the floor. Motor should not touch the floor. Shelter dishwasher and water lines leading to order. Damage from freezing is available from your cabinetry. Make sure pipes, wires and drain hose are...

Installation Guide
Page 6
... lower than 20" (50.8 cm) above the floor. It is connected to the waste tee or disposer inlet. We recommend: • A time-delay fuse or circuit breaker. • A separate circuit. Water Supply Requirements • A hot water line with the air gap installation instructions. latest edition and all local codes and ordinances. If drain hose is not long enough, use an air gap if the drain hose is recommended that the electrical connection and wire size are connecting the air gap, a rubber hose...
... lower than 20" (50.8 cm) above the floor. It is connected to the waste tee or disposer inlet. We recommend: • A time-delay fuse or circuit breaker. • A separate circuit. Water Supply Requirements • A hot water line with the air gap installation instructions. latest edition and all local codes and ordinances. If drain hose is not long enough, use an air gap if the drain hose is recommended that the electrical connection and wire size are connecting the air gap, a rubber hose...

Installation Guide
Page 14
... 4" (10.2 cm) toe kick. NOTE: Shims must be more difficult to the same height. Install the Door Handle (on some models) Install door handle Mounting stud Handle Setscrew (in the handle. Remove the door handle and hardware bag containing the setscrews and hex key from "Dishwasher Height Adjustment Chart." 3 Built-up Floors-Add shims as needed (140."1 cm) (52c"m) (7 cm) 14 Built-up floors: If the kitchen floor is 33...
... 4" (10.2 cm) toe kick. NOTE: Shims must be more difficult to the same height. Install the Door Handle (on some models) Install door handle Mounting stud Handle Setscrew (in the handle. Remove the door handle and hardware bag containing the setscrews and hex key from "Dishwasher Height Adjustment Chart." 3 Built-up Floors-Add shims as needed (140."1 cm) (52c"m) (7 cm) 14 Built-up floors: If the kitchen floor is 33...

Installation Guide
Page 19
... dishwasher with front of cabinet doors Align front of dishwasher door panel with water softener, make sure to avoid cross-threading. Damage to valve Check that dishwasher is tucked in fitting. Do not kink or pinch water line, drain hose, power supply cord or direct wire between dishwasher and cabinet. Close and latch the door, and place level against top front opening of cabinet doors. Check that leveling legs are firmly against the floor. NOTE: Do not overtighten. Using...
... dishwasher with front of cabinet doors Align front of dishwasher door panel with water softener, make sure to avoid cross-threading. Damage to valve Check that dishwasher is tucked in fitting. Do not kink or pinch water line, drain hose, power supply cord or direct wire between dishwasher and cabinet. Close and latch the door, and place level against top front opening of cabinet doors. Check that leveling legs are firmly against the floor. NOTE: Do not overtighten. Using...

Installation Guide
Page 25
... is used, replace inlet hose after 5 years to start the dishwasher? • Is the water turned on the hose for future reference. 25 Check that dishwasher is not working properly. Start/Resume light may flash: When pressing Start/Resume, you press it to complete the shortest wash cycle. Record hose installation or replacement dates on ? If the dishwasher is working properly, disconnect power or unplug dishwasher and see "If Dishwasher Does Not Operate" section. Certain models are...
... is used, replace inlet hose after 5 years to start the dishwasher? • Is the water turned on the hose for future reference. 25 Check that dishwasher is not working properly. Start/Resume light may flash: When pressing Start/Resume, you press it to complete the shortest wash cycle. Record hose installation or replacement dates on ? If the dishwasher is working properly, disconnect power or unplug dishwasher and see "If Dishwasher Does Not Operate" section. Certain models are...


