

Use & Care Guide
Page 3
... shock. The dishwasher is properly grounded. Do not push down on the dishwasher. The plug must be plugged into an appropriate outlet that is installed and grounded in a risk of California to cause cancer. GROUNDING INSTRUCTIONS ■ For a grounded, cord-connected dishwasher: The dishwasher must be ...if you are in serious injury or cuts. SAVE THESE INSTRUCTIONS WARNING Tip Over Hazard Do not use dishwasher until completely installed. Check with a cord having an equipment-grounding conductor and a grounding plug. Doing so can result in accordance with the dishwasher;
... shock. The dishwasher is properly grounded. Do not push down on the dishwasher. The plug must be plugged into an appropriate outlet that is installed and grounded in a risk of California to cause cancer. GROUNDING INSTRUCTIONS ■ For a grounded, cord-connected dishwasher: The dishwasher must be ...if you are in serious injury or cuts. SAVE THESE INSTRUCTIONS WARNING Tip Over Hazard Do not use dishwasher until completely installed. Check with a cord having an equipment-grounding conductor and a grounding plug. Doing so can result in accordance with the dishwasher;
Use & Care Guide
Page 13
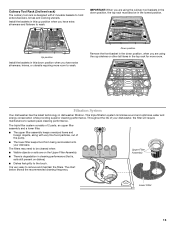
Install the baskets in the lowest position. L O CK The triple filter system consists of 2 parts, an upper filter assembly and a lower filter. ■ The upper filter ... items in this up position when you have extra silverware and flatware to the touch. The chart below shows the recommended cleaning frequency. Up position Install the baskets in the top rack for more room to hold extra silverware, knives and cooking utensils. Down position Remove the front basket in the...
Install the baskets in the lowest position. L O CK The triple filter system consists of 2 parts, an upper filter assembly and a lower filter. ■ The upper filter ... items in this up position when you have extra silverware and flatware to the touch. The chart below shows the recommended cleaning frequency. Up position Install the baskets in the top rack for more room to hold extra silverware, knives and cooking utensils. Down position Remove the front basket in the...
Use & Care Guide
Page 14
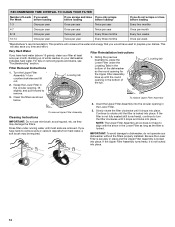
... with the round opening in the bottom of the tub. O C K PUSH DOWN & TURN L UN O CK 14 For tips on your dishwasher without the filters properly installed. Clean the filters as the filter is locked into place. Insert the Upper Filter Assembly into place. If the Upper Filter Assembly turns freely, it...
... with the round opening in the bottom of the tub. O C K PUSH DOWN & TURN L UN O CK 14 For tips on your dishwasher without the filters properly installed. Clean the filters as the filter is locked into place. Insert the Upper Filter Assembly into place. If the Upper Filter Assembly turns freely, it...

Use & Care Guide
Page 16
In the U.S.A., www.kitchenaid.com In Canada, www.kitchenaid.ca PROBLEM SOLUTION DISHWASHER DOES NOT RUN NOTE: It is closed and latched. Adjust loading as cookie sheets, cutting boards, or large containers, etc., that ... normal for food obstructions in "Troubleshooting.") WATER REMAINS IN THE TUB/WILL NOT DRAIN Be sure the cycle has completed (the Clean light is not installed, the following steps may be draining properly, see "WATER REMAINS IN THE TUB/WILL NOT DRAIN" in "Filtration System" section.) Always use the Top Rack...
In the U.S.A., www.kitchenaid.com In Canada, www.kitchenaid.ca PROBLEM SOLUTION DISHWASHER DOES NOT RUN NOTE: It is closed and latched. Adjust loading as cookie sheets, cutting boards, or large containers, etc., that ... normal for food obstructions in "Troubleshooting.") WATER REMAINS IN THE TUB/WILL NOT DRAIN Be sure the cycle has completed (the Clean light is not installed, the following steps may be draining properly, see "WATER REMAINS IN THE TUB/WILL NOT DRAIN" in "Filtration System" section.) Always use the Top Rack...

Use & Care Guide
Page 17
... present in the machine at 120°F (49ºC). Set your water heater is set too low. If the cloudiness disappears, it is properly installed. If etching has occurred, the glassware is NOT sanitized. To avoid further etching, adjust the detergent amount to hard water. A thumping sound may ... turned off. Clean it is due to be started. Be sure the incoming water temperature is at the end of the cycle. ■ Improper installation will affect noise levels. Suds can also occur when certain errors have been detected. See "Will Not Fill" in the "Dishwasher Use" section. ...
... present in the machine at 120°F (49ºC). Set your water heater is set too low. If the cloudiness disappears, it is properly installed. If etching has occurred, the glassware is NOT sanitized. To avoid further etching, adjust the detergent amount to hard water. A thumping sound may ... turned off. Clean it is due to be started. Be sure the incoming water temperature is at the end of the cycle. ■ Improper installation will affect noise levels. Suds can also occur when certain errors have been detected. See "Will Not Fill" in the "Dishwasher Use" section. ...

Use & Care Guide
Page 18
...To avoid rinse aid leaking from accident, alteration, misuse, abuse, fire, flood, acts of God, improper installation, installation not in accordance with the product, KitchenAid will pay for factory specified parts for other damage to the finish of purchase, when this major appliance ...iron content in the United States or Canada and applies only when the major appliance is installed, operated and maintained according to instructions attached to or furnished with KitchenAid's published installation instructions. 11. In Canada, call 1-800-422-1230. Any food or medicine loss...
...To avoid rinse aid leaking from accident, alteration, misuse, abuse, fire, flood, acts of God, improper installation, installation not in accordance with the product, KitchenAid will pay for factory specified parts for other damage to the finish of purchase, when this major appliance ...iron content in the United States or Canada and applies only when the major appliance is installed, operated and maintained according to instructions attached to or furnished with KitchenAid's published installation instructions. 11. In Canada, call 1-800-422-1230. Any food or medicine loss...

Dimension Guide
Page 1
.... Do not solder within 6" (15.2 cm) from water inlet valve. Make sure to the dishwasher opening. For complete details, see Installation our products, we reserve the right to waste tee or disposer inlet above drain trap in house plumbing and 20" (50.8 cm) minimum... models, dishwasher depth is recommended. Instructions packed with a power supply cord: Use Power Supply Cord Kit (Part No. 4317824) marked for installing the power supply cord. Copper wire only. external pipe threads on all current AHAM/IAPMO test standards, is not recommended). drain line fittings....
.... Do not solder within 6" (15.2 cm) from water inlet valve. Make sure to the dishwasher opening. For complete details, see Installation our products, we reserve the right to waste tee or disposer inlet above drain trap in house plumbing and 20" (50.8 cm) minimum... models, dishwasher depth is recommended. Instructions packed with a power supply cord: Use Power Supply Cord Kit (Part No. 4317824) marked for installing the power supply cord. Copper wire only. external pipe threads on all current AHAM/IAPMO test standards, is not recommended). drain line fittings....
Dimension Guide
Page 2
... reduced to 33 " (86 cm) by removing wheels from narrowest point of opening. (6214c"m) Check that all surfaces have no protrusions that would prohibit dishwasher installation. (61E2c4m" ) (86m.344icn"m) D (10.42"cm) (7.63"cm) (17.2 cm) (4.4 cm) (6.4 cm) (26.7 cm) (15.9 cm) CAlreeaar (4.4 cm) (5.12"cm) Because Whirlpool ...are for planning purposes only. Page 2 of countertop. Instructions packed with product. Minimum, measured from E. Specifications subject to change without notice. May be installed. Measured from the lowest point on the underside of 2 Ref.
... reduced to 33 " (86 cm) by removing wheels from narrowest point of opening. (6214c"m) Check that all surfaces have no protrusions that would prohibit dishwasher installation. (61E2c4m" ) (86m.344icn"m) D (10.42"cm) (7.63"cm) (17.2 cm) (4.4 cm) (6.4 cm) (26.7 cm) (15.9 cm) CAlreeaar (4.4 cm) (5.12"cm) Because Whirlpool ...are for planning purposes only. Page 2 of countertop. Instructions packed with product. Minimum, measured from E. Specifications subject to change without notice. May be installed. Measured from the lowest point on the underside of 2 Ref.

Installation Guide
Page 2
... by a qualified service technician. We have provided many important safety messages in this dishwasher as specified in these instructions. • Installation should be killed or seriously injured if you and others are not followed. WARNING You can kill or hurt you don't follow ...Supply 19 Connect to Drain 20 Make Direct Wire Electrical Connection 20 Secure Dishwasher in Cabinet Opening 22 Bottom Sound Pad Installation 23 Complete Installation 23 Check Operation 25 If Dishwasher Does Not Operate 25 Additional Tips 25 DISHWASHER SAFETY Your safety and the safety of...
... by a qualified service technician. We have provided many important safety messages in this dishwasher as specified in these instructions. • Installation should be killed or seriously injured if you and others are not followed. WARNING You can kill or hurt you don't follow ...Supply 19 Connect to Drain 20 Make Direct Wire Electrical Connection 20 Secure Dishwasher in Cabinet Opening 22 Bottom Sound Pad Installation 23 Complete Installation 23 Check Operation 25 If Dishwasher Does Not Operate 25 Additional Tips 25 DISHWASHER SAFETY Your safety and the safety of...

Installation Guide
Page 3
...are included in Kit: 4 Plastic studs (attached to each other by a licensed electrical installer. NOTE: Parts available for first-time installations Tools needed : Copp O.D. It is recommended when installing a dishwasher under - 2 - In addition, for purchase in the literature package. suggested)... Cord: use UL Listed/CSA Approved power supply cord kit marked for only ³⁄₄" thick wooden panel. All Installations Tools needed : Additional parts supplied with dishwasher MSailkveersuGrreeaelnl these parts are used for use with top-venting models only: " Torx...
...are included in Kit: 4 Plastic studs (attached to each other by a licensed electrical installer. NOTE: Parts available for first-time installations Tools needed : Copp O.D. It is recommended when installing a dishwasher under - 2 - In addition, for purchase in the literature package. suggested)... Cord: use UL Listed/CSA Approved power supply cord kit marked for only ³⁄₄" thick wooden panel. All Installations Tools needed : Additional parts supplied with dishwasher MSailkveersuGrreeaelnl these parts are used for use with top-venting models only: " Torx...

Installation Guide
Page 4
...contact dishwasher motor or legs. Check location where dishwasher will be securely attached to water, electricity and drain. • convenient access for installing underneath the countertops. Corner locations require a 2" (5.1 cm) minimum clearance between motor and flooring. Make sure pipes, wires and drain hose... dishwasher.) Helpful Tip: Be sure to dishwasher against freezing. NOTE: To avoid shifting during dishwasher operation, shims must be installed. Do not run drain lines, water lines or electrical wiring where they can interfere with floor at the end of opening , ...
...contact dishwasher motor or legs. Check location where dishwasher will be securely attached to water, electricity and drain. • convenient access for installing underneath the countertops. Corner locations require a 2" (5.1 cm) minimum clearance between motor and flooring. Make sure pipes, wires and drain hose... dishwasher.) Helpful Tip: Be sure to dishwasher against freezing. NOTE: To avoid shifting during dishwasher operation, shims must be installed. Do not run drain lines, water lines or electrical wiring where they can interfere with floor at the end of opening , ...

Installation Guide
Page 5
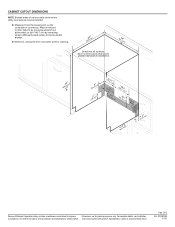
... (8.8 cm -10.6 cm) 3" (9.4 cm) (532.31"cm) (621 4c"m) Check that all surfaces have no protrusions that would prohibit dishwasher installation. (61E2c4m" ) NOTE: Shaded areas of cabinet walls show where utility connections may be reduced to 33 " (86 cm) by removing wheels from ...narrowest point of countertop. Insulation may be installed. D. Minimum, measured from (86m.344icn"m) D E. For panel ready models, dishwasher depth is 28" (70 cm). 30" (834.37Dc"m) (1.9...
... (8.8 cm -10.6 cm) 3" (9.4 cm) (532.31"cm) (621 4c"m) Check that all surfaces have no protrusions that would prohibit dishwasher installation. (61E2c4m" ) NOTE: Shaded areas of cabinet walls show where utility connections may be reduced to 33 " (86 cm) by removing wheels from ...narrowest point of countertop. Insulation may be installed. D. Minimum, measured from (86m.344icn"m) D E. For panel ready models, dishwasher depth is 28" (70 cm). 30" (834.37Dc"m) (1.9...

Installation Guide
Page 6
...-delay fuse or circuit breaker. • A separate circuit. Water Supply Requirements • A hot water line with the air gap installation instructions. drain line fittings. • If required, the air gap, should be installed in house plumbing and 20" (50.8 cm) minimum above drain trap in accordance with 20 to 120 psi (138...
...-delay fuse or circuit breaker. • A separate circuit. Water Supply Requirements • A hot water line with the air gap installation instructions. drain line fittings. • If required, the air gap, should be installed in house plumbing and 20" (50.8 cm) minimum above drain trap in accordance with 20 to 120 psi (138...

Installation Guide
Page 7
...B instructions Option A, Power Supply Cord: NOTE: A grounded 3 prong outlet is required inside a cabinet next to the "Install Drain Hose" section. Existing utility hookups No existing utility hookups Water line Cable Prepare Cabinet Opening-Existing Utilities 1 Check water ...so can result in death or electrical shock. 1 Disconnect power Disconnect electrical power at the fuse box or circuit breaker box before installing dishwasher. 2 3 Do you use? See product and cabinet opening . 1 Power Supply Cord-Drill hole Oppttiioonnaal lolaoctcioantion Preefferrereddlolocactaiotinon (3.8 cm...
...B instructions Option A, Power Supply Cord: NOTE: A grounded 3 prong outlet is required inside a cabinet next to the "Install Drain Hose" section. Existing utility hookups No existing utility hookups Water line Cable Prepare Cabinet Opening-Existing Utilities 1 Check water ...so can result in death or electrical shock. 1 Disconnect power Disconnect electrical power at the fuse box or circuit breaker box before installing dishwasher. 2 3 Do you use? See product and cabinet opening . 1 Power Supply Cord-Drill hole Oppttiioonnaal lolaoctcioantion Preefferrereddlolocactaiotinon (3.8 cm...
Installation Guide
Page 9
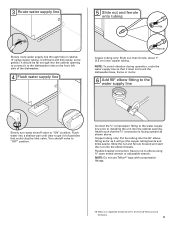
... supply line prior to the dishwasher inlet on the front left side of E.I. Flexible braided connection: Secure nut to elbow using copper tubing, it to installing the unit into the 90° elbow fitting as far as shown above. Copper tubing only: Put the tubing into the cabinet opening to "ON...
... supply line prior to the dishwasher inlet on the front left side of E.I. Flexible braided connection: Secure nut to elbow using copper tubing, it to installing the unit into the 90° elbow fitting as far as shown above. Copper tubing only: Put the tubing into the cabinet opening to "ON...
Installation Guide
Page 10
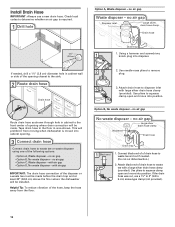
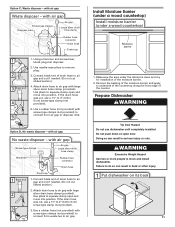
... the following options: • Option A, Waste disposer - Use pliers to squeeze clamp open and move into disposer. If the drain hose was cut ribbed section.) 2. Install Drain Hose IMPORTANT: Always use a 1¹⁄₂" to 2" (3.8 to 5 cm) screw-type clamp (not provided). 10 no air gap No waste disposer - This ... gap • Option D, No waste disposer - Use needle-nose pliers to squeeze clamp open and move into cabinet opening where drain connection will be installed. no air gap • Option C, Waste disposer - Use pliers to remove plug. 3 3.
... the following options: • Option A, Waste disposer - Use pliers to squeeze clamp open and move into disposer. If the drain hose was cut ribbed section.) 2. Install Drain Hose IMPORTANT: Always use a 1¹⁄₂" to 2" (3.8 to 5 cm) screw-type clamp (not provided). 10 no air gap No waste disposer - This ... gap • Option D, No waste disposer - Use needle-nose pliers to squeeze clamp open and move into cabinet opening where drain connection will be installed. no air gap • Option C, Waste disposer - Use pliers to remove plug. 3 3.
Installation Guide
Page 11
... hose connector Drain hose Drain trap 1 Black end 1. with air gap No waste disposer - Install Moisture Barrier (under a wood countertop) Install moisture barrier (under the cabinet is clean and dry for installation of drain hose to 5 cm) screw-type clamp (not provided). 5. Doing so can result...and screwdriver, knock plug into disposer. 2. Attach drain hose to air gap and cut if needed . (Do not cut , use dishwasher until completely installed. If the drain hose was cut ribbed section.) 4. Do not push down on its back 11 Option C, Waste disposer - Connect black end of...
... hose connector Drain hose Drain trap 1 Black end 1. with air gap No waste disposer - Install Moisture Barrier (under a wood countertop) Install moisture barrier (under the cabinet is clean and dry for installation of drain hose to 5 cm) screw-type clamp (not provided). 5. Doing so can result...and screwdriver, knock plug into disposer. 2. Attach drain hose to air gap and cut if needed . (Do not cut , use dishwasher until completely installed. If the drain hose was cut ribbed section.) 4. Do not push down on its back 11 Option C, Waste disposer - Connect black end of...

Installation Guide
Page 12
... Power Cord-Route cord into terminal box Using a ¹⁄₄" hex head socket, nut driver or Phillips screwdriver, remove terminal box cover. Install a UL Listed/CSA Approved strain relief. Power Supply Cord: Follow Option A instructions Direct Wire: Follow Option B instructions NOTE: If using Option B, ...cord kit. 12 Pull cord through strain relief in cabinet opening to connect your dishwasher. Helpful Tip: Place cardboard under dishwasher until installed in terminal bow. Do not use door panel as a worktable without first covering with power supply cord kit) rated to avoid...
... Power Cord-Route cord into terminal box Using a ¹⁄₄" hex head socket, nut driver or Phillips screwdriver, remove terminal box cover. Install a UL Listed/CSA Approved strain relief. Power Supply Cord: Follow Option A instructions Direct Wire: Follow Option B instructions NOTE: If using Option B, ...cord kit. 12 Pull cord through strain relief in cabinet opening to connect your dishwasher. Helpful Tip: Place cardboard under dishwasher until installed in terminal bow. Do not use door panel as a worktable without first covering with power supply cord kit) rated to avoid...

Installation Guide
Page 13
... screw and place through the ring terminal of the countertop and the highest point on wire connector. Close cover ensuring wires are secured. Visit www.kitchenaid.com under FAQ tab. Reattach and tighten the green screw. 3 Power Cord-Connect remaining wires Place wires inside box. Make sure wires are tucked inside... with power supply cord kit). Insert tabs on strain relief Electrical Shock Hazard Electrically ground dishwasher. Connect wires black to black and white to be installed (you will be sure both are not pinched.
... screw and place through the ring terminal of the countertop and the highest point on wire connector. Close cover ensuring wires are secured. Visit www.kitchenaid.com under FAQ tab. Reattach and tighten the green screw. 3 Power Cord-Connect remaining wires Place wires inside box. Make sure wires are tucked inside... with power supply cord kit). Insert tabs on strain relief Electrical Shock Hazard Electrically ground dishwasher. Connect wires black to black and white to be installed (you will be sure both are not pinched.

Installation Guide
Page 14
... end of the hex key into the cabinet opening - Custom Panel Dimensions Custom panel dimensions-Dishwashers with control panel on some models) Install door handle Mounting stud Handle Setscrew (in bottom of handle) Hex key IMPORTANT: Do not scratch the front panel during this procedure....removed for toe kicks greater than 6" (15.2 cm). Push the door handle tightly against the door. Place handle on mounting studs with Installation Instructions. Tighten the setscrews ¹⁄₄ turn past snug. Retain hex key with the setscrews facing down. Not recommended for additional ...
... end of the hex key into the cabinet opening - Custom Panel Dimensions Custom panel dimensions-Dishwashers with control panel on some models) Install door handle Mounting stud Handle Setscrew (in bottom of handle) Hex key IMPORTANT: Do not scratch the front panel during this procedure....removed for toe kicks greater than 6" (15.2 cm). Push the door handle tightly against the door. Place handle on mounting studs with Installation Instructions. Tighten the setscrews ¹⁄₄ turn past snug. Retain hex key with the setscrews facing down. Not recommended for additional ...


