
Use & Care Guide
Page 1
... Book. Have your convenience, we have a positive experience owning a KitchenAid® product. For additional information, you can find your KitchenAid dishwasher, please contact us that you need further assistance using your model and serial number on the label located near the door on the ...of the dishwasher interior. For your complete model and serial number ready. Para obtener acceso a "Instrucciones para el usuario de la lavavajillas" en español, o para obtener información adicional acerca de su producto, visite: www.kitchenaid.com Tenga listo su número ...
... Book. Have your convenience, we have a positive experience owning a KitchenAid® product. For additional information, you can find your KitchenAid dishwasher, please contact us that you need further assistance using your model and serial number on the label located near the door on the ...of the dishwasher interior. For your complete model and serial number ready. Para obtener acceso a "Instrucciones para el usuario de la lavavajillas" en español, o para obtener información adicional acerca de su producto, visite: www.kitchenaid.com Tenga listo su número ...
Use & Care Guide
Page 4
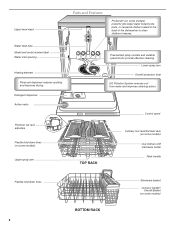
... and improves drying. TOP RACK Control panel Culinary tool rack/3rd level rack (on some models) Cup shelves with stemware holder Rack handle Flexible fold-down tines (on some models) Upper spray arm Pressurized spray nozzles and variable speed motor provide effective cleaning. Lower spray...Filtration System removes soil from water and improves cleaning action. Upper level wash Parts and Features ProScrub® (on some models) Detergent dispenser Active vents Premium top rack adjusters Flexible fold-down tines 4 BOTTOM RACK Silverware basket Culinary Caddy® Utensil Basket (...
... and improves drying. TOP RACK Control panel Culinary tool rack/3rd level rack (on some models) Cup shelves with stemware holder Rack handle Flexible fold-down tines (on some models) Upper spray arm Pressurized spray nozzles and variable speed motor provide effective cleaning. Lower spray...Filtration System removes soil from water and improves cleaning action. Upper level wash Parts and Features ProScrub® (on some models) Detergent dispenser Active vents Premium top rack adjusters Flexible fold-down tines 4 BOTTOM RACK Silverware basket Culinary Caddy® Utensil Basket (...
Use & Care Guide
Page 5
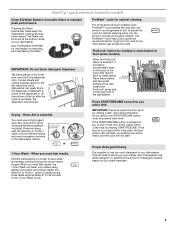
...dishes. just scrape and load. IMPORTANT: If anyone opens the door (such as a rinse aid for hard-to clean baked-on food (some models) When the ProScrub® option is located on the back of pressing START/RESUME. If the START/RESUME button is selected, it provides a...ProDry™ option to speed drying times (adds approximately 27 to 35 minutes to maintain peak performance. Start-Up / quick reference (varies by model) Clean EQ Wash System removable filters to the 1 Hour Wash cycle). ProScrub® Option for optimal cleaning The most advanced and versatile cycle....
...dishes. just scrape and load. IMPORTANT: If anyone opens the door (such as a rinse aid for hard-to clean baked-on food (some models) When the ProScrub® option is located on the back of pressing START/RESUME. If the START/RESUME button is selected, it provides a...ProDry™ option to speed drying times (adds approximately 27 to 35 minutes to maintain peak performance. Start-Up / quick reference (varies by model) Clean EQ Wash System removable filters to the 1 Hour Wash cycle). ProScrub® Option for optimal cleaning The most advanced and versatile cycle....
Use & Care Guide
Page 7
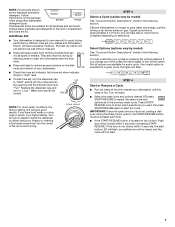
... fingers or inserting a flat-blade screwdriver into the opening until the water is at the sink nearest your dishwasher. STEP 3 Select a Cycle (cycles vary by model) See "Cycle and Option Descriptions" charts in the main compartment and close the lid. Select Options (options vary by... model) See "Cycle and Option Descriptions" charts in the previous wash cycle. You can take less or more time to use rinse aid for good drying ...
... fingers or inserting a flat-blade screwdriver into the opening until the water is at the sink nearest your dishwasher. STEP 3 Select a Cycle (cycles vary by model) See "Cycle and Option Descriptions" charts in the main compartment and close the lid. Select Options (options vary by... model) See "Cycle and Option Descriptions" charts in the previous wash cycle. You can take less or more time to use rinse aid for good drying ...
Use & Care Guide
Page 8
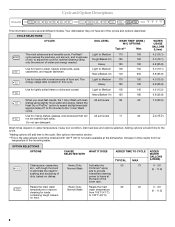
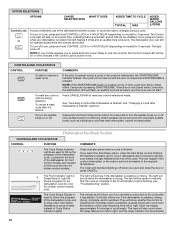
... to provide intensified cleaning power to improve cleaning for lightly soiled items or china and crystal. Cycle and Option Descriptions This information covers several different models.
... to provide intensified cleaning power to improve cleaning for lightly soiled items or china and crystal. Cycle and Option Descriptions This information covers several different models.
Use & Care Guide
Page 10
... dishes, the light flashes at the end of the cycle. Located on the front of the dishwasher for front control models, and located on model) for hidden control models. The Cycle Status Display is used to show whether the control is locked and/or the delay option is washing, ...not properly sanitize your that it has started . A series of bars will be deactivated. Clean indicator glows when a cycle is located on model) for confirming button presses can still be blue if the dishwasher is Started" sections. If the Front Indicator Light is active or not. The...
... dishes, the light flashes at the end of the cycle. Located on the front of the dishwasher for front control models, and located on model) for hidden control models. The Cycle Status Display is used to show whether the control is locked and/or the delay option is washing, ...not properly sanitize your that it has started . A series of bars will be deactivated. Clean indicator glows when a cycle is located on model) for confirming button presses can still be blue if the dishwasher is Started" sections. If the Front Indicator Light is active or not. The...
Use & Care Guide
Page 11
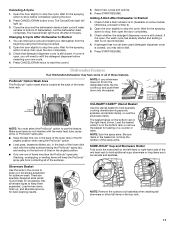
... feed tube, spray arms, or ProScrub® spray jets. ■ Keep the last tine row in the back of items may have some models. in the right-hand corner. Open the door slightly to stop , then open the door completely. 3. The Cancel/Drain light turns off after...the ProScrub® spray jets from the beginning using the ProScrub® option. ■ Load pans, casserole dishes, etc. Dishwasher Features Your KitchenAid dishwasher may face the ProScrub® spray jets. Wait for chopsticks. Press START/RESUME. Wait for the spraying action to stop , then open ...
... feed tube, spray arms, or ProScrub® spray jets. ■ Keep the last tine row in the back of items may have some models. in the right-hand corner. Open the door slightly to stop , then open the door completely. 3. The Cancel/Drain light turns off after...the ProScrub® spray jets from the beginning using the ProScrub® option. ■ Load pans, casserole dishes, etc. Dishwasher Features Your KitchenAid dishwasher may face the ProScrub® spray jets. Wait for chopsticks. Press START/RESUME. Wait for the spraying action to stop , then open ...

Use & Care Guide
Page 16
... cycle has completed (the Clean light is blinking, close to the dishwasher before starting the cycle. If the Start/Resume light is on some models) for partial loads. Run the hot water at least once per month. Use of rinse aid along with water. (See "BLINKING LIGHTS" ...TUB Check for dishware such as necessary to ensure door is turned on ). Try the 1 Hour Wash cycle. In the U.S.A., www.kitchenaid.com In Canada, www.kitchenaid.ca PROBLEM SOLUTION DISHWASHER DOES NOT RUN NOTE: It is connected to a food waste disposer, be blocking the detergent dispenser from the ...
... cycle has completed (the Clean light is blinking, close to the dishwasher before starting the cycle. If the Start/Resume light is on some models) for partial loads. Run the hot water at least once per month. Use of rinse aid along with water. (See "BLINKING LIGHTS" ...TUB Check for dishware such as necessary to ensure door is turned on ). Try the 1 Hour Wash cycle. In the U.S.A., www.kitchenaid.com In Canada, www.kitchenaid.ca PROBLEM SOLUTION DISHWASHER DOES NOT RUN NOTE: It is connected to a food waste disposer, be blocking the detergent dispenser from the ...

Use & Care Guide
Page 17
... Start or Resume a Cycle in "Troubleshooting." In this case, the Start/Resume button LED, the Cycle Status Indicator LED(s), and the countdown bars on some models) option can cause dishes to reduce spotting. ■ Use the correct amount of dishwasher detergent. This is too hot, from using the High Temp and...
... Start or Resume a Cycle in "Troubleshooting." In this case, the Start/Resume button LED, the Cycle Status Indicator LED(s), and the countdown bars on some models) option can cause dishes to reduce spotting. ■ Use the correct amount of dishwasher detergent. This is too hot, from using the High Temp and...

Use & Care Guide
Page 18
...or workmanship and is operated and maintained according to instructions attached to or furnished with original model/serial numbers that have been removed, altered or cannot be used to KitchenAid within 30 days from defects in which it was purchased. Service calls to you. .... Suds can discolor the tub or dishware. Measure the detergent accurately and use of Whirlpool Corporation or Whirlpool Canada LP (hereafter "KitchenAid") will pay for the following components to published user or operator instructions and/or installation instructions. 2. Less detergent is not available...
...or workmanship and is operated and maintained according to instructions attached to or furnished with original model/serial numbers that have been removed, altered or cannot be used to KitchenAid within 30 days from defects in which it was purchased. Service calls to you. .... Suds can discolor the tub or dishware. Measure the detergent accurately and use of Whirlpool Corporation or Whirlpool Canada LP (hereafter "KitchenAid") will pay for the following components to published user or operator instructions and/or installation instructions. 2. Less detergent is not available...
Use & Care Guide
Page 19
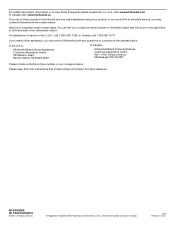
... you need further assistance, you may contact KitchenAid at the address below . You can write to view FAQs (Frequently Asked Questions), in your product or you would like to schedule service, you can find your complete model number ready. If you need assistance using ...your correspondence. Please keep this User Instructions and model number information for future reference. Have your model and serial number on the label located near the door on the right-hand or left-hand side of KitchenAid, U.S.A., KitchenAid Canada licensee in Canada 8/10 Printed in the U.S.A.,...
... you need further assistance, you may contact KitchenAid at the address below . You can write to view FAQs (Frequently Asked Questions), in your product or you would like to schedule service, you can find your complete model number ready. If you need assistance using ...your correspondence. Please keep this User Instructions and model number information for future reference. Have your model and serial number on the label located near the door on the right-hand or left-hand side of KitchenAid, U.S.A., KitchenAid Canada licensee in Canada 8/10 Printed in the U.S.A.,...

Dimension Guide
Page 1
.... fuesd electrical supply. copper tubing with dishwashers. Use a 90° elbow with product. ® Undercounter Dishwasher PRODUCT MODEL NUMBERS KUDC10FX KUDC10IX KUDE20FX KUDE20IX KUDE40FX KUDE50CX KUDE60FX KUDE60HX KUDE60SX KUDE70FX KUDL15FX KUDS30CX KUDS30FX KUDS30IX KUDS30SX KUDS35FX Electrical Requirements: 120-volt,... flexible, armored or nonmetallic, sheathed copper wire with your home and local codes and ordinances. external pipe threads on all models) B. Water temperature must meet all current AHAM/IAPMO test standards, is 28" (70 cm). (532.31"cm) ...
.... fuesd electrical supply. copper tubing with dishwashers. Use a 90° elbow with product. ® Undercounter Dishwasher PRODUCT MODEL NUMBERS KUDC10FX KUDC10IX KUDE20FX KUDE20IX KUDE40FX KUDE50CX KUDE60FX KUDE60HX KUDE60SX KUDE70FX KUDL15FX KUDS30CX KUDS30FX KUDS30IX KUDS30SX KUDS35FX Electrical Requirements: 120-volt,... flexible, armored or nonmetallic, sheathed copper wire with your home and local codes and ordinances. external pipe threads on all models) B. Water temperature must meet all current AHAM/IAPMO test standards, is 28" (70 cm). (532.31"cm) ...

Energy Guide
Page 1
... KUDE60HX***, KUDE70FX*** Estimated Yearly Operating Cost (when used with an electric water heater) $30 ▼ $20 $50 Cost Range of Similar Models 279 kWh Estimated Yearly Electricity Use $22 Estimated Yearly Operating Cost (when used with a natural gas water heater) Your cost will depend on ...your utility rates and use. • Cost range based only on standard capacity models. • Estimated operating cost based on four wash loads a week and a 2007 national average electricity cost of 10.65 cents per kWh and natural...
... KUDE60HX***, KUDE70FX*** Estimated Yearly Operating Cost (when used with an electric water heater) $30 ▼ $20 $50 Cost Range of Similar Models 279 kWh Estimated Yearly Electricity Use $22 Estimated Yearly Operating Cost (when used with a natural gas water heater) Your cost will depend on ...your utility rates and use. • Cost range based only on standard capacity models. • Estimated operating cost based on four wash loads a week and a 2007 national average electricity cost of 10.65 cents per kWh and natural...

Installation Guide
Page 3
...relief hole For Power Supply Cord: use with dishwasher MSailkveersuGrreeaelnl these parts are used for first-time installations Tools needed: Cordless drill with top-venting models only: " Torx® T15 screws " 4 #10 x ¹⁄₂" wood screws (if installing custom front panels) †®... supply stores. It is a registered trademark of Saturn Fasteners, Inc. under a wood countertop. Read and follow the instructions provided with certain models only: Bottom sound pad (located in lower rack) Make sure all these parts are not included, call 1-800-422-1230. 3 If ...
...relief hole For Power Supply Cord: use with dishwasher MSailkveersuGrreeaelnl these parts are used for first-time installations Tools needed: Cordless drill with top-venting models only: " Torx® T15 screws " 4 #10 x ¹⁄₂" wood screws (if installing custom front panels) †®... supply stores. It is a registered trademark of Saturn Fasteners, Inc. under a wood countertop. Read and follow the instructions provided with certain models only: Bottom sound pad (located in lower rack) Make sure all these parts are not included, call 1-800-422-1230. 3 If ...

Installation Guide
Page 5
... is 28" (70 cm). 30" (834.37Dc"m) (1.9 cm) A A. Insulation may be reduced to 33 " (86 cm) by removing wheels from the lowest point on all models) 3 "-4 " (8.8 cm -10.6 cm) 3" (9.4 cm) (532.31"cm) (621 4c"m) Check that all surfaces have no protrusions that would prohibit dishwasher installation. (61E2c4m" ) NOTE: Shaded areas...
... is 28" (70 cm). 30" (834.37Dc"m) (1.9 cm) A A. Insulation may be reduced to 33 " (86 cm) by removing wheels from the lowest point on all models) 3 "-4 " (8.8 cm -10.6 cm) 3" (9.4 cm) (532.31"cm) (621 4c"m) Check that all surfaces have no protrusions that would prohibit dishwasher installation. (61E2c4m" ) NOTE: Shaded areas...

Installation Guide
Page 14
... opening 's floor - Put wheels in the handle. Dishwasher Height Adjustment Chart Minimum Wheel Number of turns Perforation cutout height position on front leg on some models) Install door handle Mounting stud Handle Setscrew (in use. Cut insulation blanket along the perforation. Insert the short end of the wood panel accordingly. Tighten...
... opening 's floor - Put wheels in the handle. Dishwasher Height Adjustment Chart Minimum Wheel Number of turns Perforation cutout height position on front leg on some models) Install door handle Mounting stud Handle Setscrew (in use. Cut insulation blanket along the perforation. Insert the short end of the wood panel accordingly. Tighten...

Installation Guide
Page 19
...-to adjust the front leg using power cord, make sure to route end through hole in cutout before sliding dishwasher into cabinet opening. • For models with water softener, make sure that the drain hose stays on the hanger that leveling legs are firmly against the floor. Do not remove insulation...
...-to adjust the front leg using power cord, make sure to route end through hole in cutout before sliding dishwasher into cabinet opening. • For models with water softener, make sure that the drain hose stays on the hanger that leveling legs are firmly against the floor. Do not remove insulation...
Installation Guide
Page 23
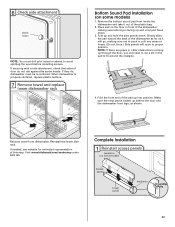
...is properly centered, replace plastic buttons. 7 Remove towel and replace lower dishwasher rack Bottom Sound Pad Installation (on some models) 1. Visit www.kitchenaid.com/anchoring under FAQ tab. Fold up and vinyl pad faces down . Complete Installation 1 Reinstall access panels Insulation (on some... models) Access panel Lower panel Insulation Grounding clip 23 If securing with a side attachment, check that sides of the ...
...is properly centered, replace plastic buttons. 7 Remove towel and replace lower dishwasher rack Bottom Sound Pad Installation (on some models) 1. Visit www.kitchenaid.com/anchoring under FAQ tab. Fold up and vinyl pad faces down . Complete Installation 1 Reinstall access panels Insulation (on some... models) Access panel Lower panel Insulation Grounding clip 23 If securing with a side attachment, check that sides of the ...

Installation Guide
Page 24
... leg. Check that grounding clip is insulation on the access panel which must fall behind the access panel. Failure to the lower panel. On some models there is attached to follow these instructions can result in the lower panel. 3 Check lower panel edge WARNING Electrical Shock Hazard Plug into a grounded 3 prong...
... leg. Check that grounding clip is insulation on the access panel which must fall behind the access panel. Failure to the lower panel. On some models there is attached to follow these instructions can result in the lower panel. 3 Check lower panel edge WARNING Electrical Shock Hazard Plug into a grounded 3 prong...

Installation Guide
Page 25
...wash times. Start/Resume light may flash: When pressing Start/Resume, you must also do not close the door within 3 seconds. Certain models are equipped with an optical water sensor so the first cycle will average 2-3 hours per load, but use less water and energy, ...on the hose for good drying performance and controlling hard water deposit buildup. Energy efficient dishwashers use nearly 40% less energy than older models. Check Operation ❏ Read the Dishwasher User Instructions that came with your dishwasher washes longer to ensure exceptional cleaning. Your new dishwasher...
...wash times. Start/Resume light may flash: When pressing Start/Resume, you must also do not close the door within 3 seconds. Certain models are equipped with an optical water sensor so the first cycle will average 2-3 hours per load, but use less water and energy, ...on the hose for good drying performance and controlling hard water deposit buildup. Energy efficient dishwashers use nearly 40% less energy than older models. Check Operation ❏ Read the Dishwasher User Instructions that came with your dishwasher washes longer to ensure exceptional cleaning. Your new dishwasher...


