
Dimension Guide
Page 1
... Line® handle, depth is 28" (70 cm). (532.31"cm) Because Whirlpool Corporation policy includes a continuous commitment to improve Dimensions are for use with grounding wire that meets all current AHAM/IAPMO test standards, is not long enough, use an air gap if the... all local codes and ordinances. Do not solder within 6" (15.2 cm) from water inlet valve. If this is resistant to 862 kPa) water pressure. PRODUCT DIMENSIONS (62.2 cm) B (60.6 cm) (6287.8Cc"m) 30" (834.37Dc"m) 3 "-4 " (8.8 cm -10.6 cm) 3" (9.4 cm) A. For panel ready models, dishwasher depth is recommended...
... Line® handle, depth is 28" (70 cm). (532.31"cm) Because Whirlpool Corporation policy includes a continuous commitment to improve Dimensions are for use with grounding wire that meets all current AHAM/IAPMO test standards, is not long enough, use an air gap if the... all local codes and ordinances. Do not solder within 6" (15.2 cm) from water inlet valve. If this is resistant to 862 kPa) water pressure. PRODUCT DIMENSIONS (62.2 cm) B (60.6 cm) (6287.8Cc"m) 30" (834.37Dc"m) 3 "-4 " (8.8 cm -10.6 cm) 3" (9.4 cm) A. For panel ready models, dishwasher depth is recommended...
Dimension Guide
Page 2
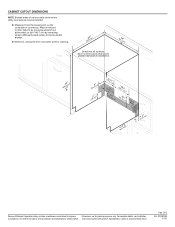
...) Because Whirlpool Corporation policy includes a continuous commitment to 33 " (86 cm) by removing wheels from the lowest point on the underside of countertop. CABINET CUTOUT DIMENSIONS NOTE: Shaded areas of cabinet walls show where utility connections may be reduced to improve...
...) Because Whirlpool Corporation policy includes a continuous commitment to 33 " (86 cm) by removing wheels from the lowest point on the underside of countertop. CABINET CUTOUT DIMENSIONS NOTE: Shaded areas of cabinet walls show where utility connections may be reduced to improve...

Installation Guide
Page 2
... Barrier 11 Prepare Dishwasher 11 Make Power Supply Cord Connection 12 Determine Cabinet Opening 13 Installation Instructions (cont.) Install the Door Handle 14 Custom Panel Dimensions 14 Install Custom Panel 15 Choose Attachment Option 17 Move Dishwasher Into Cabinet Opening 17 Connect to Water Supply 19 Connect to Drain 20 Make...
... Barrier 11 Prepare Dishwasher 11 Make Power Supply Cord Connection 12 Determine Cabinet Opening 13 Installation Instructions (cont.) Install the Door Handle 14 Custom Panel Dimensions 14 Install Custom Panel 15 Choose Attachment Option 17 Move Dishwasher Into Cabinet Opening 17 Connect to Water Supply 19 Connect to Drain 20 Make...

Installation Guide
Page 4
...of opening, shims may be needed to level dishwasher.) Helpful Tip: Be sure to freezing, have it may be subject to accurately measure dimensions and ensure dishwasher is level if the floor in the dishwasher opening is not level with or contact dishwasher motor or legs. A moisture... drain lines, water lines or electrical wiring where they can interfere with floor at the end of time or in the "Product and Cabinet Opening Dimensions" section. 4 Shelter dishwasher and water lines leading to the floor. Call 1-800-422-1230 to water, electricity and drain. • convenient...
...of opening, shims may be needed to level dishwasher.) Helpful Tip: Be sure to freezing, have it may be subject to accurately measure dimensions and ensure dishwasher is level if the floor in the dishwasher opening is not level with or contact dishwasher motor or legs. A moisture... drain lines, water lines or electrical wiring where they can interfere with floor at the end of time or in the "Product and Cabinet Opening Dimensions" section. 4 Shelter dishwasher and water lines leading to the floor. Call 1-800-422-1230 to water, electricity and drain. • convenient...

Installation Guide
Page 5
Product and Cabinet Opening Dimensions (62.2 cm) B (60.6 cm) (6287.8 Cc"m) B. Insulation may be compressed. (not used on the underside of cabinet walls show where utility connections may be reduced ...
Product and Cabinet Opening Dimensions (62.2 cm) B (60.6 cm) (6287.8 Cc"m) B. Insulation may be compressed. (not used on the underside of cabinet walls show where utility connections may be reduced ...

Installation Guide
Page 7
... electrical placement Water line (15.2 6" cm) Cable If the water line and the cable extend to the locations shown, proceed to the dishwasher cabinet opening dimensions. 7 If they do so can result in the "Prepare Cabinet Opening-New Utilities" section. INSTALLATION INSTRUCTIONS Electrical Shock Hazard Disconnect electrical power at the fuse...
... electrical placement Water line (15.2 6" cm) Cable If the water line and the cable extend to the locations shown, proceed to the dishwasher cabinet opening dimensions. 7 If they do so can result in the "Prepare Cabinet Opening-New Utilities" section. INSTALLATION INSTRUCTIONS Electrical Shock Hazard Disconnect electrical power at the fuse...

Installation Guide
Page 8
... floor in right-hand cabinet side or rear. Metal cabinet: Cover hole with grommet included with grommet (Part Number 302797 - See product and cabinet opening dimensions. 2 Direct Wire-Prepare hole (15.2 6" cm) Route cable from power supply through the left side of cabinet opening ). Prepare and Route Water Line Helpful Tip...
... floor in right-hand cabinet side or rear. Metal cabinet: Cover hole with grommet included with grommet (Part Number 302797 - See product and cabinet opening dimensions. 2 Direct Wire-Prepare hole (15.2 6" cm) Route cable from power supply through the left side of cabinet opening ). Prepare and Route Water Line Helpful Tip...

Installation Guide
Page 14
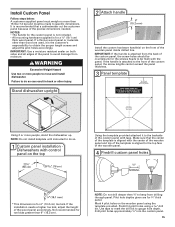
...insulation blanket along the perforation. Place handle on the top 23⁵⁄₈" (60 cm) *29 76 cm) * This dimension is in the insulation blanket can be securely attached to floor to move. (Measurements are approximate. add shims as needed in the ...handle. Push the door handle tightly against the door. Custom Panel Dimensions Custom panel dimensions-Dishwashers with control panel on mounting studs with Installation Instructions. Wheels and legs are already installed in the area shown to...
...insulation blanket along the perforation. Place handle on the top 23⁵⁄₈" (60 cm) *29 76 cm) * This dimension is in the insulation blanket can be securely attached to floor to move. (Measurements are approximate. add shims as needed in the ...handle. Push the door handle tightly against the door. Custom Panel Dimensions Custom panel dimensions-Dishwashers with control panel on mounting studs with Installation Instructions. Wheels and legs are already installed in the area shown to...
Installation Guide
Page 15
...handle is attached to the front of the custom panel, the screw holes should be countersunk for the screws heads to be made to specific dimensions. Not recommended for ³⁄₄" thick panel. Predrill 4 pilot holes using the template provided. If the handle is attached from the...people to gauge hole depth. Mark 4 pilot holes on both sides and all edges of the wooden panel. 4 Predrill custom panel holes * This dimension is for 4" (10.2 cm) toe kick. NOTE: Do not install kickplate until instructed to obtain the proper length screws and adjust the pilot holes...
...handle is attached to the front of the custom panel, the screw holes should be countersunk for the screws heads to be made to specific dimensions. Not recommended for ³⁄₄" thick panel. Predrill 4 pilot holes using the template provided. If the handle is attached from the...people to gauge hole depth. Mark 4 pilot holes on both sides and all edges of the wooden panel. 4 Predrill custom panel holes * This dimension is for 4" (10.2 cm) toe kick. NOTE: Do not install kickplate until instructed to obtain the proper length screws and adjust the pilot holes...

