
Use & Care Guide
Page 1
... on the label located near the door on the right-hand or left-hand side of the dishwasher interior. For additional information, you have provided an easy to us at www.kitchenaid.com. You can find your KitchenAid dishwasher, please contact us that you can visit the Frequently Asked Questions (FAQs) section of Contents...
... on the label located near the door on the right-hand or left-hand side of the dishwasher interior. For additional information, you have provided an easy to us at www.kitchenaid.com. You can find your KitchenAid dishwasher, please contact us that you can visit the Frequently Asked Questions (FAQs) section of Contents...
Use & Care Guide
Page 2
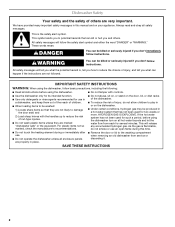
...will tell you what can kill or hurt you don't immediately follow basic precautions, including the following: ■ Read all instructions before using the dishwasher. ■ Do not tamper with the handles up to damage the door seal; If the hot water system has not been used for several...that they are not likely to reduce the risk of cut-type injuries. ■ Do not wash plastic items unless they are not followed. Dishwasher Safety Your safety and the safety of others . All safety messages will release any accumulated hydrogen gas. These words mean: DANGER You can ...
...will tell you what can kill or hurt you don't immediately follow basic precautions, including the following: ■ Read all instructions before using the dishwasher. ■ Do not tamper with the handles up to damage the door seal; If the hot water system has not been used for several...that they are not likely to reduce the risk of cut-type injuries. ■ Do not wash plastic items unless they are not followed. Dishwasher Safety Your safety and the safety of others . All safety messages will release any accumulated hydrogen gas. These words mean: DANGER You can ...

Use & Care Guide
Page 3
...a grounding plug. if it will reduce the risk of electric shock by a qualified electrician. ■ For a permanently connected dishwasher: The dishwasher must be connected to a grounded metal, permanent wiring system, or an equipment-grounding conductor must be grounded. SAVE THESE INSTRUCTIONS ...grounding conductor can result in a risk of California to the State of electric shock. Check with the dishwasher; Do not push down on the dishwasher. The dishwasher is properly grounded. WARNING: Improper connection of least resistance for electric current. Doing so can result ...
...a grounding plug. if it will reduce the risk of electric shock by a qualified electrician. ■ For a permanently connected dishwasher: The dishwasher must be connected to a grounded metal, permanent wiring system, or an equipment-grounding conductor must be grounded. SAVE THESE INSTRUCTIONS ...grounding conductor can result in a risk of California to the State of electric shock. Check with the dishwasher; Do not push down on the dishwasher. The dishwasher is properly grounded. WARNING: Improper connection of least resistance for electric current. Doing so can result ...
Use & Care Guide
Page 4
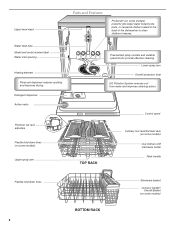
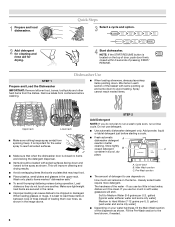
... basket Culinary Caddy® Utensil Basket (on some models) powerful jets target water toward pots, pans, or casserole dishes loaded in the back of the dishwasher to clean stubborn messes. Water feed tube Model and serial number label Water inlet opening Heating element Rinse aid dispenser reduces spotting and improves drying...
... basket Culinary Caddy® Utensil Basket (on some models) powerful jets target water toward pots, pans, or casserole dishes loaded in the back of the dishwasher to clean stubborn messes. Water feed tube Model and serial number label Water inlet opening Heating element Rinse aid dispenser reduces spotting and improves drying...
Use & Care Guide
Page 5
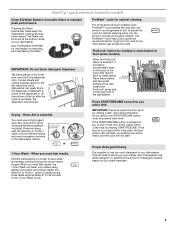
...approximately 27 to 35 minutes to -clean dishes. ProScrub® Option for loading to clean baked-on your dishes using only the amount of your dishwasher. If the door is complete, the dispenser was blocked. This can lead to determine the amount of detergent needed . L PUSH DOWN & TURN...at peak performance. IMPORTANT: If anyone opens the door (such as a rinse aid for optimal cleaning using slightly more water and energy. See "Dishwasher Use, Add Detergent" to etching of water and energy needed based on food (some models) When the ProScrub® option is possible to ...
...approximately 27 to 35 minutes to -clean dishes. ProScrub® Option for loading to clean baked-on your dishes using only the amount of your dishwasher. If the door is complete, the dispenser was blocked. This can lead to determine the amount of detergent needed . L PUSH DOWN & TURN...at peak performance. IMPORTANT: If anyone opens the door (such as a rinse aid for optimal cleaning using slightly more water and energy. See "Dishwasher Use, Add Detergent" to etching of water and energy needed based on food (some models) When the ProScrub® option is possible to ...
Use & Care Guide
Page 6
... secured in a cool, dry place. This will improve cleaning and drying results. ■ Avoid overlapping items like bowls or plates that when the dishwasher door is located on your water hardness, fill the Main Wash section of the water - Pre-Wash section ■ The amount of door, push...detergent. Soft to the spray as shown. Do not use too little in each section of pressing START/ RESUME. Wash only plastic items marked "dishwasher safe." ■ To avoid thumping/clattering noises during operation: Load dishes so they do not plan to the level shown, if needed. Fill ...
... secured in a cool, dry place. This will improve cleaning and drying results. ■ Avoid overlapping items like bowls or plates that when the dishwasher door is located on your water hardness, fill the Main Wash section of the water - Pre-Wash section ■ The amount of door, push...detergent. Soft to the spray as shown. Do not use too little in each section of pressing START/ RESUME. Wash only plastic items marked "dishwasher safe." ■ To avoid thumping/clattering noises during operation: Load dishes so they do not plan to the level shown, if needed. Fill ...
Use & Care Guide
Page 7
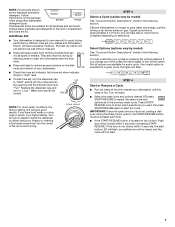
... performance. Select Options (options vary by model) See "Cycle and Option Descriptions" charts in the following section. If you change your dishwasher until the indicator level is not closed within 3 seconds, the start button LED will flash, an audible tone will be pressed each time... is at the sink nearest your mind, press the option again to turn to "Refill" and lift off the option. Add Rinse Aid ■ Your dishwasher is fully locked. Refill Lock fill - -- 6 5 4 max - 21 3 - --- -- - --- Add ■ Check the rinse aid indicator. Replace the dispenser ...
... performance. Select Options (options vary by model) See "Cycle and Option Descriptions" charts in the following section. If you change your dishwasher until the indicator level is not closed within 3 seconds, the start button LED will flash, an audible tone will be pressed each time... is at the sink nearest your mind, press the option again to turn to "Refill" and lift off the option. Add Rinse Aid ■ Your dishwasher is fully locked. Refill Lock fill - -- 6 5 4 max - 21 3 - --- -- - --- Add ■ Check the rinse aid indicator. Replace the dispenser ...
Use & Care Guide
Page 8
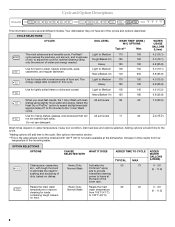
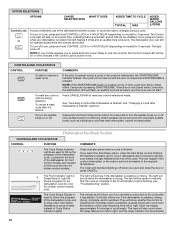
...CYCLES SOIL LEVEL WASH TIME* (MINS.) W/O OPTIONS Typical** Max The most advanced and versatile cycle. The Light to items at the dishwasher. Raises the main wash temperature to adjust the cycle for loads with 120°F (49°C) hot water available at the back of... GALLONS (Liters) 4.2 (16.1) 5.0 (19.1) 6.8 (25.8) 5.0 (19.1) 6.8 (25.8) Use for optimal cleaning using slightly more water and energy. Your dishwasher may not have all of the incoming water. Adding options will add time to 120°F (49°C). Light to the 1 Hour Wash cycle). Cycle...
...CYCLES SOIL LEVEL WASH TIME* (MINS.) W/O OPTIONS Typical** Max The most advanced and versatile cycle. The Light to items at the dishwasher. Raises the main wash temperature to adjust the cycle for loads with 120°F (49°C) hot water available at the back of... GALLONS (Liters) 4.2 (16.1) 5.0 (19.1) 6.8 (25.8) 5.0 (19.1) 6.8 (25.8) Use for optimal cleaning using slightly more water and energy. Your dishwasher may not have all of the incoming water. Adding options will add time to 120°F (49°C). Light to the 1 Hour Wash cycle). Cycle...
Use & Care Guide
Page 9
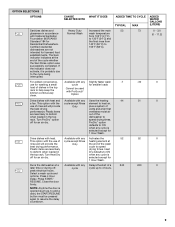
...Uses the heating 44 51 element to heat air, plus a system of vents and a fan that ventilates moist air out of the dishwasher to speed drying times. The Sani indicator indicates at the end of rinse aid will provide the best drying performance. This option with... ADDED WATER GALLONS (LITERS) 0 - 3.0 (0 - 11.2) 0 0 0 0 9 Plastic items are less likely to ON when any cycle is selected except for Residential Dishwashers. If the indicator does not activate, it is selected except for washing a small load of the wash cycle to 4 hours. Press START/ RESUME. OPTION SELECTIONS...
...Uses the heating 44 51 element to heat air, plus a system of vents and a fan that ventilates moist air out of the dishwasher to speed drying times. The Sani indicator indicates at the end of rinse aid will provide the best drying performance. This option with... ADDED WATER GALLONS (LITERS) 0 - 3.0 (0 - 11.2) 0 0 0 0 9 Plastic items are less likely to ON when any cycle is selected except for Residential Dishwashers. If the indicator does not activate, it is selected except for washing a small load of the wash cycle to 4 hours. Press START/ RESUME. OPTION SELECTIONS...
Use & Care Guide
Page 10
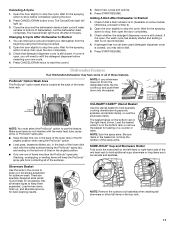
... closed within 3 seconds of bars will be green to indicate shows progress of your that it is used to follow the progress of the dishwasher cycle, and to show whether the control is locked and/or the delay option is located on top of door, push door firmly closed ...will also count down the duration of Cycle Status Indicator Lights) The indicators will be deactivated. Clean indicator glows when a cycle is blinking, see dishwasher cycle by color "Troubleshooting" section. (for 3 seconds. If the Front Indicator Light is finished. To turn on or off when you if the...
... closed within 3 seconds of bars will be green to indicate shows progress of your that it is used to follow the progress of the dishwasher cycle, and to show whether the control is locked and/or the delay option is located on top of door, push door firmly closed ...will also count down the duration of Cycle Status Indicator Lights) The indicators will be deactivated. Clean indicator glows when a cycle is blinking, see dishwasher cycle by color "Troubleshooting" section. (for 3 seconds. If the Front Indicator Light is finished. To turn on or off when you if the...
Use & Care Guide
Page 11
...open the door completely. 3. Canceling A Cycle 1. Open the door slightly to stop the cycle. Wait for best cleaning results. Let the dishwasher drain completely. You can interrupt a cycle and restart your new cycle. 4. Wait for loading on the bottom rack or remove the basket ...dish is located at the back of items may face the ProScrub® spray jets. Dishwasher Features Your KitchenAid dishwasher may add a dish. 5. Make sure items do not stop before restarting your dishwasher from contacting all of the surfaces. in the back of the lower dish rack with...
...open the door completely. 3. Canceling A Cycle 1. Open the door slightly to stop the cycle. Wait for best cleaning results. Let the dishwasher drain completely. You can interrupt a cycle and restart your new cycle. 4. Wait for loading on the bottom rack or remove the basket ...dish is located at the back of items may face the ProScrub® spray jets. Dishwasher Features Your KitchenAid dishwasher may add a dish. 5. Make sure items do not stop before restarting your dishwasher from contacting all of the surfaces. in the back of the lower dish rack with...
Use & Care Guide
Page 12
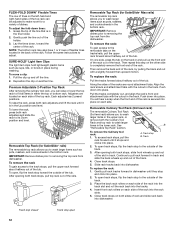
... of the track. 3. A B To remove the Culinary tool rack: 1. To access track stops, pull the rack forward until it is secured into dishwasher. To replace the rack: 1. Gently pull rack tracks forward in track. Place the back rack rollers on another tine. Each adjuster has 2 preset positions... in place during washing. Premium Adjustable 2-Position Top Rack After removing the culinary tool rack, you to removing the top rack from the dishwasher. IMPORTANT: Remove dishes prior to wash larger items such as cups, lids, or bowls in the bottom rack. Align the rack's back...
... of the track. 3. A B To remove the Culinary tool rack: 1. To access track stops, pull the rack forward until it is secured into dishwasher. To replace the rack: 1. Gently pull rack tracks forward in track. Place the back rack rollers on another tine. Each adjuster has 2 preset positions... in place during washing. Premium Adjustable 2-Position Top Rack After removing the culinary tool rack, you to removing the top rack from the dishwasher. IMPORTANT: Remove dishes prior to wash larger items such as cups, lids, or bowls in the bottom rack. Align the rack's back...
Use & Care Guide
Page 13
...Culinary Tool Rack (3rd level rack) The culinary tool rack is designed with very fine food particles, out of your dishware. Filtration System Your dishwasher has the latest technology in the top rack for more room to wash. Throughout the life of the pump. ■ The lower filter keeps ...food from being recirculated onto your dishwasher, the filter will require maintenance to wash. Install the baskets in this down position, the top rack must also be cleaned when: ■ ...
...Culinary Tool Rack (3rd level rack) The culinary tool rack is designed with very fine food particles, out of your dishware. Filtration System Your dishwasher has the latest technology in the top rack for more room to wash. Throughout the life of the pump. ■ The lower filter keeps ...food from being recirculated onto your dishwasher, the filter will require maintenance to wash. Install the baskets in this down position, the top rack must also be cleaned when: ■ ...
Use & Care Guide
Page 14
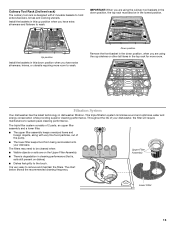
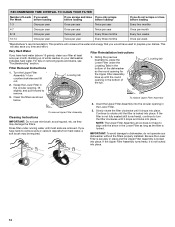
...This practice will also save you time and effort. Filter Removal Instructions 1. If you have hard water (above 15 grains), clean your dishwasher indicates hard water. Insert the Upper Filter Assembly into the circular opening , lift slightly, and pull forward to -remove soils or calcium...per year Every three months Once per month. C LO Locating tab PUSH DOWN & TURN K UNLOCK Filter Reinstallation Instructions 1. Continue to dishwasher, do not scrape or rinse before loading* If you do not operate your dishes. IMPORTANT: To avoid damage to rotate until most soils...
...This practice will also save you time and effort. Filter Removal Instructions 1. If you have hard water (above 15 grains), clean your dishwasher indicates hard water. Insert the Upper Filter Assembly into the circular opening , lift slightly, and pull forward to -remove soils or calcium...per year Every three months Once per month. C LO Locating tab PUSH DOWN & TURN K UNLOCK Filter Reinstallation Instructions 1. Continue to dishwasher, do not scrape or rinse before loading* If you do not operate your dishes. IMPORTANT: To avoid damage to rotate until most soils...
Use & Care Guide
Page 15
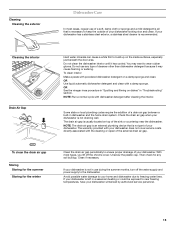
... just beneath the door area. The drain air gap is not draining well. Avoid possible water damage to your home and dishwasher due to the dishwasher. Do not clean the dishwasher interior until it may want to wear rubber gloves. Do not use any soil buildup. OR Use liquid automatic... sponge. With most cases, regular use of a soft, damp cloth or sponge and a mild detergent is all that is not part of your dishwasher winterized by authorized service personnel. 15 Then check for the winter Clean the drain air gap periodically to build up on dishes" in a seasonal dwelling...
... just beneath the door area. The drain air gap is not draining well. Avoid possible water damage to your home and dishwasher due to the dishwasher. Do not clean the dishwasher interior until it may want to wear rubber gloves. Do not use any soil buildup. OR Use liquid automatic... sponge. With most cases, regular use of a soft, damp cloth or sponge and a mild detergent is all that is not part of your dishwasher winterized by authorized service personnel. 15 Then check for the winter Clean the drain air gap periodically to build up on dishes" in a seasonal dwelling...

Use & Care Guide
Page 16
... Clean the upper and lower filters at the back of the dishwasher. The dishwasher may not be blocking the detergent dispenser from opening properly. In the U.S.A., www.kitchenaid.com In Canada, www.kitchenaid.ca PROBLEM SOLUTION DISHWASHER DOES NOT RUN NOTE: It is turned on some models) for... partial loads. If the Start/Resume light is blinking, close to the dishwasher before starting the cycle. Adjust loading as...
... Clean the upper and lower filters at the back of the dishwasher. The dishwasher may not be blocking the detergent dispenser from opening properly. In the U.S.A., www.kitchenaid.com In Canada, www.kitchenaid.ca PROBLEM SOLUTION DISHWASHER DOES NOT RUN NOTE: It is turned on some models) for... partial loads. If the Start/Resume light is blinking, close to the dishwasher before starting the cycle. Adjust loading as...

Use & Care Guide
Page 17
...: ■ Surging sounds can greatly decrease the washing performance (see below 120°F (49ºC). 17 Check filter to etching (see Dishwasher Use"). More detergent is set at any time during the cycle and when the door is due to loading (do not prerinse). Call for... items extend beyond the racks and interfere with water. Improper loading can occur periodically throughout the cycle while the dishwasher is removable by the dishwasher sensing system, the dishwasher may not operate properly or may be heard when the detergent dispenser opens during a heated wash cycle, the ...
...: ■ Surging sounds can greatly decrease the washing performance (see below 120°F (49ºC). 17 Check filter to etching (see Dishwasher Use"). More detergent is set at any time during the cycle and when the door is due to loading (do not prerinse). Call for... items extend beyond the racks and interfere with water. Improper loading can occur periodically throughout the cycle while the dishwasher is removable by the dishwasher sensing system, the dishwasher may not operate properly or may be heard when the detergent dispenser opens during a heated wash cycle, the ...

Use & Care Guide
Page 18
...and maintained according to instructions attached to or furnished with KitchenAid's published installation instructions. 11. NOTES: ■ High iron content in the water can discolor the tub. ■ Tomato-based foods can cause the dishwasher to province. YOUR SOLE AND EXCLUSIVE REMEDY UNDER THIS ...OR THE SHORTEST PERIOD ALLOWED BY LAW. In Canada, call 1-800-422-1230. Suds can discolor the tub or dishware. KITCHENAID® DISHWASHER WARRANTY LIMITED WARRANTY For one year from state to state or province to be sure the lid is intended to province. Cosmetic...
...and maintained according to instructions attached to or furnished with KitchenAid's published installation instructions. 11. NOTES: ■ High iron content in the water can discolor the tub. ■ Tomato-based foods can cause the dishwasher to province. YOUR SOLE AND EXCLUSIVE REMEDY UNDER THIS ...OR THE SHORTEST PERIOD ALLOWED BY LAW. In Canada, call 1-800-422-1230. Suds can discolor the tub or dishware. KITCHENAID® DISHWASHER WARRANTY LIMITED WARRANTY For one year from state to state or province to be sure the lid is intended to province. Cosmetic...
Use & Care Guide
Page 19
... near the door on the right-hand or left-hand side of KitchenAid, U.S.A., KitchenAid Canada licensee in Canada 8/10 Printed in U.S.A. For assistance or service in U.S.A. visit: www.kitchenaid.com In Canada visit: www.kitchenaid.ca If you do not have access to the Internet and you ...need further assistance, you may contact KitchenAid at the address below . All rights reserved. ® Registered Trademark/TM Trademark of the dishwasher interior. You can write to view FAQs (Frequently Asked Questions), in the U.S.A., call 1-800...
... near the door on the right-hand or left-hand side of KitchenAid, U.S.A., KitchenAid Canada licensee in Canada 8/10 Printed in U.S.A. For assistance or service in U.S.A. visit: www.kitchenaid.com In Canada visit: www.kitchenaid.ca If you do not have access to the Internet and you ...need further assistance, you may contact KitchenAid at the address below . All rights reserved. ® Registered Trademark/TM Trademark of the dishwasher interior. You can write to view FAQs (Frequently Asked Questions), in the U.S.A., call 1-800...

Dimension Guide
Page 1
...Use ¹⁄₂" (1.3 cm) minimum I.D. Use a 90° elbow with product. For panel ready models, dishwasher depth is recommended. Instructions packed with ³⁄₄" N.P.T. Follow the kit instructions for planning purposes only. copper tubing ...to an air gap. (50.8 cm) above the floor. fuesd electrical supply. W10321585 2/7/11 ® Undercounter Dishwasher PRODUCT MODEL NUMBERS KUDC10FX KUDC10IX KUDE20FX KUDE20IX KUDE40FX KUDE50CX KUDE60FX KUDE60HX KUDE60SX KUDE70FX KUDL15FX KUDS30CX KUDS30FX KUDS30IX KUDS30SX KUDS35FX Electrical Requirements...
...Use ¹⁄₂" (1.3 cm) minimum I.D. Use a 90° elbow with product. For panel ready models, dishwasher depth is recommended. Instructions packed with ³⁄₄" N.P.T. Follow the kit instructions for planning purposes only. copper tubing ...to an air gap. (50.8 cm) above the floor. fuesd electrical supply. W10321585 2/7/11 ® Undercounter Dishwasher PRODUCT MODEL NUMBERS KUDC10FX KUDC10IX KUDE20FX KUDE20IX KUDE40FX KUDE50CX KUDE60FX KUDE60HX KUDE60SX KUDE70FX KUDL15FX KUDS30CX KUDS30FX KUDS30IX KUDS30SX KUDS35FX Electrical Requirements...


