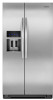
Use & Care Guide
Page 2
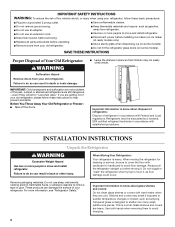
... and Local regulations. Shelves and covers may not easily climb inside. Do not use an extension cord. ■ Disconnect power before servicing. ■ Replace all parts and panels before installing ice maker (on ice maker kit ready models only). ■ Use a sturdy glass when dispensing ice (on some models). ■ Do...
... and Local regulations. Shelves and covers may not easily climb inside. Do not use an extension cord. ■ Disconnect power before servicing. ■ Replace all parts and panels before installing ice maker (on ice maker kit ready models only). ■ Use a sturdy glass when dispensing ice (on some models). ■ Do...

Use & Care Guide
Page 3
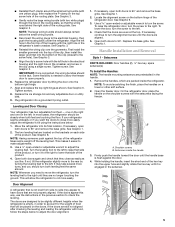
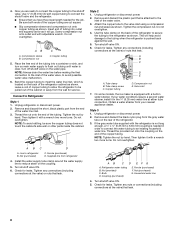
... C. Grommets F. Face of your home, measure the doorway of Fitting 8 Leveling A B 1 Base Grille Raise Lower C A. Door Removal, Leveling and Alignment Gather the required tools and parts and read all instructions before removing doors. IMPORTANT: Before you need to see the instructions below. Wiring Plugs 2 Water Dispenser Tubing Connection A A A. Unplug refrigerator or...
... C. Grommets F. Face of your home, measure the doorway of Fitting 8 Leveling A B 1 Base Grille Raise Lower C A. Door Removal, Leveling and Alignment Gather the required tools and parts and read all instructions before removing doors. IMPORTANT: Before you need to see the instructions below. Wiring Plugs 2 Water Dispenser Tubing Connection A A A. Unplug refrigerator or...
Use & Care Guide
Page 5
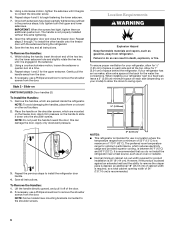
... that is needed to allow the refrigerator to make adjustments. 3. If necessary, continue to turn both doors to -side may take several more easily. Setscrews PARTS INCLUDED: Door handles (2 hex key, spare setscrew(s) To Install the Handles: NOTE: The handle mounting setscrews are aligned. 5. Some flexibility is not level from side...
... that is needed to allow the refrigerator to make adjustments. 3. If necessary, continue to turn both doors to -side may take several more easily. Setscrews PARTS INCLUDED: Door handles (2 hex key, spare setscrew(s) To Install the Handles: NOTE: The handle mounting setscrews are aligned. 5. Some flexibility is not level from side...
Use & Care Guide
Page 6
... not push the handle toward the door; Apply only downward pressure. Gently pull the handle away from refrigerator. Remove the handles, which are mounted on PARTS INCLUDED: Door handles (2) To Install the Handles: 1. Place the handle on the shoulder screws, which reduces electricity usage and provides superior cooling, is recommended. 6 Repeat...
... not push the handle toward the door; Apply only downward pressure. Gently pull the handle away from refrigerator. Remove the handles, which are mounted on PARTS INCLUDED: Door handles (2) To Install the Handles: 1. Place the handle on the shoulder screws, which reduces electricity usage and provides superior cooling, is recommended. 6 Repeat...

Use & Care Guide
Page 7
...9632; Install tubing only in death, fire, or electrical shock. See "Water Filtration System." TOOLS NEEDED: Gather the required tools and parts before starting installation. ■ Flat-blade screwdriver and ¹⁄₂" open-end wrenches or two adjustable wrenches nut driver Connect to... Do not use an adapter. NOTE: To allow sufficient water flow to 414 kPa). Water Supply Requirements Gather the required tools and parts before starting installation. Recommended Grounding Method A 115 volt, 60 Hz., AC only, 15- Replace the filter if necessary. ■...
...9632; Install tubing only in death, fire, or electrical shock. See "Water Filtration System." TOOLS NEEDED: Gather the required tools and parts before starting installation. ■ Flat-blade screwdriver and ¹⁄₂" open-end wrenches or two adjustable wrenches nut driver Connect to... Do not use an adapter. NOTE: To allow sufficient water flow to 414 kPa). Water Supply Requirements Gather the required tools and parts before starting installation. Recommended Grounding Method A 115 volt, 60 Hz., AC only, 15- Replace the filter if necessary. ■...
Use & Care Guide
Page 8
...the valve inlet using a compression nut and sleeve as shown. Unplug refrigerator or disconnect power. 2. Remove and discard the short, black plastic part from refrigerator 4. Thread the nut onto the end of the water valve. 3. Tighten the nut by hand. Then tighten it will help avoid...: To avoid rattling, be pulled out of the copper tubing. Style 2 1. Unplug refrigerator or disconnect power. 2. Remove and discard the plastic part that leak. 8 Attach the copper tube to meet the water line inlet, which is needed for service. Tighten the compression nut. Use the tube...
...the valve inlet using a compression nut and sleeve as shown. Unplug refrigerator or disconnect power. 2. Remove and discard the short, black plastic part from refrigerator 4. Thread the nut onto the end of the water valve. 3. Tighten the nut by hand. Then tighten it will help avoid...: To avoid rattling, be pulled out of the copper tubing. Style 2 1. Unplug refrigerator or disconnect power. 2. Remove and discard the plastic part that leak. 8 Attach the copper tube to meet the water line inlet, which is needed for service. Tighten the compression nut. Use the tube...
Use & Care Guide
Page 14
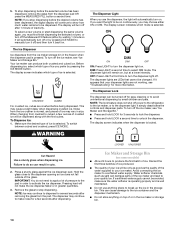
... Hazard Use a sturdy glass when dispensing ice. Pressing hard will turn off after 1 minute of ice may vary in the storage bin. This can damage parts of your ice will remain on . The display will not make sure the water softener is operating properly and is normal, and pieces of inactivity...
... Hazard Use a sturdy glass when dispensing ice. Pressing hard will turn off after 1 minute of ice may vary in the storage bin. This can damage parts of your ice will remain on . The display will not make sure the water softener is operating properly and is normal, and pieces of inactivity...
Use & Care Guide
Page 16
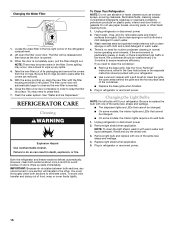
... REFRIGERATOR CARE Cleaning WARNING Explosion Hazard Use nonflammable cleaner. Unplug refrigerator or disconnect power. 2. Hand wash, rinse, and dry removable parts and interior surfaces thoroughly. Wash stainless steel and painted metal exteriors with a soft brush to snap the filter into place. See ...to close as window sprays, scouring cleansers, flammable fluids, cleaning waxes, concentrated detergents, bleaches or cleansers containing petroleum products on plastic parts, interior and door liners or gaskets. If you need to press hard. 7. Be sure to replace the bulb with one of...
... REFRIGERATOR CARE Cleaning WARNING Explosion Hazard Use nonflammable cleaner. Unplug refrigerator or disconnect power. 2. Hand wash, rinse, and dry removable parts and interior surfaces thoroughly. Wash stainless steel and painted metal exteriors with a soft brush to snap the filter into place. See ...to close as window sprays, scouring cleansers, flammable fluids, cleaning waxes, concentrated detergents, bleaches or cleansers containing petroleum products on plastic parts, interior and door liners or gaskets. If you need to press hard. 7. Be sure to replace the bulb with one of...
Use & Care Guide
Page 19
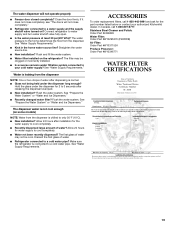
...442-9991 and ask for the water supply to cool completely. ■ Recently dispensed large amount of water after installation for the part number listed below or contact your cold water supply? If it does not close completely, see "The doors will not operate properly...closed completely? The filter may not be clogged or incorrectly installed. ■ Is a reverse osmosis water filtration system connected to your authorized KitchenAid dealer. ACCESSORIES To order replacement filters, call 1-800-807-6777. Connect refrigerator to a cold water pipe. Flush the water system. See ...
...442-9991 and ask for the water supply to cool completely. ■ Recently dispensed large amount of water after installation for the part number listed below or contact your cold water supply? If it does not close completely, see "The doors will not operate properly...closed completely? The filter may not be clogged or incorrectly installed. ■ Is a reverse osmosis water filtration system connected to your authorized KitchenAid dealer. ACCESSORIES To order replacement filters, call 1-800-807-6777. Connect refrigerator to a cold water pipe. Flush the water system. See ...
Use & Care Guide
Page 20
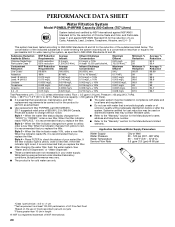
... the Manufacturer's name, address and telephone number. ■ Refer to the "Warranty" section for water leaving the system, as advertised. ■ Use replacement filter P4RFWB, part #W10295370. 2011 suggested retail price of Chlorine Taste and Odor, and Particulate Class I * Contaminant Reduction Live Cysts† Asbestos Lead: @ pH 6.5 Lead: @ pH 8.5 Lindane Toxaphene...
... the Manufacturer's name, address and telephone number. ■ Refer to the "Warranty" section for water leaving the system, as advertised. ■ Use replacement filter P4RFWB, part #W10295370. 2011 suggested retail price of Chlorine Taste and Odor, and Particulate Class I * Contaminant Reduction Live Cysts† Asbestos Lead: @ pH 6.5 Lead: @ pH 8.5 Lindane Toxaphene...
Use & Care Guide
Page 21
...date of purchase, when this filter is operated and maintained according to instructions attached to or furnished with the product, KitchenAid will pay for factory specified parts and repair labor to correct defects in materials or workmanship that vary from state to state or province to province. ... that existed when this major appliance is operated and maintained according to instructions attached to or furnished with the product, KitchenAid will pay for factory specified parts and repair labor for other damage to the finish of your major appliance if it is used in a manner that...
...date of purchase, when this filter is operated and maintained according to instructions attached to or furnished with the product, KitchenAid will pay for factory specified parts and repair labor to correct defects in materials or workmanship that vary from state to state or province to province. ... that existed when this major appliance is operated and maintained according to instructions attached to or furnished with the product, KitchenAid will pay for factory specified parts and repair labor for other damage to the finish of your major appliance if it is used in a manner that...


