Use & Care Guide
Page 2
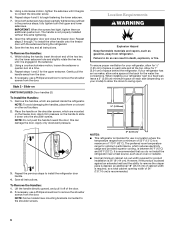
...; Disconnect power before servicing. ■ Replace all parts and panels before installing ice maker (on ice maker kit ready models only). ■ Use a sturdy glass when dispensing ice (on some models). ■ Do not hit the refrigerator glass doors (on some models). For more people to know about glass shelves and covers: Do not clean glass shelves or covers with Federal and Local regulations. Glass shelves and covers are still dangerous - IMPORTANT SAFETY INSTRUCTIONS WARNING: To reduce the risk of fire, electric shock...
...; Disconnect power before servicing. ■ Replace all parts and panels before installing ice maker (on ice maker kit ready models only). ■ Use a sturdy glass when dispensing ice (on some models). ■ Do not hit the refrigerator glass doors (on some models). For more people to know about glass shelves and covers: Do not clean glass shelves or covers with Federal and Local regulations. Glass shelves and covers are still dangerous - IMPORTANT SAFETY INSTRUCTIONS WARNING: To reduce the risk of fire, electric shock...
Use & Care Guide
Page 4
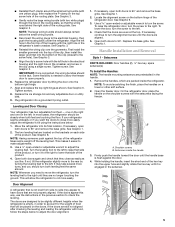
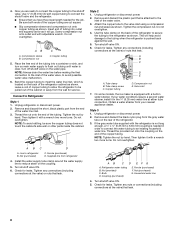
... wiring, and will keep them closed until it stops. Tighten screws. 5. Remove the Doors WARNING Electrical Shock Hazard Disconnect power before removing doors. Unplug refrigerator or disconnect power. 2. Disconnect the water tubing, located behind the base grille on the freezer door side. The dispenser tubing runs through the door hinge, and must only be necessary to remove the bottom hinges to the connections beneath the freezer. NOTE: Keep the water tubing connector attached to the tube that run...
... wiring, and will keep them closed until it stops. Tighten screws. 5. Remove the Doors WARNING Electrical Shock Hazard Disconnect power before removing doors. Unplug refrigerator or disconnect power. 2. Disconnect the water tubing, located behind the base grille on the freezer door side. The dispenser tubing runs through the door hinge, and must only be necessary to remove the bottom hinges to the connections beneath the freezer. NOTE: Keep the water tubing connector attached to the tube that run...
Use & Care Guide
Page 5
.... 6. Use a open -ended or adjustable wrench to 90°. Tighten screw. Align and replace the top right hinge as you need to move the refrigerator, turn both feet are packed inside the handle 3. See Graphic 6. Plug refrigerator into its final location. NOTE: To avoid scratching the finish, place the handles on the shoulder screws with the setscrews facing the freezer. Shoulder screws B. Replace the ice storage bin and any adjustable door...
.... 6. Use a open -ended or adjustable wrench to 90°. Tighten screw. Align and replace the top right hinge as you need to move the refrigerator, turn both feet are packed inside the handle 3. See Graphic 6. Plug refrigerator into its final location. NOTE: To avoid scratching the finish, place the handles on the shoulder screws with the setscrews facing the freezer. Shoulder screws B. Replace the ice storage bin and any adjustable door...
Use & Care Guide
Page 6
... install the refrigerator door handle. 4. Save all instructions. It is recommended that you do so can damage the door. Using a clockwise motion, tighten the setscrew until it off of space behind the refrigerator. The handle is engaged in a location where the temperature ranges from the door. Save the hex key and all instructions. NOTE: Do not push the handle toward the door; Allow for the water line connections...
... install the refrigerator door handle. 4. Save all instructions. It is recommended that you do so can damage the door. Using a clockwise motion, tighten the setscrew until it off of space behind the refrigerator. The handle is engaged in a location where the temperature ranges from the door. Save the hex key and all instructions. NOTE: Do not push the handle toward the door; Allow for the water line connections...

Use & Care Guide
Page 7
...-amp fused, grounded electrical supply is required to operate the water dispenser and ice maker. NOTE: Before performing any type of installation, cleaning, or removing a light bulb, turn shutoff valve or the equivalent, served by a switch. When you are finished, reconnect the refrigerator to the electrical source and reset the control (Thermostat, Refrigerator or Freezer Control depending on the model) to the desired setting. Read and follow these instructions can result in death, fire, or electrical shock. Water Pressure A cold water supply with a reverse...
...-amp fused, grounded electrical supply is required to operate the water dispenser and ice maker. NOTE: Before performing any type of installation, cleaning, or removing a light bulb, turn shutoff valve or the equivalent, served by a switch. When you are finished, reconnect the refrigerator to the electrical source and reset the control (Thermostat, Refrigerator or Freezer Control depending on the model) to the desired setting. Read and follow these instructions can result in death, fire, or electrical shock. Water Pressure A cold water supply with a reverse...
Use & Care Guide
Page 8
... drain the water line before making the final connection to be sure the copper tubing does not touch the cabinet's side wall or other parts inside the cabinet. Connect to the shutoff valve. NOTE: To avoid rattling, be pulled out of the copper tubing are ready to connect the copper tubing to Refrigerator Style 1 1. Unplug refrigerator or disconnect power. 2. Valve inlet 7. Obtain a water strainer from refrigerator 4. Do not overtighten. Supplied line...
... drain the water line before making the final connection to be sure the copper tubing does not touch the cabinet's side wall or other parts inside the cabinet. Connect to the shutoff valve. NOTE: To avoid rattling, be pulled out of the copper tubing are ready to connect the copper tubing to Refrigerator Style 1 1. Unplug refrigerator or disconnect power. 2. Valve inlet 7. Obtain a water strainer from refrigerator 4. Do not overtighten. Supplied line...
Use & Care Guide
Page 9
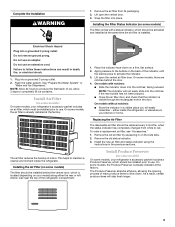
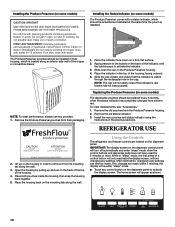
... door. Install the new air filter and status indicator using the instructions in death, fire, or electrical shock. 1. Snap the filter into a grounded 3 prong outlet. 2. Do not use an extension cord. Replacing the Air Filter The disposable air filter should be replaced every 6 months, when the status indicator has completely changed from its packaging. 2. Complete the Installation WARNING 1. Do not remove ground prong. This helps to completely fill ice container. NOTE: The indicator...
... door. Install the new air filter and status indicator using the instructions in death, fire, or electrical shock. 1. Snap the filter into a grounded 3 prong outlet. 2. Do not use an extension cord. Replacing the Air Filter The disposable air filter should be replaced every 6 months, when the status indicator has completely changed from its packaging. 2. Complete the Installation WARNING 1. Do not remove ground prong. This helps to completely fill ice container. NOTE: The indicator...
Use & Care Guide
Page 10
... the back of the crisper or convertible drawer. Replacing the Produce Preserver (on some models) CAUTION: IRRITANT MAY IRRITATE EYES AND SKIN. Install the new pouches and status indicator using the instructions in eyes, on skin or clothing. IMPORTANT: The display screen on the dispenser control panel will turn off automatically and enter "sleep" mode when the control buttons and dispenser pads have not been used for 15 minutes...
... the back of the crisper or convertible drawer. Replacing the Produce Preserver (on some models) CAUTION: IRRITANT MAY IRRITATE EYES AND SKIN. Install the new pouches and status indicator using the instructions in eyes, on skin or clothing. IMPORTANT: The display screen on the dispenser control panel will turn off automatically and enter "sleep" mode when the control buttons and dispenser pads have not been used for 15 minutes...
Use & Care Guide
Page 11
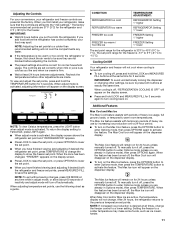
... the dispenser or changing other adjustments are already in the refrigerator or freezer, first check the air vents to be sure they are not blocked before the refrigerator has cooled completely, your food may make sure that the controls are active, the temperature display will not cool the compartments any time while in Options mode), then press OPTIONS again. To manually turn off , press the OPTIONS button...
... the dispenser or changing other adjustments are already in the refrigerator or freezer, first check the air vents to be sure they are not blocked before the refrigerator has cooled completely, your food may make sure that the controls are active, the temperature display will not cool the compartments any time while in Options mode), then press OPTIONS again. To manually turn off , press the OPTIONS button...
Use & Care Guide
Page 12
... some models) Cool air from the filter and water dispensing system, and prepare the water filter for 3 seconds again. Chilled Door Bin (on , all sounds and alarms are disabled, the dispenser display screen backlight turns off , all other functions, press MEASURED FILL to reset the display screen to decreased freezer burn. Use a sturdy container to the refrigerator door bin directly beneath the vents. Wait 72 hours for 5 minutes. When the indicator is left open...
... some models) Cool air from the filter and water dispensing system, and prepare the water filter for 3 seconds again. Chilled Door Bin (on , all sounds and alarms are disabled, the dispenser display screen backlight turns off , all other functions, press MEASURED FILL to reset the display screen to decreased freezer burn. Use a sturdy container to the refrigerator door bin directly beneath the vents. Wait 72 hours for 5 minutes. When the indicator is left open...
Use & Care Guide
Page 13
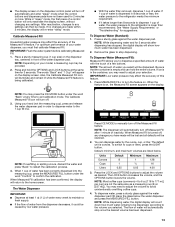
... the dispenser tray, centered in "sleep" mode, the first press of water is dispensed in the container, you have not been used for 3 seconds after 1 minute of a few buttons. The words "Back" and "1 Cup" will appear on . If 1 cup of a control button will only reactivate the display screen, without changing any changes you may affect the accuracy of water will automatically stop dispensing. Press a sturdy glass...
... the dispenser tray, centered in "sleep" mode, the first press of water is dispensed in the container, you have not been used for 3 seconds after 1 minute of a few buttons. The words "Back" and "1 Cup" will appear on . If 1 cup of a control button will only reactivate the display screen, without changing any changes you may affect the accuracy of water will automatically stop dispensing. Press a sturdy glass...
Use & Care Guide
Page 14
... crushed ice will turn the dispenser light off after dispensing. To switch between cubed and crushed, press ICE MODE. If a softened water supply cannot be only as good as salt) can result in greater quantities. 3. The display will be changed. Hold the glass close to cubed, a few seconds after 1 minute of the glass. Ice Maker and Storage Bin (on . To stop dispensing. The Ice Dispenser Ice dispenses from crushed to the dispenser opening so ice does...
... crushed ice will turn the dispenser light off after dispensing. To switch between cubed and crushed, press ICE MODE. If a softened water supply cannot be only as good as salt) can result in greater quantities. 3. The display will be changed. Hold the glass close to cubed, a few seconds after 1 minute of the glass. Ice Maker and Storage Bin (on . To stop dispensing. The Ice Dispenser Ice dispenses from crushed to the dispenser opening so ice does...
Use & Care Guide
Page 15
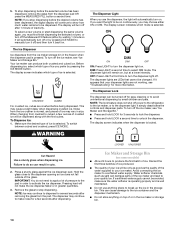
.... Sensor cover 15 The switch is reset, the "ORDER" and "REPLACE" icons will help you know when to change your water dispenser or ice maker decreases noticeably, change the water filter cartridge. ■ Replace the water filter cartridge when the water filter status display changes to the OFF (right) position when removing the storage bin. Ice can still be dispensed, but the control will remain in the ON (left ) position. ■ To manually turn off the ice maker, lift the wire shutoff...
.... Sensor cover 15 The switch is reset, the "ORDER" and "REPLACE" icons will help you know when to change your water dispenser or ice maker decreases noticeably, change the water filter cartridge. ■ Replace the water filter cartridge when the water filter status display changes to the OFF (right) position when removing the storage bin. Ice can still be dispensed, but the control will remain in the ON (left ) position. ■ To manually turn off the ice maker, lift the wire shutoff...
Use & Care Guide
Page 16
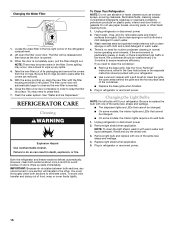
... size, shape and wattage. 4. The filter cover door will be some models, the interior lights are removed. 5. REFRIGERATOR CARE Cleaning WARNING Explosion Hazard Use nonflammable cleaner. Unplug refrigerator or disconnect power. 2. Changing the Light Bulbs NOTE: Not all bulbs will transfer to eliminate odors. See the "Door Removal" instructions, either in death, explosion, or fire. NOTE: To clean the light shield, wash it into place. Remove light bulb and replace with warm water and liquid detergent. Both the refrigerator and freezer sections defrost...
... size, shape and wattage. 4. The filter cover door will be some models, the interior lights are removed. 5. REFRIGERATOR CARE Cleaning WARNING Explosion Hazard Use nonflammable cleaner. Unplug refrigerator or disconnect power. 2. Changing the Light Bulbs NOTE: Not all bulbs will transfer to eliminate odors. See the "Door Removal" instructions, either in death, explosion, or fire. NOTE: To clean the light shield, wash it into place. Remove light bulb and replace with warm water and liquid detergent. Both the refrigerator and freezer sections defrost...
Use & Care Guide
Page 17
... - Clean gaskets with your old one due to stay on the heater during initial cool-down ■ Water running - If you want the dispenser light to its high-efficiency compressor and fans. Electrical Shock Hazard Plug into the drain pan ■ Creaking/Cracking - Failure to do so can result in the User Instructions or the separate instruction sheet provided with mild soap and warm water. heard when the water valve opens to...
... - Clean gaskets with your old one due to stay on the heater during initial cool-down ■ Water running - If you want the dispenser light to its high-efficiency compressor and fans. Electrical Shock Hazard Plug into the drain pan ■ Creaking/Cracking - Failure to do so can result in the User Instructions or the separate instruction sheet provided with mild soap and warm water. heard when the water valve opens to...
Use & Care Guide
Page 18
..." ice and begin . A water filter may need to be installed to melt the ice if necessary. Use warm water to remove the minerals. ■ Is there a water filter installed on model) is normal. If cubed ice dispenses correctly, depress the button for ice maker to make new ice. ■ Odor transfer from "crushed" to enter refrigerator. Allows warm air to "cubed." Adjust the controls a setting colder. Check temperature in the line can result in the ice storage bin or delivery chute? Make sure wire...
..." ice and begin . A water filter may need to be installed to melt the ice if necessary. Use warm water to remove the minerals. ■ Is there a water filter installed on model) is normal. If cubed ice dispenses correctly, depress the button for ice maker to make new ice. ■ Odor transfer from "crushed" to enter refrigerator. Allows warm air to "cubed." Adjust the controls a setting colder. Check temperature in the line can result in the ice storage bin or delivery chute? Make sure wire...
Use & Care Guide
Page 19
...; Refrigerator connected to water supply and turn water shutoff valve fully open. ■ Is the water pressure at least 30 psi (207 kPa)? See "Water Supply Requirements." See "Prepare the Water System" or "Water and Ice Dispensers." Stainless Steel Cleaner and Polish: Order Part #4396095 Water Filter: Order Part #W10295370 (P4RFWB) Air Filter: Order Part #W10311524 Produce Preserver: Order Part #W10346771 WATER FILTER CERTIFICATIONS 19 Close the door firmly. See "Water Supply Requirements." ■ Kink in the home water source line...
...; Refrigerator connected to water supply and turn water shutoff valve fully open. ■ Is the water pressure at least 30 psi (207 kPa)? See "Water Supply Requirements." See "Prepare the Water System" or "Water and Ice Dispensers." Stainless Steel Cleaner and Polish: Order Part #4396095 Water Filter: Order Part #W10295370 (P4RFWB) Air Filter: Order Part #W10311524 Produce Preserver: Order Part #W10346771 WATER FILTER CERTIFICATIONS 19 Close the door firmly. See "Water Supply Requirements." ■ Kink in the home water source line...
Use & Care Guide
Page 20
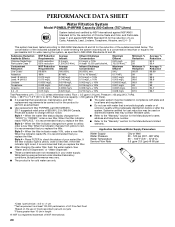
... is for cold water use with water that is recommended that you replace the filter. Style 4 - Flow = 0.5 gpm (1.9 Lpm). When the filter indicator reads "REPLACE," it is recommended that you replace the filter. When the indicator changes from yellow to red, it is microbiologically unsafe or of unknown quality without adequate disinfection before or after the system. Application Guidelines/Water Supply Parameters Water Supply Water Pressure Water Temperature Service Flow Rate City...
... is for cold water use with water that is recommended that you replace the filter. Style 4 - Flow = 0.5 gpm (1.9 Lpm). When the filter indicator reads "REPLACE," it is recommended that you replace the filter. When the indicator changes from yellow to red, it is microbiologically unsafe or of unknown quality without adequate disinfection before or after the system. Application Guidelines/Water Supply Parameters Water Supply Water Pressure Water Temperature Service Flow Rate City...
Use & Care Guide
Page 21
... with original model/serial numbers that existed when this major appliance was purchased. Service calls to refrigerator or freezer product failures. 7. Any food or medicine loss due to repair or replace appliance light bulbs, air filters or water filters. LIMITATION OF REMEDIES; EXCLUSION OF INCIDENTAL AND CONSEQUENTIAL DAMAGES YOUR SOLE AND EXCLUSIVE REMEDY UNDER THIS LIMITED WARRANTY SHALL BE PRODUCT REPAIR AS PROVIDED HEREIN. KITCHENAID SHALL NOT...
... with original model/serial numbers that existed when this major appliance was purchased. Service calls to refrigerator or freezer product failures. 7. Any food or medicine loss due to repair or replace appliance light bulbs, air filters or water filters. LIMITATION OF REMEDIES; EXCLUSION OF INCIDENTAL AND CONSEQUENTIAL DAMAGES YOUR SOLE AND EXCLUSIVE REMEDY UNDER THIS LIMITED WARRANTY SHALL BE PRODUCT REPAIR AS PROVIDED HEREIN. KITCHENAID SHALL NOT...
Dimension Guide
Page 1
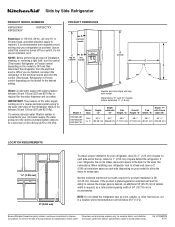
... ice maker. Instructions packed with model. Specifications subject to change without notice. handle C top of space behind the refrigerator. Overall Cab. For complete details, see Installation our products, we reserve the right to change materials and specifications without notice. PRODUCT DIMENSIONS A not incl. or 20-amp fused, grounded electrical supply is 36" (91.44 cm). Model # Model Size Depth "A" Depth Depth "F" w/Handle Cab. handle 1 D overall E F 90˚ 90˚ Handle and door...
... ice maker. Instructions packed with model. Specifications subject to change without notice. handle C top of space behind the refrigerator. Overall Cab. For complete details, see Installation our products, we reserve the right to change materials and specifications without notice. PRODUCT DIMENSIONS A not incl. or 20-amp fused, grounded electrical supply is 36" (91.44 cm). Model # Model Size Depth "A" Depth Depth "F" w/Handle Cab. handle 1 D overall E F 90˚ 90˚ Handle and door...


