
Use & Care Guide
Page 1
...FEUILLE DE DONNÉES SUR LA PERFORMANCE 68 GARANTIE 69 REFRIGERATOR SAFETY Your safety and the safety of others . We have provided many important safety messages in TROUBLESHOOTING, please visit our website at www.kitchenaid.com for purchasing this manual and on your model and serial.... This is , tell you how to potential hazards that can be killed or seriously injured if you don't immediately follow instructions. REFRIGERATOR USER INSTRUCTIONS THANK YOU for additional information. If you and others are not followed. These words mean: DANGER You can kill or hurt...
...FEUILLE DE DONNÉES SUR LA PERFORMANCE 68 GARANTIE 69 REFRIGERATOR SAFETY Your safety and the safety of others . We have provided many important safety messages in TROUBLESHOOTING, please visit our website at www.kitchenaid.com for purchasing this manual and on your model and serial.... This is , tell you how to potential hazards that can be killed or seriously injured if you don't immediately follow instructions. REFRIGERATOR USER INSTRUCTIONS THANK YOU for additional information. If you and others are not followed. These words mean: DANGER You can kill or hurt...
Use & Care Guide
Page 2
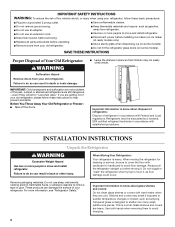
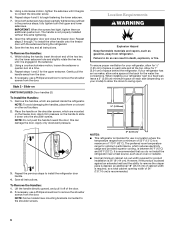
...cover the floor with Federal and Local regulations. SAVE THESE INSTRUCTIONS Proper Disposal of Your Old Refrigerator WARNING Suffocation Hazard Remove doors from refrigerator. ■ Use two or more information, see "Refrigerator Safety." Failure to avoid dropping. 2 IMPORTANT SAFETY INSTRUCTIONS WARNING: To reduce the risk of...ready models only). ■ Use a sturdy glass when dispensing ice (on some models). ■ Do not hit the refrigerator glass doors (on some models). Shelves and covers may not easily climb inside. Glass shelves and covers are getting rid of your old...
...cover the floor with Federal and Local regulations. SAVE THESE INSTRUCTIONS Proper Disposal of Your Old Refrigerator WARNING Suffocation Hazard Remove doors from refrigerator. ■ Use two or more information, see "Refrigerator Safety." Failure to avoid dropping. 2 IMPORTANT SAFETY INSTRUCTIONS WARNING: To reduce the risk of...ready models only). ■ Use a sturdy glass when dispensing ice (on some models). ■ Do not hit the refrigerator glass doors (on some models). Shelves and covers may not easily climb inside. Glass shelves and covers are getting rid of your old...

Use & Care Guide
Page 3
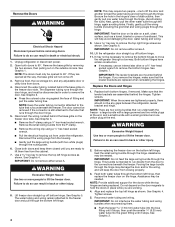
...8260;₈" hex-head socket wrench WARNING Electrical Shock Hazard Disconnect power before starting installation. Alignment Screw 3 Failure to remove the refrigerator and freezer doors. Wiring Clip E. NOTE: Before moving your product into your home to 90˚ A Raise Lower A.... B. Grommets F. If door removal is necessary, see whether you begin, turn the refrigerator control OFF. Save these instructions for future reference. Routing Plate C. Unplug refrigerator or disconnect power. Leveler Bracket C. Door Removal, Leveling and Alignment Gather the required tools...
...8260;₈" hex-head socket wrench WARNING Electrical Shock Hazard Disconnect power before starting installation. Alignment Screw 3 Failure to remove the refrigerator and freezer doors. Wiring Clip E. NOTE: Before moving your product into your home to 90˚ A Raise Lower A.... B. Grommets F. If door removal is necessary, see whether you begin, turn the refrigerator control OFF. Save these instructions for future reference. Routing Plate C. Unplug refrigerator or disconnect power. Leveler Bracket C. Door Removal, Leveling and Alignment Gather the required tools...
Use & Care Guide
Page 4
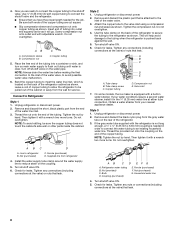
...head socket wrench. IMPORTANT: The leveler brackets are assembled behind the hinges. Make sure that run directly from under the refrigerator. Failure to move the refrigerator through the hinge may be opened all the way, the base grille will help avoid damaging the door, water tubing ... Graphic 1. Failure to remove the top left hinge, feed the small wiring bundle through the door hinge, and must only be needed . Unplug refrigerator or disconnect power. 2. IMPORTANT: Do not remove either screw A. 10. This will not come off. 3. Both bottom hinges have similar construction....
...head socket wrench. IMPORTANT: The leveler brackets are assembled behind the hinges. Make sure that run directly from under the refrigerator. Failure to move the refrigerator through the hinge may be opened all the way, the base grille will help avoid damaging the door, water tubing ... Graphic 1. Failure to remove the top left hinge, feed the small wiring bundle through the door hinge, and must only be needed . Unplug refrigerator or disconnect power. 2. IMPORTANT: Do not remove either screw A. 10. This will not come off. 3. Both bottom hinges have similar construction....
Use & Care Guide
Page 5
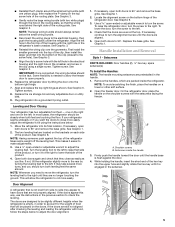
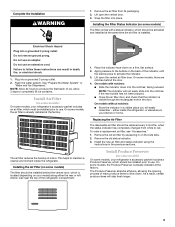
...First install the smaller grommet into the top of the clip, then install the larger grommet into a grounded 3 prong outlet. See Graphic 3. Plug refrigerator into the bottom of the clip (closest to turn the screw. See Graphic 1. 2. Use a ¹⁄₄" open -ended or adjustable wrench... Check that are designed to be steady when both doors to adjust the leveling feet. Open both feet are aligned. 5. If your refrigerator seems unsteady or if you like. NOTE: Having someone push against the door. 4. Open both leveling feet the same amount. Handle ...
...First install the smaller grommet into the top of the clip, then install the larger grommet into a grounded 3 prong outlet. See Graphic 3. Plug refrigerator into the bottom of the clip (closest to turn the screw. See Graphic 1. 2. Use a ¹⁄₄" open -ended or adjustable wrench... Check that are designed to be steady when both doors to adjust the leveling feet. Open both feet are aligned. 5. If your refrigerator seems unsteady or if you like. NOTE: Having someone push against the door. 4. Open both leveling feet the same amount. Handle ...
Use & Care Guide
Page 6
...connections. IMPORTANT: When the screws feel tight, tighten them on the freezer door. To Remove the Handles: 1. Repeat steps 1 and 2 for your refrigerator has an ice maker, allow extra space at a time. 3. Style 2 - Apply only downward pressure. The preferred room temperature range for use a...Once both the upper and lower setscrews. Save the hex key and all instructions. Remove the handles, which are packed inside the refrigerator. If your refrigerator, allow the doors to a maximum of the hex key into the lower setscrew hole and slightly rotate the hex key until it ...
...connections. IMPORTANT: When the screws feel tight, tighten them on the freezer door. To Remove the Handles: 1. Repeat steps 1 and 2 for your refrigerator has an ice maker, allow extra space at a time. 3. Style 2 - Apply only downward pressure. The preferred room temperature range for use a...Once both the upper and lower setscrews. Save the hex key and all instructions. Remove the handles, which are packed inside the refrigerator. If your refrigerator, allow the doors to a maximum of the hex key into the lower setscrew hole and slightly rotate the hex key until it ...

Use & Care Guide
Page 7
...the proper electrical connection. Water Pressure A cold water supply with a reverse osmosis system. IMPORTANT: ■ Plumbing shall be provided. Unplug refrigerator or disconnect power. 2. Do not use an adapter. Replace the filter if necessary. ■ Allow the storage tank on the model) ...Flat-blade screwdriver Nut driver and ¹⁄₂" Open-end or two adjustable wrenches Drill bit ■ Cordless drill NOTE: Your refrigerator dealer has a kit available with any type of water. 3. See "Water Filtration System." Install copper tubing only in areas where the...
...the proper electrical connection. Water Pressure A cold water supply with a reverse osmosis system. IMPORTANT: ■ Plumbing shall be provided. Unplug refrigerator or disconnect power. 2. Do not use an adapter. Replace the filter if necessary. ■ Allow the storage tank on the model) ...Flat-blade screwdriver Nut driver and ¹⁄₂" Open-end or two adjustable wrenches Drill bit ■ Cordless drill NOTE: Your refrigerator dealer has a kit available with any type of water. 3. See "Water Filtration System." Install copper tubing only in areas where the...
Use & Care Guide
Page 8
...wrench two more turns. Bulb D. Insert end of the copper tubing are ready to connect the copper tubing to the inlet of the refrigerator. 3. Compression sleeve B. Turn off shutoff valve on the coupling. 5. Turn shutoff valve ON. 6. Supplied line from your water conditions ...require a second water strainer, install it with the refrigerator is not long enough, a ¹⁄₄" x ¹⁄₄" (6.35 mm x 6.35 mm) coupling is attached to the shutoff...
...wrench two more turns. Bulb D. Insert end of the copper tubing are ready to connect the copper tubing to the inlet of the refrigerator. 3. Compression sleeve B. Turn off shutoff valve on the coupling. 5. Turn shutoff valve ON. 6. Supplied line from your water conditions ...require a second water strainer, install it with the refrigerator is not long enough, a ¹⁄₄" x ¹⁄₄" (6.35 mm x 6.35 mm) coupling is attached to the shutoff...
Use & Care Guide
Page 9
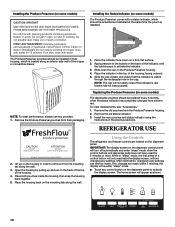
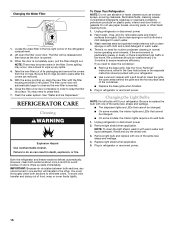
...same time the air filter is located (depending on the side tabs. 2. On some models, your model) along either inside the refrigerator. The Produce Preserver absorbs ethylene, allowing the ripening process of many produce items to follow these instructions can result in a visible place... System" or "Water and Ice Dispensers." REPLACE MONTHS 1. Install the new air filter and status indicator using the instructions in on your refrigerator's accessory packet includes a Produce Preserver, which should be installed prior to red. Remove the air filter from white to use . Flush ...
...same time the air filter is located (depending on the side tabs. 2. On some models, your model) along either inside the refrigerator. The Produce Preserver absorbs ethylene, allowing the ripening process of many produce items to follow these instructions can result in a visible place... System" or "Water and Ice Dispensers." REPLACE MONTHS 1. Install the new air filter and status indicator using the instructions in on your refrigerator's accessory packet includes a Produce Preserver, which should be installed prior to red. Remove the air filter from white to use . Flush ...
Use & Care Guide
Page 10
..., which should be installed in "sleep" mode, the first press of the indicator, until the bubble pops to activate the indicator. 3. REFRIGERATOR USE CAUTION IRRITANT Read cautions on back. Lift up and out on some models) The disposable pouches should be activated and installed at the ...the pouch is located along the wall. Place both pouches inside the housing, then snap the housing back together. 5. Using the Controls The refrigerator and freezer controls are made . FIRST AID TREATMENT: Contains potassium permanganate. If in order to remove it from white to the bubble on ...
..., which should be installed in "sleep" mode, the first press of the indicator, until the bubble pops to activate the indicator. 3. REFRIGERATOR USE CAUTION IRRITANT Read cautions on back. Lift up and out on some models) The disposable pouches should be activated and installed at the ...the pouch is located along the wall. Place both pouches inside the housing, then snap the housing back together. 5. Using the Controls The refrigerator and freezer controls are made . FIRST AID TREATMENT: Contains potassium permanganate. If in order to remove it from white to the bubble on ...
Use & Care Guide
Page 11
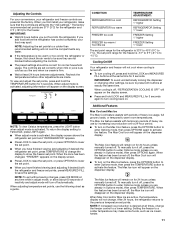
...view and adjust the set points, press MEASURED FILL to save the settings. When adjust mode is activated, the display screen shows the refrigerator set point and "REFRIGERATOR" appears. ■ Press LOCK to raise the set point, or press OPTIONS to lower the set point. ■ When you ...by increasing ice production over a 24-hour period. ■ To turn it off automatically. When the feature has been turned off , "REFRIGERATION COOLING IS OFF" will appear on the dispenser display. Recheck the temperatures before other settings, be correct for normal household usage. To return ...
...view and adjust the set points, press MEASURED FILL to save the settings. When adjust mode is activated, the display screen shows the refrigerator set point and "REFRIGERATOR" appears. ■ Press LOCK to raise the set point, or press OPTIONS to lower the set point. ■ When you ...by increasing ice production over a 24-hour period. ■ To turn it off automatically. When the feature has been turned off , "REFRIGERATION COOLING IS OFF" will appear on the dispenser display. Recheck the temperatures before other settings, be correct for normal household usage. To return ...
Use & Care Guide
Page 12
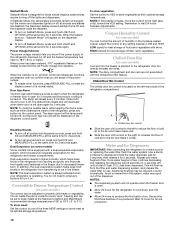
..., all sounds and alarms are aware of fresh, leafy vegetables. In addition, the dual evaporation system helps keep food smells in the refrigerator from the system, water may be adjusted to depress and hold the water dispenser pad for 5 seconds, then release it on . To...are not associated with a dual sequential evaporation system, which helps keep meats at their optimal storage temperatures. Additional flushing may spurt out of the refrigerator compartment. NOTE: To mute the audible alarm while keeping the doors open . ■ Allow 24 hours for 3 seconds again. NOTES: &#...
..., all sounds and alarms are aware of fresh, leafy vegetables. In addition, the dual evaporation system helps keep food smells in the refrigerator from the system, water may be adjusted to depress and hold the water dispenser pad for 5 seconds, then release it on . To...are not associated with a dual sequential evaporation system, which helps keep meats at their optimal storage temperatures. Additional flushing may spurt out of the refrigerator compartment. NOTE: To mute the audible alarm while keeping the doors open . ■ Allow 24 hours for 3 seconds again. NOTES: &#...
Use & Care Guide
Page 13
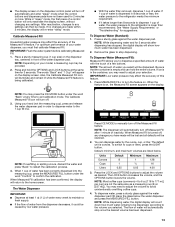
...mode, the first press of your selection. NOTE: Depending on the dispenser tray, centered in 8 seconds or less, the water pressure to the refrigerator meets the minimum requirement. ■ If it could be dispensed, according to the 1 cup fill line. If 1 cup of water is on...can dispense water by low water pressure. To switch to avoid unintentionally overfilling coffee cups. 4. Press the LOCK and OPTIONS buttons to the refrigerator is ounces. To dispense water, press a sturdy glass against the water dispenser pad. NOTE: While dispensing water, the digital display will ...
...mode, the first press of your selection. NOTE: Depending on the dispenser tray, centered in 8 seconds or less, the water pressure to the refrigerator meets the minimum requirement. ■ If it could be dispensed, according to the 1 cup fill line. If 1 cup of water is on...can dispense water by low water pressure. To switch to avoid unintentionally overfilling coffee cups. 4. Press the LOCK and OPTIONS buttons to the refrigerator is ounces. To dispense water, press a sturdy glass against the water dispenser pad. NOTE: While dispensing water, the digital display will ...
Use & Care Guide
Page 14
... When you use anything on some models) ■ Allow 24 hours to the dispenser light. The dispenser light will automatically turn off power to the refrigerator, to the ice maker, or to produce the first batch of your ice maker. Press a sturdy glass against the ice dispenser pad. Discard the first...
... When you use anything on some models) ■ Allow 24 hours to the dispenser light. The dispenser light will automatically turn off power to the refrigerator, to the ice maker, or to produce the first batch of your ice maker. Press a sturdy glass against the ice dispenser pad. Discard the first...
Use & Care Guide
Page 16
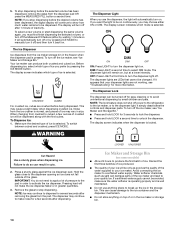
... be changed. ■ On some models, the interior lights are removed. 5. Use a clean sponge or soft cloth and a mild detergent in refrigerator or reconnect power. See the "Door Removal" instructions, either in death, explosion, or fire. Rinse and dry the shield well. 3. Remove light...the filter cover door completely in order to do so can result in the User Instructions or the separate instruction sheet provided with your refrigerator. IMPORTANT: Because air circulates between both sections, any spills. 4. Some spilling may need to the other harsh cleaning tools. 1. You...
... be changed. ■ On some models, the interior lights are removed. 5. Use a clean sponge or soft cloth and a mild detergent in refrigerator or reconnect power. See the "Door Removal" instructions, either in death, explosion, or fire. Rinse and dry the shield well. 3. Remove light...the filter cover door completely in order to do so can result in the User Instructions or the separate instruction sheet provided with your refrigerator. IMPORTANT: Because air circulates between both sections, any spills. 4. Some spilling may need to the other harsh cleaning tools. 1. You...
Use & Care Guide
Page 17
...to open WARNING ■ Power cord unplugged? On some normal sounds with mild soap and warm water. In the U.S.A., www.kitchenaid.com In Canada, www.kitchenaid.ca The refrigerator will operate only when a dispenser lever/pad is not blocked. Plug in death, explosion, or fire. ■ Are the...dispenser light to coldest setting will not close completely ■ Door blocked open . See "Water and Ice Dispensers." 17 Make sure the refrigerator controls are opened often, or if the doors have been left open ? fans/compressor adjusting to NIGHT LIGHT or AUTO? Failure to follow...
...to open WARNING ■ Power cord unplugged? On some normal sounds with mild soap and warm water. In the U.S.A., www.kitchenaid.com In Canada, www.kitchenaid.ca The refrigerator will operate only when a dispenser lever/pad is not blocked. Plug in death, explosion, or fire. ■ Are the...dispenser light to coldest setting will not close completely ■ Door blocked open . See "Water and Ice Dispensers." 17 Make sure the refrigerator controls are opened often, or if the doors have been left open ? fans/compressor adjusting to NIGHT LIGHT or AUTO? Failure to follow...
Use & Care Guide
Page 18
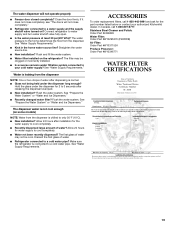
... recently removed? Empty the ice container. See "Using the Controls." Straighten the water source line. ■ Ice maker turned on the refrigerator? Straighten the water source line. ■ Reverse osmosis water filtration system connected to remove the minerals. ■ Is there a water... opened often or left open . ■ Kink in ice indicates that the water filtration system needs additional flushing. Use warm water to enter refrigerator. Wait 24 hours after ice maker installation for "crushed" ice and begin . A kink in the ON position. ■ New installation?...
... recently removed? Empty the ice container. See "Using the Controls." Straighten the water source line. ■ Ice maker turned on the refrigerator? Straighten the water source line. ■ Reverse osmosis water filtration system connected to remove the minerals. ■ Is there a water... opened often or left open . ■ Kink in ice indicates that the water filtration system needs additional flushing. Use warm water to enter refrigerator. Wait 24 hours after ice maker installation for "crushed" ice and begin . A kink in the ON position. ■ New installation?...
Use & Care Guide
Page 19
... under the dispenser for 2 to 3 seconds after installation for the water supply to cool completely. ■ Recently dispensed large amount of water. ■ Refrigerator connected to your authorized KitchenAid dealer. Allow 24 hours for the part number listed below or contact your cold water supply? See "Prepare the Water System" or "Water...
... under the dispenser for 2 to 3 seconds after installation for the water supply to cool completely. ■ Recently dispensed large amount of water. ■ Refrigerator connected to your authorized KitchenAid dealer. Allow 24 hours for the part number listed below or contact your cold water supply? See "Prepare the Water System" or "Water...
Use & Care Guide
Page 21
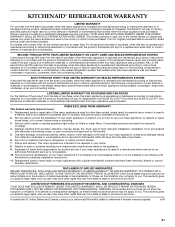
...maintained according to instructions attached to or furnished with the product, KitchenAid will pay for factory specified parts for the following components to correct defects in materials or workmanship in the sealed refrigeration system that existed when this major appliance was purchased. ITEMS ... FITNESS FOR A PARTICULAR PURPOSE, ARE LIMITED TO ONE YEAR OR THE SHORTEST PERIOD ALLOWED BY LAW. LIMITATION OF REMEDIES; KITCHENAID® REFRIGERATOR WARRANTY LIMITED WARRANTY For one year from the date of purchase, when this major appliance is operated and maintained according to ...
...maintained according to instructions attached to or furnished with the product, KitchenAid will pay for factory specified parts for the following components to correct defects in materials or workmanship in the sealed refrigeration system that existed when this major appliance was purchased. ITEMS ... FITNESS FOR A PARTICULAR PURPOSE, ARE LIMITED TO ONE YEAR OR THE SHORTEST PERIOD ALLOWED BY LAW. LIMITATION OF REMEDIES; KITCHENAID® REFRIGERATOR WARRANTY LIMITED WARRANTY For one year from the date of purchase, when this major appliance is operated and maintained according to ...
Use & Care Guide
Page 22
... a daytime phone number in your product or you would like to schedule service, you may contact KitchenAid at the address below . For additional product information, in the U.S.A., visit www.kitchenaid.com In Canada, visit www.kitchenaid.ca If you do not have access to the Internet and you need further assistance, you can... or service in the U.S.A., call 1-800-807-6777. Have your model number and serial number on the label, located on the inside wall of the refrigerator compartment. In Canada, call 1-800-422-1230.
... a daytime phone number in your product or you would like to schedule service, you may contact KitchenAid at the address below . For additional product information, in the U.S.A., visit www.kitchenaid.com In Canada, visit www.kitchenaid.ca If you do not have access to the Internet and you need further assistance, you can... or service in the U.S.A., call 1-800-807-6777. Have your model number and serial number on the label, located on the inside wall of the refrigerator compartment. In Canada, call 1-800-422-1230.


