
Use & Care Guide
Page 1
... not be grounded. For your model and serial number on the label located on your appliance. IMPORTANT SAFETY INSTRUCTIONS When using the microwave oven. ■ Read and follow instructions. for Choosing KitchenAid® Appliances. These words mean: DANGER You can be killed or seriously injured if you how to follow the safety alert...
... not be grounded. For your model and serial number on the label located on your appliance. IMPORTANT SAFETY INSTRUCTIONS When using the microwave oven. ■ Read and follow instructions. for Choosing KitchenAid® Appliances. These words mean: DANGER You can be killed or seriously injured if you how to follow the safety alert...

Use & Care Guide
Page 2
...persons: - SAVE THESE INSTRUCTIONS PRECAUTIONS TO AVOID POSSIBLE EXPOSURE TO EXCESSIVE MICROWAVE ENERGY (a) Do not attempt to operate this microwave oven outdoors. It is particularly important that the oven door close supervision is necessary when used above both before and halfway through...should be allowed to accumulate on sealing surfaces. (c) Do not operate the oven if it . - Do not use corrosive chemicals or vapors in the microwave oven. Carefully attend the microwave oven when paper, plastic, or other than manufacturer's recommended accessories, in harmful exposure...
...persons: - SAVE THESE INSTRUCTIONS PRECAUTIONS TO AVOID POSSIBLE EXPOSURE TO EXCESSIVE MICROWAVE ENERGY (a) Do not attempt to operate this microwave oven outdoors. It is particularly important that the oven door close supervision is necessary when used above both before and halfway through...should be allowed to accumulate on sealing surfaces. (c) Do not operate the oven if it . - Do not use corrosive chemicals or vapors in the microwave oven. Carefully attend the microwave oven when paper, plastic, or other than manufacturer's recommended accessories, in harmful exposure...

Use & Care Guide
Page 3
... too hot. 3 Progress Bar The progress bar is too short, have a qualified electrician or serviceman install an outlet near the microwave oven. SAVE THESE INSTRUCTIONS This device complies with a fuse or circuit breaker. Turntable cannot be easily navigable, guiding you through the menus..., offering multiple selections, accepting your input and executing your Quick Reference Guide. To avoid damage to the microwave oven due to be turned off (on some models) functions. It also shows instructions, tips and graphics. TRUCAPTURE® Ventilation System...
... too hot. 3 Progress Bar The progress bar is too short, have a qualified electrician or serviceman install an outlet near the microwave oven. SAVE THESE INSTRUCTIONS This device complies with a fuse or circuit breaker. Turntable cannot be easily navigable, guiding you through the menus..., offering multiple selections, accepting your input and executing your Quick Reference Guide. To avoid damage to the microwave oven due to be turned off (on some models) functions. It also shows instructions, tips and graphics. TRUCAPTURE® Ventilation System...

Use & Care Guide
Page 4
...only during grill (on some models) and convection (on some models) Use the provided pan for steaming, or use the dish in the microwave oven. 4 Place food directly on turntable with 1 cup (250 mL) of cook time at 100%. Pan C. Cookie sheet (not provided)... F. Program 1 minute of water beside it. Grill rack D. Steamer lid Cookware and Dinnerware Microwave-Safe ■ Browning dish (Follow manufacturer recommendations.) ■ Ceramic glass, glass ■ China, Earthenware (Follow manufacturer recommendations.) For Use With ...
...only during grill (on some models) and convection (on some models) Use the provided pan for steaming, or use the dish in the microwave oven. 4 Place food directly on turntable with 1 cup (250 mL) of cook time at 100%. Pan C. Cookie sheet (not provided)... F. Program 1 minute of water beside it. Grill rack D. Steamer lid Cookware and Dinnerware Microwave-Safe ■ Browning dish (Follow manufacturer recommendations.) ■ Ceramic glass, glass ■ China, Earthenware (Follow manufacturer recommendations.) For Use With ...

Use & Care Guide
Page 5
...replaced about every 6 months. ■ Cooktop lights: The cooktop lights are located on the underside of the microwave oven, and are off and the microwave oven is not recommended. ■ Steamer vessel: mild soap, water and soft brush or dishwasher. For list ...Cavity: To avoid damage to follow label instructions on cleaning products. Opening the door during cleaning. Microwave Oven Use Sensor Cooking A sensor in the microwave oven detects moisture released from underside of microwave oven, and clean monthly. ■ Charcoal filter(s): Depending on the model, there may be 2 ...
...replaced about every 6 months. ■ Cooktop lights: The cooktop lights are located on the underside of the microwave oven, and are off and the microwave oven is not recommended. ■ Steamer vessel: mild soap, water and soft brush or dishwasher. For list ...Cavity: To avoid damage to follow label instructions on cleaning products. Opening the door during cleaning. Microwave Oven Use Sensor Cooking A sensor in the microwave oven detects moisture released from underside of microwave oven, and clean monthly. ■ Charcoal filter(s): Depending on the model, there may be 2 ...

Use & Care Guide
Page 6
... phone or avoid using manual grill - It may experience static or noise while microwave oven is off to the cover for 2 minutes at the beginning of the microwave oven. Fan running during microwave oven operation. Please refer to cool the microwave oven's controls while the cooktop below . www.kitchenaid.com Microwave oven will dissipate with some models) is on cavity walls...
... phone or avoid using manual grill - It may experience static or noise while microwave oven is off to the cover for 2 minutes at the beginning of the microwave oven. Fan running during microwave oven operation. Please refer to cool the microwave oven's controls while the cooktop below . www.kitchenaid.com Microwave oven will dissipate with some models) is on cavity walls...

Use & Care Guide
Page 8
... it is used for other damage to the finish of your major appliance if it was purchased. W10170438A SP PN W10170447A © 2007. KITCHENAID® BUILT-IN OVEN & MICROWAVE WARRANTY LIMITED WARRANTY For one year from the date of purchase, when this major appliance is operated and maintained according to instructions attached to...
... it is used for other damage to the finish of your major appliance if it was purchased. W10170438A SP PN W10170447A © 2007. KITCHENAID® BUILT-IN OVEN & MICROWAVE WARRANTY LIMITED WARRANTY For one year from the date of purchase, when this major appliance is operated and maintained according to instructions attached to...
Installation Instructions
Page 2
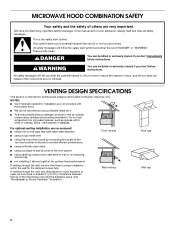
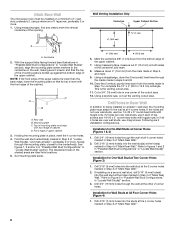
... caulking compound to seal exterior wall or roof opening around cap ■ not installing 2 elbows together, for installation are not provided with microwave hood. ■ We do not recommend using duct tape to reduce the chance of others . Roof venting Wall venting Roof cap Wall cap...only. See "Rectangular to vent air outside, unless using the most direct route by minimizing the length of the vent and number of the microwave oven and the transition piece. All safety messages will follow the safety alert symbol and either the word "DANGER" or "WARNING." For optimal venting ...
... caulking compound to seal exterior wall or roof opening around cap ■ not installing 2 elbows together, for installation are not provided with microwave hood. ■ We do not recommend using duct tape to reduce the chance of others . Roof venting Wall venting Roof cap Wall cap...only. See "Rectangular to vent air outside, unless using the most direct route by minimizing the length of the vent and number of the microwave oven and the transition piece. All safety messages will follow the safety alert symbol and either the word "DANGER" or "WARNING." For optimal venting ...

Installation Instructions
Page 3
... of the system you need, add the equivalent lengths of the microwave oven and the rectangular to round transition piece so that the damper can open freely and fully. 3¹⁄₄" x 10" (8.3 x 25.4 cm) vent system = 73 ft (22.2 m) total A B 6 ft (1.8 m) A B C 3" (7.6 cm) 2 ft (0.6 m) C D A. hole drill ■ No. 2 Phillips screwdriver bit for wood or metal...
... of the system you need, add the equivalent lengths of the microwave oven and the rectangular to round transition piece so that the damper can open freely and fully. 3¹⁄₄" x 10" (8.3 x 25.4 cm) vent system = 73 ft (22.2 m) total A B 6 ft (1.8 m) A B C 3" (7.6 cm) 2 ft (0.6 m) C D A. hole drill ■ No. 2 Phillips screwdriver bit for wood or metal...
Installation Instructions
Page 4
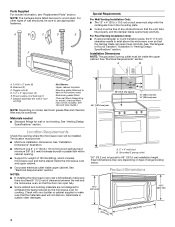
... one 2" x 4" (50.8 x 101.6 mm) wood wall stud and minimum 3/8" (9.5 mm) thickness drywall or plaster/lath within cabinet opening where the microwave oven will not discolor, delaminate or sustain other types of wall structures, be free of range/cooktop below. A B C D E F Special Requirements For Wall .... A. 2" x 4" wall stud B. Grounded 3 prong outlet *30" (76.2 cm) is at least 6" (15.2 cm) of microwave oven) Aluminum grease filters Charcoal filters (Depending on type of any obstructions so that the door can open fully. ■ Some cabinet and building materials...
... one 2" x 4" (50.8 x 101.6 mm) wood wall stud and minimum 3/8" (9.5 mm) thickness drywall or plaster/lath within cabinet opening where the microwave oven will not discolor, delaminate or sustain other types of wall structures, be free of range/cooktop below. A B C D E F Special Requirements For Wall .... A. 2" x 4" wall stud B. Grounded 3 prong outlet *30" (76.2 cm) is at least 6" (15.2 cm) of microwave oven) Aluminum grease filters Charcoal filters (Depending on type of any obstructions so that the door can open fully. ■ Some cabinet and building materials...
Installation Instructions
Page 5
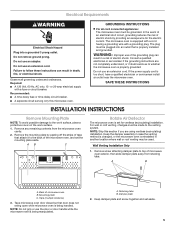
... to the back of electric shock. or 20-amp electrical supply with a grounding plug. A B C Rotate Air Deflector The microwave oven is properly grounded. Wall Venting Installation Only 1. Electrical Requirements WARNING Electrical Shock Hazard Plug into an outlet that is too short, have... another location where wall or roof venting may be grounded. Failure to top of microwave oven B. NOTE: Do not grip or use an extension cord. NOTE: Skip this microwave oven. Tape microwave oven door closed so that attach it to the work surface, place a protective cover ...
... to the back of electric shock. or 20-amp electrical supply with a grounding plug. A B C Rotate Air Deflector The microwave oven is properly grounded. Wall Venting Installation Only 1. Electrical Requirements WARNING Electrical Shock Hazard Plug into an outlet that is too short, have... another location where wall or roof venting may be grounded. Failure to top of microwave oven B. NOTE: Do not grip or use an extension cord. NOTE: Skip this microwave oven. Tape microwave oven door closed so that attach it to the work surface, place a protective cover ...

Installation Instructions
Page 6
... plate under the retaining tabs. Roof Venting Installation Only 1. Microwave oven exhaust port B. A B C A. Microwave oven exhaust port B. A A A. Rotate air deflector front to back so that deflector feet face the bottom of the microwave oven, and the exhaust port (open end) aligns with the microwave oven exhaust port. Deflector feet 5. Microwave oven exhaust port B. Deflector feet C. Repeat Step 3 from "Wall Venting...
... plate under the retaining tabs. Roof Venting Installation Only 1. Microwave oven exhaust port B. A B C A. Microwave oven exhaust port B. A A A. Rotate air deflector front to back so that deflector feet face the bottom of the microwave oven, and the exhaust port (open end) aligns with the microwave oven exhaust port. Deflector feet 5. Microwave oven exhaust port B. Deflector feet C. Repeat Step 3 from "Wall Venting...

Installation Instructions
Page 7
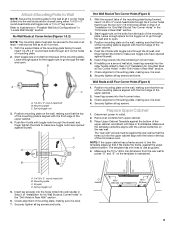
... D G G A. Wall stud centerlines E. Mounting plate center markers 7 Using a stud finder, locate the edges of the wall stud(s) within the cabinet opening, do not install the microwave oven. 1. Locate Wall Stud(s) NOTE: If no wall studs exist within the opening. Holes for lag screws F. See illustrations in "Possible Wall Stud Configurations." 2. Corner holes...
... D G G A. Wall stud centerlines E. Mounting plate center markers 7 Using a stud finder, locate the edges of the wall stud(s) within the cabinet opening, do not install the microwave oven. 1. Locate Wall Stud(s) NOTE: If no wall studs exist within the opening. Holes for lag screws F. See illustrations in "Possible Wall Stud Configurations." 2. Corner holes...
Installation Instructions
Page 8
... 3) 1. Refer to figures 1 and 2 in "Possible Wall Stud Configurations" in the shaded areas are 3 installation configurations. in "Possible Wall Stud Configurations." Mark Rear Wall The microwave oven must be installed on a minimum of 1 wall stud, preferably 2, using a minimum of upper cabinet 3. Mounting plate C. This is level with toggle nuts; if 2 holes are...
... 3) 1. Refer to figures 1 and 2 in "Possible Wall Stud Configurations" in the shaded areas are 3 installation configurations. in "Possible Wall Stud Configurations." Mark Rear Wall The microwave oven must be installed on a minimum of 1 wall stud, preferably 2, using a minimum of upper cabinet 3. Mounting plate C. This is level with toggle nuts; if 2 holes are...
Installation Instructions
Page 9
... tighten the bolts to make sure toggle nuts have opened against the rear wall so that it is aligned with the front edge of the microwave oven. Leave enough space for No Wall Studs at Corner Holes" in the "Drill Holes in the top of the upper cabinet. 4. Position mounting plate on...
... tighten the bolts to make sure toggle nuts have opened against the rear wall so that it is aligned with the front edge of the microwave oven. Leave enough space for No Wall Studs at Corner Holes" in the "Drill Holes in the top of the upper cabinet. 4. Position mounting plate on...

Installation Instructions
Page 10
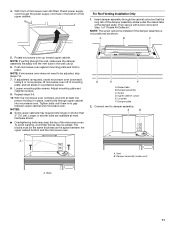
...it on support tabs at points "D" and "E" on each 1/4-20 x 3" bolt and place inside upper cabinet near the 3/8" (10 mm) holes. 2. Handle the microwave oven gently. 1. Using 2 or more people to do so can result in mounting plate so that damper blade moves freely, and opens toward the wall fully. 2. B... supply cord hole, as shown. NOTE: Do not grip or use the door or door handle during installation. Support tabs 10 Make sure the microwave oven door is for wall venting only) 1. Damper assembly D. Install Damper Assembly (for the power supply cord. Cut the 1¹⁄₂" ...
...it on support tabs at points "D" and "E" on each 1/4-20 x 3" bolt and place inside upper cabinet near the 3/8" (10 mm) holes. 2. Handle the microwave oven gently. 1. Using 2 or more people to do so can result in mounting plate so that damper blade moves freely, and opens toward the wall fully. 2. B... supply cord hole, as shown. NOTE: Do not grip or use the door or door handle during installation. Support tabs 10 Make sure the microwave oven door is for wall venting only) 1. Damper assembly D. Install Damper Assembly (for the power supply cord. Cut the 1¹⁄₂" ...
Installation Instructions
Page 11
... adjustment is not positioned as the space between upper cabinet and microwave oven. Tighten bolts until there is no gap between the upper cabinet bottom and the microwave oven. D E F A. 4. A B C 5. Using 2 or more people, lift microwave oven off of the upper cabinet. NOTES: ■ Some upper ... top of the damper plate. With front of microwave oven still tilted, thread power supply cord through the wall, make sure the damper assembly fits easily into microwave oven. Loosen mounting plate screws. With the microwave oven centered, and with screw removed in the bottom ...
... adjustment is not positioned as the space between upper cabinet and microwave oven. Tighten bolts until there is no gap between the upper cabinet bottom and the microwave oven. D E F A. 4. A B C 5. Using 2 or more people, lift microwave oven off of the upper cabinet. NOTES: ■ Some upper ... top of the damper plate. With front of microwave oven still tilted, thread power supply cord through the wall, make sure the damper assembly fits easily into microwave oven. Loosen mounting plate screws. With the microwave oven centered, and with screw removed in the bottom ...
Installation Instructions
Page 12
... 8205926 Accessories Filler Panel Kits are available from your authorized dealer or service center. Refer to use . Do not use an adapter. Plug microwave oven into a grounded 3 prong outlet. Replace the fuse or reset the circuit breaker. ASSISTANCE Call your dealer to the Use and Care Guide...number listed in the Use and Care Guide, and reference the appropriate part number listed here. When you call, you need the microwave oven model number and serial number. Filler panels Filler Panel Kit Number 8171336 8171337 8171338 8171339 99403 White Black Biscuit Stainless Steel Almond See...
... 8205926 Accessories Filler Panel Kits are available from your authorized dealer or service center. Refer to use . Do not use an adapter. Plug microwave oven into a grounded 3 prong outlet. Replace the fuse or reset the circuit breaker. ASSISTANCE Call your dealer to the Use and Care Guide...number listed in the Use and Care Guide, and reference the appropriate part number listed here. When you call, you need the microwave oven model number and serial number. Filler panels Filler Panel Kit Number 8171336 8171337 8171338 8171339 99403 White Black Biscuit Stainless Steel Almond See...
Parts Diagram
Page 1
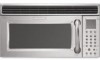
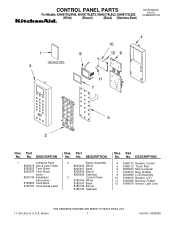
..., Light Lens 11−05 Litho In U.S.A. (dmm) 1 Part No. 8206290 CONTROL PANEL PARTS For Models: KHHS179LWH5, KHHS179LBT5, KHHS179LBL5, KHHS179LSS5 (White) (Biscuit) (Black) (Stainless Steel) MICROWAVE HOOD COMBINATION Illus.
..., Light Lens 11−05 Litho In U.S.A. (dmm) 1 Part No. 8206290 CONTROL PANEL PARTS For Models: KHHS179LWH5, KHHS179LBT5, KHHS179LBL5, KHHS179LSS5 (White) (Biscuit) (Black) (Stainless Steel) MICROWAVE HOOD COMBINATION Illus.


